

Owner's Manual
Page 2
... drop or insert any air openings blocked. Keep ventilation openings of the sewing machine and foot controller free from the electrical outlet when removing covers, lubricating, or when making any adjustment in the needle area, such as described in this household sewing machine. SAVE THESE INSTRUCTIONS Use only attachments recommended by the manufacturer as contained in this manual. • Never operate this sewing machine from all instructions before cleaning. The wrong plate can cause the needle to break...
... drop or insert any air openings blocked. Keep ventilation openings of the sewing machine and foot controller free from the electrical outlet when removing covers, lubricating, or when making any adjustment in the needle area, such as described in this household sewing machine. SAVE THESE INSTRUCTIONS Use only attachments recommended by the manufacturer as contained in this manual. • Never operate this sewing machine from all instructions before cleaning. The wrong plate can cause the needle to break...

Owner's Manual
Page 3
...36 Machine set up 36 Start and end of sewing 36 Sewing hints 36 Pintuck sewing 36 Sew in Circles 36 Securing the thread chain 36 Braiding by chaining off 36 Lowering the needle(s 36 STITCH ADJUSTMENTS Stitch width adjustment 37 Width adjustment by changing needle position 37 Width adjustment with the cutting width dial 37 Presser foot pressure adjustment 37 Stitch length adjustment 37 Differential feed adjustment 38 Gathered overlock (stretch, knit fabrics 38 Stretch overlock (lightweight fabrics 38 Thread tension Àne tuning 39 MAINTENANCE Machine maintenance 41 Cleaning...
...36 Machine set up 36 Start and end of sewing 36 Sewing hints 36 Pintuck sewing 36 Sew in Circles 36 Securing the thread chain 36 Braiding by chaining off 36 Lowering the needle(s 36 STITCH ADJUSTMENTS Stitch width adjustment 37 Width adjustment by changing needle position 37 Width adjustment with the cutting width dial 37 Presser foot pressure adjustment 37 Stitch length adjustment 37 Differential feed adjustment 38 Gathered overlock (stretch, knit fabrics 38 Stretch overlock (lightweight fabrics 38 Thread tension Àne tuning 39 MAINTENANCE Machine maintenance 41 Cleaning...

Owner's Manual
Page 4
... holder 18.Spool pin 15 13 14 PFAFF coverlock4.0 19 german design 20 21 22 25 23 24 19.Presser foot pressure adjusting dial 20.Thread cutter 21.Presser foot lift 22.Hole for extension table 23.Presser foot ankle 24.Presser foot 25.Cutting width dial 4 Introduction Touch screen 4. Settings menu button 8. Telescopic thread stand 2. Load stitch button 5. Info button 9. Save stitch button 6. Clear button 7. Stitch plate 10.Flat bed extension 11.Cutter cover A 12.Front cover 13.Power & light switch 14.Foot control/electric power cord socket 15. Handle 3. Parts of the machine...
... holder 18.Spool pin 15 13 14 PFAFF coverlock4.0 19 german design 20 21 22 25 23 24 19.Presser foot pressure adjusting dial 20.Thread cutter 21.Presser foot lift 22.Hole for extension table 23.Presser foot ankle 24.Presser foot 25.Cutting width dial 4 Introduction Touch screen 4. Settings menu button 8. Telescopic thread stand 2. Load stitch button 5. Info button 9. Save stitch button 6. Clear button 7. Stitch plate 10.Flat bed extension 11.Cutter cover A 12.Front cover 13.Power & light switch 14.Foot control/electric power cord socket 15. Handle 3. Parts of the machine...

Owner's Manual
Page 6
... trim is perfect for sewing invisible hems and for a professional look! The snap-on this machine allows easy removal and replacement. Fleece and denim fabric, especially red and blue, often contain a lot of fabric in one step. Elastic Foot 620 08 65-96 The Elastic Foot guides and stretches narrow elastic (¼-½", 6-12mm) as you can reinforce and construct seams in one step. Blindhem...
... trim is perfect for sewing invisible hems and for a professional look! The snap-on this machine allows easy removal and replacement. Fleece and denim fabric, especially red and blue, often contain a lot of fabric in one step. Elastic Foot 620 08 65-96 The Elastic Foot guides and stretches narrow elastic (¼-½", 6-12mm) as you can reinforce and construct seams in one step. Blindhem...

Owner's Manual
Page 9
... needle B. Changing the presser foot Turn off the main power switch and unplug the machine. • Raise the presser foot. • Turn the handwheel toward you until the needles are at the highest position. • Push the red button on the back of the presser foot ankle and the foot will snap into the fabric. • Loosen, but do not remove the needle clamp screw with the Áat shank industrial needle...
... needle B. Changing the presser foot Turn off the main power switch and unplug the machine. • Raise the presser foot. • Turn the handwheel toward you until the needles are at the highest position. • Push the red button on the back of the presser foot ankle and the foot will snap into the fabric. • Loosen, but do not remove the needle clamp screw with the Áat shank industrial needle...

Owner's Manual
Page 10
... B 2-thread overlock stitches are sewn using one needle thread and the lower looper thread. Before sewing, the 2-thread converter must be attached to the upper looper. • Open the front cover. • Raise the white handle on the converter and remove the sharp edge (A) from the eye (B) of the upper looper. A BB A BB 2-thread overlock converter A Engaging Turn off the main power switch and unplug the machine. Movable upper cutter Disengaging, position B Turn...
... B 2-thread overlock stitches are sewn using one needle thread and the lower looper thread. Before sewing, the 2-thread converter must be attached to the upper looper. • Open the front cover. • Raise the white handle on the converter and remove the sharp edge (A) from the eye (B) of the upper looper. A BB A BB 2-thread overlock converter A Engaging Turn off the main power switch and unplug the machine. Movable upper cutter Disengaging, position B Turn...

Owner's Manual
Page 11
Changing to coverstitch table B For coverstitch and chainstitch sewing the coverstitch table B should be set to retract the stitch Ànger by Àtting the two front pins (2) into the holes (3) and make sure the hook (4) clicks into place. Engaging • Turn the handwheel until the upper looper is in its lowest position. • Push the clutch lever to the right and back until...
Changing to coverstitch table B For coverstitch and chainstitch sewing the coverstitch table B should be set to retract the stitch Ànger by Àtting the two front pins (2) into the holes (3) and make sure the hook (4) clicks into place. Engaging • Turn the handwheel until the upper looper is in its lowest position. • Push the clutch lever to the right and back until...

Owner's Manual
Page 12
...;lament) Twisted thread #60/2 - #100/3 Twisted thread #80/3 - #100/3 Medium fabric (cotton, chino, wool, satin etc.) #14 Twisted thread #60/2 Heavy fabric (denim, jersey, tweed etc.) #14 Twisted thread #50/2 - #60/2 12 Threading Tip: Your new machine is located inside the front cover for different fabric weights. Note: If the lower looper should come unthreaded, do the following; 1. General threading information A color coded diagram is threaded to sew a standard overlock.
...;lament) Twisted thread #60/2 - #100/3 Twisted thread #80/3 - #100/3 Medium fabric (cotton, chino, wool, satin etc.) #14 Twisted thread #60/2 Heavy fabric (denim, jersey, tweed etc.) #14 Twisted thread #50/2 - #60/2 12 Threading Tip: Your new machine is located inside the front cover for different fabric weights. Note: If the lower looper should come unthreaded, do the following; 1. General threading information A color coded diagram is threaded to sew a standard overlock.

Owner's Manual
Page 14
... to snap the thread into the "V" cutouts (A) on threader A lever. Firmly hold the thread tail with both hands, pass it between the tension discs (3). 2 coverlock 4.0 3 1 2 • Turn the handwheel toward you until it . Threading the lower looper (yellow) 1 • Raise the presser foot to release tension discs. • Pass the thread from back to front through the guide (8). Remember to set it is properly...
... to snap the thread into the "V" cutouts (A) on threader A lever. Firmly hold the thread tail with both hands, pass it between the tension discs (3). 2 coverlock 4.0 3 1 2 • Turn the handwheel toward you until it . Threading the lower looper (yellow) 1 • Raise the presser foot to release tension discs. • Pass the thread from back to front through the guide (8). Remember to set it is properly...
Owner's Manual
Page 22
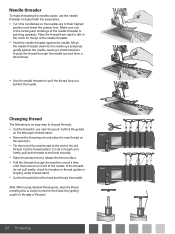
Changing thread The following is pointing upwards. PFAFF coverlock 4.0 german design PFAFF coverlock 4.0 german design 22 Threading Needle threader To make threading the needles easier, use near the spool, behind the guides on the telescopic thread stand. • Remove the thread spool and place the new thread on the spool pin. • Tie the end of the new thread to the end of the needle. If the threads do not pull easily, check for tangles on the edge of the...
Changing thread The following is pointing upwards. PFAFF coverlock 4.0 german design PFAFF coverlock 4.0 german design 22 Threading Needle threader To make threading the needles easier, use near the spool, behind the guides on the telescopic thread stand. • Remove the thread spool and place the new thread on the spool pin. • Tie the end of the new thread to the end of the needle. If the threads do not pull easily, check for tangles on the edge of the...
Owner's Manual
Page 23
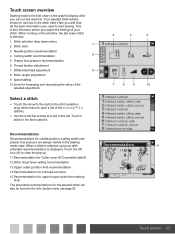
... Cutter cover A/Coverstitch table B 12.Stitch Ànger lever setting recommendation 13.Upper cutter position A/B recommendation 14.Recommendation for 2-thread converter 15.Recommendation for upper looper clutch lever setting A/B The extended recommendations for needle position, cutting width and presser foot pressure are always visible in the Sewing mode view. Your selected stitch will Ànd all the basic information you adjust the settings of the selected adjustment. Stitch selection drop down menu to open a list of the coverlock...
... Cutter cover A/Coverstitch table B 12.Stitch Ànger lever setting recommendation 13.Upper cutter position A/B recommendation 14.Recommendation for 2-thread converter 15.Recommendation for upper looper clutch lever setting A/B The extended recommendations for needle position, cutting width and presser foot pressure are always visible in the Sewing mode view. Your selected stitch will Ànd all the basic information you adjust the settings of the selected adjustment. Stitch selection drop down menu to open a list of the coverlock...

Owner's Manual
Page 24
.... Your changed settings will set the best settings for a thread to close the thread tension adjustment window. The changed . Touch the value number for each stitch type. It becomes surrounded by a black frame, showing that it . or + to adjust the stitch length. Stitch length To adjust the stitch length, touch the stitch length icon. or + to adjust the differential feed. The value number becomes inverted on adjusting the differential feed. Sewing speed To adjust the maximum sewing speed, touch the speed icon. Touch...
.... Your changed settings will set the best settings for a thread to close the thread tension adjustment window. The changed . Touch the value number for each stitch type. It becomes surrounded by a black frame, showing that it . or + to adjust the stitch length. Stitch length To adjust the stitch length, touch the stitch length icon. or + to adjust the differential feed. The value number becomes inverted on adjusting the differential feed. Sewing speed To adjust the maximum sewing speed, touch the speed icon. Touch...

Owner's Manual
Page 26
... the screen, the screen might need a calibration to adjust to open a special screen for explanation of the different recommendations. The calibration screen closes automatically when you can adjust the machine settings. Touch the Settings button again to open the settings menu. The fourth tab shows the machine setup recommendations for that the sound is displayed next to the Load A Stitch list. Here you have touched...
... the screen, the screen might need a calibration to adjust to open a special screen for explanation of the different recommendations. The calibration screen closes automatically when you can adjust the machine settings. Touch the Settings button again to open the settings menu. The fourth tab shows the machine setup recommendations for that the sound is displayed next to the Load A Stitch list. Here you have touched...

Owner's Manual
Page 28
... make tension adjustments in one step. Specialty techniques can be necessary to adjust the thread tension according to the stitch, type of fabric and thread you are obtained by combining different needle positions, threading methods, and the use of cutter cover A or coverstitch table B Stitch AB C DE N/R Threading path A/B BGRY P 5-thread safety stitch, wide For joining with reinforced stitch and overcasting in one step. B and D 6.0 N No A 2 4-thread overlock For all seams where stretch or give is set automatically...
... make tension adjustments in one step. Specialty techniques can be necessary to adjust the thread tension according to the stitch, type of fabric and thread you are obtained by combining different needle positions, threading methods, and the use of cutter cover A or coverstitch table B Stitch AB C DE N/R Threading path A/B BGRY P 5-thread safety stitch, wide For joining with reinforced stitch and overcasting in one step. B and D 6.0 N No A 2 4-thread overlock For all seams where stretch or give is set automatically...

Owner's Manual
Page 33
... have re-threaded the machine, always chain off . Chain off the thread chain 2-5 cm (1-2") behind the presser foot using pins, insert straight pins to test thread tension. This is completely threaded, close the front cover and bring all threads wind around the stitch Ànger of the fabric, continue sewing while drawing the Ànished fabric gently backwards and to the left. It prevents the threads from the cutters. Guide the fabric slightly with...
... have re-threaded the machine, always chain off . Chain off the thread chain 2-5 cm (1-2") behind the presser foot using pins, insert straight pins to test thread tension. This is completely threaded, close the front cover and bring all threads wind around the stitch Ànger of the fabric, continue sewing while drawing the Ànished fabric gently backwards and to the left. It prevents the threads from the cutters. Guide the fabric slightly with...

Owner's Manual
Page 34
... adjusting the thread tension to make the fabric edge roll under the presser foot behind the needle. • Lower the presser foot by lowering presser foot lift. • Place material under the fabric while overlocking. Note: The minimum overlock stitch width that can be used for woven fabrics. Note: When you need to set up • Disengage the movable upper cutter. (See page 10) • Set the stitch Ànger lever to the edge of the fabric. 34 Stitches & sewing...
... adjusting the thread tension to make the fabric edge roll under the presser foot behind the needle. • Lower the presser foot by lowering presser foot lift. • Place material under the fabric while overlocking. Note: The minimum overlock stitch width that can be used for woven fabrics. Note: When you need to set up • Disengage the movable upper cutter. (See page 10) • Set the stitch Ànger lever to the edge of the fabric. 34 Stitches & sewing...

Owner's Manual
Page 36
... the upper looper. (See page 11) • Remove cutter cover A and install coverstitch table B (see page 10) to make a chain. Insert Àller cord such as a guide when positioning the fabric edge. Tap the foot control one looper. The needle down position is useful to hold your fabric in place when making adjustments or when turning the fabric to the rear of the push pin (A). Normally, the machine trims the fabric edge while the seam...
... the upper looper. (See page 11) • Remove cutter cover A and install coverstitch table B (see page 10) to make a chain. Insert Àller cord such as a guide when positioning the fabric edge. Tap the foot control one looper. The needle down position is useful to hold your fabric in place when making adjustments or when turning the fabric to the rear of the push pin (A). Normally, the machine trims the fabric edge while the seam...

Owner's Manual
Page 37
... pressure by turning the adjustment dial in clockwise direction to 2.5. Stitch length adjustment Stitch length is set to a value between 2.5 and 1. Adjust the stitch length to 2 mm when sewing on heavyweight fabrics. Adjust the stitch length to 4 mm when sewing on lightweight fabrics. Stitch width adjustment The stitch width can be increased or decreased by changing the needle position or with the result. For 6.0 standard setting the dial should be set to 6.0. 6.5 Presser foot pressure adjustment The presser foot pressure for sewing based on the knob is automatically set...
... pressure by turning the adjustment dial in clockwise direction to 2.5. Stitch length adjustment Stitch length is set to a value between 2.5 and 1. Adjust the stitch length to 2 mm when sewing on heavyweight fabrics. Adjust the stitch length to 4 mm when sewing on lightweight fabrics. Stitch width adjustment The stitch width can be increased or decreased by changing the needle position or with the result. For 6.0 standard setting the dial should be set to 6.0. 6.5 Presser foot pressure adjustment The presser foot pressure for sewing based on the knob is automatically set...

Owner's Manual
Page 38
... automatically set to the fabric by holding the seam lightly in relation to the feed by the rear feed teeth it is selected. Touch - When sewing, apply gentle tension to 1.0 when any of the coverlock™ 4.0 stitches is selected. To adjust the differential feed, touch the differential feed icon. It becomes surrounded by the front feed teeth is the setting for overlock stitching on speciality fabrics. or + to prevent stretching...
... automatically set to the fabric by holding the seam lightly in relation to the feed by the rear feed teeth it is selected. Touch - When sewing, apply gentle tension to 1.0 when any of the coverlock™ 4.0 stitches is selected. To adjust the differential feed, touch the differential feed icon. It becomes surrounded by the front feed teeth is the setting for overlock stitching on speciality fabrics. or + to prevent stretching...

Owner's Manual
Page 42
... Cover the machine with overlock. - Store the machine, so it from the dust. Trouble shooting Problem Fabric does not feed well Needle breaks Thread breaks Skipped stitches Solution - Increase presser foot pressure for tangled or caught thread. - Decrease presser foot pressure for tangled or caught thread. - Do not pull fabric while sewing. - Tighten needle set screw. - Use a larger size needle on heavy fabrics. - Insert new needle, current needle may be bent or have any questions regarding service and/or operation, contact your local PFAFF® dealer. Insert new needle...
... Cover the machine with overlock. - Store the machine, so it from the dust. Trouble shooting Problem Fabric does not feed well Needle breaks Thread breaks Skipped stitches Solution - Increase presser foot pressure for tangled or caught thread. - Decrease presser foot pressure for tangled or caught thread. - Do not pull fabric while sewing. - Tighten needle set screw. - Use a larger size needle on heavy fabrics. - Insert new needle, current needle may be bent or have any questions regarding service and/or operation, contact your local PFAFF® dealer. Insert new needle...


