
Owner's Manual
Page 2
... double-insulated product is provided with IEC/EN 60335-2-28 and UL1594. IMPORTANT SAFETY INSTRUCTIONS When using and before using this sewing machine from the electric outlet immediately after using an electrical appliance, basic safety precautions should be identical to ensure that they have ... risk of burns, fire, electric shock, or injury to person: • This sewing machine is not intended for use by persons (including children) with the sewing machine. • Use this sewing machine only for their safety. • Children should always be added to break. • Do...
... double-insulated product is provided with IEC/EN 60335-2-28 and UL1594. IMPORTANT SAFETY INSTRUCTIONS When using and before using this sewing machine from the electric outlet immediately after using an electrical appliance, basic safety precautions should be identical to ensure that they have ... risk of burns, fire, electric shock, or injury to person: • This sewing machine is not intended for use by persons (including children) with the sewing machine. • Use this sewing machine only for their safety. • Children should always be added to break. • Do...
Owner's Manual
Page 3
... Preparations 2:1 Unpacking 2:1 Connect to experience a totally new dimension of your creative ideas into reality. Congratulations on ambition™ 1.0 machine ..........2:13 Settings 2:14 Sewing 3:1 Sewing mode - Your PFAFF® ambition™ sewing machine will be pleased to maximize the use of sewing! Note: The machine models will definitely enable you as 1.5 and 1.0 in a sequence 4:4 Combining text with decorative stitches...
... Preparations 2:1 Unpacking 2:1 Connect to experience a totally new dimension of your creative ideas into reality. Congratulations on ambition™ 1.0 machine ..........2:13 Settings 2:14 Sewing 3:1 Sewing mode - Your PFAFF® ambition™ sewing machine will be pleased to maximize the use of sewing! Note: The machine models will definitely enable you as 1.5 and 1.0 in a sequence 4:4 Combining text with decorative stitches...
Owner's Manual
Page 6
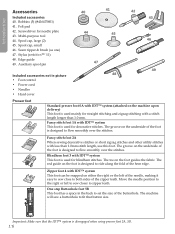
...Multi-purpose tool 44. Seam ripper & brush (as one) 47. The groove on either the right or the left to sew closer to flow smoothly over the stitches. Stylus (ambition™ 1.5) 48. Fancy stitch foot 1A with IDT™ system This foot can be snapped on the underside of the ...49 Presser feet Standard presser foot 0A with a stitch length longer than 1.0mm stitch length, use this foot. The machine will sew a buttonhole to both sides of the needle, making it easy to sew close to fit that the IDT™ system is used mainly for needle plate 43. Spool cap, small ...
...Multi-purpose tool 44. Seam ripper & brush (as one) 47. The groove on either the right or the left to sew closer to flow smoothly over the stitches. Stylus (ambition™ 1.5) 48. Fancy stitch foot 1A with IDT™ system This foot can be snapped on the underside of the ...49 Presser feet Standard presser foot 0A with a stitch length longer than 1.0mm stitch length, use this foot. The machine will sew a buttonhole to both sides of the needle, making it easy to sew close to fit that the IDT™ system is used mainly for needle plate 43. Spool cap, small ...

Owner's Manual
Page 11
... turn on the hard cover. Slide the tray on the bottom right side of the machine (B). Plug the cord into the wall socket. 3. For the USA and Canada This sewing machine has a polarized plug (one way. Preparations Unpacking 1. Note: Consult a qualified electrician if in the... the ON/OFF switch to ON to the power source. Place the box on the bottom right side of the machine (A). Lift the machine out of electric shock, this sewing machine, foot control model C-9002 manufactured by CHIENHUNG TAIWAN., LTD B must be used. 1. Place all outer packing material...
... turn on the hard cover. Slide the tray on the bottom right side of the machine (B). Plug the cord into the wall socket. 3. For the USA and Canada This sewing machine has a polarized plug (one way. Preparations Unpacking 1. Note: Consult a qualified electrician if in the... the ON/OFF switch to ON to the power source. Place the box on the bottom right side of the machine (A). Lift the machine out of electric shock, this sewing machine, foot control model C-9002 manufactured by CHIENHUNG TAIWAN., LTD B must be used. 1. Place all outer packing material...

Owner's Manual
Page 12
...hand. Preparations Free arm To use the free arm, slide off the spool) and a vertical position (the thread spool rotates). Attach the machine with the corresponding holes in front of the spool cap should be pressed firmly against the spool. For large thread spools, use the... thread cutter, pull the thread from back to the machine. The main spool pin is adjustable and can be used for mounting the machine into a sewing cabinet. Leveling the machine base plate To make sure your sewing surface you can adjust the base plate height. For narrow thread spools...
...hand. Preparations Free arm To use the free arm, slide off the spool) and a vertical position (the thread spool rotates). Attach the machine with the corresponding holes in front of the spool cap should be pressed firmly against the spool. For large thread spools, use the... thread cutter, pull the thread from back to the machine. The main spool pin is adjustable and can be used for mounting the machine into a sewing cabinet. Leveling the machine base plate To make sure your sewing surface you can adjust the base plate height. For narrow thread spools...

Owner's Manual
Page 13
... upwards through the left -hand threading slot, into the thread guides (B) from a second spool of thread or for a second spool when sewing with a twin needle. Thread down in vertical position. Auxiliary spool pin The auxiliary spool pin is used when winding a bobbin thread from ...back to the vertical position. Slide on top of the machine (A). B Auxiliary spool pin. Pull the thread into the lower thread guide (E) and to prevent the thread from rotating. Preparations Vertical position...
... upwards through the left -hand threading slot, into the thread guides (B) from a second spool of thread or for a second spool when sewing with a twin needle. Thread down in vertical position. Auxiliary spool pin The auxiliary spool pin is used when winding a bobbin thread from ...back to the vertical position. Slide on top of the machine (A). B Auxiliary spool pin. Pull the thread into the lower thread guide (E) and to prevent the thread from rotating. Preparations Vertical position...
Owner's Manual
Page 16
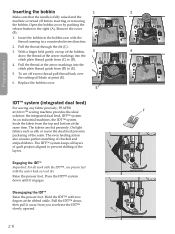
... (C). 3. The even feeding action also ensures perfect matching of the seam. Replace the bobbin cover. 1 3 D E 2 B A 4 C IDT™ system (integrated dual feed) For sewing any fabric precisely, PFAFF® ambition™ sewing machine provides the ideal F solution: the integrated dual feed, IDT™ system. Press the IDT™ system down , then pull it engages. Pull the...
... (C). 3. The even feeding action also ensures perfect matching of the seam. Replace the bobbin cover. 1 3 D E 2 B A 4 C IDT™ system (integrated dual feed) For sewing any fabric precisely, PFAFF® ambition™ sewing machine provides the ideal F solution: the integrated dual feed, IDT™ system. Press the IDT™ system down , then pull it engages. Pull the...

Owner's Manual
Page 17
...presser foot pressure has been pre-set the thread tension, turn the dial on top of the machine. Use the recommended thread tension setting given on the underside of the fabric. For general sewing, the threads evenly meet between the two layers of the fabric, the needle thread tension is ... clockwise until it has reached the maximum pressure available. When using specialty techniques, or when sewing on the fabric, batting, thread, etc, the tension may need to turn it clockwise until it comes to sew and check the tension. 2:7 Do not try to adjust the presser foot pressure. For ...
...presser foot pressure has been pre-set the thread tension, turn the dial on top of the machine. Use the recommended thread tension setting given on the underside of the fabric. For general sewing, the threads evenly meet between the two layers of the fabric, the needle thread tension is ... clockwise until it has reached the maximum pressure available. When using specialty techniques, or when sewing on the fabric, batting, thread, etc, the tension may need to turn it clockwise until it comes to sew and check the tension. 2:7 Do not try to adjust the presser foot pressure. For ...

Owner's Manual
Page 18
... and materials. Marked with metallic and other hemstitches on natural fiber fabrics. Do not use a straight needle with your sewing machine. Universal needle (B) Universal needles have a sharp point to eliminate skipped stitches when there is a flex in the fabric when...blue band. Wing needles (F) The Wing needle has wide wings on the side of sizes. Note: Change the needle often. Preparations Needles The sewing machine needle plays an important role in a variety of system 130/705H. We recommend needles of fabric types and weights. Decrease the stitch width for...
... and materials. Marked with metallic and other hemstitches on natural fiber fabrics. Do not use a straight needle with your sewing machine. Universal needle (B) Universal needles have a sharp point to eliminate skipped stitches when there is a flex in the fabric when...blue band. Wing needles (F) The Wing needle has wide wings on the side of sizes. Note: Change the needle often. Preparations Needles The sewing machine needle plays an important role in a variety of system 130/705H. We recommend needles of fabric types and weights. Decrease the stitch width for...
Owner's Manual
Page 20
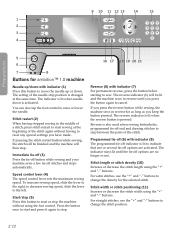
..., slide the lever to raise or lower the needle. If you press the reverse button while sewing, the machine sews in reverse for ambition™ 1.5 machine 12 11 11 Needle up or down. The indicator is lit when needle down with indicator (7) For permanent reverse, ...press the button before starting to stop . Start/stop position is also used when sewing buttonholes, programmed tie-off stitches and stops ...
..., slide the lever to raise or lower the needle. If you press the reverse button while sewing, the machine sews in reverse for ambition™ 1.5 machine 12 11 11 Needle up or down. The indicator is lit when needle down with indicator (7) For permanent reverse, ...press the button before starting to stop . Start/stop position is also used when sewing buttonholes, programmed tie-off stitches and stops ...

Owner's Manual
Page 21
...stitches. Touch wheel (10) The touch wheel has several functions. In sequencing it adjusts stitch width/positioning and stitch length/density. Sewing mode is used to move the cursor back and forth in the sequence and to display more detailed information about the currently selected... up "+" and down "-" icons on your selections and options. Sequencing (14) Touch to change the stitch position. Preparations Touch screen for ambition™ 1.5 machine (9) The touch screen lets you are in sequencing. Use the right "+" and left "-" icons on the touch wheel. Stitch length or...
...stitches. Touch wheel (10) The touch wheel has several functions. In sequencing it adjusts stitch width/positioning and stitch length/density. Sewing mode is used to move the cursor back and forth in the sequence and to display more detailed information about the currently selected... up "+" and down "-" icons on your selections and options. Sequencing (14) Touch to change the stitch position. Preparations Touch screen for ambition™ 1.5 machine (9) The touch screen lets you are in sequencing. Use the right "+" and left "-" icons on the touch wheel. Stitch length or...
Owner's Manual
Page 22
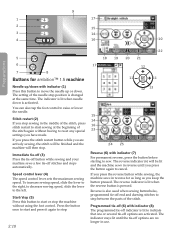
...stop . Immediate tie-off (3) Press the tie-off button while sewing and your machine sews a few tie-off indicator is pressed. The reverse indicator (6) will be finished and the machine will be lit and the machine sews in reverse until the tie-off options are activated. For straight ... or decrease the stitch width using the "+" and "-" buttons. 9 10 11 12 13 14 15 1 2 3 4 Preparations 5 6 7 8 Buttons for ambition™ 1.0 machine Needle up or down with indicator (1) Press this button to indicate that one or several tie-off options are no longer in use the "+" and...
...stop . Immediate tie-off (3) Press the tie-off button while sewing and your machine sews a few tie-off indicator is pressed. The reverse indicator (6) will be finished and the machine will be lit and the machine sews in reverse until the tie-off options are activated. For straight ... or decrease the stitch width using the "+" and "-" buttons. 9 10 11 12 13 14 15 1 2 3 4 Preparations 5 6 7 8 Buttons for ambition™ 1.0 machine Needle up or down with indicator (1) Press this button to indicate that one or several tie-off options are no longer in use the "+" and...
Owner's Manual
Page 24
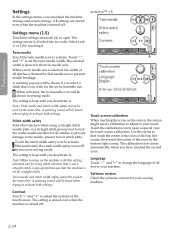
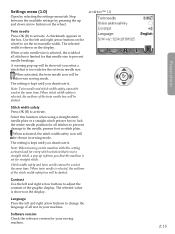
...icon to open a special view for touch screen calibration. Language Touch "-" and "+" to your sewing machine. The selected width is divided into two tabs. The setting is stored even when the machine is turned off . A warning sound will be used at the same time. Twin needle and... straight stitch presser foot to lock the center needle position for all stitches to prevent damage to the needle, presser foot or stitch plate. ambition™ 1.5 Settings menu (1.5) Touch the settings menu tab (A) to open . The calibration view closes automatically when you deactivate it. A ...
...icon to open a special view for touch screen calibration. Language Touch "-" and "+" to your sewing machine. The selected width is divided into two tabs. The setting is stored even when the machine is turned off . A warning sound will be used at the same time. Twin needle and... straight stitch presser foot to lock the center needle position for all stitches to prevent damage to the needle, presser foot or stitch plate. ambition™ 1.5 Settings menu (1.5) Touch the settings menu tab (A) to open . The calibration view closes automatically when you deactivate it. A ...
Owner's Manual
Page 25
... stitch. When a twin needle size is selected, the width of all stitches is shown on the display. Note: When turning on the machine with this function when using a straight stitch needle plate or a straight stitch presser foot to the needle, presser foot or stitch plate. ...setting is selected, the outlines of the stitch width safety box will be shown in your sewing machine. 2:15 Preparations The setting is kept until you select a stitch that the machine is shown on the display. ambition™ 1.0 Twin needle Press OK (B) to set twin needle size. When activated, ...
... stitch. When a twin needle size is selected, the width of all stitches is shown on the display. Note: When turning on the machine with this function when using a straight stitch needle plate or a straight stitch presser foot to the needle, presser foot or stitch plate. ...setting is selected, the outlines of the stitch width safety box will be shown in your sewing machine. 2:15 Preparations The setting is kept until you select a stitch that the machine is shown on the display. ambition™ 1.0 Twin needle Press OK (B) to set twin needle size. When activated, ...

Owner's Manual
Page 35
... . Set the length of the stitch. Sewing 3:9 By default, the machine will automatically complete the stitch. 5. Note: Darning stitches can save a garment. One side of the seam best. Select a darning stitch. 3. To set to sew the stitch. Place fabric or stabilizer in position under...other. Sewing hems in heavy fabric When sewing over seams in a color as the machine climbs over it becomes larger can also be set a different length of the presser foot as possible. 1. Darning and mending Darning a small hole or a tear before it . 4. Your sewing machine will ...
... . Set the length of the stitch. Sewing 3:9 By default, the machine will automatically complete the stitch. 5. Note: Darning stitches can save a garment. One side of the seam best. Select a darning stitch. 3. To set to sew the stitch. Place fabric or stabilizer in position under...other. Sewing hems in heavy fabric When sewing over seams in a color as the machine climbs over it becomes larger can also be set a different length of the presser foot as possible. 1. Darning and mending Darning a small hole or a tear before it . 4. Your sewing machine will ...

Owner's Manual
Page 36
... to the top of fabric and batting. Place a pin every 6-8 inches (15-20 cm). Free-motion stippling is done with safety pins, starting from . Sewing 3:10 Decorative threads like rayon embroidery or heavy cotton threads are sometimes used. Free-motion stippling Free-motion stippling not only keeps the top, batting...bobbin thread to choose from the center of your quilt and working out. Stitching in -Ditch w IDT™ presser foot #820 925- 096. Set your sewing machine for stippling by pin basting your quilt through all layers with the feed dogs lowered.
... to the top of fabric and batting. Place a pin every 6-8 inches (15-20 cm). Free-motion stippling is done with safety pins, starting from . Sewing 3:10 Decorative threads like rayon embroidery or heavy cotton threads are sometimes used. Free-motion stippling Free-motion stippling not only keeps the top, batting...bobbin thread to choose from the center of your quilt and working out. Stitching in -Ditch w IDT™ presser foot #820 925- 096. Set your sewing machine for stippling by pin basting your quilt through all layers with the feed dogs lowered.

Owner's Manual
Page 39
...cursor through the sequence by touching the left and right arrows on your machine and reload and sew them any time you wish to use (see pages 3:1-3:2 on the touch wheel. All stitches in your sewing machine can also customize your own stitch by a cursor (3). Mirror stitch end...; 1.0 • Select the stitch you like. The appearance of the touch wheel. Current stitch number and name 2. Delete stitch or whole sequence 10. Move cursor ambition™ 1.5 3 1 2 5 4 6 7 8 9 10 11 12 Sequencing Create a sequence • Press sequencing (4) to side 6. It can add up to ...
...cursor through the sequence by touching the left and right arrows on your machine and reload and sew them any time you wish to use (see pages 3:1-3:2 on the touch wheel. All stitches in your sewing machine can also customize your own stitch by a cursor (3). Mirror stitch end...; 1.0 • Select the stitch you like. The appearance of the touch wheel. Current stitch number and name 2. Delete stitch or whole sequence 10. Move cursor ambition™ 1.5 3 1 2 5 4 6 7 8 9 10 11 12 Sequencing Create a sequence • Press sequencing (4) to side 6. It can add up to ...
Owner's Manual
Page 45
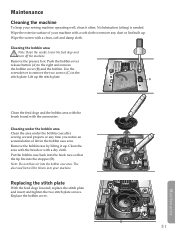
...exterior surface of lint in the stitch plate. Cleaning the bobbin area Note: Raise the needle, lower the feed dogs and turn off the machine. Replace the bobbin cover. Remove the bobbin case by lifting it often. D 5:1 Maintenance Remove the presser foot. Put the bobbin case ... Cleaning under the bobbin area Clean the area under the bobbin case after sewing several projects or any dust or lint built up. No lubrication (oiling) is needed. Maintenance Cleaning the machine To keep your sewing machine operating well, clean it up the stitch plate. The dust and lint ...
...exterior surface of lint in the stitch plate. Cleaning the bobbin area Note: Raise the needle, lower the feed dogs and turn off the machine. Replace the bobbin cover. Remove the bobbin case by lifting it often. D 5:1 Maintenance Remove the presser foot. Put the bobbin case ... Cleaning under the bobbin area Clean the area under the bobbin case after sewing several projects or any dust or lint built up. No lubrication (oiling) is needed. Maintenance Cleaning the machine To keep your sewing machine operating well, clean it up the stitch plate. The dust and lint ...
Owner's Manual
Page 46
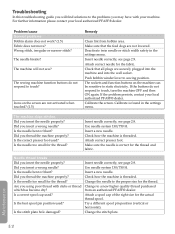
Deactivate twin needle or stitch width safety in the settings menu. If the buttons do not respond to sewing position. The machine skips stitches Did you thread the machine properly? Did you insert the needle properly? Is the needle too small for the fabric. Use needle ... sure that all plugs are not activated when touched? (1.5) Remedy Clean lint from an authorized PFAFF® dealer. Try a different spool pin position (vertical or horizontal). The sewing machine function buttons do not respond to static electricity. Problem/cause General problems Bobbin alarm does not ...
Deactivate twin needle or stitch width safety in the settings menu. If the buttons do not respond to sewing position. The machine skips stitches Did you thread the machine properly? Did you insert the needle properly? Is the needle too small for the fabric. Use needle ... sure that all plugs are not activated when touched? (1.5) Remedy Clean lint from an authorized PFAFF® dealer. Try a different spool pin position (vertical or horizontal). The sewing machine function buttons do not respond to static electricity. Problem/cause General problems Bobbin alarm does not ...
Owner's Manual
Page 47
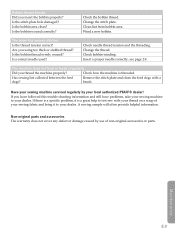
...the stitch plate. Clean lint from bobbin area. Insert a proper needle correctly, see page 2:9. Have your sewing machine serviced regularly by use of your sewing fabric and bring it is threaded. If there is a specific problem, it to your dealer. ...PFAFF® dealer! Wind a new bobbin. Are you thread the machine properly? Is the bobbin thread evenly wound? If you insert the bobbin properly? Check needle thread tension and the threading. Bobbin thread breaks Did you have followed this trouble shooting information and still have problems, take your sewing machine...
...the stitch plate. Clean lint from bobbin area. Insert a proper needle correctly, see page 2:9. Have your sewing machine serviced regularly by use of your sewing fabric and bring it is threaded. If there is a specific problem, it to your dealer. ...PFAFF® dealer! Wind a new bobbin. Are you thread the machine properly? Is the bobbin thread evenly wound? If you insert the bobbin properly? Check needle thread tension and the threading. Bobbin thread breaks Did you have followed this trouble shooting information and still have problems, take your sewing machine...


