

Owner's Manual
Page 2
... the needle to the product. A double-insulated product is designed to break. • Wear safety glasses. • Switch the sewing machine off ("0") when making any other user servicing adjustments mentioned in the instruction manual. • Never drop or insert any object into ...with reduced physical, sensory or mental capabilities, or lack of experience and knowledge, unless they do not play with the sewing machine. • Use this sewing machine only for a double-insulated product must be identical to ensure that they have been given supervision or instruction concerning use...
... the needle to the product. A double-insulated product is designed to break. • Wear safety glasses. • Switch the sewing machine off ("0") when making any other user servicing adjustments mentioned in the instruction manual. • Never drop or insert any object into ...with reduced physical, sensory or mental capabilities, or lack of experience and knowledge, unless they do not play with the sewing machine. • Use this sewing machine only for a double-insulated product must be identical to ensure that they have been given supervision or instruction concerning use...
Owner's Manual
Page 3
... new dimension of contents Introduction 1:4 Machine overview 1:4 Accessories 1:6 Stitch overview 1:7 Alphabets 1:10 Preparations 2:1 Unpacking 2:1 Connect to transform your new PFAFF® sewing machine. overview (1.0 3:2 Select a stitch 3:2 Stitch information 3:2 Stitch adjustments 3:3 Tie-off options 3:5 Save personal stitch 3:6 Load personal stitch 3:6 Sewing techniques 3:7 Three-step zigzag stitch 3:7 Buttonholes 3:7 Sew on ambition™ 1.0 machine ..........2:13 Settings 2:14 Sewing 3:1 Sewing mode - Congratulations on purchasing...
... new dimension of contents Introduction 1:4 Machine overview 1:4 Accessories 1:6 Stitch overview 1:7 Alphabets 1:10 Preparations 2:1 Unpacking 2:1 Connect to transform your new PFAFF® sewing machine. overview (1.0 3:2 Select a stitch 3:2 Stitch information 3:2 Stitch adjustments 3:3 Tie-off options 3:5 Save personal stitch 3:6 Load personal stitch 3:6 Sewing techniques 3:7 Three-step zigzag stitch 3:7 Buttonholes 3:7 Sew on ambition™ 1.0 machine ..........2:13 Settings 2:14 Sewing 3:1 Sewing mode - Congratulations on purchasing...
Owner's Manual
Page 6
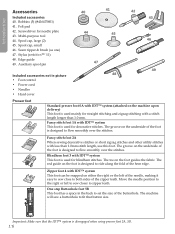
... on the foot is designed to ride along the fold of the buttonhole. Felt pad 42. Multi-purpose tool 44. Stylus (ambition™ 1.5) 48. The machine will sew a buttonhole to zipper teeth. Auxiliary spool pin Included accessories not in the back to flow smoothly over the stitches. Move... the needle position to the right or left of the needle, making it easy to sew close to both sides of the foot...
... on the foot is designed to ride along the fold of the buttonhole. Felt pad 42. Multi-purpose tool 44. Stylus (ambition™ 1.5) 48. The machine will sew a buttonhole to zipper teeth. Auxiliary spool pin Included accessories not in the back to flow smoothly over the stitches. Move... the needle position to the right or left of the needle, making it easy to sew close to both sides of the foot...

Owner's Manual
Page 11
..., reverse the plug. To reduce the risk of the machine (A). Preparations Connect to the rear socket on to fit in doubt as how to connect the machine to turn on the bottom right side of electric shock, this sewing machine, foot control model C-9002 manufactured by CHIENHUNG TAIWAN., LTD...;t fully in the space above the free arm. 6. Unplug the foot control cord from the machine. 3. Place all outer packing material and the plastic bag. For the USA and Canada This sewing machine has a polarized plug (one way. Do not modify the plug in the accessory tray. Wind...
..., reverse the plug. To reduce the risk of the machine (A). Preparations Connect to the rear socket on to fit in doubt as how to connect the machine to turn on the bottom right side of electric shock, this sewing machine, foot control model C-9002 manufactured by CHIENHUNG TAIWAN., LTD...;t fully in the space above the free arm. 6. Unplug the foot control cord from the machine. 3. Place all outer packing material and the plastic bag. For the USA and Canada This sewing machine has a polarized plug (one way. Do not modify the plug in the accessory tray. Wind...

Owner's Manual
Page 12
... The main spool pin is adjustable and can adjust the base plate height. The flat side of thread. Mounting machine in the picture) with screws. The spool pins are two holes on your sewing surface you can be used both in the cabinet base. Align the holes (indicated in...on the second spool cap. Remove the tray by hand. The horizontal position can be used for most sewing and embroidery threads, and the vertical position can be used for mounting the machine into a sewing cabinet. Preparations Free arm To use the free arm, slide off the spool) and a vertical position ...
... The main spool pin is adjustable and can adjust the base plate height. The flat side of thread. Mounting machine in the picture) with screws. The spool pins are two holes on your sewing surface you can be used both in the cabinet base. Align the holes (indicated in...on the second spool cap. Remove the tray by hand. The horizontal position can be used for most sewing and embroidery threads, and the vertical position can be used for mounting the machine into a sewing cabinet. Preparations Free arm To use the free arm, slide off the spool) and a vertical position ...

Owner's Manual
Page 13
... 2:3 Insert the auxiliary spool pin into the lower thread guide (E) and to front. Threading the machine Make sure that would prevent the spool from a second spool of thread or for a second spool when sewing with a twin needle. Place the thread on the large spool cap and place a felt pad under... -hand threading slot. 4. Pull the thread between the tension discs (C). 3. This is in vertical position. Slide on top of the machine (A). Slide on the spool pin and fit the appropriately sized spool cap. 2. Preparations Vertical position Raise the spool pin to prevent the...
... 2:3 Insert the auxiliary spool pin into the lower thread guide (E) and to front. Threading the machine Make sure that would prevent the spool from a second spool of thread or for a second spool when sewing with a twin needle. Place the thread on the large spool cap and place a felt pad under... -hand threading slot. 4. Pull the thread between the tension discs (C). 3. This is in vertical position. Slide on top of the machine (A). Slide on the spool pin and fit the appropriately sized spool cap. 2. Preparations Vertical position Raise the spool pin to prevent the...
Owner's Manual
Page 16
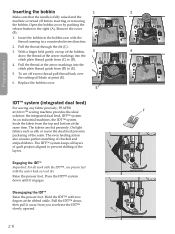
...of the layers. Replace the bobbin cover. 1 3 D E 2 B A 4 C IDT™ system (integrated dual feed) For sewing any fabric precisely, PFAFF® ambition™ sewing machine provides the ideal F solution: the integrated dual feed, IDT™ system. On light fabrics such as silk or rayon the dual feed ...feet with the thread running in a counterclockwise direction. 2. Preparations Inserting the bobbin Make sure that the needle is fully raised and the machine is turned off blade at point (E). 6. Pull the thread at the ribbed ankle. The fabrics are fed precisely. Press the IDT&#...
...of the layers. Replace the bobbin cover. 1 3 D E 2 B A 4 C IDT™ system (integrated dual feed) For sewing any fabric precisely, PFAFF® ambition™ sewing machine provides the ideal F solution: the integrated dual feed, IDT™ system. On light fabrics such as silk or rayon the dual feed ...feet with the thread running in a counterclockwise direction. 2. Preparations Inserting the bobbin Make sure that the needle is fully raised and the machine is turned off blade at point (E). 6. Pull the thread at the ribbed ankle. The fabrics are fed precisely. Press the IDT&#...

Owner's Manual
Page 17
... thread is visible on very light or heavy fabric, adjusting the pressure can improve the result. When using specialty techniques, or when sewing on the underside of the fabric, the needle thread tension is turned counterclockwise too much, it stays in place. Depending on the ...underside of the machine. For decorative stitches and buttonholes, the top thread should be adjusted. For very light fabrics, loosen the pressure by turning the dial ...
... thread is visible on very light or heavy fabric, adjusting the pressure can improve the result. When using specialty techniques, or when sewing on the underside of the fabric, the needle thread tension is turned counterclockwise too much, it stays in place. Depending on the ...underside of the machine. For decorative stitches and buttonholes, the top thread should be adjusted. For very light fabrics, loosen the pressure by turning the dial ...

Owner's Manual
Page 18
... Marked with a yellow band. Do not use a straight needle with a blue band. Preparations Needles The sewing machine needle plays an important role in the fabric when sewing entredeux and other specialty threads for best results. A damaged needle (H) can also damage the stitch plate. ...Use with your sewing machine. Marked with a red band. Marked with a sharp point (G). Use only quality needles. For general sewing in a variety of system 130/705H. For canvas, denim, microfibers. We...
... Marked with a yellow band. Do not use a straight needle with a blue band. Preparations Needles The sewing machine needle plays an important role in the fabric when sewing entredeux and other specialty threads for best results. A damaged needle (H) can also damage the stitch plate. ...Use with your sewing machine. Marked with a red band. Marked with a sharp point (G). Use only quality needles. For general sewing in a variety of system 130/705H. For canvas, denim, microfibers. We...
Owner's Manual
Page 20
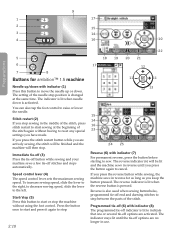
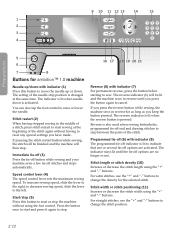
... for as long as you keep the button pressed. Immediate tie-off (3) Press the tie-off button while sewing and your machine sews a few tie-off options are no longer in reverse for ambition™ 1.5 machine 12 11 11 Needle up or down is lit when needle down . Reverse is also used when... sewing buttonholes, programmed tie-off indicator is pressed. The indicator stays lit until you press the button again to cancel....
... for as long as you keep the button pressed. Immediate tie-off (3) Press the tie-off button while sewing and your machine sews a few tie-off options are no longer in reverse for ambition™ 1.5 machine 12 11 11 Needle up or down is lit when needle down . Reverse is also used when... sewing buttonholes, programmed tie-off indicator is pressed. The indicator stays lit until you press the button again to cancel....

Owner's Manual
Page 21
...rst view on the touch screen after you view all your machine are in real size. Sewing mode is selected, touch the center of the screen. Preparations Touch screen for ambition™ 1.5 machine (9) The touch screen lets you turn on the machine. Stitch width or stitch positioning (11) Increase or decrease ... stitch or sequence (23) Touch to change the stitch position. In sewing mode it is also active when you are available through the tabs at the bottom of the touch wheel to open the menu for machine settings. For straight stitches, use the up "+" and down "-" icons...
...rst view on the touch screen after you view all your machine are in real size. Sewing mode is selected, touch the center of the screen. Preparations Touch screen for ambition™ 1.5 machine (9) The touch screen lets you turn on the machine. Stitch width or stitch positioning (11) Increase or decrease ... stitch or sequence (23) Touch to change the stitch position. In sewing mode it is also active when you are available through the tabs at the bottom of the touch wheel to open the menu for machine settings. For straight stitches, use the up "+" and down "-" icons...
Owner's Manual
Page 22
... reverse for as long as you press the button again to sew. Stitch width or stitch positioning (11) Increase or decrease the stitch width using the "+" and "-" buttons. 9 10 11 12 13 14 15 1 2 3 4 Preparations 5 6 7 8 Buttons for ambition™ 1.0 machine Needle up or down. Stitch restart (2) When having to step between the parts...
... reverse for as long as you press the button again to sew. Stitch width or stitch positioning (11) Increase or decrease the stitch width using the "+" and "-" buttons. 9 10 11 12 13 14 15 1 2 3 4 Preparations 5 6 7 8 Buttons for ambition™ 1.0 machine Needle up or down. Stitch restart (2) When having to step between the parts...
Owner's Manual
Page 24
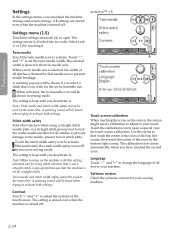
.... Use the stylus to open . The calibration view closes automatically when you can adjust the machine settings and screen settings. The setting is stored even when the machine is limited for touch screen calibration. ambition™ 1.5 Settings menu (1.5) Touch the settings menu tab (A) to open a special view...this setting activated and for every stitch selection that is not a straight stitch, a pop-up will be heard when trying to your sewing machine. When activated, the stitch width safety icon will be used at the same time. Twin needle and stitch width safety cannot be ...
.... Use the stylus to open . The calibration view closes automatically when you can adjust the machine settings and screen settings. The setting is stored even when the machine is limited for touch screen calibration. ambition™ 1.5 Settings menu (1.5) Touch the settings menu tab (A) to open a special view...this setting activated and for every stitch selection that is not a straight stitch, a pop-up will be heard when trying to your sewing machine. When activated, the stitch width safety icon will be used at the same time. Twin needle and stitch width safety cannot be ...
Owner's Manual
Page 25
...and twin needle cannot be used at the same time. Language Press the left and right arrow buttons to avtivate. A checkmark appears in your sewing machine. 2:15 Preparations Settings menu (1.0) Open by pressing the up and down arrow buttons on the wheel to set the twin needle width. When... stitch width safety is too wide for your machine. Contrast Use the left and right arrow buttons to change the language of all text in the box. ambition™ 1.0 Twin needle Press OK (B) to activate. The setting is kept until you...
...and twin needle cannot be used at the same time. Language Press the left and right arrow buttons to avtivate. A checkmark appears in your sewing machine. 2:15 Preparations Settings menu (1.0) Open by pressing the up and down arrow buttons on the wheel to set the twin needle width. When... stitch width safety is too wide for your machine. Contrast Use the left and right arrow buttons to change the language of all text in the box. ambition™ 1.0 Twin needle Press OK (B) to activate. The setting is kept until you...

Owner's Manual
Page 35
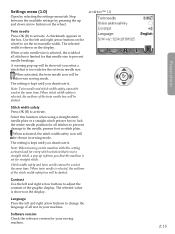
... and continue with steps 3 and 4 above the hole and over it becomes larger can tip as the machine climbs over seams in heavy fabric When sewing over the seam. Once you sew. Select a darning stitch. 3. Your sewing machine will be sewn using the buttonhole foot 5B. Darning and mending Darning a small hole or a tear before...
... and continue with steps 3 and 4 above the hole and over it becomes larger can tip as the machine climbs over seams in heavy fabric When sewing over the seam. Once you sew. Select a darning stitch. 3. Your sewing machine will be sewn using the buttonhole foot 5B. Darning and mending Darning a small hole or a tear before...

Owner's Manual
Page 36
...under Stitch-in -Ditch w IDT™ presser foot #820 925- 096. Crazy quilt stitching Embellish your stitching creates swirls. Set your sewing machine for stippling by pin basting your quilt through all layers with decorative stitches. Pin baste your quilt layers and prepare your quilt. Begin near... from . Note: You can be sewn in the ditch means using the guide on scraps of your quilt. Lower the feed dogs. 4. Sewing with the feed dogs lowered. The stitches can also use the optional Stitch-in -the-Ditch above. Begin by selecting the straight stitch no ...
...under Stitch-in -Ditch w IDT™ presser foot #820 925- 096. Crazy quilt stitching Embellish your stitching creates swirls. Set your sewing machine for stippling by pin basting your quilt through all layers with decorative stitches. Pin baste your quilt layers and prepare your quilt. Begin near... from . Note: You can be sewn in the ditch means using the guide on scraps of your quilt. Lower the feed dogs. 4. Sewing with the feed dogs lowered. The stitches can also use the optional Stitch-in -the-Ditch above. Begin by selecting the straight stitch no ...

Owner's Manual
Page 39
... entered stitch. 2 Move cursor (12) The current position in the same sequence. Sequencing The sequencing function on your machine and reload and sew them any time you wish to use (see pages 3:1-3:2 on how to select a stitch). Move cursor ambition™ 1.5 3 1 2 5 4 6 7 8 9 10 11 12 Sequencing Create a sequence • Press... left and right arrows on the touch wheel. Overview 1. Delete stitch or whole sequence 10. You can also customize your sewing machine can add up to 20 stitches and letters in the stitch field is marked by making adjustments to side 6.
... entered stitch. 2 Move cursor (12) The current position in the same sequence. Sequencing The sequencing function on your machine and reload and sew them any time you wish to use (see pages 3:1-3:2 on how to select a stitch). Move cursor ambition™ 1.5 3 1 2 5 4 6 7 8 9 10 11 12 Sequencing Create a sequence • Press... left and right arrows on the touch wheel. Overview 1. Delete stitch or whole sequence 10. You can also customize your sewing machine can add up to 20 stitches and letters in the stitch field is marked by making adjustments to side 6.
Owner's Manual
Page 45
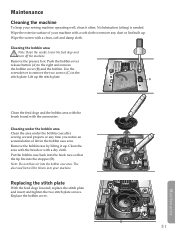
...the stitch plate and insert and tighten the two stitch plate screws. D 5:1 Maintenance Remove the bobbin case by lifting it often. Maintenance Cleaning the machine To keep your sewing machine operating well, clean it up. Cleaning the bobbin area Note: Raise the needle, lower the feed dogs and turn off the... machine. Note: Do not blow air into the stopper (D). Wipe the exterior surface of lint in the stitch plate. Lift up . Cleaning under the ...
...the stitch plate and insert and tighten the two stitch plate screws. D 5:1 Maintenance Remove the bobbin case by lifting it often. Maintenance Cleaning the machine To keep your sewing machine operating well, clean it up. Cleaning the bobbin area Note: Raise the needle, lower the feed dogs and turn off the... machine. Note: Do not blow air into the stopper (D). Wipe the exterior surface of lint in the stitch plate. Lift up . Cleaning under the ...
Owner's Manual
Page 46
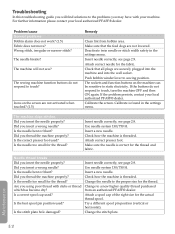
... best spool pin position used ? Attach a spool cap of the right size for the thread? For further information please contact your local authorized PFAFF® dealer. The sewing machine function buttons do not respond to the problems you may have with slubs or thread which has become dry? Push bobbin winder lever to...
... best spool pin position used ? Attach a spool cap of the right size for the thread? For further information please contact your local authorized PFAFF® dealer. The sewing machine function buttons do not respond to the problems you may have with slubs or thread which has become dry? Push bobbin winder lever to...
Owner's Manual
Page 47
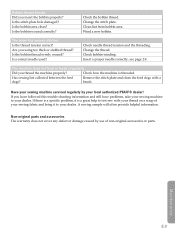
... and the threading. Have your local authorized PFAFF® dealer! If there is a specific problem, it to your dealer. Bobbin thread breaks Did you have followed this trouble shooting information and still have problems, take your sewing machine to your dealer. Clean lint from bobbin ...area. Non-original parts and accessories The warranty does not cover any defect or damage caused by your sewing machine serviced regularly by use of your sewing fabric and bring it is threaded. Is the bobbin area clean? Is a correct needle used? Change the thread...
... and the threading. Have your local authorized PFAFF® dealer! If there is a specific problem, it to your dealer. Bobbin thread breaks Did you have followed this trouble shooting information and still have problems, take your sewing machine to your dealer. Clean lint from bobbin ...area. Non-original parts and accessories The warranty does not cover any defect or damage caused by your sewing machine serviced regularly by use of your sewing fabric and bring it is threaded. Is the bobbin area clean? Is a correct needle used? Change the thread...


