

Owner's Manual
Page 4
... (1 5) Clear key "beginning of pattern" (16) Master switch (1 7) Accessory box (1 8> Sewing foot holder with sewing foot (1 9) Needle threader (20) Thread guides (21) Threading slot (22> Needle thread tension (23> Take-up lever (24) Presser bar lifter (25) Needle holder with set screw (26) Program key for tens digits (27...) Thread guide for bobbin winding (28) Program table (29) Spool holder with unwinding disk (30) Second spare spool holder (31) Bobbin winder ...
... (1 5) Clear key "beginning of pattern" (16) Master switch (1 7) Accessory box (1 8> Sewing foot holder with sewing foot (1 9) Needle threader (20) Thread guides (21) Threading slot (22> Needle thread tension (23> Take-up lever (24) Presser bar lifter (25) Needle holder with set screw (26) Program key for tens digits (27...) Thread guide for bobbin winding (28) Program table (29) Spool holder with unwinding disk (30) Second spare spool holder (31) Bobbin winder ...
Owner's Manual
Page 8
... Automatic darning Balance Balance slide key Bartack Basting stitch Bias tape binder Blind stitch Bobbin case Bobbin thread, raising the Bobbin thread tension Bobbin winding Bobbin winding through the needle Borders Braces Buttonhole balance Buttonholes Buttonhole, fully automatic Buttonhole with gimp...sewing foot Changing the needle Changing the needle plate Cleaning and oiling Clear key Closed overlock stitch Closed overlock stitch with edge thread Combined borders Cording foot Couching foot Cross hem stitch Cross stitch Darning Darning tears Darning with zigzag stitch Darning with straight ...
... Automatic darning Balance Balance slide key Bartack Basting stitch Bias tape binder Blind stitch Bobbin case Bobbin thread, raising the Bobbin thread tension Bobbin winding Bobbin winding through the needle Borders Braces Buttonhole balance Buttonholes Buttonhole, fully automatic Buttonhole with gimp...sewing foot Changing the needle Changing the needle plate Cleaning and oiling Clear key Closed overlock stitch Closed overlock stitch with edge thread Combined borders Cording foot Couching foot Cross hem stitch Cross stitch Darning Darning tears Darning with zigzag stitch Darning with straight ...

Owner's Manual
Page 9
... embroidery Eyelets Fagoting stitch Fancy elastic stitch Faults Felling foot Foot control Free arm Fringe foot Function keys Gathering with elastic threads Gathering with straight stitch Handwheel release disk Hemstitching Hem with the twin needle Honeycomb stitch Inserting the bobbin Inserting zippers Knit-... position Lightbulb Light knit mending stitch Linen embroidery Lowering the feed dog Maintenance and sewing faults Master switch Monograms Needle chart Needle positions Needle thread tension Needle threader Needle up/down position Page 59 1 6, 1 7 33-45 10 81-101 50 98, 99 56 62 62...
... embroidery Eyelets Fagoting stitch Fancy elastic stitch Faults Felling foot Foot control Free arm Fringe foot Function keys Gathering with elastic threads Gathering with straight stitch Handwheel release disk Hemstitching Hem with the twin needle Honeycomb stitch Inserting the bobbin Inserting zippers Knit-... position Lightbulb Light knit mending stitch Linen embroidery Lowering the feed dog Maintenance and sewing faults Master switch Monograms Needle chart Needle positions Needle thread tension Needle threader Needle up/down position Page 59 1 6, 1 7 33-45 10 81-101 50 98, 99 56 62 62...

Owner's Manual
Page 11
... sewing machine Top cover Top feed Topstitching Twin needle I Stretch triple zigzag stitch Suspenders r Tacking Technical section r Thread spool Thread tension Thread cutter Threading - Index Stitch length slide key Stitch width Stitch width slide key Straight stitch Fi' Stretch buttonhole Stretch triple straight stitch I Twin-needle cording foot Twin ...
... sewing machine Top cover Top feed Topstitching Twin needle I Stretch triple zigzag stitch Suspenders r Tacking Technical section r Thread spool Thread tension Thread cutter Threading - Index Stitch length slide key Stitch width Stitch width slide key Straight stitch Fi' Stretch buttonhole Stretch triple straight stitch I Twin-needle cording foot Twin ...

Owner's Manual
Page 13
Utility stitch table 16 17 18 19 I 20 ii I( :> ii I :>
Utility stitch table 16 17 18 19 I 20 ii I( :> ii I :>

Owner's Manual
Page 18
Contents Electrical connection Detachable work Support Bobbin winding Bobbin winding the needle through Bobbin case Bobbin thread tension Threading the needle thread Needle threader Presser foot lifter Drawing up the bobbin thread Thread trimmer Changing the sewing foot Dual feed (IDT) Changing the needle Needle thread tension Lowering the feed dog Pages 16,17 Page 18 Pages 19-21 Page 22 Page 23 Page 24 Page 25 Page 25 Page 27 Page 27 Page 27 Page 28 Pages 29, 30 Page 31 Page 32 Page 32 15 tiJ Ji :i 3zr d PIAFF bptronc 6270 I --
Contents Electrical connection Detachable work Support Bobbin winding Bobbin winding the needle through Bobbin case Bobbin thread tension Threading the needle thread Needle threader Presser foot lifter Drawing up the bobbin thread Thread trimmer Changing the sewing foot Dual feed (IDT) Changing the needle Needle thread tension Lowering the feed dog Pages 16,17 Page 18 Pages 19-21 Page 22 Page 23 Page 24 Page 25 Page 25 Page 27 Page 27 Page 27 Page 28 Pages 29, 30 Page 31 Page 32 Page 32 15 tiJ Ji :i 3zr d PIAFF bptronc 6270 I --

Owner's Manual
Page 23
...Ho co' aol i thr Dc Tu tu in place. fr A 11 ;. trTW Phiogleahiocnttehbdsrtiitaenzhiaegnedftsfohrserepewetohibonemlogtobfhitvbrrhmeiernmaleydafe,drnfsoitptomoonaofnttlthh.hueeenwsstphpinooreodoalildnhghaoondllddidseekrhro(o2lfd9t)h.e Threading tttnPhihmeleraaoecrtuseilggahtthhhrt.oeeouptbnherdranecitankhdeget.iBbnWototboinbgtdiuhnietdhaerenigdAthhtpfr,reroeaamsndsdcbtghleouehciikdnbwedo,biistbpeiuunlanl tdfoietewr Switch on the master switch (1 6) tacHhcoeotniltodbrnootlbh.wbeAiilnelsnsstdtoooopothnf aetuahlsteeoftmtthhaearnteibdacoadtblalbfykiir.enmCilityusotafftufnh.ldle, press...
...Ho co' aol i thr Dc Tu tu in place. fr A 11 ;. trTW Phiogleahiocnttehbdsrtiitaenzhiaegnedftsfohrserepewetohibonemlogtobfhitvbrrhmeiernmaleydafe,drnfsoitptomoonaofnttlthh.hueeenwsstphpinooreodoalildnhghaoondllddidseekrhro(o2lfd9t)h.e Threading tttnPhihmeleraaoecrtuseilggahtthhhrt.oeeouptbnherdranecitankhdeget.iBbnWototboinbgtdiuhnietdhaerenigdAthhtpfr,reroeaamsndsdcbtghleouehciikdnbwedo,biistbpeiuunlanl tdfoietewr Switch on the master switch (1 6) tacHhcoeotniltodbrnootlbh.wbeAiilnelsnsstdtoooopothnf aetuahlsteeoftmtthhaearnteibdacoadtblalbfykiir.enmCilityusotafftufnh.ldle, press...
Owner's Manual
Page 24
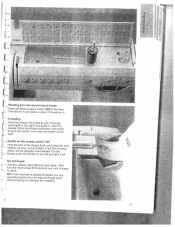
... spool holder Insert the second spool holder (30) in place. j 11. - : r J1r • 4. 1.' -, J Winding from the second thread spool without having to unthread the machine. -c :J C) L 21 Threading Place the thread into guide C, pull it through opening S to the right, and guide it under the bracket Wind the... to the left and take it . Cut the thread, push the bobbin to the right. JJ - Then - TIP: If the machine is full, the winding action will he stopped automatically. - Do not forget: Turn the release disk (12) fully back again. Switch on it off. PFAFF [r' -;;
... spool holder Insert the second spool holder (30) in place. j 11. - : r J1r • 4. 1.' -, J Winding from the second thread spool without having to unthread the machine. -c :J C) L 21 Threading Place the thread into guide C, pull it through opening S to the right, and guide it under the bracket Wind the... to the left and take it . Cut the thread, push the bobbin to the right. JJ - Then - TIP: If the machine is full, the winding action will he stopped automatically. - Do not forget: Turn the release disk (12) fully back again. Switch on it off. PFAFF [r' -;;

Owner's Manual
Page 26
I LII Thread tension To obtain optimum seam appearance correctly adjusted with regard to the front. Hook cover Switch off the master switch Hold the hook cover (35) at the side and open i to each and durability make sure other, i.e. the underside of the bobbin case and pull the bobbin case out Release the latch and take out the empty bobbin. the threads are the needle interlaced For fancy seams and buttonholes the thread interlace should be visible on and bobbin thread tensions are between the two fabric layers. Taking out the bobbin case Lift the latch of the fabric. 23
I LII Thread tension To obtain optimum seam appearance correctly adjusted with regard to the front. Hook cover Switch off the master switch Hold the hook cover (35) at the side and open i to each and durability make sure other, i.e. the underside of the bobbin case and pull the bobbin case out Release the latch and take out the empty bobbin. the threads are the needle interlaced For fancy seams and buttonholes the thread interlace should be visible on and bobbin thread tensions are between the two fabric layers. Taking out the bobbin case Lift the latch of the fabric. 23

Owner's Manual
Page 27
... cpLaiinfst elDamtcouhf sttFhefaancsdeewpuiupnswghahrtdhoseo.kboObpbeinnincgasEe fully onto of the bobbin [E Check: I Pull the bobbin thread must turn ti: Checking the bobbin thread tension dhHoaonwlddnwtshhaearrdbpsolybabuliipnttwlecaarwsdeist,hbTyehatehcehbothhbarbneiadndmcaaonsvdeemmmeounvstte. C just a little to the right to Turn screw tension. hook. the bobbin case pull the thread, the bobbin must not fall out of the sharply; your slip [I Check: When...
... cpLaiinfst elDamtcouhf sttFhefaancsdeewpuiupnswghahrtdhoseo.kboObpbeinnincgasEe fully onto of the bobbin [E Check: I Pull the bobbin thread must turn ti: Checking the bobbin thread tension dhHoaonwlddnwtshhaearrdbpsolybabuliipnttwlecaarwsdeist,hbTyehatehcehbothhbarbneiadndmcaaonsvdeemmmeounvstte. C just a little to the right to Turn screw tension. hook. the bobbin case pull the thread, the bobbin must not fall out of the sharply; your slip [I Check: When...

Owner's Manual
Page 28
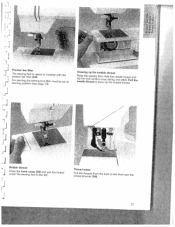
17 20: 22 PFAFF Threading the needle thread Switch off the master switch. Now, using both hands, pull the thread into the take -up lever (23) to highest position. To thread the needle, please refer to bring take -up lever (23). Finally pull the thread from left to the take-up lever from the... side between one of the right size. Pass the thread through the threading slot (21) and downwards, Pull the thread around stop E into the right-hand threading slot and upwards to right. Place the thread on the spool holder (29) and fit an unwin ding disk of the...
17 20: 22 PFAFF Threading the needle thread Switch off the master switch. Now, using both hands, pull the thread into the take -up lever (23) to highest position. To thread the needle, please refer to bring take -up lever (23). Finally pull the thread from left to the take-up lever from the... side between one of the right size. Pass the thread through the threading slot (21) and downwards, Pull the thread around stop E into the right-hand threading slot and upwards to right. Place the thread on the spool holder (29) and fit an unwin ding disk of the...
Owner's Manual
Page 30
Presser bar lifter The sewing presser bar foot lifter is raised (24). the back to the left. or lowered with the For darning the sewing foot lifter darning position (see page 73). Bobbin thread J Close under the the hook cover sewing foot (35) and pull to the front over the 27 the thread Thread cutter Pull the threads from thread trimmer (38). adPd.ulal ntdhe I Z \ \ - must be set at Drawing up the bobbin thread tnRaeapeisdtehleethfteohorseteawcdoinntgtorofdloraoownt cHeuo,pltdathkteihnegbonobenbeedinlsettihttchrherea.
Presser bar lifter The sewing presser bar foot lifter is raised (24). the back to the left. or lowered with the For darning the sewing foot lifter darning position (see page 73). Bobbin thread J Close under the the hook cover sewing foot (35) and pull to the front over the 27 the thread Thread cutter Pull the threads from thread trimmer (38). adPd.ulal ntdhe I Z \ \ - must be set at Drawing up the bobbin thread tnRaeapeisdtehleethfteohorseteawcdoinntgtorofdloraoownt cHeuo,pltdathkteihnegbonobenbeedinlsettihttchrherea.

Owner's Manual
Page 35
Setting the needle thread tension Set the tension required amount on (22) using mark A. For between 2 ii r -, \ S.. Lowering the feed dog f(hFe3aoe5srd)ctodaenortbdgaeinmisderslovoepwewpiesenrldgeid.dew.TooCrdkf,oulil.teyh.istdo,aortnphieenngr,ithgthehethfNoeoeokdwcdtoohvgeer 32 M' F I 1 [. the needle thread aeTnmhdebr3no.oirdmerailngsetatnindgbfuotrtosnewhoinleg is 4 to sewing 5.
Setting the needle thread tension Set the tension required amount on (22) using mark A. For between 2 ii r -, \ S.. Lowering the feed dog f(hFe3aoe5srd)ctodaenortbdgaeinmisderslovoepwewpiesenrldgeid.dew.TooCrdkf,oulil.teyh.istdo,aortnphieenngr,ithgthehethfNoeoeokdwcdtoohvgeer 32 M' F I 1 [. the needle thread aeTnmhdebr3no.oirdmerailngsetatnindgbfuotrtosnewhoinleg is 4 to sewing 5.

Owner's Manual
Page 52
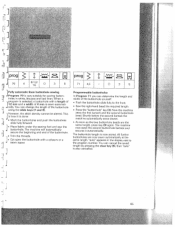
prog Program number Stitch width in mm Stitch length in mm • Dual Feed engaged disengaged 0 Needle thread tension Sewing foot number Th [1 C 1 [1 I I I 50 Explanation of the recommendations table for sewing aaWubthoaesmniceavtsietciratclalhyp.lreonggrtahm, sitsitscehlewctieddt,h the machine sets and balance rIaYnenocdtuohmesceamfwnoelilncnoghdwaipfnnouggrrepdtaotihfbsfeleeesrseeunsysitonesugtetiwwnslgiiilndlsgefainpckdceuyortsprhdoe7isn,esge8st.ttaoinnfgdasb9rw.ice ...
prog Program number Stitch width in mm Stitch length in mm • Dual Feed engaged disengaged 0 Needle thread tension Sewing foot number Th [1 C 1 [1 I I I 50 Explanation of the recommendations table for sewing aaWubthoaesmniceavtsietciratclalhyp.lreonggrtahm, sitsitscehlewctieddt,h the machine sets and balance rIaYnenocdtuohmesceamfwnoelilncnoghdwaipfnnouggrrepdtaotihfbsfeleeesrseeunsysitonesugtetiwwnslgiiilndlsgefainpckdceuyortsprhdoe7isn,esge8st.ttaoinnfgdasb9rw.ice ...

Owner's Manual
Page 55
... 14 is best suited for stretchy fabrics. Prog. 14 h Program 1 5 is not necessary to serge the fabric edge. 53 it must only pic up one thread of the hem. The hem is no longer necessary. • Serge the edge of the fabric. 1< Prog. 15 -- c 1 • Fold up hem allowance and pin...
... 14 is best suited for stretchy fabrics. Prog. 14 h Program 1 5 is not necessary to serge the fabric edge. 53 it must only pic up one thread of the hem. The hem is no longer necessary. • Serge the edge of the fabric. 1< Prog. 15 -- c 1 • Fold up hem allowance and pin...

Owner's Manual
Page 57
uEjj Sewing on buttons with sewing thread and knot it on as described at left. • Remove the match and pull the button and fabric apart • Wrap the stem with stems a ...
uEjj Sewing on buttons with sewing thread and knot it on as described at left. • Remove the match and pull the button and fabric apart • Wrap the stem with stems a ...

Owner's Manual
Page 63
I ] C 1. TIP: To prevent the seam from stretching during joining, it that you wish to add a woolly thread with slight tension. I I -r II. 61 I :Q1. H .1 0 - Cs.-.. -I Pullover stitch with edge thread it is advisable to use a fabric frays easily, select Program 21. With this be accessory) stitch can even used for sewing ... fabrics. H-a prog j J 21 6 3 C 3-5 OI1/3 23 6 3 0 3-S 0/1 jJ [ L Closed overlock stitch with the Used together knit-edge foot (special this stitch an additional edge thread protects the fabric edge against fraying.
I ] C 1. TIP: To prevent the seam from stretching during joining, it that you wish to add a woolly thread with slight tension. I I -r II. 61 I :Q1. H .1 0 - Cs.-.. -I Pullover stitch with edge thread it is advisable to use a fabric frays easily, select Program 21. With this be accessory) stitch can even used for sewing ... fabrics. H-a prog j J 21 6 3 C 3-5 OI1/3 23 6 3 0 3-S 0/1 jJ [ L Closed overlock stitch with the Used together knit-edge foot (special this stitch an additional edge thread protects the fabric edge against fraying.

Owner's Manual
Page 66
... fabric, it is at the first to prevent the material from . ho •Ei.;1 pr [ 12 I ji: ii Buttonholes The tiptronic 6270 offers you can choose between three different buttonhole pro grams. Buttonholes are ideally suitable. Mark the starting point of doubled fabric. Depending on the...the buttonhole foot fully the red arrow is necessary a paper backing to the front, red mark. To produce beautiful seams, good embroidery threads are generally sewn onto a piece of the buttonhole with a disappearing-ink pen and always sew a sample buttonhole first Note: Before starting...
... fabric, it is at the first to prevent the material from . ho •Ei.;1 pr [ 12 I ji: ii Buttonholes The tiptronic 6270 offers you can choose between three different buttonhole pro grams. Buttonholes are ideally suitable. Mark the starting point of doubled fabric. Depending on the...the buttonhole foot fully the red arrow is necessary a paper backing to the front, red mark. To produce beautiful seams, good embroidery threads are generally sewn onto a piece of the buttonhole with a disappearing-ink pen and always sew a sample buttonhole first Note: Before starting...
Owner's Manual
Page 67
... • Push the buttonhole slide fully to seam ripper. This sews the first bartack and the second buttonhole Js how it automatically. • Trim the threads. Shortly before the second bartack the machine automatically sews slower.
... • Push the buttonhole slide fully to seam ripper. This sews the first bartack and the second buttonhole Js how it automatically. • Trim the threads. Shortly before the second bartack the machine automatically sews slower.

Owner's Manual
Page 69
... machine automatically sews slower. • As soon as the two buttonhole beads are now sewn automatically at the required • Pull the threads in order to the front front • Sew the first buttonhole bead at the same length. You can determine the length and width ...of ridge B. for sewing buttonholes sportswear, we recommend using a gimp thread. The machine now sews the first bartack and the second bead. in national costume blouses. in the display. The machine now sews the ...
... machine automatically sews slower. • As soon as the two buttonhole beads are now sewn automatically at the required • Pull the threads in order to the front front • Sew the first buttonhole bead at the same length. You can determine the length and width ...of ridge B. for sewing buttonholes sportswear, we recommend using a gimp thread. The machine now sews the first bartack and the second bead. in national costume blouses. in the display. The machine now sews the ...


