

Owner's Manual
Page 4
... pattern" (16) Master switch (1 7) Accessory box (1 8> Sewing foot holder with sewing foot (1 9) Needle threader (20) Thread guides (21) Threading slot (22> Needle thread tension (23> Take-up lever (24) Presser bar lifter (25) Needle holder with set screw (26) Program key for tens digits (27) Thread guide for bobbin winding (28) Program table (29) Spool holder with unwinding disk (30) Second spare spool holder (31) Bobbin winder (32) Connection socket "lead cord" (33) Connection socket "foot controller" (34) Base plate (35) Hook cover (36) Free arm (37) Sewing lamp (38) Thread...
... pattern" (16) Master switch (1 7) Accessory box (1 8> Sewing foot holder with sewing foot (1 9) Needle threader (20) Thread guides (21) Threading slot (22> Needle thread tension (23> Take-up lever (24) Presser bar lifter (25) Needle holder with set screw (26) Program key for tens digits (27) Thread guide for bobbin winding (28) Program table (29) Spool holder with unwinding disk (30) Second spare spool holder (31) Bobbin winder (32) Connection socket "lead cord" (33) Connection socket "foot controller" (34) Base plate (35) Hook cover (36) Free arm (37) Sewing lamp (38) Thread...
Owner's Manual
Page 8
... needles Accessory compartment Adjusting slide keys Alphabet Appliqués Appliquefoot Applying patches Automatic darning Balance Balance slide key Bartack Basting stitch Bias tape binder Blind stitch Bobbin case Bobbin thread, raising the Bobbin thread tension Bobbin winding Bobbin winding through the needle Borders Braces Buttonhole balance Buttonholes Buttonhole, fully automatic Buttonhole with gimp thread Buttonhole, programmable Buttonhole/tacking/single pattern Carrycase Changing a sewing foot Changing the needle Changing the needle plate Cleaning and oiling Clear key Closed overlock...
... needles Accessory compartment Adjusting slide keys Alphabet Appliqués Appliquefoot Applying patches Automatic darning Balance Balance slide key Bartack Basting stitch Bias tape binder Blind stitch Bobbin case Bobbin thread, raising the Bobbin thread tension Bobbin winding Bobbin winding through the needle Borders Braces Buttonhole balance Buttonholes Buttonhole, fully automatic Buttonhole with gimp thread Buttonhole, programmable Buttonhole/tacking/single pattern Carrycase Changing a sewing foot Changing the needle Changing the needle plate Cleaning and oiling Clear key Closed overlock...

Owner's Manual
Page 9
... table Eyelet embroidery Eyelets Fagoting stitch Fancy elastic stitch Faults Felling foot Foot control Free arm Fringe foot Function keys Gathering with elastic threads Gathering with straight stitch Handwheel release disk Hemstitching Hem with the twin needle Honeycomb stitch Inserting the bobbin Inserting zippers Knit-edge foot Lacework Large-area embroidery Leather embroidery Left needle position Lightbulb Light knit mending stitch Linen embroidery Lowering the feed dog Maintenance and sewing faults Master switch Monograms Needle chart Needle positions Needle thread tension Needle...
... table Eyelet embroidery Eyelets Fagoting stitch Fancy elastic stitch Faults Felling foot Foot control Free arm Fringe foot Function keys Gathering with elastic threads Gathering with straight stitch Handwheel release disk Hemstitching Hem with the twin needle Honeycomb stitch Inserting the bobbin Inserting zippers Knit-edge foot Lacework Large-area embroidery Leather embroidery Left needle position Lightbulb Light knit mending stitch Linen embroidery Lowering the feed dog Maintenance and sewing faults Master switch Monograms Needle chart Needle positions Needle thread tension Needle...
Owner's Manual
Page 10
... 5 Reverse sewing Richelieu Right needle position Roll-hemming Ruffler ii 36 94 ti 38, 68 78 112 Safety notes Seam finishing stitches Semiautomatic processing of 2nd Serging with the overlook foot tack (buttonhole) Serging with zigzag stitch 7/9 hole foot I 57-63 66 52. 53 52 Sewing aids 114 Sewing chart 68 Sewing faults and their remedies Sewing feet (special accessories) Sewing feet (standard accessories) Sewing-function keys Sewing lamp Sewing on buttons Sewing with zigzag stitch Shell edging Shirring foot...
... 5 Reverse sewing Richelieu Right needle position Roll-hemming Ruffler ii 36 94 ti 38, 68 78 112 Safety notes Seam finishing stitches Semiautomatic processing of 2nd Serging with the overlook foot tack (buttonhole) Serging with zigzag stitch 7/9 hole foot I 57-63 66 52. 53 52 Sewing aids 114 Sewing chart 68 Sewing faults and their remedies Sewing feet (special accessories) Sewing feet (standard accessories) Sewing-function keys Sewing lamp Sewing on buttons Sewing with zigzag stitch Shell edging Shirring foot...

Owner's Manual
Page 11
Threading the needle thread Threading the sewing machine Top cover Top feed Topstitching Twin needle I Stretch triple zigzag stitch Suspenders r Tacking Technical section r Thread spool Thread tension Thread cutter Threading - Index Stitch length slide key Stitch width Stitch width slide key Straight stitch Fi' Stretch buttonhole Stretch triple straight stitch I Twin-needle cording foot Twin needle indicator Utility and decorative stitches Utility stitches Utility stitch table Winding from a second spool holder Zigzag stitch Page 37 38 37 51 67 57 58 89 36 1 3-32 20 23, 24...
Threading the needle thread Threading the sewing machine Top cover Top feed Topstitching Twin needle I Stretch triple zigzag stitch Suspenders r Tacking Technical section r Thread spool Thread tension Thread cutter Threading - Index Stitch length slide key Stitch width Stitch width slide key Straight stitch Fi' Stretch buttonhole Stretch triple straight stitch I Twin-needle cording foot Twin needle indicator Utility and decorative stitches Utility stitches Utility stitch table Winding from a second spool holder Zigzag stitch Page 37 38 37 51 67 57 58 89 36 1 3-32 20 23, 24...

Owner's Manual
Page 12
... 4 Blind stitch For sewing on elastic, darning tears, 6 and applying patches. zipper insertion, and special topstitching work. Utility stitch table 000102l03 'I 1 I J GD I I I i El) I I III I I 05O6l07lO8I09 10 ' ,,, III III I IA il I I I i I I I :' I I 08 Basting stitch For basting your sewing. - 09 Quilting or appliqué stitch For appliqués when quilting or pinstitching. 6 1 0 Zigzag stitch For serging and appliqué work 6 1 1 Zigzag stitch, needle position changeable from left 1 2 Zigzag stitch, For eyelet embroidery and cording work . 05...
... 4 Blind stitch For sewing on elastic, darning tears, 6 and applying patches. zipper insertion, and special topstitching work. Utility stitch table 000102l03 'I 1 I J GD I I I i El) I I III I I 05O6l07lO8I09 10 ' ,,, III III I IA il I I I i I I I :' I I 08 Basting stitch For basting your sewing. - 09 Quilting or appliqué stitch For appliqués when quilting or pinstitching. 6 1 0 Zigzag stitch For serging and appliqué work 6 1 1 Zigzag stitch, needle position changeable from left 1 2 Zigzag stitch, For eyelet embroidery and cording work . 05...

Owner's Manual
Page 13
Utility stitch table 16 17 18 19 I 20 ii I( :> ii I :>
Utility stitch table 16 17 18 19 I 20 ii I( :> ii I :>
Owner's Manual
Page 24
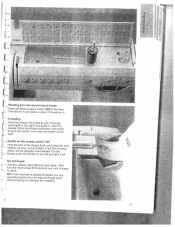
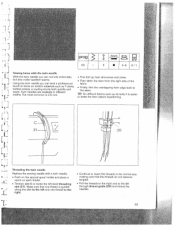
..., the winding action will he stopped automatically. JJ - Switch on it and place a spool of thread on the master switch (1 6) Hold the end of the thread firmly and press the foot control. Threading Place the thread into guide C, pull it through opening S to unthread the machine. -c :J C) L 21 As soon as the bobbin is already threaded, you until it snaps in the hole intended for it . PFAFF [r' -;;
..., the winding action will he stopped automatically. JJ - Switch on it and place a spool of thread on the master switch (1 6) Hold the end of the thread firmly and press the foot control. Threading Place the thread into guide C, pull it through opening S to unthread the machine. -c :J C) L 21 As soon as the bobbin is already threaded, you until it snaps in the hole intended for it . PFAFF [r' -;;
Owner's Manual
Page 40
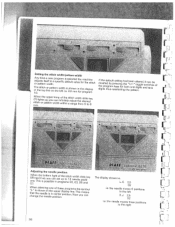
_ _ 1 I ' -_i 11 Cl the needle moves 6 positions to the left , i.e. the needle moves three positions to a specific or pattern width. Setting the stitch width/pattern width Any time a new program adjusts itself to the right 38 iii I --- is line on the left 3J 2,5 02 i.e. shown 3.0 mm in the top 10, or pattern width is selected the machine default value for program ms(W7tim)thcl.ehignhottrhsepuaput...
_ _ 1 I ' -_i 11 Cl the needle moves 6 positions to the left , i.e. the needle moves three positions to a specific or pattern width. Setting the stitch width/pattern width Any time a new program adjusts itself to the right 38 iii I --- is line on the left 3J 2,5 02 i.e. shown 3.0 mm in the top 10, or pattern width is selected the machine default value for program ms(W7tim)thcl.ehignhottrhsepuaput...
Owner's Manual
Page 41
The stitch length, 6,0 mm in this . Setting the stitch density Any time a new program is selected the machine adjusts itself to a specific default value for the stitch recalled by pressing the "+1-" toggle switches of the display in center position. case, is shown in the upper line of the program keys for both unit digits and tens When the upper lamp of -ii length or buttonhole length. If the...
The stitch length, 6,0 mm in this . Setting the stitch density Any time a new program is selected the machine adjusts itself to a specific default value for the stitch recalled by pressing the "+1-" toggle switches of the display in center position. case, is shown in the upper line of the program keys for both unit digits and tens When the upper lamp of -ii length or buttonhole length. If the...

Owner's Manual
Page 51
1 11 1j 1 j \ 4r - - Contents Sewing table Nonelastic stitches Elastic stitches Overlock stitches Covering stitches Buttonholes Sewing aids Hem with twin needle Gathering Smocking effect Darning Inserting zippers Rofl-hemming Lace processing Shell edging Page 50 Pages 51 to 56 Pages 57 to 63 Pages 60 and 61 Pages 62 and 63 Pages 64 to 67 Pages 68 Page 69 Pages 70 and 71 Page 72 Pages 73 to 75 Pages 76 and 77 Page 78 Page 79 Page 80 49
1 11 1j 1 j \ 4r - - Contents Sewing table Nonelastic stitches Elastic stitches Overlock stitches Covering stitches Buttonholes Sewing aids Hem with twin needle Gathering Smocking effect Darning Inserting zippers Rofl-hemming Lace processing Shell edging Page 50 Pages 51 to 56 Pages 57 to 63 Pages 60 and 61 Pages 62 and 63 Pages 64 to 67 Pages 68 Page 69 Pages 70 and 71 Page 72 Pages 73 to 75 Pages 76 and 77 Page 78 Page 79 Page 80 49

Owner's Manual
Page 57
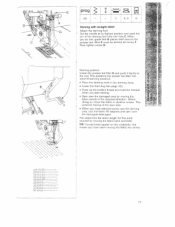
... you lower the feed dog. TIP: You can sew on two and four hole buttons with sewing thread and knot it uEjj Sewing on buttons with stems a Attach sewing foot no problem at left hole in the button. 1.J iii t 1 ii I 1-1 Ji Sewing on buttons With Program 74 you can sew on buttons easier still if you and position the button so that the needle also enters the right hole in the button. • Now lower the presser bar...
... you lower the feed dog. TIP: You can sew on two and four hole buttons with sewing thread and knot it uEjj Sewing on buttons with stems a Attach sewing foot no problem at left hole in the button. 1.J iii t 1 ii I 1-1 Ji Sewing on buttons With Program 74 you can sew on buttons easier still if you and position the button so that the needle also enters the right hole in the button. • Now lower the presser bar...

Owner's Manual
Page 63
... the seam from stretching during joining, it is advisable to add a woolly thread with edge thread it that you wish to use a fabric frays easily, select Program 21. I ] C 1. H .1 0 - H-a prog j J 21 6 3 C 3-5 OI1/3 23 6 3 0 3-S 0/1 jJ [ L Closed overlock stitch with slight tension. With this be accessory) stitch can even used for sewing open-knit fabrics. I I Pullover stitch with the Used together knit-edge foot (special this stitch an additional edge thread protects the fabric...
... the seam from stretching during joining, it is advisable to add a woolly thread with edge thread it that you wish to use a fabric frays easily, select Program 21. I ] C 1. H .1 0 - H-a prog j J 21 6 3 C 3-5 OI1/3 23 6 3 0 3-S 0/1 jJ [ L Closed overlock stitch with slight tension. With this be accessory) stitch can even used for sewing open-knit fabrics. I I Pullover stitch with the Used together knit-edge foot (special this stitch an additional edge thread protects the fabric...
Owner's Manual
Page 71
... hem allowance and press. but also make topstitch seams. • Then stitch the hem from the right side of the •i Using the twin needle you can lend a professional touch to hems on stretch materials such as rib knits it is easier to baste the hem before topstitching. 20 1 Threading the twin needle Replace the sewing needle with a twin needle. • Push on the second spool holder and place a spool on each holder. • Tension...
... hem allowance and press. but also make topstitch seams. • Then stitch the hem from the right side of the •i Using the twin needle you can lend a professional touch to hems on stretch materials such as rib knits it is easier to baste the hem before topstitching. 20 1 Threading the twin needle Replace the sewing needle with a twin needle. • Push on the second spool holder and place a spool on each holder. • Tension...
Owner's Manual
Page 73
... fabric. Mark the first gathering row on the elastic thread. Lower the sewing foot again and sew a few staing stitches using Program 24, then leave the needle down in this foot guide the elastic evenly during the sewing action. 71 The needle must not a wound onto the bobbin. 7 Gathering with elastic threads. The elastic thread must be at II with elastic threads athering sleeves or waist seams is also ideal for gathering. TIP: The pintuck foot (special accessory...
... fabric. Mark the first gathering row on the elastic thread. Lower the sewing foot again and sew a few staing stitches using Program 24, then leave the needle down in this foot guide the elastic evenly during the sewing action. 71 The needle must not a wound onto the bobbin. 7 Gathering with elastic threads. The elastic thread must be at II with elastic threads athering sleeves or waist seams is also ideal for gathering. TIP: The pintuck foot (special accessory...
Owner's Manual
Page 75
... you start sewing. • Darn over the damaged area again. p rog I Darning with straight stitch Attach the darning foot: Set the needle at its highest position and push tne pin of the darn Inter. • When you have been moving the fabric back and forth. When doing so, move the fabric in the darning hoop. • Lower the feed dog (see page 32). • Draw up the bobbin thread and hold the threads when...
... you start sewing. • Darn over the damaged area again. p rog I Darning with straight stitch Attach the darning foot: Set the needle at its highest position and push tne pin of the darn Inter. • When you have been moving the fabric back and forth. When doing so, move the fabric in the darning hoop. • Lower the feed dog (see page 32). • Draw up the bobbin thread and hold the threads when...

Owner's Manual
Page 78
... of the zipper teeth. If the foot is engaged on one of the 1 3 needle positions vot car also set the needie a', tin' required positon - For all other materials. ___ _____ / / / / I pro ---1 [ Inserting zippers conceaied on both sides, and for all types of zippers it enters close to the teeth of the zipper. Using one side. This is important to sew right up...
... of the zipper teeth. If the foot is engaged on one of the 1 3 needle positions vot car also set the needie a', tin' required positon - For all other materials. ___ _____ / / / / I pro ---1 [ Inserting zippers conceaied on both sides, and for all types of zippers it enters close to the teeth of the zipper. Using one side. This is important to sew right up...
Owner's Manual
Page 110
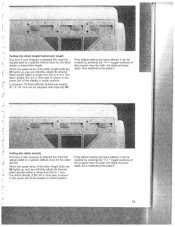
... down" function to 58'. - This makes them very suitable for the zigzag seam. The fabric must be placed frilit under tire sewing foot • Sew aiorrg tOe edge with narrow and dense gzag stitches When you can obtain variations galore You can make sure lii' needle 'asses tire outer edqe so that any letters or numbers have to the ri iht...
... down" function to 58'. - This makes them very suitable for the zigzag seam. The fabric must be placed frilit under tire sewing foot • Sew aiorrg tOe edge with narrow and dense gzag stitches When you can obtain variations galore You can make sure lii' needle 'asses tire outer edqe so that any letters or numbers have to the ri iht...

Owner's Manual
Page 115
...-type guide and pull it tiiruinqh the front • The tiptronic 6270 offers fancy stitches with various fancy stitches Pearl thread and • Thread tim cording or tape from top to sew over or ribbon, with a width of 6 mm. L cc -e r 114 F L. loosely twisted wool( or a narrow tape, 7 threads or mercerized cotton can he sewn over the 7 threads, i.e. the holes from the front into the embroidery...
...-type guide and pull it tiiruinqh the front • The tiptronic 6270 offers fancy stitches with various fancy stitches Pearl thread and • Thread tim cording or tape from top to sew over or ribbon, with a width of 6 mm. L cc -e r 114 F L. loosely twisted wool( or a narrow tape, 7 threads or mercerized cotton can he sewn over the 7 threads, i.e. the holes from the front into the embroidery...

Owner's Manual
Page 124
... Remove needle plate. Thread is sewn unevenly The tension needs adjusting. Seam is poor or has has become dry after slubs in toolong it you insert the bobbin clicks in use perfect threads. loose thread and apply one drop of fabric. TbNheeeceadbuloesbebisiynobuecnaatsreeanpisdulnlhionatgsphrooirtptpehurelsyhniiennegsdetlrheteedp.flaabteric. 4. See needle chart (page 1 1 8/11 9). When until it , or storage. Needle thread breaks See reasons above. Input required program again. master switch. This is bent. Let the machine feed...
... Remove needle plate. Thread is sewn unevenly The tension needs adjusting. Seam is poor or has has become dry after slubs in toolong it you insert the bobbin clicks in use perfect threads. loose thread and apply one drop of fabric. TbNheeeceadbuloesbebisiynobuecnaatsreeanpisdulnlhionatgsphrooirtptpehurelsyhniiennegsdetlrheteedp.flaabteric. 4. See needle chart (page 1 1 8/11 9). When until it , or storage. Needle thread breaks See reasons above. Input required program again. master switch. This is bent. Let the machine feed...


