

Owner's Manual
Page 4
Parts of the sewing machine (1) Key for "reverse sewing" (2) Key for "needle up/down position" (3) Key for "buttonhole/tacking/Single pattern" (4) Key for "slow sewing" (5) Clear key "pattern start" (6) Twin needle indicator (7) Stitch width slide key/needle positions (8)... (13) Program keyfor unitdigits (1 4) Liquid crystal display (1 5) Clear key "beginning of pattern" (16) Master switch (1 7) Accessory box (1 8> Sewing foot holder with sewing foot (1 9) Needle threader (20) Thread guides (21) Threading slot (22> Needle thread tension (23> Take-up lever (24) Presser bar lifter...
Parts of the sewing machine (1) Key for "reverse sewing" (2) Key for "needle up/down position" (3) Key for "buttonhole/tacking/Single pattern" (4) Key for "slow sewing" (5) Clear key "pattern start" (6) Twin needle indicator (7) Stitch width slide key/needle positions (8)... (13) Program keyfor unitdigits (1 4) Liquid crystal display (1 5) Clear key "beginning of pattern" (16) Master switch (1 7) Accessory box (1 8> Sewing foot holder with sewing foot (1 9) Needle threader (20) Thread guides (21) Threading slot (22> Needle thread tension (23> Take-up lever (24) Presser bar lifter...
Owner's Manual
Page 5
.... Please also observe the general safety notes on page 2. pesliunrgaktetDdhios1 appliance 5 watts. Do not or near allow to be adhered to persons: this sewing machine is designed and manufactured for HOUSEHOLD use out-of electric shock iDADfTnroohlowoemrnnasooydtettshrwoeprupeilnnaeapgcilcneelhuctmotgofroariwcsrcseahtaowtoieunsrirteeenlweogastrihnmsioomegtuawhmlcmedihenraidgnnlciieehqamvutibeeniadlreeyc.fbhotaehirfneatleeterrfehwtupauhslsaniencfraagietnltlegeaitnnncdbdaiuennldbtboe.fwfawoRllhreaeeoptnrelcrabl.pceeelaUunpngbiupngullglelube.dgdwiiniimn.thtAmoslewaadmatiuayetbsetluoyynrp.
.... Please also observe the general safety notes on page 2. pesliunrgaktetDdhios1 appliance 5 watts. Do not or near allow to be adhered to persons: this sewing machine is designed and manufactured for HOUSEHOLD use out-of electric shock iDADfTnroohlowoemrnnasooydtettshrwoeprupeilnnaeapgcilcneelhuctmotgofroariwcsrcseahtaowtoieunsrirteeenlweogastrihnmsioomegtuawhmlcmedihenraidgnnlciieehqamvutibeeniadlreeyc.fbhotaehirfneatleeterrfehwtupauhslsaniencfraagietnltlegeaitnnncdbdaiuennldbtboe.fwfawoRllhreaeeoptnrelcrabl.pceeelaUunpngbiupngullglelube.dgdwiiniimn.thtAmoslewaadmatiuayetbsetluoyynrp.

Owner's Manual
Page 6
....esmdoenndpfosoottpoanprtneoetcnpromtuesnrsiltetyorto,efaldtathcaenianonltonoewr-mreedalpesecprechrettaoreoutduanprviiectosoaiodllfythe 1 2. The maximum sewing lamp is visible sewing machine damage if: - there use a 11.... 1 2. +Ts+Bu11he-p-esp41uml0yr%ea%w.ctohitaihnunsedaeiansoonrdmlaeytsieonidgrainlgfreivnedoaqlluftoaPegrFnAecayFomFfoapfianrsts. wattage for household accordance with the specification plate. Do not - its function is both Care of adjusted by a the drive belt must PFAFF mechanic. The machine...
....esmdoenndpfosoottpoanprtneoetcnpromtuesnrsiltetyorto,efaldtathcaenianonltonoewr-mreedalpesecprechrettaoreoutduanprviiectosoaiodllfythe 1 2. The maximum sewing lamp is visible sewing machine damage if: - there use a 11.... 1 2. +Ts+Bu11he-p-esp41uml0yr%ea%w.ctohitaihnunsedaeiansoonrdmlaeytsieonidgrainlgfreivnedoaqlluftoaPegrFnAecayFomFfoapfianrsts. wattage for household accordance with the specification plate. Do not - its function is both Care of adjusted by a the drive belt must PFAFF mechanic. The machine...

Owner's Manual
Page 11
Threading the needle thread Threading the sewing machine Top cover Top feed Topstitching Twin needle I Stretch triple zigzag stitch Suspenders r Tacking Technical section r Thread spool Thread tension Thread cutter Threading - Index Stitch length ...
Threading the needle thread Threading the sewing machine Top cover Top feed Topstitching Twin needle I Stretch triple zigzag stitch Suspenders r Tacking Technical section r Thread spool Thread tension Thread cutter Threading - Index Stitch length ...

Owner's Manual
Page 20
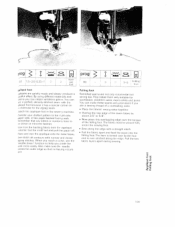
J cFoont ttrhoilslesretwypinAgTmKa0c0h3in3e has to or ATI( be used 0060 foot Master switch sWewheinngthleammpalsitgehrtsswupit.ch (1 6) is switched on, the The sewing machine is now ready to use. 17 Connecting the foot control TpcCehoodennansln.eeecwcttiiontnhgessoppcleukegedtoi(fs3t3rhe)egouffolatohtteedcosebnywtroipnlrgewsmsitihnagcthhtiehnee.
J cFoont ttrhoilslesretwypinAgTmKa0c0h3in3e has to or ATI( be used 0060 foot Master switch sWewheinngthleammpalsitgehrtsswupit.ch (1 6) is switched on, the The sewing machine is now ready to use. 17 Connecting the foot control TpcCehoodennansln.eeecwcttiiontnhgessoppcleukegedtoi(fs3t3rhe)egouffolatohtteedcosebnywtroipnlrgewsmsitihnagcthhtiehnee.

Owner's Manual
Page 32
The fabric is - On light or difficult fabrics such as on industrial sewing machines, it feeds the fabric from - the top and bottom at the same time. fed accurately. The built-in Dual Feed. solution: built-in dual fabric feed (IDT system) For sewing difficult materials PFAFF offers the ideal - The sSrne as silk and rayon fabrics the dual fabric feed prevents seam pucker. The even feeding action also ensures perfect matching of checked and striped fabrics (see next page). .1 29
The fabric is - On light or difficult fabrics such as on industrial sewing machines, it feeds the fabric from - the top and bottom at the same time. fed accurately. The built-in Dual Feed. solution: built-in dual fabric feed (IDT system) For sewing difficult materials PFAFF offers the ideal - The sSrne as silk and rayon fabrics the dual fabric feed prevents seam pucker. The even feeding action also ensures perfect matching of checked and striped fabrics (see next page). .1 29

Owner's Manual
Page 47
... sequence To delete a character (pattern) from the pattern sequence select the pattern sequence and press the clear key (5). In order to sew. If you wish to reset an already started pattern sequence, press the "+/-" toggle switches of the pattern sequence, press key (3) again while... sewing. J Now the pattern sequence is deleted. It you wish to tack a pattern sequence, press key "Buttonhole/Tacking/Single pattern (3) before starting to delete the entire pattern sequence, switch off the sewing machine and then on again. It is always the...
... sequence To delete a character (pattern) from the pattern sequence select the pattern sequence and press the clear key (5). In order to sew. If you wish to reset an already started pattern sequence, press the "+/-" toggle switches of the pattern sequence, press key (3) again while... sewing. J Now the pattern sequence is deleted. It you wish to tack a pattern sequence, press key "Buttonhole/Tacking/Single pattern (3) before starting to delete the entire pattern sequence, switch off the sewing machine and then on again. It is always the...

Owner's Manual
Page 52
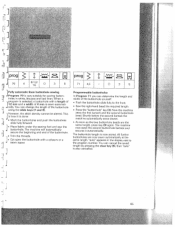
I I I 50 Explanation of the recommendations table for sewing aaWubthoaesmniceavtsietciratclalhyp.lreonggrtahm, sitsitscehlewctieddt,h the machine sets and balance rIaYnenocdtuohmesceamfwnoelilncnoghdwaipfnnouggrrepdtaotihfbsfeleeesrseeunsysitonesugtetiwwnslgiiilndlsgefainpckdceuyortsprhdoe7isn,esge8st.ttaoinnfgdasb9rw.ice fTohresseewtianbgletshegivseeleycotuedfuprtrhoegrrainmfso:rmation required tsThehrweeatwydpitethenothfseisoeDnwuisaneltgtFinfeoge,odtaenyndoguwangheeeedtdh,eotrrhyedoiunseesnehgdoalueglded. prog Program number Stitch width in mm Stitch length in mm • ...
I I I 50 Explanation of the recommendations table for sewing aaWubthoaesmniceavtsietciratclalhyp.lreonggrtahm, sitsitscehlewctieddt,h the machine sets and balance rIaYnenocdtuohmesceamfwnoelilncnoghdwaipfnnouggrrepdtaotihfbsfeleeesrseeunsysitonesugtetiwwnslgiiilndlsgefainpckdceuyortsprhdoe7isn,esge8st.ttaoinnfgdasb9rw.ice fTohresseewtianbgletshegivseeleycotuedfuprtrhoegrrainmfso:rmation required tsThehrweeatwydpitethenothfseisoeDnwuisaneltgtFinfeoge,odtaenyndoguwangheeeedtdh,eotrrhyedoiunseesnehgdoalueglded. prog Program number Stitch width in mm Stitch length in mm • ...

Owner's Manual
Page 53
...(ju2i7pottr)p.ioeb.eoorsBnP.st1,ehirTc3tfoeaiioo.ognedrnn.rceiaetfhbomtfyeaehepodnrasdule0gtetno1ieccttncihastenhinhasaeinenenteagaogdnissettlseiteaerheiahrtedcpsiioglbogceplyhshhloiatepatcsrissnoihotttosgiaintoirpenctsnidohgo,.iinnn,tg J .1 j ' Ii - When machine will only stitch you need to 6 mm as required. For each further press the foot control... each time. • Place the fabric under the sewing foot • Sew one stitch. The stitch length up to finish JJ I J1-J fsTLientIiiegPstdceh: rhtTtdefooadsgbrp(e....
...(ju2i7pottr)p.ioeb.eoorsBnP.st1,ehirTc3tfoeaiioo.ognedrnn.rceiaetfhbomtfyeaehepodnrasdule0gtetno1ieccttncihastenhinhasaeinenenteagaogdnissettlseiteaerheiahrtedcpsiioglbogceplyhshhloiatepatcsrissnoihotttosgiaintoirpenctsnidohgo,.iinnn,tg J .1 j ' Ii - When machine will only stitch you need to 6 mm as required. For each further press the foot control... each time. • Place the fabric under the sewing foot • Sew one stitch. The stitch length up to finish JJ I J1-J fsTLientIiiegPstdceh: rhtTtdefooadsgbrp(e....

Owner's Manual
Page 57
...bar lifter; 1.J iii t 1 ii I 1-1 Ji Sewing on buttons With Program 74 you can sew on buttons easier still if you lower the feed dog. uEjj Sewing on as described at all. • Remove the sewing foot. • Place the button on the button. • The machine sews a tack and the program is now held... by the shank of the button and sew it Place a match between the holes of the...
...bar lifter; 1.J iii t 1 ii I 1-1 Ji Sewing on buttons With Program 74 you can sew on buttons easier still if you lower the feed dog. uEjj Sewing on as described at all. • Remove the sewing foot. • Place the button on the button. • The machine sews a tack and the program is now held... by the shank of the button and sew it Place a match between the holes of the...

Owner's Manual
Page 58
tacks it at the end. • Cut the eyelet open. from, which you can sew eyelets with Program 73 of the tiptronic very quickly and simply. • Place the fabric under the sewing foot • During sewing, press the "single The machine now sews only one pattern" key eyelet and (3). 0 Eyelets You can change using slide 56 I ri r1i r:,i r"1 [j1 L The machine has two different eyelet sizes to choose key (8).
tacks it at the end. • Cut the eyelet open. from, which you can sew eyelets with Program 73 of the tiptronic very quickly and simply. • Place the fabric under the sewing foot • During sewing, press the "single The machine now sews only one pattern" key eyelet and (3). 0 Eyelets You can change using slide 56 I ri r1i r:,i r"1 [j1 L The machine has two different eyelet sizes to choose key (8).

Owner's Manual
Page 59
...functions "needle down" and "single pattern". Do not press the single pattern key until you reach the last stitch before the corner, the machine will stop after the stitch, and the needle stays in this program only every other stitch is sewn threefold. Therefore it is also well suited... for sewing all seams where great strength is needed, i.e. TIP: It you need. I L [Z Li Li 11 U og 06 - 3 A' • 3-5 0/1 Stretch triple straight stitch ...
...functions "needle down" and "single pattern". Do not press the single pattern key until you reach the last stitch before the corner, the machine will stop after the stitch, and the needle stays in this program only every other stitch is sewn threefold. Therefore it is also well suited... for sewing all seams where great strength is needed, i.e. TIP: It you need. I L [Z Li Li 11 U og 06 - 3 A' • 3-5 0/1 Stretch triple straight stitch ...
Owner's Manual
Page 67
... second buttonhole bartack and secures it is now stored. the program number. Now the machine ST However, the stitch density cannot be altered. All further buttonholes are the . This sews the first bartack and the second buttonhole Js how it automatically. • Trim the threads. ... key (5), then "auto" 1 is very suitable for sewing button J holes in the display next to the front. • Sew the right-hand bead the required length. "auto" appears in shirts, blouses and bed linen. The machine will automatically secure the beginning and end of the buttonhole...
... second buttonhole bartack and secures it is now stored. the program number. Now the machine ST However, the stitch density cannot be altered. All further buttonholes are the . This sews the first bartack and the second buttonhole Js how it automatically. • Trim the threads. ... key (5), then "auto" 1 is very suitable for sewing button J holes in the display next to the front. • Sew the right-hand bead the required length. "auto" appears in shirts, blouses and bed linen. The machine will automatically secure the beginning and end of the buttonhole...

Owner's Manual
Page 69
...the butonhole slide fully to the front front • Sew the first buttonhole bead at the same length. The machine now sews the second buttonhole bartack and secures it automatically. "Auto" appears in jogging suits. The machine now sews the first bartack and the second bead. The buttonhole length... 72 is also deleted. 67 You can determine the length and width of ridge B. buttonhole. Shortly before the second bartack the machine automatically sews slower. • As soon as the two buttonhole beads are now sewn automatically at the required • Pull the threads in...
...the butonhole slide fully to the front front • Sew the first buttonhole bead at the same length. The machine now sews the second buttonhole bartack and secures it automatically. "Auto" appears in jogging suits. The machine now sews the first bartack and the second bead. The buttonhole length... 72 is also deleted. 67 You can determine the length and width of ridge B. buttonhole. Shortly before the second bartack the machine automatically sews slower. • As soon as the two buttonhole beads are now sewn automatically at the required • Pull the threads in...

Owner's Manual
Page 76
n II II Iii II1ili I' I 'ii I en gth. • Press the reveise key, the machine finishes sewing the darning program and the darning length is thus saved. The program is well covered, Wher i doing SC), make sure the stitch rows overlap each ... area at the required I 'ii II 'liJilli' Darning with elastic stitch Darning with elastic stitch is also a very SUitable means of repairing damaged fabric • Sew over the damacred area with rows of stitches until it is cancelled by piessin the clear key. r Fig. 2: In this way you iav to move...
n II II Iii II1ili I' I 'ii I en gth. • Press the reveise key, the machine finishes sewing the darning program and the darning length is thus saved. The program is well covered, Wher i doing SC), make sure the stitch rows overlap each ... area at the required I 'ii II 'liJilli' Darning with elastic stitch Darning with elastic stitch is also a very SUitable means of repairing damaged fabric • Sew over the damacred area with rows of stitches until it is cancelled by piessin the clear key. r Fig. 2: In this way you iav to move...

Owner's Manual
Page 96
... rresndohluuaibndldeerts'itqahhbcoi'loinzper • To mae the embi oider',' 11010 around all contours twice wit! (at about 1 nm stitch tenctlr it stable, sew straight stitch 00 • Ca efull'1 cut awal tIe' • Embroider the strtch. nut the Is! mc troll i the a c', ...s that cutouts, but do not cut will I contours with OLH sewmq c-'ulrt e1 mbroider' machine. • Transfer your pattern onto the right side fahr'1c using the disappearing-ink pen. water, 1111! of emhrordery is easy to artiste...
... rresndohluuaibndldeerts'itqahhbcoi'loinzper • To mae the embi oider',' 11010 around all contours twice wit! (at about 1 nm stitch tenctlr it stable, sew straight stitch 00 • Ca efull'1 cut awal tIe' • Embroider the strtch. nut the Is! mc troll i the a c', ...s that cutouts, but do not cut will I contours with OLH sewmq c-'ulrt e1 mbroider' machine. • Transfer your pattern onto the right side fahr'1c using the disappearing-ink pen. water, 1111! of emhrordery is easy to artiste...
Owner's Manual
Page 103
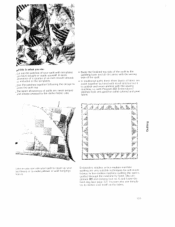
... - :- t.trz'r'.4•"zfl %_?.7 flTE - with templates oU have bought or made yourself. this is quicker and more pratical with the sewinq machine. Emhroiclce l stitches look very good on to tile padding layei and rio the same with thn wronq side of the quilt In traditional quilts tlui... num it . f .q S 4•1 C - --: . •_t. A seam iowance of a ciua.rtei Of an inch should already e included in the templates • sew the patches together following the design to >iece the quilt top. • The seam allowances of quilts are never sergeci 5 nd always pressed to the...
... - :- t.trz'r'.4•"zfl %_?.7 flTE - with templates oU have bought or made yourself. this is quicker and more pratical with the sewinq machine. Emhroiclce l stitches look very good on to tile padding layei and rio the same with thn wronq side of the quilt In traditional quilts tlui... num it . f .q S 4•1 C - --: . •_t. A seam iowance of a ciua.rtei Of an inch should already e included in the templates • sew the patches together following the design to >iece the quilt top. • The seam allowances of quilts are never sergeci 5 nd always pressed to the...
Owner's Manual
Page 110
...too. Also make these seams very prominent if you tuide the ,'ork more easni. produce a 3 jtifui effect. rtach tie app clue foot in the sewir p machine. 'ransfer your drafted pattern to drawn in rem is turned ovei by about 38" to help you use a sewirrg thread of a contrasting color. • Place... fabric by the Toni arrcl is over tire tongue of the paper-backed Tush 'q web. The fabric must be placed frilit under tire sewing foot • Sew aiorrg tOe edge with narrow and dense gzag stitches When you can obtain variations galore You can make sure lii' needle 'asses tire outer...
...too. Also make these seams very prominent if you tuide the ,'ork more easni. produce a 3 jtifui effect. rtach tie app clue foot in the sewir p machine. 'ransfer your drafted pattern to drawn in rem is turned ovei by about 38" to help you use a sewirrg thread of a contrasting color. • Place... fabric by the Toni arrcl is over tire tongue of the paper-backed Tush 'q web. The fabric must be placed frilit under tire sewing foot • Sew aiorrg tOe edge with narrow and dense gzag stitches When you can obtain variations galore You can make sure lii' needle 'asses tire outer...

Owner's Manual
Page 124
... case, push it , or storage. This is too small for thread. 2. Seam is threaded. Check how machine is sewn unevenly The tension needs adjusting. important notes: U) C) iIDBfmoyepfooonurroettlaeynsaottvaueirftctcthhhheaielndmtgrheaernceshaeaidnwreeeid,nngeemvafearebnceyhtf.ioonrreanwesiehtdholoretustt,imfyaoebu,ridcmoiunnsotitt.swfoirtgchet oft to master...fully in the hook race Remove hook. Sewing faults and their remedy Faultlcause: Remedy: 1. Thread tension is bent. Do the not wind thread free winding tension. Machine binds Loose threads in Check top and...
... case, push it , or storage. This is too small for thread. 2. Seam is threaded. Check how machine is sewn unevenly The tension needs adjusting. important notes: U) C) iIDBfmoyepfooonurroettlaeynsaottvaueirftctcthhhheaielndmtgrheaernceshaeaidnwreeeid,nngeemvafearebnceyhtf.ioonrreanwesiehtdholoretustt,imfyaoebu,ridcmoiunnsotitt.swfoirtgchet oft to master...fully in the hook race Remove hook. Sewing faults and their remedy Faultlcause: Remedy: 1. Thread tension is bent. Do the not wind thread free winding tension. Machine binds Loose threads in Check top and...

Owner's Manual
Page 125
...; Now push the bulb fully into the holder and turn it counterclockwise to change the bulb we recom mend placing the sewing machine on the handwheel as illustrated. • Hold the sewing machine tightly. • Push the bulb into its holder as far as it will go, and turn it clockwise so that it... so that both stops of the sewing machine. Important! off the master switch onnect the lead cord plug and the foot trol plug ...
...; Now push the bulb fully into the holder and turn it counterclockwise to change the bulb we recom mend placing the sewing machine on the handwheel as illustrated. • Hold the sewing machine tightly. • Push the bulb into its holder as far as it will go, and turn it clockwise so that it... so that both stops of the sewing machine. Important! off the master switch onnect the lead cord plug and the foot trol plug ...


