

Owner's Manual
Page 4
... sewing machine (models 6232 and 6152) (1> Key for "stow sewing" (model 6232) (2) Key for "needle down position" (model 6232) (3) Key for "tacking" (model 6232) (4) Carrying handle (5) Handwheel (6) Handwheel release disk (7) Fancy stitch knob (8) Main switch (9) Connection socket "foot control with mains cord" (model 6152)... (10) Touch controls (11) Stitch length knob (12) Connection socket "foot control" (model 6232) (13) Base plate (14) Detachable work support (15) Sewing foot holder with sewing foot (16) Needle threader (17) Threading slit...
... sewing machine (models 6232 and 6152) (1> Key for "stow sewing" (model 6232) (2) Key for "needle down position" (model 6232) (3) Key for "tacking" (model 6232) (4) Carrying handle (5) Handwheel (6) Handwheel release disk (7) Fancy stitch knob (8) Main switch (9) Connection socket "foot control with mains cord" (model 6152)... (10) Touch controls (11) Stitch length knob (12) Connection socket "foot control" (model 6232) (13) Base plate (14) Detachable work support (15) Sewing foot holder with sewing foot (16) Needle threader (17) Threading slit...

Owner's Manual
Page 5
... reach for examination, repair, electrical or mechanical adjustment. 4. Return the appliance to break. 1 5. Always use outdoors. 7. Switch the sewing machine off ("0") position, then remove plug from the electric outlet when removing covers, lubricating, or when making any air openings blocked. Keep ventilation...and before cleaning it has been dropped or damaged, or dropped into water or other user servicing adjustments mentioned in this sewing machine. Do not allow plug to off ("0") when making any object into cord reel. Do not operate where aerosol spray...
... reach for examination, repair, electrical or mechanical adjustment. 4. Return the appliance to break. 1 5. Always use outdoors. 7. Switch the sewing machine off ("0") position, then remove plug from the electric outlet when removing covers, lubricating, or when making any air openings blocked. Keep ventilation...and before cleaning it has been dropped or damaged, or dropped into water or other user servicing adjustments mentioned in this sewing machine. Do not allow plug to off ("0") when making any object into cord reel. Do not operate where aerosol spray...

Owner's Manual
Page 6
...with condensation which can reach up and down move ment of the drive belt must constantly observe the sewing area while sewing. 2. The machine is visible damage its cord. 9. This sewing machine is wet, e.g. static electricity, heat-radiating objects, corro sive chemicals or liquids. Do not use... PFAFF parts. 1 2. It should not be subjected to use a soft cloth with a nominal voltage of +1- 10% and a rated frequency of the soc ket by it is a high-quality electro nic-mechanical device. Cleaning Housing and display: To clean the housing, use the sewing machine if...
...with condensation which can reach up and down move ment of the drive belt must constantly observe the sewing area while sewing. 2. The machine is visible damage its cord. 9. This sewing machine is wet, e.g. static electricity, heat-radiating objects, corro sive chemicals or liquids. Do not use... PFAFF parts. 1 2. It should not be subjected to use a soft cloth with a nominal voltage of +1- 10% and a rated frequency of the soc ket by it is a high-quality electro nic-mechanical device. Cleaning Housing and display: To clean the housing, use the sewing machine if...
Owner's Manual
Page 7
... a button Congratulations! If you . So get ready to read through thick and thin for you have some fun! Your PFAFF dealer is worth it! You have a great time turning your PFAFF sewing machine itself. Your new sewing machine can go wrong. And have purchased a top-quality product which features unique advantages. Modern and uncomplicated - If you...
... a button Congratulations! If you . So get ready to read through thick and thin for you have some fun! Your PFAFF dealer is worth it! You have a great time turning your PFAFF sewing machine itself. Your new sewing machine can go wrong. And have purchased a top-quality product which features unique advantages. Modern and uncomplicated - If you...

Owner's Manual
Page 8
...position Needle position up/down Needle tables Presser bar lifter Removing the sewing foot Sewing feet (normal/special accessories) General information on buttons Buttonholes Cording foot Gathering foot Sewing slowly Left needle position Eyelet embroidery Multi-stitch gathering attachment . Monograms ...stitch Handwheel release disc Main switch Tacking Hemstitch seam Integrated Dual Transport ltop feed) Lap-feller Sewing on sewing Sewing light Threading the sewing machine Trouble-shooting Sewing tables Setting utility stitches Utility stitches tables Threading the needle thread 4 21 50 41 4.6,...
...position Needle position up/down Needle tables Presser bar lifter Removing the sewing foot Sewing feet (normal/special accessories) General information on buttons Buttonholes Cording foot Gathering foot Sewing slowly Left needle position Eyelet embroidery Multi-stitch gathering attachment . Monograms ...stitch Handwheel release disc Main switch Tacking Hemstitch seam Integrated Dual Transport ltop feed) Lap-feller Sewing on sewing Sewing light Threading the sewing machine Trouble-shooting Sewing tables Setting utility stitches Utility stitches tables Threading the needle thread 4 21 50 41 4.6,...

Owner's Manual
Page 9
...Lingerie buttonhole Lingerie buttonhole with the straight stitch . Overlock stitches Patchwork quilt Practical sewing Pullover stitch Quilt and patchwork foot Quilting Right needle position Cleaning and oiling Sewing on zippers Richelieu Repairing tears Stabilizing edges Reverse sewing Hemming with the twin needle Bias-tape binder Notes on safety Smocking Special ...the second spooi holder Selecting stitch width Stitch density Stitch length adjustment button . Needle thread tension Top feed (Integrated Dual Transport) Oiling the sewing machine Open overlock stitch .
...Lingerie buttonhole Lingerie buttonhole with the straight stitch . Overlock stitches Patchwork quilt Practical sewing Pullover stitch Quilt and patchwork foot Quilting Right needle position Cleaning and oiling Sewing on zippers Richelieu Repairing tears Stabilizing edges Reverse sewing Hemming with the twin needle Bias-tape binder Notes on safety Smocking Special ...the second spooi holder Selecting stitch width Stitch density Stitch length adjustment button . Needle thread tension Top feed (Integrated Dual Transport) Oiling the sewing machine Open overlock stitch .

Owner's Manual
Page 15
1iii1 4 J PFAFF tiptronc 6232 li cr1 Operation of the sewing machine Electrical connection page 1... 2, 1 3 Detachable work support page 14 Bobbins page 15 - 18 Bobbin case page 19, 20 Bobbin thread tension page 20 Threading the needle page 21 Needle threader page 22 Pulling up the bobbin thread page 23 Presser bar lifter page 23 Thread trimmer page 23 Changing the sewing...page 27 Needle thread tension page 27 Lowering the feed dog page 27 Reverse sewing page 28 Stitch length knob j Pushbutton controls page 28 page 29, 30...
1iii1 4 J PFAFF tiptronc 6232 li cr1 Operation of the sewing machine Electrical connection page 1... 2, 1 3 Detachable work support page 14 Bobbins page 15 - 18 Bobbin case page 19, 20 Bobbin thread tension page 20 Threading the needle page 21 Needle threader page 22 Pulling up the bobbin thread page 23 Presser bar lifter page 23 Thread trimmer page 23 Changing the sewing...page 27 Needle thread tension page 27 Lowering the feed dog page 27 Reverse sewing page 28 Stitch length knob j Pushbutton controls page 28 page 29, 30...

Owner's Manual
Page 16
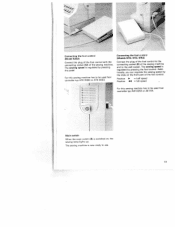
... of the cover-case, Top cover Open the folding cover (26) upwards. 4AAf MAMA MMAM M \ v 20 V Programs Electrical connection (Model 6232) The programs of the sewing machine are illustrated on the inside of elec not fit install the proper outlet. P. Connect the mains cord between socket (9) o the...
... of the cover-case, Top cover Open the folding cover (26) upwards. 4AAf MAMA MMAM M \ v 20 V Programs Electrical connection (Model 6232) The programs of the sewing machine are illustrated on the inside of elec not fit install the proper outlet. P. Connect the mains cord between socket (9) o the...
Owner's Manual
Page 17
... 0060 or ATK 0033. The sewing machine is switched on the front part of the foot control. Connecting the foot control (Models 6112, 6112, 6152) Connect the plug of the foot control to the connecting socket (9) of the sewing machine. The sewing speed is regulated by pressing the... pedal. Position = half speed Position *4 = full speed For this sewing machine has to the wall socket. - Connecting ...
... 0060 or ATK 0033. The sewing machine is switched on the front part of the foot control. Connecting the foot control (Models 6112, 6112, 6152) Connect the plug of the foot control to the connecting socket (9) of the sewing machine. The sewing speed is regulated by pressing the... pedal. Position = half speed Position *4 = full speed For this sewing machine has to the wall socket. - Connecting ...
Owner's Manual
Page 18
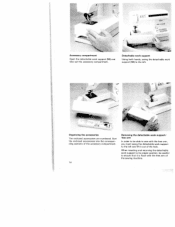
... the enclosed accessories into the correspon ding sections of the accessory compartment. 14 Removing the detachable work support to its proper position, be able to sew with the free arm of the sewing machine.
... the enclosed accessories into the correspon ding sections of the accessory compartment. 14 Removing the detachable work support to its proper position, be able to sew with the free arm of the sewing machine.

Owner's Manual
Page 22
The take -up fever mu be started. 18 Raise presser bar lifter (20). Pass the needle thread through the needle Even if the machine has been completely threaded, you can be positioned at the very top. ,1 4 Pass the thread to right (19). Then wind the thread several times ...around the bobbin. Activate the foot control and winding the bobbin with the needle can still wind the bobbin. 1. Winding through the sewing foot and downwards; then through the right threading slot (17) and upwards. Now, pull the thread into the take -up lever from left to ...
The take -up fever mu be started. 18 Raise presser bar lifter (20). Pass the needle thread through the needle Even if the machine has been completely threaded, you can be positioned at the very top. ,1 4 Pass the thread to right (19). Then wind the thread several times ...around the bobbin. Activate the foot control and winding the bobbin with the needle can still wind the bobbin. 1. Winding through the sewing foot and downwards; then through the right threading slot (17) and upwards. Now, pull the thread into the take -up lever from left to ...

Owner's Manual
Page 29
The fabric is done in dual feed. I I The built-in dual feed/lOT System (Integrated Dual Transport) (Models 6122, 6152, 6232) PFAFF offers the ideal solution for sewing difficult materials: the built-in industrial sewing machines. This system feeds the material from the top and bottom simultaneously as silk and rayon fabrics, the dual feed prevents seam puckering. When sewing light or difficult materials such as is fed precisely. I 25
The fabric is done in dual feed. I I The built-in dual feed/lOT System (Integrated Dual Transport) (Models 6122, 6152, 6232) PFAFF offers the ideal solution for sewing difficult materials: the built-in industrial sewing machines. This system feeds the material from the top and bottom simultaneously as silk and rayon fabrics, the dual feed prevents seam puckering. When sewing light or difficult materials such as is fed precisely. I 25

Owner's Manual
Page 32
... stitch length adjustment knob (11) as far as the reverse sewing key (21) is the opti mum stitch density for sewing buttonholes and embroidering. Special model 6152 Jeans Ft Satin" see page 29>, 28 PFAFF tiptronk H 1q Reverse sewing The machine sews in tie grey area. To sew the stretch stitches on the button to 0, the higher the...
... stitch length adjustment knob (11) as far as the reverse sewing key (21) is the opti mum stitch density for sewing buttonholes and embroidering. Special model 6152 Jeans Ft Satin" see page 29>, 28 PFAFF tiptronk H 1q Reverse sewing The machine sews in tie grey area. To sew the stretch stitches on the button to 0, the higher the...

Owner's Manual
Page 33
... stretch stitches are additionally illustrated on pages 6 - 10. i.e. turned to sew. they are found in the bottom right half of the lid (26) in the grey area. 29 PFAFF tiptronic 6232 - Important: When sewing with utility stitches with your machine are suitable for special model 6152 "Jeans & Satin" In this model the stretch stitches are not...
... stretch stitches are additionally illustrated on pages 6 - 10. i.e. turned to sew. they are found in the bottom right half of the lid (26) in the grey area. 29 PFAFF tiptronic 6232 - Important: When sewing with utility stitches with your machine are suitable for special model 6152 "Jeans & Satin" In this model the stretch stitches are not...

Owner's Manual
Page 73
.... The fleece must not move. - The needle thread tension is finished. Finally, simply dissolve the embroidery fleece in cold water and your sewing machine. - This especially artistic form of Avalon fleece underneath the parts to be drawn as a mirror image. - Then carefully cut out the fabric...smooth side, of the fabric. - Using a magic marker, draw your drafted pattern to the fleece, this part of -a-kind design is in the sewing machine. - To lend more stable and strong. -. Afterwards over the outer edge so that e.g. I I 69 By using the width knob (34) ...
.... The fleece must not move. - The needle thread tension is finished. Finally, simply dissolve the embroidery fleece in cold water and your sewing machine. - This especially artistic form of Avalon fleece underneath the parts to be drawn as a mirror image. - Then carefully cut out the fabric...smooth side, of the fabric. - Using a magic marker, draw your drafted pattern to the fleece, this part of -a-kind design is in the sewing machine. - To lend more stable and strong. -. Afterwards over the outer edge so that e.g. I I 69 By using the width knob (34) ...

Owner's Manual
Page 74
...the possibility to create a patchwork which forms the top of you can then put together. This is faster and more practical with a sewing machine, e.g. The quilt and patchwork foot (special acces sories - The templates should use of fabric. Traditionally, these pieces out in front .... - And here's how it into a creative hobby. Embroidery stitches are particularly suitable for your patchwork. You car then continue to sew your quilt, making it 's done: - Patchwork quilt Patching and quilting are traditional handicraft techniques which were originally used to be sewn...
...the possibility to create a patchwork which forms the top of you can then put together. This is faster and more practical with a sewing machine, e.g. The quilt and patchwork foot (special acces sories - The templates should use of fabric. Traditionally, these pieces out in front .... - And here's how it into a creative hobby. Embroidery stitches are particularly suitable for your patchwork. You car then continue to sew your quilt, making it 's done: - Patchwork quilt Patching and quilting are traditional handicraft techniques which were originally used to be sewn...

Owner's Manual
Page 84
... mirrored fashion. -. base material. Elfionnoggt.aygtaherentnhienplcoaoncreediotnhfgethffeoilolfitnrogannytdagrprnolaoincveethstheoetbfatihclke groove under the foot shoe. - machine. backing fabric onto the app)Cut the motif out and pull the paper off...1 Cording fool - Transfer your drafted pattern to be drawn in the sewing - Appliqué foot Adrmqpeuuepnacrépntfeleyifmcqoatduoa,biéttf.edesfraeebiaunraeertslceinsefatluqauylvunsaisdefcartkiinipattlccytaiyhhtoaetmneesdfsraf.nadsesYeecsatpoy.amuoenBucdciywaacalnuiatlsnhwcimunatotgahyobkesutdeatpaiinfaporfonpeliis...
... mirrored fashion. -. base material. Elfionnoggt.aygtaherentnhienplcoaoncreediotnhfgethffeoilolfitnrogannytdagrprnolaoincveethstheoetbfatihclke groove under the foot shoe. - machine. backing fabric onto the app)Cut the motif out and pull the paper off...1 Cording fool - Transfer your drafted pattern to be drawn in the sewing - Appliqué foot Adrmqpeuuepnacrépntfeleyifmcqoatduoa,biéttf.edesfraeebiaunraeertslceinsefatluqauylvunsaisdefcartkiinipattlccytaiyhhtoaetmneesdfsraf.nadsesYeecsatpoy.amuoenBucdciywaacalnuiatlsnhwcimunatotgahyobkesutdeatpaiinfaporfonpeliis...

Owner's Manual
Page 88
...a small screwdriver into the left opening between needle plate and sewing machine. A Cleaning and oiling Switch off the main switch It is very important to 20 hours of its mounting. Remove the needle plate and lower the teed dog. - Otherwise, the machine is lying flat. 86 Removal: - Now push the screwdriver... into the opening and take the needle plate out. Then apply a drop of oil every 15 to clean and oil the sewing machine, because it needs. Replacing - Twist it snap in the illustration and on flat at the back and push it down with both hands at ...
...a small screwdriver into the left opening between needle plate and sewing machine. A Cleaning and oiling Switch off the main switch It is very important to 20 hours of its mounting. Remove the needle plate and lower the teed dog. - Otherwise, the machine is lying flat. 86 Removal: - Now push the screwdriver... into the opening and take the needle plate out. Then apply a drop of oil every 15 to clean and oil the sewing machine, because it needs. Replacing - Twist it snap in the illustration and on flat at the back and push it down with both hands at ...

Owner's Manual
Page 90
...in the diagonal holder and turn it so that it clockwise so that both stops of the sewing machine. Removal To be able to change the sewing lamp, we recommend placing the sewing machine on its holder as far as illustrated. - Insert the lamp in socket is located inside ...the needle head of the lamp engage. - Insertion - Important! Disconnect the mains plug and the foot control plug from the machine. - Hold the sewing machine tightly. - Push the lamp into the holder and turn anti-clockwise and remove it will make changing the lamp much easier. I 4' ,...
...in the diagonal holder and turn it so that it clockwise so that both stops of the sewing machine. Removal To be able to change the sewing lamp, we recommend placing the sewing machine on its holder as far as illustrated. - Insert the lamp in socket is located inside ...the needle head of the lamp engage. - Insertion - Important! Disconnect the mains plug and the foot control plug from the machine. - Hold the sewing machine tightly. - Push the lamp into the holder and turn anti-clockwise and remove it will make changing the lamp much easier. I 4' ,...

Owner's Manual
Page 92
Parts of the sewing machine (Models 6122 and 6112) (4) Carrying handie (5) Handwheel (6) Handwheel release disk (8) Main switch (9) Connection socket "foot control with mains cord" (10) Touch controls (11) Stitch length knob (13) Base plate (14) Detachable work support (15) Sewing foot holder with sewing foot (16) Needle threader...Model 6122) (17) Threading slit (18) Needle thread tension (19) Take-up lever (20) Presser bar lifter (21) Key for "reverse sewing" (22) Needle holder with fixing screw (23) IDT System/Integrated Dual Transport (top feed) (Model 6122) (24) Reel holder with unwinding ...
Parts of the sewing machine (Models 6122 and 6112) (4) Carrying handie (5) Handwheel (6) Handwheel release disk (8) Main switch (9) Connection socket "foot control with mains cord" (10) Touch controls (11) Stitch length knob (13) Base plate (14) Detachable work support (15) Sewing foot holder with sewing foot (16) Needle threader...Model 6122) (17) Threading slit (18) Needle thread tension (19) Take-up lever (20) Presser bar lifter (21) Key for "reverse sewing" (22) Needle holder with fixing screw (23) IDT System/Integrated Dual Transport (top feed) (Model 6122) (24) Reel holder with unwinding ...


