
Owner's Manual
Page 4
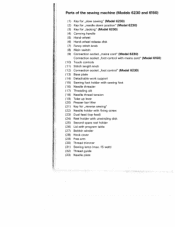
Parts of the sewing machine (Models 6230 and 6150) (1) Key for ,,slow sewing" (Model 6230) (2) Key for ,,needle down position" (Model 6230) (3) Key for ,,tacking" (Model 6230) (4) Carrying handle (5) Hand-wheel (6) Hand-wheel release disk (7) Fancy stitch knob... cord" (Model 6150) (10) Touch controls (11) Stitch length knob (1 2) Connection socket ,,foot control" (Model 6230) (13) Base plate (14) Detachable work support (1 5) Sewing foot holder with sewing foot (16) Needle threader (17) Threading slit (1 8) Needle thread tension (19) Take-up lever (20) Presser bar lifter (21) Key for ,,reverse...
Parts of the sewing machine (Models 6230 and 6150) (1) Key for ,,slow sewing" (Model 6230) (2) Key for ,,needle down position" (Model 6230) (3) Key for ,,tacking" (Model 6230) (4) Carrying handle (5) Hand-wheel (6) Hand-wheel release disk (7) Fancy stitch knob... cord" (Model 6150) (10) Touch controls (11) Stitch length knob (1 2) Connection socket ,,foot control" (Model 6230) (13) Base plate (14) Detachable work support (1 5) Sewing foot holder with sewing foot (16) Needle threader (17) Threading slit (1 8) Needle thread tension (19) Take-up lever (20) Presser bar lifter (21) Key for ,,reverse...
Owner's Manual
Page 5
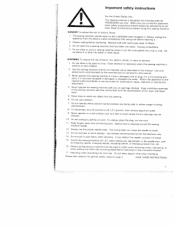
... object into a tub or sink. Always unplug appliance from the electric outlet immediately after using this sewing machine. Unplug immediately. 4 Do not place or store a sewing machine where not place in this sewing machine only for ifs intended use outdoors. 7. Use this manual. from all controls to break. 1..., basic safety precautions should never be adhered to as fol lows: Read all instructions before using and before relamping. Always unplug sewing machine from outlet. 9. When you use the proper needle plate The wrong plate can fall or be 10 Do not unplug by...
... object into a tub or sink. Always unplug appliance from the electric outlet immediately after using this sewing machine. Unplug immediately. 4 Do not place or store a sewing machine where not place in this sewing machine only for ifs intended use outdoors. 7. Use this manual. from all controls to break. 1..., basic safety precautions should never be adhered to as fol lows: Read all instructions before using and before relamping. Always unplug sewing machine from outlet. 9. When you use the proper needle plate The wrong plate can fall or be 10 Do not unplug by...
Owner's Manual
Page 6
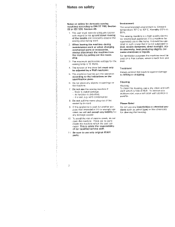
... Notes on safety Notes on safety for domestic sewing machines according to the up and down moving of the needle and constantly observe the sewing area during maintenance work . 2. its cord. 9. Cleaning Housing: To clean the housing, use only original PFAFF parts. The user must only be used for... another pur pose than intended or if it is a machine for supervised use a soft cloth with...
... Notes on safety Notes on safety for domestic sewing machines according to the up and down moving of the needle and constantly observe the sewing area during maintenance work . 2. its cord. 9. Cleaning Housing: To clean the housing, use only original PFAFF parts. The user must only be used for... another pur pose than intended or if it is a machine for supervised use a soft cloth with...
Owner's Manual
Page 7
... the only way to make full use of them If you . Your new sewing machine can take time enough to study the instruction book nothing can go wrong After all this instruction book is Just as uncomplicated as your PFAFF sewing machine If you now take any help or advice you can do and to... learn all the things the machine can get started! So now you need. It features the very latest in its stride and...
... the only way to make full use of them If you . Your new sewing machine can take time enough to study the instruction book nothing can go wrong After all this instruction book is Just as uncomplicated as your PFAFF sewing machine If you now take any help or advice you can do and to... learn all the things the machine can get started! So now you need. It features the very latest in its stride and...
Owner's Manual
Page 9
... . Right needle position Roll hemming Safety notes Serging with the overlock foot Serging with zigzag stitch Setting stretch stitch . Shell edging Slow sewing Smocking . . . Threading the needle thread Threading the sewing machine. Lowering the feed dog Main switch Maintenance and faults Monograms Multi4oot gathering foot. Open overlock stitch Overlock stitches Pattern length . Winding...
... . Right needle position Roll hemming Safety notes Serging with the overlock foot Serging with zigzag stitch Setting stretch stitch . Shell edging Slow sewing Smocking . . . Threading the needle thread Threading the sewing machine. Lowering the feed dog Main switch Maintenance and faults Monograms Multi4oot gathering foot. Open overlock stitch Overlock stitches Pattern length . Winding...
Owner's Manual
Page 15
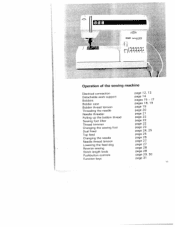
PFAFF I Stitch length knob Pushbutton controls Function keys page 28 page 29, 30 page 31 11 Operation of the sewing machine I I Electrical connection Detachable work support Bobbins page 1 2, 1 3 page 1 4 pages 15 - 17 Bobbin case pages 1 8, 1 9 Bobbin thread tension page 1 9 J Threading the needle page 20 Needle threader page 21 I Pulling up the bobbin thread Sewing foot...
PFAFF I Stitch length knob Pushbutton controls Function keys page 28 page 29, 30 page 31 11 Operation of the sewing machine I I Electrical connection Detachable work support Bobbins page 1 2, 1 3 page 1 4 pages 15 - 17 Bobbin case pages 1 8, 1 9 Bobbin thread tension page 1 9 J Threading the needle page 20 Needle threader page 21 I Pulling up the bobbin thread Sewing foot...
Owner's Manual
Page 16
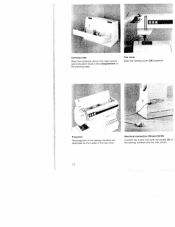
F. Ii N Carrying case Place the enclosed mains cord, foot control and instruction book in the compartment of the sewing machine and the wall socket 12 Top cover Open the folding cover (26) upwards. ] 0' N' Programs The programs of the sewing machine are illustrated on the inside of the top cover Electrical connection (Modell 6230) Connect the mains cord with the socket (9) of the carrying case.
F. Ii N Carrying case Place the enclosed mains cord, foot control and instruction book in the compartment of the sewing machine and the wall socket 12 Top cover Open the folding cover (26) upwards. ] 0' N' Programs The programs of the sewing machine are illustrated on the inside of the top cover Electrical connection (Modell 6230) Connect the mains cord with the socket (9) of the carrying case.
Owner's Manual
Page 17
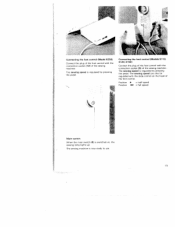
... pressing the pedal. Connecting the foot control (Models 6110. 6120. 6150) Connect the plug of the foot control with the slide control on . The sewing machine is regulated by pressing the pedal. The sewing speed can also be regulated with the connection socket (9) of the sewing machine. the sewing lamp lights up. Connecting the foot control (Model...
... pressing the pedal. Connecting the foot control (Models 6110. 6120. 6150) Connect the plug of the foot control with the slide control on . The sewing machine is regulated by pressing the pedal. The sewing speed can also be regulated with the connection socket (9) of the sewing machine. the sewing lamp lights up. Connecting the foot control (Model...
Owner's Manual
Page 26
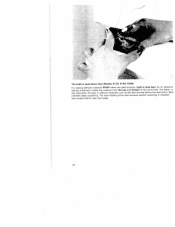
The even feeding action also ensures perfect matching of checked and striped fabrics (see next page). 24 On light or difficult materials such as silk and viscose fabrics the dual fabric feed prevents seam puckering. The built-in dual fabric feed (Models 6120, 6150, 6230) For sewing difficult materials PFAFF offers the ideal solution: built-in dual feed. As on industria sewing machines it feeds the material from the top and bottom at the same time. The fabric is fed accurately.
The even feeding action also ensures perfect matching of checked and striped fabrics (see next page). 24 On light or difficult materials such as silk and viscose fabrics the dual fabric feed prevents seam puckering. The built-in dual fabric feed (Models 6120, 6150, 6230) For sewing difficult materials PFAFF offers the ideal solution: built-in dual feed. As on industria sewing machines it feeds the material from the top and bottom at the same time. The fabric is fed accurately.
Owner's Manual
Page 30
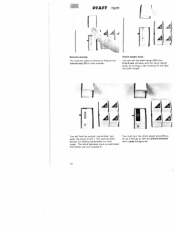
PFAFF tiptr 1 11A) L fl1 Al Reverse sewing The machine sews in this range. Stitch length knob You can set the stitch length (11) from o to 6 mm infinitely with the stitch length knob, by turning to sew the stretch stitches with a grey background. 28 The stitch becomes more concentrated the farther you turn towards O You must turn... in reverse as long as it will find the symbol buttonhole bet ween the figure 0 arid 1. Li AA You will go to the marking for sewing buttonholes is kept pressed. The optimal stitch density for the desi red stitch length.
PFAFF tiptr 1 11A) L fl1 Al Reverse sewing The machine sews in this range. Stitch length knob You can set the stitch length (11) from o to 6 mm infinitely with the stitch length knob, by turning to sew the stretch stitches with a grey background. 28 The stitch becomes more concentrated the farther you turn towards O You must turn... in reverse as long as it will find the symbol buttonhole bet ween the figure 0 arid 1. Li AA You will go to the marking for sewing buttonholes is kept pressed. The optimal stitch density for the desi red stitch length.

Owner's Manual
Page 31
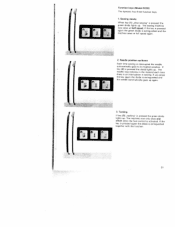
... the fancy stitch knob (7) must be switched off, i.e. If the right button is pressed the program is selec ted and the machine is ready to edge of the grey area. Press the selected key down and turn the stitch length knob (11) right to... B releases the keys that have already been activated. Important: When sewing with utility stitches with a grey background are stretch stitches, i.e. turned to• 29 On model 6230 the most important stitches are suitable for stretch material. PFAFF tiptronic 6230 ' I A 1 T- 4AAA Pushbutton controls Setting utility stitches Under the id (26)...
... the fancy stitch knob (7) must be switched off, i.e. If the right button is pressed the program is selec ted and the machine is ready to edge of the grey area. Press the selected key down and turn the stitch length knob (11) right to... B releases the keys that have already been activated. Important: When sewing with utility stitches with a grey background are stretch stitches, i.e. turned to• 29 On model 6230 the most important stitches are suitable for stretch material. PFAFF tiptronic 6230 ' I A 1 T- 4AAA Pushbutton controls Setting utility stitches Under the id (26)...
Owner's Manual
Page 33
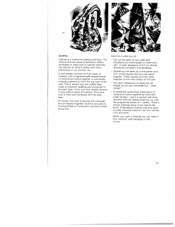
...together with the function. 31 Needle position up/down Each time sewing is pressed the green diode lights up again. 3. I II I I it Function keys (Model 6230) The tiptronic has three function keys. 1. Sewing slowly When key (1) slow sewing' is interrupted the needle automatically goes to its highest position. Tacking...If the key is pressed again the green diode is pressed the diode lights up . If key (2) is extinguished and the machine sews at half speed. The machine now only sews one stitch when the foot control is activated. The sewing machine now sews at full speed again. 2.
...together with the function. 31 Needle position up/down Each time sewing is pressed the green diode lights up again. 3. I II I I it Function keys (Model 6230) The tiptronic has three function keys. 1. Sewing slowly When key (1) slow sewing' is interrupted the needle automatically goes to its highest position. Tacking...If the key is pressed again the green diode is pressed the diode lights up . If key (2) is extinguished and the machine sews at half speed. The machine now only sews one stitch when the foot control is activated. The sewing machine now sews at full speed again. 2.

Owner's Manual
Page 37
...Place the fabric under the sewing foot. - Sew one stitch. The stitch length can be done easier by the required amount. Needle position on the right - prog a Taste3 - Basting stitch (Mode) 6230) With key (3) basting you press the foot control the machine will only make sure it... pins crosswise to the basting direction, Light fabrics are easier to - HLi C' 3 0/1 - - - - topstitching a collar or sewing in the middle - Some sewing jobs can baste a gar ment before trying it is the basic straight stitch with middle needle position. Straight stitch Program G is in ...
...Place the fabric under the sewing foot. - Sew one stitch. The stitch length can be done easier by the required amount. Needle position on the right - prog a Taste3 - Basting stitch (Mode) 6230) With key (3) basting you press the foot control the machine will only make sure it... pins crosswise to the basting direction, Light fabrics are easier to - HLi C' 3 0/1 - - - - topstitching a collar or sewing in the middle - Some sewing jobs can baste a gar ment before trying it is the basic straight stitch with middle needle position. Straight stitch Program G is in ...

Owner's Manual
Page 68
...be drawn any letters or num as a mirror image. Embroider the contours with much more stable, sew - machine Transfer your side, smooth drafted side, of bar and make sure the needle all contours with stitches... cut the areas that bers have to be embroidered and tauten the fabric and backing in the sewing - the work Advrd(esuaepnpcrnptieesalceimtiqailaoyualbnéteseassrtaciigauctacaretleihslsfoesuqraodleunr.idfisceaYeksnpalofcyam,uyttbmceewearfacnfnidteashecumtys.taaheonkBuedeiyt acaahuaplsnapwpislneaiogqryabfusetdseacppiitfnef,rfocoeoiatl cutout on the - Afterwards ...
...be drawn any letters or num as a mirror image. Embroider the contours with much more stable, sew - machine Transfer your side, smooth drafted side, of bar and make sure the needle all contours with stitches... cut the areas that bers have to be embroidered and tauten the fabric and backing in the sewing - the work Advrd(esuaepnpcrnptieesalceimtiqailaoyualbnéteseassrtaciigauctacaretleihslsfoesuqraodleunr.idfisceaYeksnpalofcyam,uyttbmceewearfacnfnidteashecumtys.taaheonkBuedeiyt acaahuaplsnapwpislneaiogqryabfusetdseacppiitfnef,rfocoeoiatl cutout on the - Afterwards ...
Owner's Manual
Page 69
... as in our country, too. but just smoothed out - with small stitches - When your quilt is quicker and more practical with the sewing machine e.g. Quilting Quilting is often also bordered with the back layer. This is tacked onto the middle layer made your quilt with many enthusiasts in the...squares are sewn together by hand with the program ID stretch or L stretch. The seam allowances of material The entire quilt is a traditional sewing technique. The method that the wives of American settlers developed to form the surface of 0,7 cm should already be very precise.
... as in our country, too. but just smoothed out - with small stitches - When your quilt is quicker and more practical with the sewing machine e.g. Quilting Quilting is often also bordered with the back layer. This is tacked onto the middle layer made your quilt with many enthusiasts in the...squares are sewn together by hand with the program ID stretch or L stretch. The seam allowances of material The entire quilt is a traditional sewing technique. The method that the wives of American settlers developed to form the surface of 0,7 cm should already be very precise.
Owner's Manual
Page 77
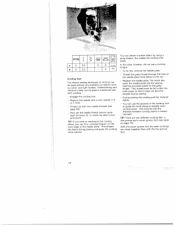
... gives the cording more prominent. Replace the needle with two needle threads Isee page 64). - ween the needle plate and the sewing machine provides space for the gimp thread. You can use a cording tongue. - Thread the gimp thread through the hole of the needle plate. Now ...front edge of the needle plate from below to the top. During sewing the cording pull the material lightly. - This shapes the fabric during sewing. - This thread must be given a traditional look wider. Cording foot The classic sewing technique of cording can be used without any problems on fabrics such as...
... gives the cording more prominent. Replace the needle with two needle threads Isee page 64). - ween the needle plate and the sewing machine provides space for the gimp thread. You can use a cording tongue. - Thread the gimp thread through the hole of the needle plate. Now ...front edge of the needle plate from below to the top. During sewing the cording pull the material lightly. - This shapes the fabric during sewing. - This thread must be given a traditional look wider. Cording foot The classic sewing technique of cording can be used without any problems on fabrics such as...
Owner's Manual
Page 79
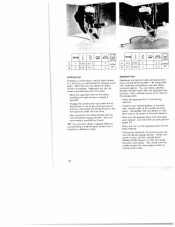
... galore. then place the filling thread in mirrored fashion. -. Insert the appliqué foot in which pearl thread or a fine cord is a technique in the sewing machine. - Cut the motif Out and pull the paper off. - proglJ,I I% I cording foot Cording foot Cording is overstitched to be made more easily. Ia C O35-lj...
... galore. then place the filling thread in mirrored fashion. -. Insert the appliqué foot in which pearl thread or a fine cord is a technique in the sewing machine. - Cut the motif Out and pull the paper off. - proglJ,I I% I cording foot Cording foot Cording is overstitched to be made more easily. Ia C O35-lj...

Owner's Manual
Page 80
... thicker threads you wish with the magic pen. - This foot is best to sew a test seam first. - Knot the threads on the reverse side. 79 Mark out any pattern you may have to work out of the machine carefully, because if you pull too fast, you have to choose a longer stitch length...
... thicker threads you wish with the magic pen. - This foot is best to sew a test seam first. - Knot the threads on the reverse side. 79 Mark out any pattern you may have to work out of the machine carefully, because if you pull too fast, you have to choose a longer stitch length...
Owner's Manual
Page 84
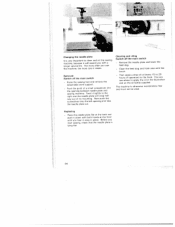
...to the hook. Remove the needle plate and lower the feed dog. - Clean the feed dog and hook area with a longer service life. The machine is otherwise maintenance free and must not be oiled. detachable work support. Push the point of its mounting. Then apply a drop of operation) to ...and on the oil bottle supplied. I q Lht Changing the needle plate It is very important to clean and oil the sewing machine, because it needs. The more often you use the machine, the more care it will snap half way out of a small screwdriver into the left opening between needle plate and...
...to the hook. Remove the needle plate and lower the feed dog. - Clean the feed dog and hook area with a longer service life. The machine is otherwise maintenance free and must not be oiled. detachable work support. Push the point of its mounting. Then apply a drop of operation) to ...and on the oil bottle supplied. I q Lht Changing the needle plate It is very important to clean and oil the sewing machine, because it needs. The more often you use the machine, the more care it will snap half way out of a small screwdriver into the left opening between needle plate and...
Owner's Manual
Page 85
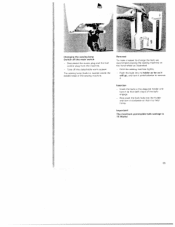
... off the main switch Disconnect the mains plug and the toot control plug from the machine. -- Important! Hold the sewing machine tightly - - Push the bulb into the holder and turn it clockwise so that both stops of the sewing machine Removal To make it easier to change the bulb we recommend placing the... sewing machine on the hand wheel as it will go, and turn it anticlockwise to remove Insertion Insert the bulb ...
... off the main switch Disconnect the mains plug and the toot control plug from the machine. -- Important! Hold the sewing machine tightly - - Push the bulb into the holder and turn it clockwise so that both stops of the sewing machine Removal To make it easier to change the bulb we recommend placing the... sewing machine on the hand wheel as it will go, and turn it anticlockwise to remove Insertion Insert the bulb ...


