
Owner's Manual
Page 4
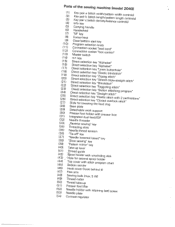
Parts of the sewing machine (model 2040) (1) (2> (3) (4) Key Key Key Info pair pair pair key a b c (stitch (stitch (stitch width/pattern width controls) length/pattern length controls) density/balance controls) (5) Carrying handle (6) Handwheel (7) "M" ...
Parts of the sewing machine (model 2040) (1) (2> (3) (4) Key Key Key Info pair pair pair key a b c (stitch (stitch (stitch width/pattern width controls) length/pattern length controls) density/balance controls) (5) Carrying handle (6) Handwheel (7) "M" ...
Owner's Manual
Page 5
... where it to be used by the manufacturer as threading needle, changing needle, threading bobbin, or changing presser foot, etc. 1 6. To disconnect, turn all moving parts. Do not allow to break. 1 5. Never operate on page 2. Do not pull or push fabric while stitching.
... where it to be used by the manufacturer as threading needle, changing needle, threading bobbin, or changing presser foot, etc. 1 6. To disconnect, turn all moving parts. Do not allow to break. 1 5. Never operate on page 2. Do not pull or push fabric while stitching.
Owner's Manual
Page 6
... is to over-heating. 14. When leaving the machine, during maintenance work or when changing mechanical parts or accessories, always disconnect the machine from the mains by a PFAFF mechanic. 5. The machine is solely the responsibility of the socket by it is not subjected to be...however, it . o not use the sewing machine if: - Do not use any damage caused if this machine is used . I 3. I 1.Only original PFAFF parts may be caused by introducing a cold machine into operation according to it should changes be accepted for the sewing lamp is suppressed and insensitive to...
... is to over-heating. 14. When leaving the machine, during maintenance work or when changing mechanical parts or accessories, always disconnect the machine from the mains by a PFAFF mechanic. 5. The machine is solely the responsibility of the socket by it is not subjected to be...however, it . o not use the sewing machine if: - Do not use any damage caused if this machine is used . I 3. I 1.Only original PFAFF parts may be caused by introducing a cold machine into operation according to it should changes be accepted for the sewing lamp is suppressed and insensitive to...
Owner's Manual
Page 12
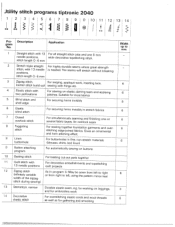
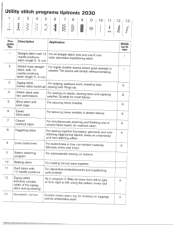
... stitch length 0-6mm wide decorative topstitching stitch. 2 Stretch triple straight stitch, with two perforations For sewing on buttons 1 0 Basting stitch For basting cut-out parts together 11 Quilt stitch with 1 3 needle positions For decorative embellishments and topstitching quilt projects 1 2 Zigzag stitch (infinitely variable width of the zigzag As in ...or from right to left, using the pattern mirror key) stitch during sewing) 1 3 Stemstitch, narrow 1 4 Decorative elastic stitch Durable elastic seam, e.g. Jtility stitch programs tiptronic 2040 1 ID Ill "i.
... stitch length 0-6mm wide decorative topstitching stitch. 2 Stretch triple straight stitch, with two perforations For sewing on buttons 1 0 Basting stitch For basting cut-out parts together 11 Quilt stitch with 1 3 needle positions For decorative embellishments and topstitching quilt projects 1 2 Zigzag stitch (infinitely variable width of the zigzag As in ...or from right to left, using the pattern mirror key) stitch during sewing) 1 3 Stemstitch, narrow 1 4 Decorative elastic stitch Durable elastic seam, e.g. Jtility stitch programs tiptronic 2040 1 ID Ill "i.
Owner's Manual
Page 14
.... for embroidery work , inserting lace, sewing with fringe etc. 4 Elastic stitch with 1 3 needle positions, nFeoer dheigdh. Utility stitch programs tiptronic 2030 1234 6 101 '11 12 13 Ill I 1 Pro- An overlock seam 6 asFtnoidtrcshheienwmginesgdtigttcoehg-ijenotgihneeerdfffeofacubtnrdicast.ioGnivgeas ramnenortsnaamndenotavler- 6 For buttonholes in program ...For automatically sewing on and for working on buttons 6 T 1 0 Basting stitch j For basting cut-out parts together 11 Quilt stitch with 1 3 needle positions, stitch length 0- 6 mm For at! Description gram No.
.... for embroidery work , inserting lace, sewing with fringe etc. 4 Elastic stitch with 1 3 needle positions, nFeoer dheigdh. Utility stitch programs tiptronic 2030 1234 6 101 '11 12 13 Ill I 1 Pro- An overlock seam 6 asFtnoidtrcshheienwmginesgdtigttcoehg-ijenotgihneeerdfffeofacubtnrdicast.ioGnivgeas ramnenortsnaamndenotavler- 6 For buttonholes in program ...For automatically sewing on and for working on buttons 6 T 1 0 Basting stitch j For basting cut-out parts together 11 Quilt stitch with 1 3 needle positions, stitch length 0- 6 mm For at! Description gram No.

Owner's Manual
Page 22
Arrange the parts in the respective compartments of the lid and open the lid upwards and iway from you. ccessories 2030/2040 ccessory compartment Dpen the accessor,' compartment by placing 'our left index finger on the ridged area on the eft of the accessory tray. Arranging the accessories The standard accessories are marked with numbers.
Arrange the parts in the respective compartments of the lid and open the lid upwards and iway from you. ccessories 2030/2040 ccessory compartment Dpen the accessor,' compartment by placing 'our left index finger on the ridged area on the eft of the accessory tray. Arranging the accessories The standard accessories are marked with numbers.
Owner's Manual
Page 31
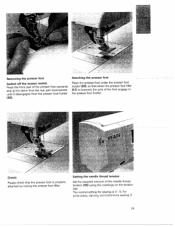
... and buttonhole sewing 3. 29 Setting the needle thread tension Set the required amount of the presser foot upwards and at the same time the rear part downwards until it disengages from the presser foot holder (30). The normal setting for sewing is lowered, the pins of the foot engage in the... presser foot holder. •[ Removing the presser foot Switch off the master switch Press the front part of the needle thread tension (35) using the markings on the tension dial. Attaching the presser foot Place the presser foot under the presser foot...
... and buttonhole sewing 3. 29 Setting the needle thread tension Set the required amount of the presser foot upwards and at the same time the rear part downwards until it disengages from the presser foot holder (30). The normal setting for sewing is lowered, the pins of the foot engage in the... presser foot holder. •[ Removing the presser foot Switch off the master switch Press the front part of the needle thread tension (35) using the markings on the tension dial. Attaching the presser foot Place the presser foot under the presser foot...
Owner's Manual
Page 56
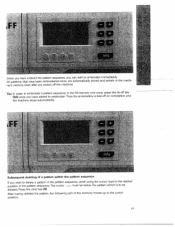
...-off key (36) once you have been embroidered once, are automatically stored and remain in the pattern sequence. After having deleted the pattern, the following part of a pattern within the pattern sequence If you wish to delete a pattern in the pattern sequence, scroll using the cursor keys to embroider immediately. Tip...
...-off key (36) once you have been embroidered once, are automatically stored and remain in the pattern sequence. After having deleted the pattern, the following part of a pattern within the pattern sequence If you wish to delete a pattern in the pattern sequence, scroll using the cursor keys to embroider immediately. Tip...
Owner's Manual
Page 136
Parts of the sewing machine (model 2030) (1) Key pair a (stitch width/pattern width controls) (2) Key pair b (stitch length/pattern length controls) (3 Key pair c (stitch density/balance ...
Parts of the sewing machine (model 2030) (1) Key pair a (stitch width/pattern width controls) (2) Key pair b (stitch length/pattern length controls) (3 Key pair c (stitch density/balance ...


