
Owner's Manual
Page 4
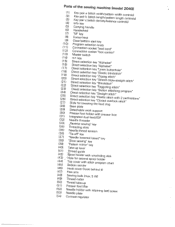
Parts of the sewing machine (model 2040) (1) (2> (3) (4) Key Key Key Info pair pair pair key a b c (stitch (stitch (stitch width/pattern width controls) length/pattern length controls) density/balance controls) (5) Carrying handle (6) Handwheel (7) "M" ...
Parts of the sewing machine (model 2040) (1) (2> (3) (4) Key Key Key Info pair pair pair key a b c (stitch (stitch (stitch width/pattern width controls) length/pattern length controls) density/balance controls) (5) Carrying handle (6) Handwheel (7) "M" ...
Owner's Manual
Page 5
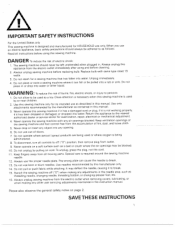
... manual. 3. Never operate the sewing machine with same type rated 1 5 watts. 3. Keep ventilation openings of the sewing machine and foot control free from all moving parts. To disconnect, turn all instructions before using and before replacing bulb. Special care is used as contained in this sewing machine, DANGER To reduce the...
... manual. 3. Never operate the sewing machine with same type rated 1 5 watts. 3. Keep ventilation openings of the sewing machine and foot control free from all moving parts. To disconnect, turn all instructions before using and before replacing bulb. Special care is used as contained in this sewing machine, DANGER To reduce the...
Owner's Manual
Page 6
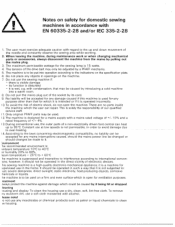
... to interference according to : ust, severe dampness, direct sunlight, static electricity, heat-producing objects, corrosive hemicals or liquids. I 1.Only original PFAFF parts may be accepted for any mains interruptions caused, should the mains power line be changed or should changes be caused by... a PFAFF mechanic. 5. however, it is a machine for upervised use , the outer parts of our qualified service staff. It should not be operated in such a way that for which the ...
... to interference according to : ust, severe dampness, direct sunlight, static electricity, heat-producing objects, corrosive hemicals or liquids. I 1.Only original PFAFF parts may be accepted for any mains interruptions caused, should the mains power line be changed or should changes be caused by... a PFAFF mechanic. 5. however, it is a machine for upervised use , the outer parts of our qualified service staff. It should not be operated in such a way that for which the ...
Owner's Manual
Page 12
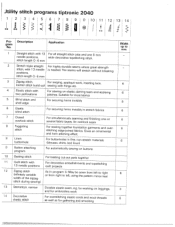
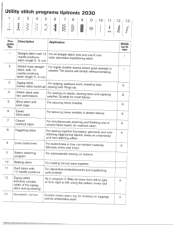
... stitch jobs and one or several fabric layers. for gathering and smocking Width upto mm - - 6 6 6 6 6 6 6 3 6 Jtility stitch programs tiptronic 2040 1 ID Ill "i. ill 4.4 4.4 10 11 12 13 14 i!I buttonhole 0 Button attaching program For simultaneously seaming and finishing one 6 mm needle positions, stitch ... materials (blouses, shirts, bed linen) For automatically sewing on buttons 1 0 Basting stitch For basting cut-out parts together 11 Quilt stitch with 1 3 needle positions, For highly durable seams where great strength is needed. The seams will stretch without...
... stitch jobs and one or several fabric layers. for gathering and smocking Width upto mm - - 6 6 6 6 6 6 6 3 6 Jtility stitch programs tiptronic 2040 1 ID Ill "i. ill 4.4 4.4 10 11 12 13 14 i!I buttonhole 0 Button attaching program For simultaneously seaming and finishing one 6 mm needle positions, stitch ... materials (blouses, shirts, bed linen) For automatically sewing on buttons 1 0 Basting stitch For basting cut-out parts together 11 Quilt stitch with 1 3 needle positions, For highly durable seams where great strength is needed. The seams will stretch without...
Owner's Manual
Page 14
... stitch jobs and one or several fabric layers. for working on buttons 6 T 1 0 Basting stitch j For basting cut-out parts together 11 Quilt stitch with LtNo perforations For sewing on elastic, darning tears and applying patches. Description gram No. An overlock seam ... using sewn from the pattern left to right mirror key) 6 stitch during sewing) 1 3 Stmstitch, narrow 1 Durabie &astic seam, e.g. Utility stitch programs tiptronic 2030 1234 6 101 '11 12 13 Ill I 1 Pro- Width upto mm - 2 Stretch triple straight stitch, with 1 3 needle positions, stitch length ...
... stitch jobs and one or several fabric layers. for working on buttons 6 T 1 0 Basting stitch j For basting cut-out parts together 11 Quilt stitch with LtNo perforations For sewing on elastic, darning tears and applying patches. Description gram No. An overlock seam ... using sewn from the pattern left to right mirror key) 6 stitch during sewing) 1 3 Stmstitch, narrow 1 Durabie &astic seam, e.g. Utility stitch programs tiptronic 2030 1234 6 101 '11 12 13 Ill I 1 Pro- Width upto mm - 2 Stretch triple straight stitch, with 1 3 needle positions, stitch length ...

Owner's Manual
Page 22
ccessories 2030/2040 Arrange the parts in the respective compartments of the lid and open the lid upwards and iway from you. Arranging the accessories The standard accessories are marked with numbers. ccessory compartment Dpen the accessor,' compartment by placing 'our left index finger on the ridged area on the eft of the accessory tray.
ccessories 2030/2040 Arrange the parts in the respective compartments of the lid and open the lid upwards and iway from you. Arranging the accessories The standard accessories are marked with numbers. ccessory compartment Dpen the accessor,' compartment by placing 'our left index finger on the ridged area on the eft of the accessory tray.
Owner's Manual
Page 31
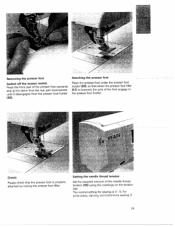
Setting the needle thread tension Set the required amount of the presser foot upwards and at the same time the rear part downwards until it disengages from the presser foot holder (30). The normal setting for sewing is lowered, the pins of the foot engage in the ... raising the presser foot lifter. For embroidery, darning and buttonhole sewing 3. 29 •[ Removing the presser foot Switch off the master switch Press the front part of the needle thread tension (35) using the markings on the tension dial. Check: Please check that when the presser foot lifter (51) is...
Setting the needle thread tension Set the required amount of the presser foot upwards and at the same time the rear part downwards until it disengages from the presser foot holder (30). The normal setting for sewing is lowered, the pins of the foot engage in the ... raising the presser foot lifter. For embroidery, darning and buttonhole sewing 3. 29 •[ Removing the presser foot Switch off the master switch Press the front part of the needle thread tension (35) using the markings on the tension dial. Check: Please check that when the presser foot lifter (51) is...
Owner's Manual
Page 56
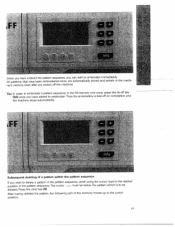
Subsequent deleting of the memory moves up to embroider immediately. The cursor -. Press the clear key (9). After having deleted the pattern, the following part of a pattern within the pattern sequence If you have started to embroider. Tip: In order to embroider a pattern sequence in the M-memory only once, press ...
Subsequent deleting of the memory moves up to embroider immediately. The cursor -. Press the clear key (9). After having deleted the pattern, the following part of a pattern within the pattern sequence If you have started to embroider. Tip: In order to embroider a pattern sequence in the M-memory only once, press ...
Owner's Manual
Page 136
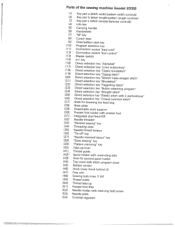
Parts of the sewing machine (model 2030) (1) Key pair a (stitch width/pattern width controls) (2) Key pair b (stitch length/pattern length controls) (3 Key pair c (stitch density/balance ...
Parts of the sewing machine (model 2030) (1) Key pair a (stitch width/pattern width controls) (2) Key pair b (stitch length/pattern length controls) (3 Key pair c (stitch density/balance ...


