
Owner's Manual
Page 4
Parts of the sewing machine (model 2040) (1) (2> (3) (4) Key Key Key Info pair pair pair key a b c (stitch (stitch (stitch width/pattern width controls) length/pattern length controls) density/balance controls) (5) Carrying handle (6) Handwheel (7)..." key "Slow sewing" key (39) "Pattern mirror" key (40) Take-up lever (41) hread guide (42) (43) (44) (45) Spool holder with unwinding 'HTooplecfoovresrewcoitnhdstsiptcoholprhooglrdaemr Bobbin winder disk chart (46) (47) Hook cover (hook behind it) Free arm (48) Sewing bulb (max. 5 W) (49) Thread cutter (50) Thread take-up (51) ...
Parts of the sewing machine (model 2040) (1) (2> (3) (4) Key Key Key Info pair pair pair key a b c (stitch (stitch (stitch width/pattern width controls) length/pattern length controls) density/balance controls) (5) Carrying handle (6) Handwheel (7)..." key "Slow sewing" key (39) "Pattern mirror" key (40) Take-up lever (41) hread guide (42) (43) (44) (45) Spool holder with unwinding 'HTooplecfoovresrewcoitnhdstsiptcoholprhooglrdaemr Bobbin winder disk chart (46) (47) Hook cover (hook behind it) Free arm (48) Sewing bulb (max. 5 W) (49) Thread cutter (50) Thread take-up (51) ...
Owner's Manual
Page 5
... the sewing machine with same type rated 1 5 watts. 3. Do not use as a toy. Never operate on a soft surface such as threading needle, changing needle, threading bobbin, or changing presser foot, etc. 1 6. Unplug immediately. 4.
... the sewing machine with same type rated 1 5 watts. 3. Do not use as a toy. Never operate on a soft surface such as threading needle, changing needle, threading bobbin, or changing presser foot, etc. 1 6. Unplug immediately. 4.
Owner's Manual
Page 8
index of headings Accessories Appliqué work Automatic tapering Balance Basting Bobbin case Bobbin thread monitor (model 2040) Bobbin thread tension Bobbin thread, drawing up Bobbin winding Bobbin winding through the needle Buttonhole, fully-automatic Buttonholes Buttonholes with gimp thread Buttonholes, tips for difficult fabrics Buttonholes, types Buttons, sewing on Carrying case Changing a ...
index of headings Accessories Appliqué work Automatic tapering Balance Basting Bobbin case Bobbin thread monitor (model 2040) Bobbin thread tension Bobbin thread, drawing up Bobbin winding Bobbin winding through the needle Buttonhole, fully-automatic Buttonholes Buttonholes with gimp thread Buttonholes, tips for difficult fabrics Buttonholes, types Buttons, sewing on Carrying case Changing a ...
Owner's Manual
Page 10
ndex of headings Jeedle plate, changing '.Jeedle table 'Jeedle threader 'Jeedle, changing \Jeedle, threading "Jeedle/bobbin thread tension "Jon-elastic/elastic stitches \ion-stick fancy stitch foot for leather Dverlock stitches 3 atchwork and quilting 'Pattern beginning" 'Pattern beginning" within pattern combination ...
ndex of headings Jeedle plate, changing '.Jeedle table 'Jeedle threader 'Jeedle, changing \Jeedle, threading "Jeedle/bobbin thread tension "Jon-elastic/elastic stitches \ion-stick fancy stitch foot for leather Dverlock stitches 3 atchwork and quilting 'Pattern beginning" 'Pattern beginning" within pattern combination ...
Owner's Manual
Page 19
... cover with stitch program chart Electrical connection Voltage switchover Accessories Detachable work support Bobbin winding Bobbin case Needle/bobbin thread tension Threading the needle thread Needle threader Pulling up the bobbin thread Presser foot lifter Thread cutter Changing the presser feet Winding a bobbin through the needle Changing needles Threading twin needle Dual Feed/IDF Lowering...
... cover with stitch program chart Electrical connection Voltage switchover Accessories Detachable work support Bobbin winding Bobbin case Needle/bobbin thread tension Threading the needle thread Needle threader Pulling up the bobbin thread Presser foot lifter Thread cutter Changing the presser feet Winding a bobbin through the needle Changing needles Threading twin needle Dual Feed/IDF Lowering...

Owner's Manual
Page 23
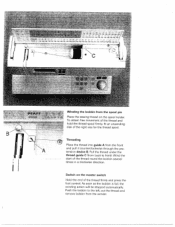
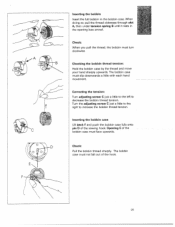
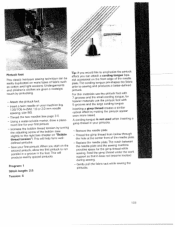
L Preparing the machine for bobbing winding Place an empty bobbin so that the black pin of the bobbing winder snaps into the slot of using the free arm, swing the hole. When replacing the the detachable work support work support (free arm) In order to the right Note: The bobbin can only be wound if it is flush with lift the it is moved fully to the right 21 Removing the detachable work support, make sure to the left and it free arm of the sewing machine. Push the bobbin to sew upwards out of the bobbin.
L Preparing the machine for bobbing winding Place an empty bobbin so that the black pin of the bobbing winder snaps into the slot of using the free arm, swing the hole. When replacing the the detachable work support work support (free arm) In order to the right Note: The bobbin can only be wound if it is flush with lift the it is moved fully to the right 21 Removing the detachable work support, make sure to the left and it free arm of the sewing machine. Push the bobbin to sew upwards out of the bobbin.
Owner's Manual
Page 24
...an unwinding disk of the thread round the bobbin several I times in a clockwise direction. Push the bobbin to front). Switch on the spool holder. As soon as the bobbin is full, the winding action will be stopped automatically. Ô3: Winding the bobbin from back to the left, cut the thread... and remove bobbin from the front and pull it counterclockwise through the pre tension device B. ...
...an unwinding disk of the thread round the bobbin several I times in a clockwise direction. Push the bobbin to front). Switch on the spool holder. As soon as the bobbin is full, the winding action will be stopped automatically. Ô3: Winding the bobbin from back to the left, cut the thread... and remove bobbin from the front and pull it counterclockwise through the pre tension device B. ...
Owner's Manual
Page 25
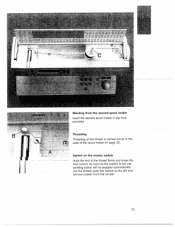
Switch on page 22. -- 5 - -- .2040 . - B - - .-. % Winding from the winder. 23 Cut the thread, push the bobbin to the left and remove bobbin from the second spool holder Insert the second spool holder in the case of the spool holder on the master switch Hold the end of the thread is full, the winding action will be stopped automatically. As soon as the bobbin is carried out as in the hole provided. Threading Threading of the thread firmly and press the I foot control.
Switch on page 22. -- 5 - -- .2040 . - B - - .-. % Winding from the winder. 23 Cut the thread, push the bobbin to the left and remove bobbin from the second spool holder Insert the second spool holder in the case of the spool holder on the master switch Hold the end of the thread is full, the winding action will be stopped automatically. As soon as the bobbin is carried out as in the hole provided. Threading Threading of the thread firmly and press the I foot control.
Owner's Manual
Page 26
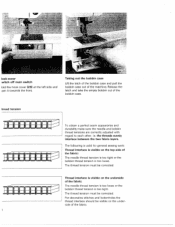
... under side of the fabric. The thread tension must be corrected. Release the latch and take the empty bobbin out of the fabric: The needle thread tension is too tight or the bobbin thread tension is too loose. For decorative stitches and buttonholes the thread interlace should be visible on the underside... of the machine. The following is valid for general sewing work: Thread interlace is visible on the top side of the bobbin case. look cover witch off main switch bid the hook cover (26) at the left side and pen it towards the front Taking out the...
... under side of the fabric. The thread tension must be corrected. Release the latch and take the empty bobbin out of the fabric: The needle thread tension is too tight or the bobbin thread tension is too loose. For decorative stitches and buttonholes the thread interlace should be visible on the underside... of the machine. The following is valid for general sewing work: Thread interlace is visible on the top side of the bobbin case. look cover witch off main switch bid the hook cover (26) at the left side and pen it towards the front Taking out the...
Owner's Manual
Page 27
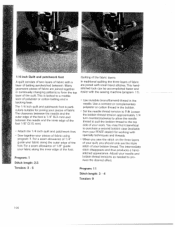
...you pull the thread, the bobbin must face upwards. Turn the adjusting screw C just a little to the right to decrease the bobbin thread tension. The bobbin case must not fall out of the bobbin case must turn clockwise. Inserting the bobbin Insert the full bobbin in the opening (see arrow...). Check: Pull the bobbin thread sharply. then under tension spring B until it...
...you pull the thread, the bobbin must face upwards. Turn the adjusting screw C just a little to the right to decrease the bobbin thread tension. The bobbin case must not fall out of the bobbin case must turn clockwise. Inserting the bobbin Insert the full bobbin in the opening (see arrow...). Check: Pull the bobbin thread sharply. then under tension spring B until it...
Owner's Manual
Page 30
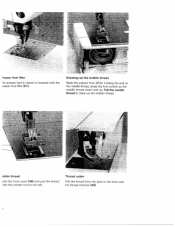
obbin thread lose the hook cover (46) and pull the thread ider the presser foot to the front over the thread trimmer (49). Pull the needle thread to draw up . Thread cutter Pull the thread from the back to the left. resser foot lifter The presser foot is raised or lowered with the )resser foot lifter (51). Drawing-up the bobbin thread Raise the presser foot While holding the end of the needle thread, press the foot control so the needle moves down and up the bobbin thread.
obbin thread lose the hook cover (46) and pull the thread ider the presser foot to the front over the thread trimmer (49). Pull the needle thread to draw up . Thread cutter Pull the thread from the back to the left. resser foot lifter The presser foot is raised or lowered with the )resser foot lifter (51). Drawing-up the bobbin thread Raise the presser foot While holding the end of the needle thread, press the foot control so the needle moves down and up the bobbin thread.
Owner's Manual
Page 32
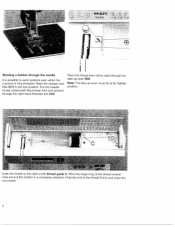
... a clockwise direction. Place the thread from left to the top position. uide the thread to wind bobbins even when the machine is possible to the right under thread guide C. Pull the needle thread underneath the presser foot and upward through the take -...). Wind the beginning of the thread firmly and press the cot control. Note: The take -up lever must be at its highest position. "FE PFFF 2040 I Winding a bobbin through the needle It is fully threaded. Raise the presser foot lifter (51) to right through the right-hand threader slot (34).
... a clockwise direction. Place the thread from left to the top position. uide the thread to wind bobbins even when the machine is possible to the right under thread guide C. Pull the needle thread underneath the presser foot and upward through the take -...). Wind the beginning of the thread firmly and press the cot control. Note: The take -up lever must be at its highest position. "FE PFFF 2040 I Winding a bobbin through the needle It is fully threaded. Raise the presser foot lifter (51) to right through the right-hand threader slot (34).
Owner's Manual
Page 38
Contents Adjusting the contrast on the display Bobbin thread monitor (model 2040) Selecting the sewing programs Altering pattern sizes Altering the stitch width/needle position Altering the pattern width/stitch length Altering the pattern length/stitch density Balance lnfo key/reverse sewing key Sewing function keys Twin needle Formation of the stitch patterns Page 38 Page 38 Page 39 Page 40 Page 41 Page 42 Page 43 Page 44 Page 45 Page 46 Page 47 Page 48/49 37
Contents Adjusting the contrast on the display Bobbin thread monitor (model 2040) Selecting the sewing programs Altering pattern sizes Altering the stitch width/needle position Altering the pattern width/stitch length Altering the pattern length/stitch density Balance lnfo key/reverse sewing key Sewing function keys Twin needle Formation of the stitch patterns Page 38 Page 38 Page 39 Page 40 Page 41 Page 42 Page 43 Page 44 Page 45 Page 46 Page 47 Page 48/49 37

Owner's Manual
Page 39
Bobbin thread monitor (model 2040) If the bobbin is nearing its end [2 yd (2 m) 3 '/ yd (3 m)1 or there is inserted and you start to the machine being This setting can be readjusted with the contrast regulator (54). setting on the display may change after the full bobbin is no thread on the bobbin, the bobbin symbol appears on the display The contrast transported. The symbol disappears after long use or due to sew again. 38 Adjusting the contrast on the display.
Bobbin thread monitor (model 2040) If the bobbin is nearing its end [2 yd (2 m) 3 '/ yd (3 m)1 or there is inserted and you start to the machine being This setting can be readjusted with the contrast regulator (54). setting on the display may change after the full bobbin is no thread on the bobbin, the bobbin symbol appears on the display The contrast transported. The symbol disappears after long use or due to sew again. 38 Adjusting the contrast on the display.

Owner's Manual
Page 69
... of your work to appear on the reverse side of the hole. With thumb and index finger press the darning foot together. Draw up the bobbin thread and hold the threads when you until it lightly to -fast sewing speed will allow you have covered the width of the damaged area...
... of your work to appear on the reverse side of the hole. With thumb and index finger press the darning foot together. Draw up the bobbin thread and hold the threads when you until it lightly to -fast sewing speed will allow you have covered the width of the damaged area...

Owner's Manual
Page 71
... elastic thread around the back of the seam. During stitching of the fabric. The amount of gathering is not stretched or pierced by pulling the bobbin (bottom) threads to the desired fullness. - Gather the fabric by the needle. 74 Sew a few more rows of stitching, using the edge of gathering stitches...
... elastic thread around the back of the seam. During stitching of the fabric. The amount of gathering is not stretched or pierced by pulling the bobbin (bottom) threads to the desired fullness. - Gather the fabric by the needle. 74 Sew a few more rows of stitching, using the edge of gathering stitches...
Owner's Manual
Page 75
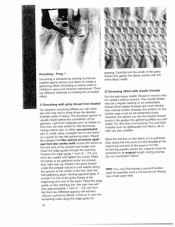
...first row. Prog. 1 Smocking is achieved by sewing numerous parallel seams across your fabric to create a gathering effect Smocking is wound onto the bobbin without tension. The smocked section is usually made before the completion of smocking, fine and light material such as a guide for this kind of ...For beautiful smocking effects you will sew approximately 1 inch (2 - 2.5 cm) from the needle and tihten the screw. Place the edge guide on the bobbin case must be gathered under the presser foot so it runs exactly along this stitching line the next row will need two and one half...
...first row. Prog. 1 Smocking is achieved by sewing numerous parallel seams across your fabric to create a gathering effect Smocking is wound onto the bobbin without tension. The smocked section is usually made before the completion of smocking, fine and light material such as a guide for this kind of ...For beautiful smocking effects you will sew approximately 1 inch (2 - 2.5 cm) from the needle and tihten the screw. Place the edge guide on the bobbin case must be gathered under the presser foot so it runs exactly along this stitching line the next row will need two and one half...
Owner's Manual
Page 98
... For thin materials use the pintuck foot with 7 grooves and the small cording tongue, for the gimp thread while sewing. Increase the bobbin thread tension by turning the adjusting screw of below through the needle plate. - Sew your pintucks. - A cording tongue is not ...fabric prior to run parallel in a groove in your first pintuck second pintuck, allow When you can attach a cording tongue (spe cial accessory) on "Bobbin thread tension"). Inserting a gimp thread creates a similar optical effect by pintucking. - Tension: 5 103 mm needle spacing; size 80). - Using a...
... For thin materials use the pintuck foot with 7 grooves and the small cording tongue, for the gimp thread while sewing. Increase the bobbin thread tension by turning the adjusting screw of below through the needle plate. - Sew your pintucks. - A cording tongue is not ...fabric prior to run parallel in a groove in your first pintuck second pintuck, allow When you can attach a cording tongue (spe cial accessory) on "Bobbin thread tension"). Inserting a gimp thread creates a similar optical effect by pintucking. - Tension: 5 103 mm needle spacing; size 80). - Using a...
Owner's Manual
Page 101
... a backing layer. The intermediate stitch disappears and thus produces a handstitched appearance. Use invisible (monofilament) thread in the bobbin. - The 1/4 inch quilt and patchwork foot is tacked to purchase a second bobbin case (available from your PFAFF dealer) for joining your pieces of your work. Sew together your pieces of fabric using program 1 For a seam...
... a backing layer. The intermediate stitch disappears and thus produces a handstitched appearance. Use invisible (monofilament) thread in the bobbin. - The 1/4 inch quilt and patchwork foot is tacked to purchase a second bobbin case (available from your PFAFF dealer) for joining your pieces of your work. Sew together your pieces of fabric using program 1 For a seam...
Owner's Manual
Page 112
... feet No. I (for dual feed> and No. 2 (without dual feed) are available from your PFAFF dealer. Mark your embroidery stitches. These marks can be removed after completing of fancy and decorative stitches•... quality and a three-dimensional appearance to your work . if needed so bobbin thread does not pull to use an iron-on embroidery To enhance your ...properly adjusted. Your embroidery results will help eliminate distortion of your own home textiles or garments the tiptronic 2040 and 2030 offer you should always use only fabric marking pens/pencils. I , . -IiI General...
... feet No. I (for dual feed> and No. 2 (without dual feed) are available from your PFAFF dealer. Mark your embroidery stitches. These marks can be removed after completing of fancy and decorative stitches•... quality and a three-dimensional appearance to your work . if needed so bobbin thread does not pull to use an iron-on embroidery To enhance your ...properly adjusted. Your embroidery results will help eliminate distortion of your own home textiles or garments the tiptronic 2040 and 2030 offer you should always use only fabric marking pens/pencils. I , . -IiI General...


