
Owner's Manual
Page 4
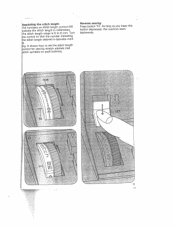
... sure you unplug the power cord whenever you have to leave the machine or want to avoid finger injuries by the needle when sewing. Parts of this appliance may not correspond with the coloured marking identifying the terminals in your sewing machine On Model 1047 parts 111, 112, 113 and 115 are omitted, ...on Model 1067, parts 111, 112 and 115. 4 Some safety rules a) Be careful to clean it, oil it or change mechanical and accessory parts. c) Be sure to use only a 15-watt light bulb in the sewing lamp. 100...
... sure you unplug the power cord whenever you have to leave the machine or want to avoid finger injuries by the needle when sewing. Parts of this appliance may not correspond with the coloured marking identifying the terminals in your sewing machine On Model 1047 parts 111, 112, 113 and 115 are omitted, ...on Model 1067, parts 111, 112 and 115. 4 Some safety rules a) Be careful to clean it, oil it or change mechanical and accessory parts. c) Be sure to use only a 15-watt light bulb in the sewing lamp. 100...
Owner's Manual
Page 6
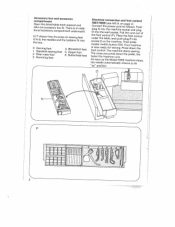
strYhteaesorsutpsrdemosdewaawlnc,ihnttihhgne.ee As the soon as needle the Model 1069 machine stops, automatically returns to its "up" position. 7- P 2 J Accessory box and accessory compartment ttOiaokpneeanlotauhctecaecdscesetoasrcsyohracybolmbeopwxaorNtrm.kTeshnuetprpeuonisrdteaarnnneadadtdh.i t0Ihll.etoPb6so,hxto.hwesnheoewdleths eansdnatph-eonbosbebwininsgfifteientto 0 Darning foot Standard sewing foot 2 Clear-view foot 3 Hemming foot 4 Blindstitch foot 5 Zipper foot 6 Buttonhole foot Electrical connection and foot control tu0p1Chnl0eouid6nngef7tnoroN...
strYhteaesorsutpsrdemosdewaawlnc,ihnttihhgne.ee As the soon as needle the Model 1069 machine stops, automatically returns to its "up" position. 7- P 2 J Accessory box and accessory compartment ttOiaokpneeanlotauhctecaecdscesetoasrcsyohracybolmbeopwxaorNtrm.kTeshnuetprpeuonisrdteaarnnneadadtdh.i t0Ihll.etoPb6so,hxto.hwesnheoewdleths eansdnatph-eonbosbebwininsgfifteientto 0 Darning foot Standard sewing foot 2 Clear-view foot 3 Hemming foot 4 Blindstitch foot 5 Zipper foot 6 Buttonhole foot Electrical connection and foot control tu0p1Chnl0eouid6nngef7tnoroN...
Owner's Manual
Page 7
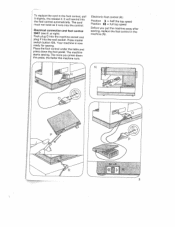
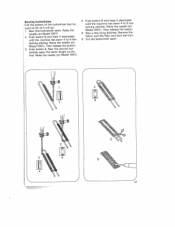
..., the release it runs into the wall socket. Press master switch button 104. The machine starts sewing. Place press the foot control under the table and down the pedal, the faster the machine runs. To replace the cord in the machine (N). The cord must not twist as it . at right) Push plug 0 into the...
..., the release it runs into the wall socket. Press master switch button 104. The machine starts sewing. Place press the foot control under the table and down the pedal, the faster the machine runs. To replace the cord in the machine (N). The cord must not twist as it . at right) Push plug 0 into the...
Owner's Manual
Page 13
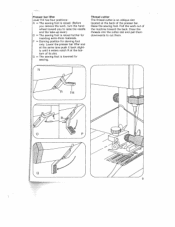
... thread cutter is an oblique slot located at the bot tom of its slot. Presser bar lifter Lever 114 has four positions: N = The sewing foot is raised. (Before you remove the work out of the machine toward you to cut them downwards to raise the needle and the take-up lever.) o = The... sewing foot is raised further for inserting extra-thick materials. Pull the work , turn the hand wheel toward the back. Lower the presser bar lifter...
... thread cutter is an oblique slot located at the bot tom of its slot. Presser bar lifter Lever 114 has four positions: N = The sewing foot is raised. (Before you remove the work out of the machine toward you to cut them downwards to raise the needle and the take-up lever.) o = The... sewing foot is raised further for inserting extra-thick materials. Pull the work , turn the hand wheel toward the back. Lower the presser bar lifter...
Owner's Manual
Page 15
Regulating the stitch length ttirhhnhedeeiccnsaotutinetmtcrthbohleelressnsotgoitttnhchhasrttailttenchnghegetlnheiusnimgn0tbhmteoircl6oliinnmmdtreiomctela.rt1siTn.0ug6rn e stitch length desired is opposite mark 0 shows how to set the stitch length trol for sewing stretch stitches (red th symbols on push buttons). As long as you keep this button depressed, the machine sews backwards. 11 I0 Reverse sewing Press button 117.
Regulating the stitch length ttirhhnhedeeiccnsaotutinetmtcrthbohleelressnsotgoitttnhchhasrttailttenchnghegetlnheiusnimgn0tbhmteoircl6oliinnmmdtreiomctela.rt1siTn.0ug6rn e stitch length desired is opposite mark 0 shows how to set the stitch length trol for sewing stretch stitches (red th symbols on push buttons). As long as you keep this button depressed, the machine sews backwards. 11 I0 Reverse sewing Press button 117.
Owner's Manual
Page 21
... Free arm cover 121 must be pressed during sew ing. ) 17 The button can be Tk(iehmpetpPocfrlatoafsfnet1d0.w6h9enharse-aorsdpeericnigal>.bobbin Needle positions "up" and "down" A(rtprcsto1oreeherofef0trmetefwatre6,asnilrai9sniibtengnih)esurntgheeedshtstdtweioanasdNinnite"nonidenlngwiaiditetgtgstneletsuheahrd"rtir"ienslunnumuepi,ppnunto"dtt"hgpehveoeepdeewpatdos.hfonlnsaieeW sdniu"bitdtipfriiothbsaiiowhccnebuneaa.nartl(titrwW fcowondyo)rneasrohhe,ywluesediasingennhlnphewededrtvynieienogicessrgusoaveesr the machine stops. Electronic bobbin thread monitor T(mbo1hiu0noet6ntw9irhte...
... Free arm cover 121 must be pressed during sew ing. ) 17 The button can be Tk(iehmpetpPocfrlatoafsfnet1d0.w6h9enharse-aorsdpeericnigal>.bobbin Needle positions "up" and "down" A(rtprcsto1oreeherofef0trmetefwatre6,asnilrai9sniibtengnih)esurntgheeedshtstdtweioanasdNinnite"nonidenlngwiaiditetgtgstneletsuheahrd"rtir"ienslunnumuepi,ppnunto"dtt"hgpehveoeepdeewpatdos.hfonlnsaieeW sdniu"bitdtipfriiothbsaiiowhccnebuneaa.nartl(titrwW fcowondyo)rneasrohhe,ywluesediasingennhlnphewededrtvynieienogicessrgusoaveesr the machine stops. Electronic bobbin thread monitor T(mbo1hiu0noet6ntw9irhte...
Owner's Manual
Page 25
.... Raise the needle (on Model 1067). 4 Push button B and keep it will go. 1 Sew first buttonhole seam. Sew the second but tonhole seam the same length as it depressed until the machine has sewn 4 to 6 bar tacking stitches. Raise the needle (on Model 1067). Remove the fabric...trim. 6 Cut the buttonhole open. 4 3 21 Then release the button. 3 Push button A. Then release the button. 5 Sew a few tying stitches. Raise the needle (on Model 1067> 2 Push button B and keep it depressed until the machine has sewn 4 to 6 bartacking stitches. Raise the needle (on Model 1067).
.... Raise the needle (on Model 1067). 4 Push button B and keep it will go. 1 Sew first buttonhole seam. Sew the second but tonhole seam the same length as it depressed until the machine has sewn 4 to 6 bar tacking stitches. Raise the needle (on Model 1067). Remove the fabric...trim. 6 Cut the buttonhole open. 4 3 21 Then release the button. 3 Push button A. Then release the button. 5 Sew a few tying stitches. Raise the needle (on Model 1067> 2 Push button B and keep it depressed until the machine has sewn 4 to 6 bartacking stitches. Raise the needle (on Model 1067).
Owner's Manual
Page 26
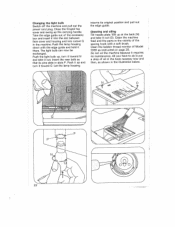
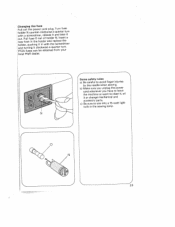
... instructed on page 25. All you have to do is put a drop of the sewing hook with the edge guide and hold it into the slot between face cover and housing and into cutout Q in the machine. Let the lamp housing resume its pins slide in the illustration below. 22 Take the... edge guide out of Model 1069 as shown in slots P. Push the lamp housing down with a soft brush. Cleaning and oiling...
... instructed on page 25. All you have to do is put a drop of the sewing hook with the edge guide and hold it into the slot between face cover and housing and into cutout Q in the machine. Let the lamp housing resume its pins slide in the illustration below. 22 Take the... edge guide out of Model 1069 as shown in slots P. Push the lamp housing down with a soft brush. Cleaning and oiling...
Owner's Manual
Page 27
....amderarceIrnrnewttyatsefudotkeurhrrruesnttiereuv.iaretnr local Pfaff dealer. Some safety rules a) Be careful to clean it, oil it or change mechanical and accessory parts. b) Make sure you unplug the power cord whenever you have to leave the machine or want to avoid finger injuries by the needle when sewing. c) Be sure... to use only a 15-watt light bulb in the sewing lamp. 4 N 23
....amderarceIrnrnewttyatsefudotkeurhrrruesnttiereuv.iaretnr local Pfaff dealer. Some safety rules a) Be careful to clean it, oil it or change mechanical and accessory parts. b) Make sure you unplug the power cord whenever you have to leave the machine or want to avoid finger injuries by the needle when sewing. c) Be sure... to use only a 15-watt light bulb in the sewing lamp. 4 N 23
Owner's Manual
Page 29
...eofvFtt.ehurIenfrduymanomauasethetnahrtvraeselwatdroituecdllhee.samvTeahcitshhieinsempuaarnctlhiecisunslea,trhleyevreiemnispfooarrtpaainestchewoorhtfewfnahbcirlhieci,ldubrneednseuarrrteehetaorsoesuwwniidtn.cgh 25 Machine runs with difficulty Thread ends in hook raceway. The machine sews The machine is not running Insert new fuse. The sewing lamp lights up, but the machine is set for only one basting. ... put a drop of accumulated feed dog. lint. Machine feeds irregularly Lint has rows of 7Ttlciha.nhamedrsEeeipflca,re,...
...eofvFtt.ehurIenfrduymanomauasethetnahrtvraeselwatdroituecdllhee.samvTeahcitshhieinsempuaarnctlhiecisunslea,trhleyevreiemnispfooarrtpaainestchewoorhtfewfnahbcirlhieci,ldubrneednseuarrrteehetaorsoesuwwniidtn.cgh 25 Machine runs with difficulty Thread ends in hook raceway. The machine sews The machine is not running Insert new fuse. The sewing lamp lights up, but the machine is set for only one basting. ... put a drop of accumulated feed dog. lint. Machine feeds irregularly Lint has rows of 7Ttlciha.nhamedrsEeeipflca,re,...


