
Owner's Manual
Page 2
...the top cover Removing and opening the swing-out arm Accessory box and accessory compartment Electrical connection Foot control Placing spool of thread on pin Upper threading Threading the needle Disengaging the sewing mechanism Bobbin winding... lifter Thread cutter Thread tensions Regulating the stitch length Reverse sewing Finger-tip controls 1027 Finger-tip controls 1025 Selecting utility stitches Selecting stretch stitches Utility- and stretch-stitch combinations 1027 Selecting the needle position for straight stitching Droppingthemachinefeed Changing the needle Changingthesewingfoot Special...
...the top cover Removing and opening the swing-out arm Accessory box and accessory compartment Electrical connection Foot control Placing spool of thread on pin Upper threading Threading the needle Disengaging the sewing mechanism Bobbin winding... lifter Thread cutter Thread tensions Regulating the stitch length Reverse sewing Finger-tip controls 1027 Finger-tip controls 1025 Selecting utility stitches Selecting stretch stitches Utility- and stretch-stitch combinations 1027 Selecting the needle position for straight stitching Droppingthemachinefeed Changing the needle Changingthesewingfoot Special...
Owner's Manual
Page 4
...-out sewing arm with accessory compartment 38 Needle plate 39 Sewing foot holder with sewing foot 40 Needle holder with screw 41 Needle thread tension 42 Presser bar lifter 43 Presser bar with thread cutter 44 Reverse-feed control 45 Stitch chart (Model 1027) 46 Accessory box with accessory compartment underneath 47 Bobbin winder...
...-out sewing arm with accessory compartment 38 Needle plate 39 Sewing foot holder with sewing foot 40 Needle holder with screw 41 Needle thread tension 42 Presser bar lifter 43 Presser bar with thread cutter 44 Reverse-feed control 45 Stitch chart (Model 1027) 46 Accessory box with accessory compartment underneath 47 Bobbin winder...
Owner's Manual
Page 7
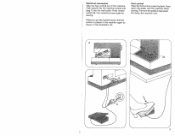
Push plug B into the machine socket and plug C into the wall outlet. Press master switch 34. Foot control Place the foot control under the table. When you put the machine away, the foot control is depressed, the faster the machine runs. 3 Electrical connection Take the foot control out of the machine. The more the pedal is placed in the machine again as shown in the illustration (A). Your machine is now readyfor sewing. Press down the pedal, and the machine starts sewing.
Push plug B into the machine socket and plug C into the wall outlet. Press master switch 34. Foot control Place the foot control under the table. When you put the machine away, the foot control is depressed, the faster the machine runs. 3 Electrical connection Take the foot control out of the machine. The more the pedal is placed in the machine again as shown in the illustration (A). Your machine is now readyfor sewing. Press down the pedal, and the machine starts sewing.
Owner's Manual
Page 22
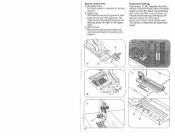
...1 9 (A). Regulate the stitch density in the buttonhole range of the foot, pull it taut and clamp it in position with screw H. Attach the buttonhole foot. This serves to determine the buttonhole length. B Zipper foot First insert its rear pin into groove F, then push its front pin ...into groove G. The zipper foot can be adjusted sideways for stitching along scale F. C Darning foot Remove the sewing foot holder and secure the darning foot in front lug D. Special sewing feet A Blindstitch foot Blindstich guide E is adjusted by turning screw D. Insert the...
...1 9 (A). Regulate the stitch density in the buttonhole range of the foot, pull it taut and clamp it in position with screw H. Attach the buttonhole foot. This serves to determine the buttonhole length. B Zipper foot First insert its rear pin into groove F, then push its front pin ...into groove G. The zipper foot can be adjusted sideways for stitching along scale F. C Darning foot Remove the sewing foot holder and secure the darning foot in front lug D. Special sewing feet A Blindstitch foot Blindstich guide E is adjusted by turning screw D. Insert the...


