

Owner's Manual
Page 3
...5 Changing Presser Foot 6 Threading Machine 6 Winding Bobbin 7 Bobbin Winder Stop 7 Threading Removing Upper Thread Bobbin Case 7 8 BITnrhsinreegratiindngigngUBpBoboLbboibnwineCrCasTaesheread 9 9 10 Controls 10 Stitch Pattern 11 Limit Lever 11 Stitch Length 11 Reverse Stitch 12 Tension Tension Pressure of of Upper Lower Thread Thread 12 13 14 Fabric Feed 14 Sewing Light And Light Switch 15 ThaTOrotpefRroaertmioMonvakeoinfTghTehDeiWffMeorraekcnhtinTeypes of Seam Staystitching Zig-zag Stitching Zig-zag Stitch 21 Shell Stitch Edging 21 Bartacks 22 Satin...
...5 Changing Presser Foot 6 Threading Machine 6 Winding Bobbin 7 Bobbin Winder Stop 7 Threading Removing Upper Thread Bobbin Case 7 8 BITnrhsinreegratiindngigngUBpBoboLbboibnwineCrCasTaesheread 9 9 10 Controls 10 Stitch Pattern 11 Limit Lever 11 Stitch Length 11 Reverse Stitch 12 Tension Tension Pressure of of Upper Lower Thread Thread 12 13 14 Fabric Feed 14 Sewing Light And Light Switch 15 ThaTOrotpefRroaertmioMonvakeoinfTghTehDeiWffMeorraekcnhtinTeypes of Seam Staystitching Zig-zag Stitching Zig-zag Stitch 21 Shell Stitch Edging 21 Bartacks 22 Satin...
Owner's Manual
Page 9
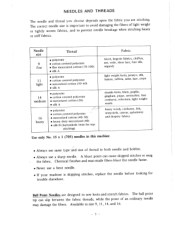
... to sew knits and stretch fabrics. The ball point tip can cause skipped stitches or snag the fabric. Available in both needle and bobbin. • Always use a bent needle. • If your machine is important to avoid damaging the fibers of thread in size 9, 11, 14, and 16. -5-- NEEDLES AND THREADS The needle and thread you choose depends upon the fabric you are designed to prevent needle breakage when stitching...
... to sew knits and stretch fabrics. The ball point tip can cause skipped stitches or snag the fabric. Available in both needle and bobbin. • Always use a bent needle. • If your machine is important to avoid damaging the fibers of thread in size 9, 11, 14, and 16. -5-- NEEDLES AND THREADS The needle and thread you choose depends upon the fabric you are designed to prevent needle breakage when stitching...
Owner's Manual
Page 15
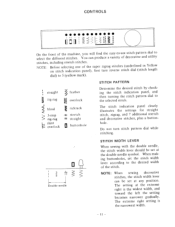
... reverse stitch dial (stitch length dial) to utility stitches, including stretch stitches. The setting at the double needle symbol. you You will find the can be set at any position. straight t zig-zag blind 3-step zig-zag slant overlock feather overlock rickrack II stretch III St ía igh buttonhole STITCH PATTERN Determine the desired stitch by check ing the stitch indication panel, and then turning the stitch pattern dial to -use stitch pattern variety of the super panel), first zigzag stitches (underlined iii Yellow turn stitch pattern dial while stitching...
... reverse stitch dial (stitch length dial) to utility stitches, including stretch stitches. The setting at the double needle symbol. you You will find the can be set at any position. straight t zig-zag blind 3-step zig-zag slant overlock feather overlock rickrack II stretch III St ía igh buttonhole STITCH PATTERN Determine the desired stitch by check ing the stitch indication panel, and then turning the stitch pattern dial to -use stitch pattern variety of the super panel), first zigzag stitches (underlined iii Yellow turn stitch pattern dial while stitching...
Owner's Manual
Page 16
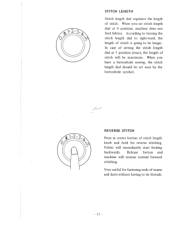
... stitch length dial to tie threads. 12- - When you set near by the buttonhole symbol. Very useful for reverse stitching. Release button and machine will immediately start feeding backwards. In case of setting the stitch length dial at 0 position, machine does not feed fabrics. Fabric will resume normal forward stitching. When you have a buttonhole sewing, the stitch length dial should be maximum. REVERSE STITCH Press in center button of stitch length knob and hold for fastening ends of stitch will be set stitch length dial at 5 position (max), the length of seams...
... stitch length dial to tie threads. 12- - When you set near by the buttonhole symbol. Very useful for reverse stitching. Release button and machine will immediately start feeding backwards. In case of setting the stitch length dial at 0 position, machine does not feed fabrics. Fabric will resume normal forward stitching. When you have a buttonhole sewing, the stitch length dial should be maximum. REVERSE STITCH Press in center button of stitch length knob and hold for fastening ends of stitch will be set stitch length dial at 5 position (max), the length of seams...
Owner's Manual
Page 17
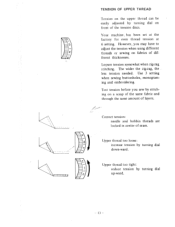
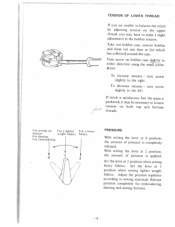
.... TENSION OF UPPER THREAD Tension on the upper thread can be easily adjusted by turning dial up-ward. 13- Use 3 setting when sewing buttonholes, monogram ing and embroidering. Your machine, has been set at the factory for even thread tension at 6 setting. Upper thread too loose: increase tension by stitch ing on a scrap of the same fabric and through the same amount of seam. Correct tension: needle and bobbin threads are locked in center of layers. Loosen tension somewhat when zig-zag stitching. However, you sew...
.... TENSION OF UPPER THREAD Tension on the upper thread can be easily adjusted by turning dial up-ward. 13- Use 3 setting when sewing buttonholes, monogram ing and embroidering. Your machine, has been set at the factory for even thread tension at 6 setting. Upper thread too loose: increase tension by stitch ing on a scrap of the same fabric and through the same amount of seam. Correct tension: needle and bobbin threads are locked in center of layers. Loosen tension somewhat when zig-zag stitching. However, you sew...
Owner's Manual
Page 18
... fabrics For darning For cmbroiderin For a heavy fabrics 0 1 2 PRESSURE With setting the lever at o position, the amount of pressure is completely released. Turn screw on the upper thread, you are unable to balance the stitch by adjusting tension on bobbin case slightly in the bobbin tension. Adjust the pressure regulator according to make a slight adjustment in either direction using the small screw driver: To increase tension - For sewing on both top and bottom threads. If stitch is satisfactory but the seam...
... fabrics For darning For cmbroiderin For a heavy fabrics 0 1 2 PRESSURE With setting the lever at o position, the amount of pressure is completely released. Turn screw on the upper thread, you are unable to balance the stitch by adjusting tension on bobbin case slightly in the bobbin tension. Adjust the pressure regulator according to make a slight adjustment in either direction using the small screw driver: To increase tension - For sewing on both top and bottom threads. If stitch is satisfactory but the seam...

Owner's Manual
Page 23
...stitch in the straight stitch position to prevent needle from hitting presser foot. Adjust stitch length according to your fabric. Raise presser foot and turn fabric using the straight stitch foot, be sure stitch pattern knob is the most usual type of seams by backstitching to secure the threads. When using needle as a pivot. STRAIGHT STITCHING Machine Setting - 1 Presser foot Stitch pattern STRAIGHT STITCH Umit lever ] Stitch length Fabric feed Straight stitch zig-zag foot çFree I WA This is in reverse to edge, then sew forward to end of dart in new direction...
...stitch in the straight stitch position to prevent needle from hitting presser foot. Adjust stitch length according to your fabric. Raise presser foot and turn fabric using the straight stitch foot, be sure stitch pattern knob is the most usual type of seams by backstitching to secure the threads. When using needle as a pivot. STRAIGHT STITCHING Machine Setting - 1 Presser foot Stitch pattern STRAIGHT STITCH Umit lever ] Stitch length Fabric feed Straight stitch zig-zag foot çFree I WA This is in reverse to edge, then sew forward to end of dart in new direction...
Owner's Manual
Page 24
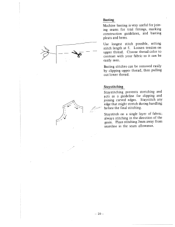
..., setting stitch length at 5. --s-- Basting Machine basting is very useful for join ing seams for clipping and joining curved edges. always stitching in the seam allowance. 20 - - Loosen tension on a single layer of the grain. Basting stitches can be removed easily by clipping upper thread, then pulling out lower thread. Staystitch any edge that might stretch during handling before the final stitching. Place stitching 3mm away from seamline in the direction of fabric...
..., setting stitch length at 5. --s-- Basting Machine basting is very useful for join ing seams for clipping and joining curved edges. always stitching in the seam allowance. 20 - - Loosen tension on a single layer of the grain. Basting stitches can be removed easily by clipping upper thread, then pulling out lower thread. Staystitch any edge that might stretch during handling before the final stitching. Place stitching 3mm away from seamline in the direction of fabric...
Owner's Manual
Page 25
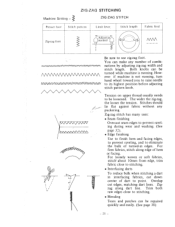
... close to its highest position before adjusting stitch pattern knob. Machine Setting ZlG-ZAG STiTCHING ZIG-ZAG STITCH Presser foot j Stitch pattern Limit lever Stitch length Fabric feed Zig-zag foOt / 'I 'N Be sure to stitching. • Mending Tears and patches can be repaired quickly and easily. (See page 38) 21 - Zig-zag stitch has many uses: • Seam finishing Overcast seam edges to prevent ravel ing during wear and washing. (See page 32). • Edge finishing Use to finish hem and facing edges, to...
... close to its highest position before adjusting stitch pattern knob. Machine Setting ZlG-ZAG STiTCHING ZIG-ZAG STITCH Presser foot j Stitch pattern Limit lever Stitch length Fabric feed Zig-zag foOt / 'I 'N Be sure to stitching. • Mending Tears and patches can be repaired quickly and easily. (See page 38) 21 - Zig-zag stitch has many uses: • Seam finishing Overcast seam edges to prevent ravel ing during wear and washing. (See page 32). • Edge finishing Use to finish hem and facing edges, to...
Owner's Manual
Page 26
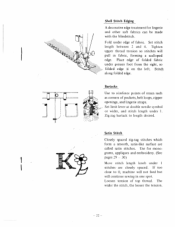
... edge of folded fabric under edge of top thread. Bartacks Use to 0, machine will not feed but will pull in one spot. Set limit lever at double needle symbol or wider, and stitch length under I stitches are called satin stitches. Loosen tension of fabric. Satin Stitch Closely spaced zig-zag stitches which form a smooth, satin-like surface are closely spaced. The wider the stitch, the looser the tension. 22 - - Fold under presser foot from the right...
... edge of folded fabric under edge of top thread. Bartacks Use to 0, machine will not feed but will pull in one spot. Set limit lever at double needle symbol or wider, and stitch length under I stitches are called satin stitches. Loosen tension of fabric. Satin Stitch Closely spaced zig-zag stitches which form a smooth, satin-like surface are closely spaced. The wider the stitch, the looser the tension. 22 - - Fold under presser foot from the right...
Owner's Manual
Page 30
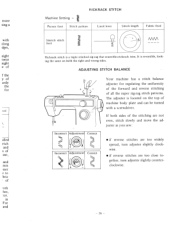
... of machine body plate and can be turned with a screwdriver. If both the right and wrong sides. The adjuster is reversible, look ing the same on the top of 'o rk he s, ice. For and RICKRACK STITCH Machine Setting -- Presser foot Stitch pattern Limit lever Stitch length Fabric feed Stretch stitch Rickrack stitch is a triple stitched zig-zag that resembles rickrack trim, It is located on both sides of all the super zig-zag stitch patterns. more...
... of machine body plate and can be turned with a screwdriver. If both the right and wrong sides. The adjuster is reversible, look ing the same on the top of 'o rk he s, ice. For and RICKRACK STITCH Machine Setting -- Presser foot Stitch pattern Limit lever Stitch length Fabric feed Stretch stitch Rickrack stitch is a triple stitched zig-zag that resembles rickrack trim, It is located on both sides of all the super zig-zag stitch patterns. more...
Owner's Manual
Page 34
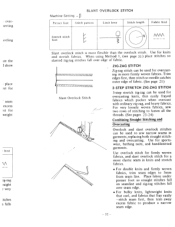
... presser foot so straight stitches fall on seamline and zig-zag stitches fall over seam edge. • For bulky knits, lightweight knits that curl, and fabrics that fray easily -stitch seam first, then trim away excess fabric to produce a narrow seam edge. 32 - - SLANT OVERLOCK STITCH Presser fool Stitch pattcrn Limit lever Stitch length Fabric feed Stretch stitch foot --- When using Method I show place st for seam excess st for overcast ing in knits and stretch fabrics. • For double...
... presser foot so straight stitches fall on seamline and zig-zag stitches fall over seam edge. • For bulky knits, lightweight knits that curl, and fabrics that fray easily -stitch seam first, then trim away excess fabric to produce a narrow seam edge. 32 - - SLANT OVERLOCK STITCH Presser fool Stitch pattcrn Limit lever Stitch length Fabric feed Stretch stitch foot --- When using Method I show place st for seam excess st for overcast ing in knits and stretch fabrics. • For double...

Owner's Manual
Page 35
... for straight or slightly curved hems. Turn up hem the desired width and press. For better control, use cloth guide as the fabric. Press hem. It provides a durable hem that straight stitches will fall on right side of the folded edge. For a less bulky hem in place. finish raw edge of four straight stitches and one thread of garment. Presser foot Stitch pattern Limit lever Stitch length Fabric feed Zig-zag foot Blindstitch consists of hem with tape...
... for straight or slightly curved hems. Turn up hem the desired width and press. For better control, use cloth guide as the fabric. Press hem. It provides a durable hem that straight stitches will fall on right side of the folded edge. For a less bulky hem in place. finish raw edge of four straight stitches and one thread of garment. Presser foot Stitch pattern Limit lever Stitch length Fabric feed Zig-zag foot Blindstitch consists of hem with tape...
Owner's Manual
Page 36
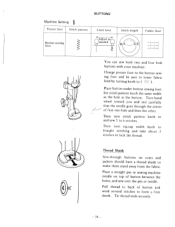
... back of button between the holes, and sew over the pin or needle. jf Thread Shank Sew-through the center of first one hole and then the other. Set stitch pattern knob the same width as the hole in the button. Pull thread to 6 stitches. Place button under button sewing foot. Turn hand wheel toward you and test carefully that the needle goes through buttons on top of button and wind around stitches to ( ). } Machine Setting Presser foot Stitch pattern BUTTONS Limit lever Button sewing foot Stitch length Fabric feed - -
... back of button between the holes, and sew over the pin or needle. jf Thread Shank Sew-through the center of first one hole and then the other. Set stitch pattern knob the same width as the hole in the button. Pull thread to 6 stitches. Place button under button sewing foot. Turn hand wheel toward you and test carefully that the needle goes through buttons on top of button and wind around stitches to ( ). } Machine Setting Presser foot Stitch pattern BUTTONS Limit lever Button sewing foot Stitch length Fabric feed - -

Owner's Manual
Page 38
... buttonhole foot so needle enters fabric on the mark at end -nearest you. STEP 3- Draw upper thread through to #4. Turn stitch pattern knob to #1. to #3. Place fabric under side. 36 - - Raise needle to its highest position. Stitch left side of button hole the same length as first row. Raise needle to its highest position. Set stitch length knob to 0 so machine does not feed, and turn stitch pattern knob to securely fasten stitches. Make 2 or 3 stitches to straight stitch...
... buttonhole foot so needle enters fabric on the mark at end -nearest you. STEP 3- Draw upper thread through to #4. Turn stitch pattern knob to #1. to #3. Place fabric under side. 36 - - Raise needle to its highest position. Stitch left side of button hole the same length as first row. Raise needle to its highest position. Set stitch length knob to 0 so machine does not feed, and turn stitch pattern knob to securely fasten stitches. Make 2 or 3 stitches to straight stitch...

Owner's Manual
Page 39
... fabric. Raise needle to the left so that needle passes through notch on right side of needle Zipper foot allows you to stitch right next to the cord with zipper foot. ZIPPERS Left side of needle Right side of foot. Lower needle slowly to be moved to its highest position, attach zipper foot, and set dials for stitching. Machine Setting - First, make welting by covering cord ing with bias fabric and stitching close to a raised area such as a zipper or cording...
... fabric. Raise needle to the left so that needle passes through notch on right side of needle Zipper foot allows you to stitch right next to the cord with zipper foot. ZIPPERS Left side of needle Right side of foot. Lower needle slowly to be moved to its highest position, attach zipper foot, and set dials for stitching. Machine Setting - First, make welting by covering cord ing with bias fabric and stitching close to a raised area such as a zipper or cording...

Owner's Manual
Page 40
... of hole or worn area. Patches Stitch patch into place around edge of material. 'abric feed stitch right as a zipper justable so r right side rig to turn position, dials for reinforcement. step stretch zig-zag stitch. When mending a three-cornered tear. Trim raw edges close am using Machine Setting MENDING AND DARNING MENDING or Presser foot Stitch pattern Zig-zag foot Stretch stitch foot K ) Limit lever Stitch length Fabric feed /W\ Tears and patches can be stitche easily and quickly with zig-zag or 3. stitch from...
... of hole or worn area. Patches Stitch patch into place around edge of material. 'abric feed stitch right as a zipper justable so r right side rig to turn position, dials for reinforcement. step stretch zig-zag stitch. When mending a three-cornered tear. Trim raw edges close am using Machine Setting MENDING AND DARNING MENDING or Presser foot Stitch pattern Zig-zag foot Stretch stitch foot K ) Limit lever Stitch length Fabric feed /W\ Tears and patches can be stitche easily and quickly with zig-zag or 3. stitch from...
Owner's Manual
Page 42
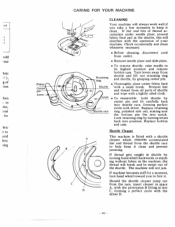
... machine will always work well if you to its highest position and remove bric bobbin case. g of shuttle and wipe with a lightly oiled cloth. 'hen • To reassemble: hold shuttle by grasping center pin. Remove lint and thread from outlet. 'our • Remove needle plate and slide plate. • To remove shuttle: raise needle to free it clean. bric n to help keep it . Lock retaining ring by turning hand wheel backwards or stitch ing without fabric...
... machine will always work well if you to its highest position and remove bric bobbin case. g of shuttle and wipe with a lightly oiled cloth. 'hen • To reassemble: hold shuttle by grasping center pin. Remove lint and thread from outlet. 'our • Remove needle plate and slide plate. • To remove shuttle: raise needle to free it clean. bric n to help keep it . Lock retaining ring by turning hand wheel backwards or stitch ing without fabric...
Owner's Manual
Page 43
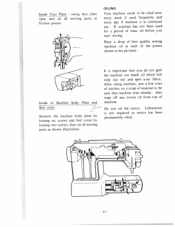
... that you start sewing. OILING Your machine needs to be oiled once every week if used for a period of Machine Body Plate and Bed cover Remove the machine body plate by loosing six screws and bed cover by loosing two screws, then oil all moving parts as motor has been permanently oiled. 41 - - Do not oil the motor. It is not required as shown illustration. Lubrication is important that machine sews cleanly. Inside Face__Plate - After oiling machine, sew a few rows...
... that you start sewing. OILING Your machine needs to be oiled once every week if used for a period of Machine Body Plate and Bed cover Remove the machine body plate by loosing six screws and bed cover by loosing two screws, then oil all moving parts as motor has been permanently oiled. 41 - - Do not oil the motor. It is not required as shown illustration. Lubrication is important that machine sews cleanly. Inside Face__Plate - After oiling machine, sew a few rows...
Owner's Manual
Page 45
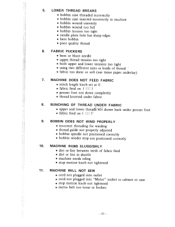
... sizes or kinds of fabric feed • dirt or lint in shuttle • machine needs oiling • stop motion knob not tightened 11. LOWER THREAD BREAKS • bobbin case threaded incorrectly • bobbin case inserted incorrectly in cabinet or case • stop not positioned correctly 10. MACHINE WILL NOT SEW • cord not plugged into outlet • cord not plugged into "Motor" socket in machine • bobbin wound unevenly • bobbin wound too full • bobbin tension too tight • needle plate hole...
... sizes or kinds of fabric feed • dirt or lint in shuttle • machine needs oiling • stop motion knob not tightened 11. LOWER THREAD BREAKS • bobbin case threaded incorrectly • bobbin case inserted incorrectly in cabinet or case • stop not positioned correctly 10. MACHINE WILL NOT SEW • cord not plugged into outlet • cord not plugged into "Motor" socket in machine • bobbin wound unevenly • bobbin wound too full • bobbin tension too tight • needle plate hole...


