
Owner's Manual
Page 6
... drop info water or other user servicing adjustments mentioned in this sewing machine only for HOUSEHOLD use bent or blunt needles. Do not pull or push fabric while stitching. The sewing machine should iIvty ' i'll,',' . Alw,y' imphit appliance from the accumulation of lint, dust, and loose cloth 9. Never operate this manual. Keep ventilation openings 1 $ the sewing machine and foot control free from the electric outlet immediately after using this sewing machire' r. The wrong plate...
... drop info water or other user servicing adjustments mentioned in this sewing machine only for HOUSEHOLD use bent or blunt needles. Do not pull or push fabric while stitching. The sewing machine should iIvty ' i'll,',' . Alw,y' imphit appliance from the accumulation of lint, dust, and loose cloth 9. Never operate this manual. Keep ventilation openings 1 $ the sewing machine and foot control free from the electric outlet immediately after using this sewing machire' r. The wrong plate...
Owner's Manual
Page 8
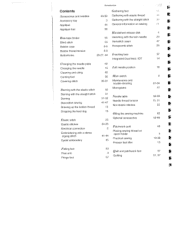
...foot Covering stitch Darning with the elastic stitch Darning with the straight stitch Darning Decorative sewing Drawing up the bobbin thread Dropping the feed dog Elastic stitch Elastic stitches Electrical connection Embroidering with a dense zigzag stitch Eyelet embroidery 62 15 62 56 30-31 32 31 31-32 41 -47 12 15 25 24-25 2 41 -44 Left needle position Main switch Maintenance and trouble-shooting Monograms Needle table Needle thread tension Non-elastic stitches Oiling the sewing machine Optional accessories Patchwork quilt Placing sewing thread on spool holder Practical sewing Presser foot...
...foot Covering stitch Darning with the elastic stitch Darning with the straight stitch Darning Decorative sewing Drawing up the bobbin thread Dropping the feed dog Elastic stitch Elastic stitches Electrical connection Embroidering with a dense zigzag stitch Eyelet embroidery 62 15 62 56 30-31 32 31 31-32 41 -47 12 15 25 24-25 2 41 -44 Left needle position Main switch Maintenance and trouble-shooting Monograms Needle table Needle thread tension Non-elastic stitches Oiling the sewing machine Optional accessories Patchwork quilt Placing sewing thread on spool holder Practical sewing Presser foot...

Owner's Manual
Page 9
... Sewing light 63 Sewing on buttons 28 Sewing on patches 32 Sewing on zippers 34-35 Sewing table Introduction Shirring foot 53 Smocking 29 Special accessories table 52 Stabilizing edges 36 Standard buttonhole 27 Standard buttonhole with gimp thread 27 Stitch density 17 Stitch length adjustment dial 17 Stitch selection dial 18 Straight stitch 22 Stretch triple straight stitch 24 Stretch triple zigzag stitch 24 Top-stitching Trouble-shooting Twin needle 21 64 11,29 Utility stitch table Introduction Winding from the second spool holder 6 Winding the bobbin...
... Sewing light 63 Sewing on buttons 28 Sewing on patches 32 Sewing on zippers 34-35 Sewing table Introduction Shirring foot 53 Smocking 29 Special accessories table 52 Stabilizing edges 36 Standard buttonhole 27 Standard buttonhole with gimp thread 27 Stitch density 17 Stitch length adjustment dial 17 Stitch selection dial 18 Straight stitch 22 Stretch triple straight stitch 24 Stretch triple zigzag stitch 24 Top-stitching Trouble-shooting Twin needle 21 64 11,29 Utility stitch table Introduction Winding from the second spool holder 6 Winding the bobbin...

Owner's Manual
Page 10
... all sewing and top-stitching require a right needle position. For serging, appliqué, tapering operations which Zigzag stitch: and cording work up to 6 mm For serging and tapering, eyelet appliqué. for blouses oi hod in' n Fseoarmin/voivsiebrlceahsteimngm. Jn.rroductio Stitch table (non-elastic stitches) j. . 3.J Li ! >< ... * Stitch [Description A/B/C Buttonhole H Blind stitch with zigzag (elastic) E Straight stitch, 15 needle positions Stitch width dial set at 0 Zigzag stitch, 15 needle positions, stitch width dial set at 0.5 - 5 Left needle position (for...
... all sewing and top-stitching require a right needle position. For serging, appliqué, tapering operations which Zigzag stitch: and cording work up to 6 mm For serging and tapering, eyelet appliqué. for blouses oi hod in' n Fseoarmin/voivsiebrlceahsteimngm. Jn.rroductio Stitch table (non-elastic stitches) j. . 3.J Li ! >< ... * Stitch [Description A/B/C Buttonhole H Blind stitch with zigzag (elastic) E Straight stitch, 15 needle positions Stitch width dial set at 0 Zigzag stitch, 15 needle positions, stitch width dial set at 0.5 - 5 Left needle position (for...
Owner's Manual
Page 13
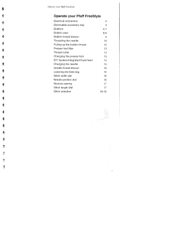
Operate your Pfaff FreeStyle Operate your Pfaff FreeSty'e Electrical connection Removable accessory tray Bobbins Bobbin case Bobbin thread tension Threading the needle Pulling up the bobbin thread Presser foot lifter Thread cutter Changing the presser foot IDT System/Integrated Dual Feed Changing the needle Needle thread tension Lowering the feed dog Stitch width dial Needle position dial Reverse sewing Stitch length dial Stitch selection 2 3 4-7 8-9 9 10 12 13 13 13 14 15 15 15 16 16 17 17 18-19
Operate your Pfaff FreeStyle Operate your Pfaff FreeSty'e Electrical connection Removable accessory tray Bobbins Bobbin case Bobbin thread tension Threading the needle Pulling up the bobbin thread Presser foot lifter Thread cutter Changing the presser foot IDT System/Integrated Dual Feed Changing the needle Needle thread tension Lowering the feed dog Stitch width dial Needle position dial Reverse sewing Stitch length dial Stitch selection 2 3 4-7 8-9 9 10 12 13 13 13 14 15 15 15 16 16 17 17 18-19
Owner's Manual
Page 15
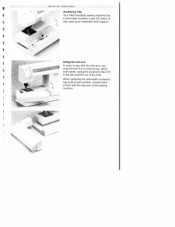
When replacing the removable accessory tray to its proper position, ensure that it out of the sewing machine. Using both hands, swing the accessory tray (27) to sew with the free arm of the hole. Using the free arm In order to the left and lift it is also used as an extended work support. Operat' your Pfriff FreeSt',k Accessory tray Your Pfaff FreeStyle sewing machine has a removable accessory tray (27) which is flush with the free arm, you must remove the accessory tray.
When replacing the removable accessory tray to its proper position, ensure that it out of the sewing machine. Using both hands, swing the accessory tray (27) to sew with the free arm of the hole. Using the free arm In order to the left and lift it is also used as an extended work support. Operat' your Pfriff FreeSt',k Accessory tray Your Pfaff FreeStyle sewing machine has a removable accessory tray (27) which is flush with the free arm, you must remove the accessory tray.
Owner's Manual
Page 18
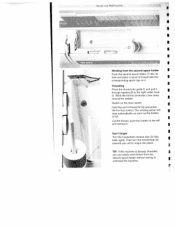
...'t forget: Turn the handwheel release disk (3) fully back again. I Switch on the main switch I Push the second spool holder (7) into its hole and place a spool of thread firmly and press the the foot control. Cut the thread, push the bobbin to the right under hook S D. Wind the thread clockwise a few times around the bobbin. V 6 Operate your Pfaff FreeStyle a * S S $ S L ZEE t S S Winding from the second spool holder without having to unthread the machine.
...'t forget: Turn the handwheel release disk (3) fully back again. I Switch on the main switch I Push the second spool holder (7) into its hole and place a spool of thread firmly and press the the foot control. Cut the thread, push the bobbin to the right under hook S D. Wind the thread clockwise a few times around the bobbin. V 6 Operate your Pfaff FreeStyle a * S S $ S L ZEE t S S Winding from the second spool holder without having to unthread the machine.
Owner's Manual
Page 27
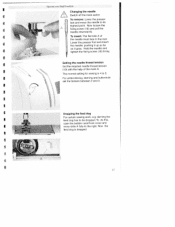
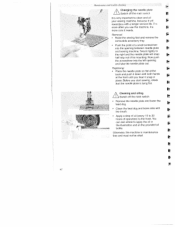
... To remove: Lower the presser foot and move slide A fully to be dropped. Dropping the feed dog I For certain sewing work, e.g. darning the feed dog has to the right. Now the feed dog is 4 to its highest point. Hold the needle and tighten the fixing screw (16) firmly. For embroidering, darning and buttonhole set the tension between 2 and 3. To insert: The flat side A of the mark A. To do this, open the bobbin case/hook cover and move the needle to...
... To remove: Lower the presser foot and move slide A fully to be dropped. Dropping the feed dog I For certain sewing work, e.g. darning the feed dog has to the right. Now the feed dog is 4 to its highest point. Hold the needle and tighten the fixing screw (16) firmly. For embroidering, darning and buttonhole set the tension between 2 and 3. To insert: The flat side A of the mark A. To do this, open the bobbin case/hook cover and move the needle to...
Owner's Manual
Page 29
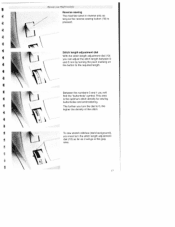
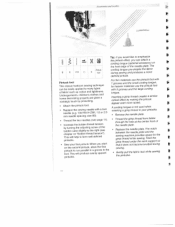
41 4 tI I 4 Operate your Pfaff FreeStyle Reverse sewing The machine sews in the grey area. '7 This area is pressed. To sew stretch stitches (dark background), you must turn the dial to the required length. \\ Between the numbers 0 and 1 you turn the stitch length adjustment dial (19) as far as the reverse sewing button (18) is the optimum stitch density for sewing buttonholes and embroidering. Stitch length adjustment dial With the stitch length adjustment dial (19) you can adjust the stitch length between 0 and 6 mm by turning...
41 4 tI I 4 Operate your Pfaff FreeStyle Reverse sewing The machine sews in the grey area. '7 This area is pressed. To sew stretch stitches (dark background), you must turn the dial to the required length. \\ Between the numbers 0 and 1 you turn the stitch length adjustment dial (19) as far as the reverse sewing button (18) is the optimum stitch density for sewing buttonholes and embroidering. Stitch length adjustment dial With the stitch length adjustment dial (19) you can adjust the stitch length between 0 and 6 mm by turning...

Owner's Manual
Page 33
... The normal setting for top-stitching work. Perfect tension Too high tension Too low tension Topstitching Straight stitch E can always guide the sewing foot along the guide marks on the needle plate or use the edge guide (standard accessory No.8). Sewing aid for thick seams I To ensure a consistent feed when beginning sewing at a thick seam, we I ('nsure perfect sewing results, the nindle and bobbin thread tensions must be interlaced between the two fabric pieces. If the needle thread tension is...
... The normal setting for top-stitching work. Perfect tension Too high tension Too low tension Topstitching Straight stitch E can always guide the sewing foot along the guide marks on the needle plate or use the edge guide (standard accessory No.8). Sewing aid for thick seams I To ensure a consistent feed when beginning sewing at a thick seam, we I ('nsure perfect sewing results, the nindle and bobbin thread tensions must be interlaced between the two fabric pieces. If the needle thread tension is...

Owner's Manual
Page 34
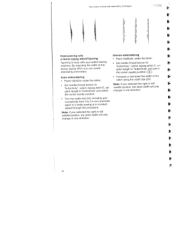
...: When the blind stitch fool is the basic straight stitch. The stitch length can be positioned halfway under the sewing toot. You can adjust this case, the material should only be reducn I 3-5 0/1 2E 2 ' IL E 2-m 1-2 e 3-5 0/1 Straight stitch Stitch E is used for overcasting with adjusting screw A. For overcasting difficult materials, blind stitch foot No. 3 is at its highest position when adjusting the needle position. Zigzag stitch In addition to overlock stitching, zigzag stitch E, stitch width 5 , is easier to 15 different needle positions (see page...
...: When the blind stitch fool is the basic straight stitch. The stitch length can be positioned halfway under the sewing toot. You can adjust this case, the material should only be reducn I 3-5 0/1 2E 2 ' IL E 2-m 1-2 e 3-5 0/1 Straight stitch Stitch E is used for overcasting with adjusting screw A. For overcasting difficult materials, blind stitch foot No. 3 is at its highest position when adjusting the needle position. Zigzag stitch In addition to overlock stitching, zigzag stitch E, stitch width 5 , is easier to 15 different needle positions (see page...

Owner's Manual
Page 36
... hem from you as far as it will go for hems on T-shirts and underwear. Stretch triple zigzag stitch The stretch triple zigzag stitch is a highly elastic and decorative seam which is needed, e.g. inside trouser seams. Turn the stitch length dial away from the right side. t Utility stitches and prauical sewing I E • 0 Stretch 3-5 oil I • E 3-5 Stretch 3-5 0/1 Stretch triple straight stitch This stitch is used for sewing all seams where great strength is very suitable for the longest stitch length...
... hem from you as far as it will go for hems on T-shirts and underwear. Stretch triple zigzag stitch The stretch triple zigzag stitch is a highly elastic and decorative seam which is needed, e.g. inside trouser seams. Turn the stitch length dial away from the right side. t Utility stitches and prauical sewing I E • 0 Stretch 3-5 oil I • E 3-5 Stretch 3-5 0/1 Stretch triple straight stitch This stitch is used for sewing all seams where great strength is very suitable for the longest stitch length...

Owner's Manual
Page 39
... yoLi would like to the required length. Sew the left and right of the Inllonhole to sew very [Inc buttonholes, you can reduce the 4 buttonhole width with scissors or a seam ripper. Sew the right side of the gimp thread into the buttonhole and cut the threads. Clamp the threads to approx. 3 mm, Use the 4 ('enter needle position Slect stitch A. Slide the buttonhole runner as far forwards as...
... yoLi would like to the required length. Sew the left and right of the Inllonhole to sew very [Inc buttonholes, you can reduce the 4 buttonhole width with scissors or a seam ripper. Sew the right side of the gimp thread into the buttonhole and cut the threads. Clamp the threads to approx. 3 mm, Use the 4 ('enter needle position Slect stitch A. Slide the buttonhole runner as far forwards as...

Owner's Manual
Page 41
... sewing I : I l :i ' I Hemming with the twin needle Use the twin needle to make sure that you select the center Don't forget, the higher the bobbin thread tension, the more intense the gathering needle position . To prevent the set at the beginning and end of the seam on the right side of fabric desired for beautiful smocking work with the elastic thread, you should use an additional bobbin case and wind the bobbin by hand with the elastic thread...
... sewing I : I l :i ' I Hemming with the twin needle Use the twin needle to make sure that you select the center Don't forget, the higher the bobbin thread tension, the more intense the gathering needle position . To prevent the set at the beginning and end of the seam on the right side of fabric desired for beautiful smocking work with the elastic thread, you should use an additional bobbin case and wind the bobbin by hand with the elastic thread...
Owner's Manual
Page 54
...change in one direction. Note: If you can create interesting embroidery. Uneven embroidering Place stabilizer under the fabric. • Set needle thread tension to "buttonhole". Decorath e sewing and embroidery rechinque i I I I fr. Even embroidering Place stabilizer under the fabric. Embrokiering with a dense zigzag stitch/Tapering Tapering is easy with your select sewing machine By adjusting the width of the stitch using the width dial (24). select zigzag stitch E, set stitch length to 0 while sewing at a constant speed through the procedure. Set needle thread tension...
...change in one direction. Note: If you can create interesting embroidery. Uneven embroidering Place stabilizer under the fabric. • Set needle thread tension to "buttonhole". Decorath e sewing and embroidery rechinque i I I I fr. Even embroidering Place stabilizer under the fabric. Embrokiering with a dense zigzag stitch/Tapering Tapering is easy with your select sewing machine By adjusting the width of the stitch using the width dial (24). select zigzag stitch E, set stitch length to 0 while sewing at a constant speed through the procedure. Set needle thread tension...

Owner's Manual
Page 62
.4cce, sories uul iicedle Presser feet (normal accr'; n 0 Standard presser foot P Part No. 98-694 816-00 1 C'ear view foot (Fancy-stitch foot not suitable for lop feed) Part No. 98-694 864-01 3 BHnd stftch and overtock foot Part No. 98-694-890-00 4 Zpperand edgestitchng foot Part No. 98-694 884-00 5 Buttonhoe foot Part No. 93-036 990-91
.4cce, sories uul iicedle Presser feet (normal accr'; n 0 Standard presser foot P Part No. 98-694 816-00 1 C'ear view foot (Fancy-stitch foot not suitable for lop feed) Part No. 98-694 864-01 3 BHnd stftch and overtock foot Part No. 98-694-890-00 4 Zpperand edgestitchng foot Part No. 98-694 884-00 5 Buttonhoe foot Part No. 93-036 990-91

Owner's Manual
Page 64
... patchwork sewing Patchwork foot (with bias tape For cording work . They are available f tu' charge from your dealer Accessory Appliqué foot Part No. synth. For embroidering leather a. For overstitching cords For sewing yarn and ribben For embroidery work All types of the special accessory feet Needle plate with round hole 98-694 822-00 For topstitching seams and sewing very light and soft materials_(silk_jersey_etc) Felling foot 4.5 mm Felling_foot 6.5 mm Gathering foot Multi-stitch gathering foot (remove sewing holder) Cording foot Eyelet plate...
... patchwork sewing Patchwork foot (with bias tape For cording work . They are available f tu' charge from your dealer Accessory Appliqué foot Part No. synth. For embroidering leather a. For overstitching cords For sewing yarn and ribben For embroidery work All types of the special accessory feet Needle plate with round hole 98-694 822-00 For topstitching seams and sewing very light and soft materials_(silk_jersey_etc) Felling foot 4.5 mm Felling_foot 6.5 mm Gathering foot Multi-stitch gathering foot (remove sewing holder) Cording foot Eyelet plate...
Owner's Manual
Page 66
... 2.0 mm needle spacing; size 80). • Remove the needle plate. .1cce orie, uui d1e p E 0 2,5 Pintuck Tip: If you would like to emphasize the pintuck effect, you start • Replace the needle plate. Feed the gimp thread under the work support so that it does not become knotted during sewing and produces a more raised. with Pintuck foot 7 grooves and the small cording tongue, This classic heirloom sewing technique...
... 2.0 mm needle spacing; size 80). • Remove the needle plate. .1cce orie, uui d1e p E 0 2,5 Pintuck Tip: If you would like to emphasize the pintuck effect, you start • Replace the needle plate. Feed the gimp thread under the work support so that it does not become knotted during sewing and produces a more raised. with Pintuck foot 7 grooves and the small cording tongue, This classic heirloom sewing technique...
Owner's Manual
Page 74
... way out of operation) to the right and the needle plate will rewardyou with a longer service life. I ; Cleaning and oiling Switch off the main switch It is very important to clean and oil your sewing machine, because it needs. Removal: • Raise the sewing foot and remove the removable accessory tray. • Push the point of a small screwdriver into the left opening between needle plate and sewing machine. Clean the feed dog and hook area with...
... way out of operation) to the right and the needle plate will rewardyou with a longer service life. I ; Cleaning and oiling Switch off the main switch It is very important to clean and oil your sewing machine, because it needs. Removal: • Raise the sewing foot and remove the removable accessory tray. • Push the point of a small screwdriver into the left opening between needle plate and sewing machine. Clean the feed dog and hook area with...

Owner's Manual
Page 76
... threads. Feed dog is unevenly wound. If you leave the machine, even for thread. Needle is threaded. Check how machine is bent or blunt. Thread is not properly inserted. Adjust thread tension. Only use perfect threads Do not wind thread free-hand, but run it . Insert new needle. Remove the threads and apply one drop of fabric, Check top and bottom tensions. Do not start the threaded machine without fabric in it fully into the stop. Maintenance and trouble- chooring Troubeshooting Problem: The machine...
... threads. Feed dog is unevenly wound. If you leave the machine, even for thread. Needle is threaded. Check how machine is bent or blunt. Thread is not properly inserted. Adjust thread tension. Only use perfect threads Do not wind thread free-hand, but run it . Insert new needle. Remove the threads and apply one drop of fabric, Check top and bottom tensions. Do not start the threaded machine without fabric in it fully into the stop. Maintenance and trouble- chooring Troubeshooting Problem: The machine...


