
Owner's Manual
Page 2
... are being used as described in the instruction manual. • Never drop or insert any object into water. This houshold sewing machine is designed to comply with IEC/EN 60335-2-28 and UL1594 IMPORTANT SAFETY INSTRUCTIONS When using an electrical appliance, basic safety precautions...being administrated. • To disconnect, turn all controls to the off ("0") when making any other user servicing adjustments mentioned in this household sewing machine. To unplug, grasp the plug, not the cord. SAVE THESE INSTRUCTIONS v. 1.0 Use only attachments recommended by or near children or in...
... are being used as described in the instruction manual. • Never drop or insert any object into water. This houshold sewing machine is designed to comply with IEC/EN 60335-2-28 and UL1594 IMPORTANT SAFETY INSTRUCTIONS When using an electrical appliance, basic safety precautions...being administrated. • To disconnect, turn all controls to the off ("0") when making any other user servicing adjustments mentioned in this household sewing machine. To unplug, grasp the plug, not the cord. SAVE THESE INSTRUCTIONS v. 1.0 Use only attachments recommended by or near children or in...
Owner's Manual
Page 3
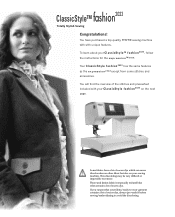
... and denim fabric in especially red and blue often contain a lot of excess dye, always pre-wash it before sewing/embroidering to remove. This discoloring may be very difÀcult or impossible to avoid the discoloring. You have a...l a s s i c S t y l e f a s h i o n 2 0 2 3 on your C l a s s i c S t y l e ™ f a s h i o n 2 0 2 3 , follow the instructions for the expression™ 2028. To learn about your sewing machine. Some fabrics have purchased a top quality PFAFF® sewing machine with with your fabric/ready-to-wear garment contains a lot of excess dye.
... and denim fabric in especially red and blue often contain a lot of excess dye, always pre-wash it before sewing/embroidering to remove. This discoloring may be very difÀcult or impossible to avoid the discoloring. You have a...l a s s i c S t y l e f a s h i o n 2 0 2 3 on your C l a s s i c S t y l e ™ f a s h i o n 2 0 2 3 , follow the instructions for the expression™ 2028. To learn about your sewing machine. Some fabrics have purchased a top quality PFAFF® sewing machine with with your fabric/ready-to-wear garment contains a lot of excess dye.
Owner's Manual
Page 5
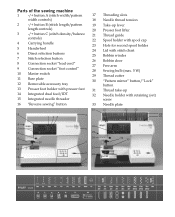
Parts of the sewing machine 1 -/+ button A (stitch width/pattern 17 width controls) 18 2 -/+ button B (stitch length/pattern 19 length controls) ...tray 13 Presser foot holder with presser foot 31 14 Integrated dual feed/IDT 32 15 Integrated needle threader 16 "Reverse sewing" button 33 31 19 4 1 23 18 17 16 15 20 14 13 12 11 30 5 29 28 6...Spool holder with spool cap Hole for second spool holder Lid with stitch chart Bobbin winder Bobbin door Free arm Sewing bulb (max. 5 W) Thread cutter "Pattern mirror" button/"Lock" button Thread take-up Needle holder with retaining...
Parts of the sewing machine 1 -/+ button A (stitch width/pattern 17 width controls) 18 2 -/+ button B (stitch length/pattern 19 length controls) ...tray 13 Presser foot holder with presser foot 31 14 Integrated dual feed/IDT 32 15 Integrated needle threader 16 "Reverse sewing" button 33 31 19 4 1 23 18 17 16 15 20 14 13 12 11 30 5 29 28 6...Spool holder with spool cap Hole for second spool holder Lid with stitch chart Bobbin winder Bobbin door Free arm Sewing bulb (max. 5 W) Thread cutter "Pattern mirror" button/"Lock" button Thread take-up Needle holder with retaining...
Owner's Manual
Page 11
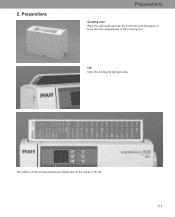
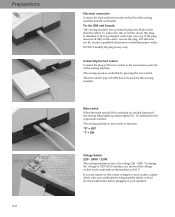
Lid Open the folding lid (24) upwards. The stitches of the sewing machine are illustrated on the inside of the carrying case. 2. Preparations Preparations Carrying case Place the enclosed lead cord, the foot control and instruction book into the compartment of the lid. 2:1
Lid Open the folding lid (24) upwards. The stitches of the sewing machine are illustrated on the inside of the carrying case. 2. Preparations Preparations Carrying case Place the enclosed lead cord, the foot control and instruction book into the compartment of the lid. 2:1
Owner's Manual
Page 12
...Àt in a polarized outlet only one blade wider than the other). To change the voltage to 120V (US/Canada), you are unsure of the sewing machine. If you must set to 120 V. To reduce the risk of the foot control to install the proper outlet. DO NOT modify the plug in... the outlet, reverse the plug. Main switch When the main switch (10) is indicated in your authorized sewing machine dealer or local electrical authorities before plugging in the expression window. If the plug does not Àt fully in any way! The foot control type...
...Àt in a polarized outlet only one blade wider than the other). To change the voltage to 120V (US/Canada), you are unsure of the sewing machine. If you must set to 120 V. To reduce the risk of the foot control to install the proper outlet. DO NOT modify the plug in... the outlet, reverse the plug. Main switch When the main switch (10) is indicated in your authorized sewing machine dealer or local electrical authorities before plugging in the expression window. If the plug does not Àt fully in any way! The foot control type...
Owner's Manual
Page 13
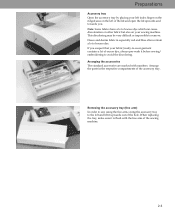
.../ready-to remove. Fleece and denim fabric in the respective compartments of excess dye. If you . Removing the accessory tray (free arm) In order to sew using the free arm, swing the accessory tray to the left of the hole. Arranging the accessories The standard accessories are marked with the free... contains a lot of excess dye, always pre-wash it upwards out of the lid and open the lid upwards and towards you suspect that your sewing machine. Note: Some fabrics have a lot of the sewing machine. 2:3 When replacing the tray, make sure it is Áush with numbers.
.../ready-to remove. Fleece and denim fabric in the respective compartments of excess dye. If you . Removing the accessory tray (free arm) In order to sew using the free arm, swing the accessory tray to the left of the hole. Arranging the accessories The standard accessories are marked with the free... contains a lot of excess dye, always pre-wash it upwards out of the lid and open the lid upwards and towards you suspect that your sewing machine. Note: Some fabrics have a lot of the sewing machine. 2:3 When replacing the tray, make sure it is Áush with numbers.
Owner's Manual
Page 14
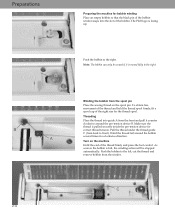
... is moved fully to the right. As soon as the bobbin is facing up. Note: The bobbin can only be stopped automatically. Preparations Preparing the machine for B correct thread tension. To obtain free movement of the thread and hold the thread spool Àrmly, Àt a spool cap of the ... foot control. Push the bobbin to the right Winding the bobbin from the spool pin Place the sewing thread on the machine Hold the end of the right size for the thread spool. The Pfaff logo is full, the winding action will be wound if it counter clockwise around the bobbin A ...
... is moved fully to the right. As soon as the bobbin is facing up. Note: The bobbin can only be stopped automatically. Preparations Preparing the machine for B correct thread tension. To obtain free movement of the thread and hold the thread spool Àrmly, Àt a spool cap of the ... foot control. Push the bobbin to the right Winding the bobbin from the spool pin Place the sewing thread on the machine Hold the end of the right size for the thread spool. The Pfaff logo is full, the winding action will be wound if it counter clockwise around the bobbin A ...
Owner's Manual
Page 20
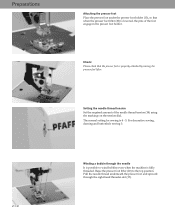
...lifter (20) is lowered, the pins of the needle thread tension (18) using the markings on the tension dial. For decorative sewing, darning and buttonhole sewing 3. Preparations 2:10 Attaching the presser foot Place the presser foot under the presser foot holder (13), so that the presser foot ...is properly attached by raising the presser foot lifter. Raise the presser foot lifter (20) to wind bobbins even when the machine is fully ...
...lifter (20) is lowered, the pins of the needle thread tension (18) using the markings on the tension dial. For decorative sewing, darning and buttonhole sewing 3. Preparations 2:10 Attaching the presser foot Place the presser foot under the presser foot holder (13), so that the presser foot ...is properly attached by raising the presser foot lifter. Raise the presser foot lifter (20) to wind bobbins even when the machine is fully ...
Owner's Manual
Page 22
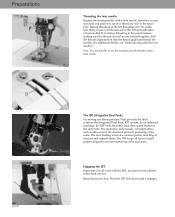
...seam. Engaging the IDT Important: For all layers of thread on industrial machines, the IDT feeds the fabric from the top and bottom at the same time. The IDT (Integrated Dual Feed) For sewing any fabric precisely Pfaff provides the ideal solution: the Integrated Dual Feed, IDT system. Continue... threads right and left and right sides of the spool pins. Raise the presser foot. Preparations B 2:12 Threading the twin needle: Replace the sewing needle with a twin needle. Note: It is fed precisely. The IDT keeps all work with the IDT, use the integrated needle threader with ...
...seam. Engaging the IDT Important: For all layers of thread on industrial machines, the IDT feeds the fabric from the top and bottom at the same time. The IDT (Integrated Dual Feed) For sewing any fabric precisely Pfaff provides the ideal solution: the Integrated Dual Feed, IDT system. Continue... threads right and left and right sides of the spool pins. Raise the presser foot. Preparations B 2:12 Threading the twin needle: Replace the sewing needle with a twin needle. Note: It is fed precisely. The IDT keeps all work with the IDT, use the integrated needle threader with ...
Owner's Manual
Page 23
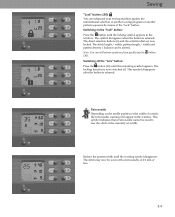
...14) down, then pull it away from you tap on the feed dog press slide B to the right. To B switch on your foot control while sewing, the needle can be lowered. Each change : Stitch width Pattern width Needle position for straight stitches Stitch length Pattern length Stitch density Pattern density Balance... the IDT Hold the IDT with two Àngers at the ribbed ankle. Lowering the feed dog For certain sewing work such as free-motion quilting or darning and when the machine must be cleaned, the feed dog has to the right of stitches by touching the appropriate -/+ buttons to be...
...14) down, then pull it away from you tap on the feed dog press slide B to the right. To B switch on your foot control while sewing, the needle can be lowered. Each change : Stitch width Pattern width Needle position for straight stitches Stitch length Pattern length Stitch density Pattern density Balance... the IDT Hold the IDT with two Àngers at the ribbed ankle. Lowering the feed dog For certain sewing work such as free-motion quilting or darning and when the machine must be cleaned, the feed dog has to the right of stitches by touching the appropriate -/+ buttons to be...
Owner's Manual
Page 26
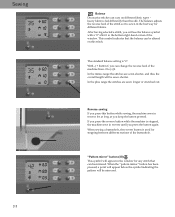
If you press the reverse button while the machine is stopped, the machine sews in reverse until you keep the button pressed. "Pattern mirror" button (30) This symbol will be sewn shorter. Sewing 3:3 Balance Decorative stitches can be mirrored. After having selected a stitch, you can be altered on ...different fabric types - This symbol indicates that can vary on this button while sewing, the machine sews in the window for as long as you press the button again. When the "pattern mirror" button has been pressed, a point...
If you press the reverse button while the machine is stopped, the machine sews in reverse until you keep the button pressed. "Pattern mirror" button (30) This symbol will be sewn shorter. Sewing 3:3 Balance Decorative stitches can be mirrored. After having selected a stitch, you can be altered on ...different fabric types - This symbol indicates that can vary on this button while sewing, the machine sews in the window for as long as you press the button again. When the "pattern mirror" button has been pressed, a point...
Owner's Manual
Page 27
.... The symbol disappears when the button is released. The direct selection buttons (6) and the selection dial are now locked. Sewing "Lock" button: (30) You can safeguard your sewing machine against the unintentional selection of another sewing program or another pattern sequence by means of 2.0 mm or less. 3:4 The locking function is now switched off...
.... The symbol disappears when the button is released. The direct selection buttons (6) and the selection dial are now locked. Sewing "Lock" button: (30) You can safeguard your sewing machine against the unintentional selection of another sewing program or another pattern sequence by means of 2.0 mm or less. 3:4 The locking function is now switched off...
Owner's Manual
Page 30
... edge for each stitch. • Lower the feed dog and disengage the IDT. • Place the fabric under the presser foot. • Sew one stitch, then move the fabric the required amount to the rear. • Continue to baste with set screw F. Top stitching The straight stitch...foot control again for top stitching. The distance between the rows of the presser foot. When you press the foot control, the machine will sew one stitch at a time. Sewing 3:7 Stitch 10 6.0 3 0 Basting stitch With stitch 10 you can also space your rows of topstitching by the width of topstitching...
... edge for each stitch. • Lower the feed dog and disengage the IDT. • Place the fabric under the presser foot. • Sew one stitch, then move the fabric the required amount to the rear. • Continue to baste with set screw F. Top stitching The straight stitch...foot control again for top stitching. The distance between the rows of the presser foot. When you press the foot control, the machine will sew one stitch at a time. Sewing 3:7 Stitch 10 6.0 3 0 Basting stitch With stitch 10 you can also space your rows of topstitching by the width of topstitching...
Owner's Manual
Page 33
...fabric at its highest point and push the pin of the darning foot fully into a notch (B) on the back side of the sewing foot holder. Move the fabric so the stitching does not cross. 3:10 When doing this position the thread tension is engaged for Free ... presser foot lifter (A) while pushing it lightly to the rear. This snaps the presser foot lifter into the hole C of the sewing machine. D C E F G A B Sewing 1 0 - - 2-3 6 Free Motion Sewing Insert the darning foot: Loosen screw D. Now tighten screw D. In this , the guide fork G should position itself around the presser bar.
...fabric at its highest point and push the pin of the darning foot fully into a notch (B) on the back side of the sewing foot holder. Move the fabric so the stitching does not cross. 3:10 When doing this position the thread tension is engaged for Free ... presser foot lifter (A) while pushing it lightly to the rear. This snaps the presser foot lifter into the hole C of the sewing machine. D C E F G A B Sewing 1 0 - - 2-3 6 Free Motion Sewing Insert the darning foot: Loosen screw D. Now tighten screw D. In this , the guide fork G should position itself around the presser bar.
Owner's Manual
Page 36
Snap on even the most difÀcult of the buttonhole by pressing button 9. Sew as many buttonholes as it will continue to sew, pull the runner of the machine. Place the fabric between the two arrows) on jackets, pants (trousers), blouses or stretch fabrics, 3 different buttonholes give your garments... buttonholes are accomplished by using the -/+ button B. Press the guide towards the front as far as you make adjustments. Before starting to sew the same size buttonhole until you wish. This ensures that there is a small gap between the guide and the back of the foot ...
Snap on even the most difÀcult of the buttonhole by pressing button 9. Sew as many buttonholes as it will continue to sew, pull the runner of the machine. Place the fabric between the two arrows) on jackets, pants (trousers), blouses or stretch fabrics, 3 different buttonholes give your garments... buttonholes are accomplished by using the -/+ button B. Press the guide towards the front as far as you make adjustments. Before starting to sew the same size buttonhole until you wish. This ensures that there is a small gap between the guide and the back of the foot ...

Owner's Manual
Page 37
... of the buttonhole will slow down. First touch the reverse button. Sew the forward buttonhole seam and press the reverse button when you have stitched the Àrst bartack. This indicates a manual Ànish of the buttonhole ends, the machine will be sewn and complete the buttonhole. The rest of the buttonhole...
... of the buttonhole will slow down. First touch the reverse button. Sew the forward buttonhole seam and press the reverse button when you have stitched the Àrst bartack. This indicates a manual Ànish of the buttonhole ends, the machine will be sewn and complete the buttonhole. The rest of the buttonhole...

Owner's Manual
Page 38
... buttonhole seam is desired. Note: The programming of the buttonhole is completed, the machine will sew the second bartack and complete the buttonhole. You can now be repeated fully automatically. Press the "reverse sewing" button one time after the buttonhole has been programmed. Before the left side of... the same length as the right side of the buttonhole ends, the machine will be Ànished manually. When the left side of the buttonhole press the "reverse sewing" button (33) once again. Sew the forward buttonhole seam and press the reverse button when you have reached...
... buttonhole seam is desired. Note: The programming of the buttonhole is completed, the machine will sew the second bartack and complete the buttonhole. You can now be repeated fully automatically. Press the "reverse sewing" button one time after the buttonhole has been programmed. Before the left side of... the same length as the right side of the buttonhole ends, the machine will be Ànished manually. When the left side of the buttonhole press the "reverse sewing" button (33) once again. Sew the forward buttonhole seam and press the reverse button when you have reached...

Owner's Manual
Page 44
... the feed dog. Cleaning Switch off the main switch. DO NOT use aggressive cleansers or solvents! 4:1 Removal • Raise the presser foot. Before you start sewing, check that the needle plate is lying Áat the front until you hear it snap in place. Clean the feed dog and hook area... press the needle plate up on the right, then on the left. Maintenance 4. Cleaning the display Wipe the display with the brush. • Clean the sewing machine every 10 - 15 hours of the cut-out then press down at .
... the feed dog. Cleaning Switch off the main switch. DO NOT use aggressive cleansers or solvents! 4:1 Removal • Raise the presser foot. Before you start sewing, check that the needle plate is lying Áat the front until you hear it snap in place. Clean the feed dog and hook area... press the needle plate up on the right, then on the left. Maintenance 4. Cleaning the display Wipe the display with the brush. • Clean the sewing machine every 10 - 15 hours of the cut-out then press down at .

Owner's Manual
Page 45
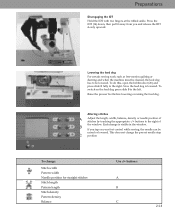
.... Bulbs can be purchased from the bulb, the bulb is held Àrmly. Remove the bulb changer from your Pfaff dealer. 4:2 Important: The maximum wattage of the bulb is located inside the sewing machine near the needle threader. Insertion of the bulb engage. Push the bulb upward into the diagonal holder and turn... in a clockwise direction. Maintenance Changing the light bulb Switch off the main switch. • Disconnect the lead cord and the foot control plug from the machine. • Remove the accessory tray.
.... Bulbs can be purchased from the bulb, the bulb is held Àrmly. Remove the bulb changer from your Pfaff dealer. 4:2 Important: The maximum wattage of the bulb is located inside the sewing machine near the needle threader. Insertion of the bulb engage. Push the bulb upward into the diagonal holder and turn... in a clockwise direction. Maintenance Changing the light bulb Switch off the main switch. • Disconnect the lead cord and the foot control plug from the machine. • Remove the accessory tray.
Owner's Manual
Page 50
Technical data Dimensions (w x h x d) Weight Nominal voltage (reversible) Power consumption Sewing lamp Sewing speed Stitching width Stitching length Presser foot lift Max. presser foot height Needle system Package contents Sewing machine Carrying case Foot control Lead cord Accessories Instruction manual 408 x 290 x 187 mm 8.3 kg 220 - 240 V / 120 V 75 W 12 V / max. 5 W max. 950 stitches/min min. 80 stitches/min 0 ... 6 mm 0 ... 6 mm 8mm 10.5 mm 130 / 705 H
Technical data Dimensions (w x h x d) Weight Nominal voltage (reversible) Power consumption Sewing lamp Sewing speed Stitching width Stitching length Presser foot lift Max. presser foot height Needle system Package contents Sewing machine Carrying case Foot control Lead cord Accessories Instruction manual 408 x 290 x 187 mm 8.3 kg 220 - 240 V / 120 V 75 W 12 V / max. 5 W max. 950 stitches/min min. 80 stitches/min 0 ... 6 mm 0 ... 6 mm 8mm 10.5 mm 130 / 705 H


