
Owner's Manual
Page 2
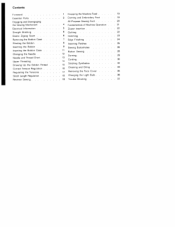
... Case Changing the Needle Needle and Thread Chart Upper Threading Drawing Up the Bobbin Thread • Correct Tension Regulation Regulating the Tensions Stitch Length Regulation Reverse Sewing • . • 1 Dropping the Machine Feed 2 Darning and Embroidery Foot • All-Purpose Sewing Foot 4 Fundamentals of Machine Operation 5 Zipper Insertion 6 Quilting 6 Hemming 7 Edge Finishing 8 Inserting Patches 9 Sewing Buttonholes 11 Button Sewing 12 Darning 13 Cording 14 15 Stitching Synthetics 16 Cleaning and Oiling 17 Removing the Face Cover 18 Changing tho Light Bulb 18 Trouble...
... Case Changing the Needle Needle and Thread Chart Upper Threading Drawing Up the Bobbin Thread • Correct Tension Regulation Regulating the Tensions Stitch Length Regulation Reverse Sewing • . • 1 Dropping the Machine Feed 2 Darning and Embroidery Foot • All-Purpose Sewing Foot 4 Fundamentals of Machine Operation 5 Zipper Insertion 6 Quilting 6 Hemming 7 Edge Finishing 8 Inserting Patches 9 Sewing Buttonholes 11 Button Sewing 12 Darning 13 Cording 14 15 Stitching Synthetics 16 Cleaning and Oiling 17 Removing the Face Cover 18 Changing tho Light Bulb 18 Trouble...
Owner's Manual
Page 3
... owner of important sewing jobs. Follow these simple instructions and sewing with a number of a Pfaff 9, the sewing machine which will enable you to help you understand the machine and familiarize you with your Pfaff dealer. This instruction book will help you at any sewing problems, please con tact your Pfaff will be glad to master all ordinary sewing, embroidering and darning jobs that may come true. If you should have any time...
... owner of important sewing jobs. Follow these simple instructions and sewing with a number of a Pfaff 9, the sewing machine which will enable you to help you understand the machine and familiarize you with your Pfaff dealer. This instruction book will help you at any sewing problems, please con tact your Pfaff will be glad to master all ordinary sewing, embroidering and darning jobs that may come true. If you should have any time...
Owner's Manual
Page 4
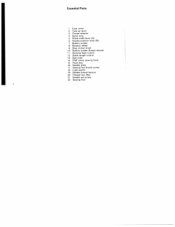
Essential Parts I Face cover 2 Take-up lever 3 Thread retainer 4 Spool pins 5 Stitch width lever (A) 6 Needle position ever (B) 7 Bobbin winder 8 Balance wheel 9 Stop motion knob 10 Bobbin winder thread retainer 11 Reverse feed control 12 Stitch length control 13 Bed slide 14 Pfaff rotary sewing hook 15 Feed dog 16 Needle plate 17 Sewing foot thumb screw 18 Light switch 19 Needle thread tension 20 Presser bar lifter 21 Needle set screw 22 Sewing foot
Essential Parts I Face cover 2 Take-up lever 3 Thread retainer 4 Spool pins 5 Stitch width lever (A) 6 Needle position ever (B) 7 Bobbin winder 8 Balance wheel 9 Stop motion knob 10 Bobbin winder thread retainer 11 Reverse feed control 12 Stitch length control 13 Bed slide 14 Pfaff rotary sewing hook 15 Feed dog 16 Needle plate 17 Sewing foot thumb screw 18 Light switch 19 Needle thread tension 20 Presser bar lifter 21 Needle set screw 22 Sewing foot
Owner's Manual
Page 5
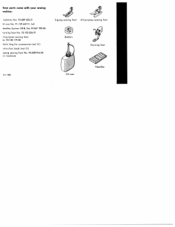
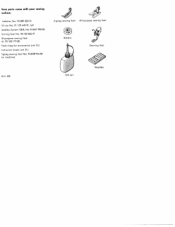
hese parts come with your sewing iachine: bobbins No. 93-009 033-21 can No. 91-129449-91,full .leedles,Systeml3OR, No.93-847 990-00 )arning foot No. 93-102 826-91 JI-purpose sewing foot io. 93-1 00 179-00 lastic bag for accessories (not ill,) struction book (not ill.) gzag sewing foot No. 93-838954-00 )fl machine) Zigzag sewing foot All-purpose sewing foot Bobbin Darning foot 774 1070 Needles
hese parts come with your sewing iachine: bobbins No. 93-009 033-21 can No. 91-129449-91,full .leedles,Systeml3OR, No.93-847 990-00 )arning foot No. 93-102 826-91 JI-purpose sewing foot io. 93-1 00 179-00 lastic bag for accessories (not ill,) struction book (not ill.) gzag sewing foot No. 93-838954-00 )fl machine) Zigzag sewing foot All-purpose sewing foot Bobbin Darning foot 774 1070 Needles
Owner's Manual
Page 8
hese parts come with your sewing iachine: bobbins No. 93-009 033-21 )il can No. 91-129 449-91, full eedles, System 130 R, No.93-847 990-00 )arning foot No. 93-1 02 826-91 Jl-purpose sewing foot o. 93-100 179-00 'lastic bag for accessories (not ill.) nstruction book (not ill.) igzag sewing foot No.93-838954-00 on machine) O774 1070 Zigzag sewing foot All-purpose sewing foot Bobbin Darning foot Oil con Needles
hese parts come with your sewing iachine: bobbins No. 93-009 033-21 )il can No. 91-129 449-91, full eedles, System 130 R, No.93-847 990-00 )arning foot No. 93-1 02 826-91 Jl-purpose sewing foot o. 93-100 179-00 'lastic bag for accessories (not ill.) nstruction book (not ill.) igzag sewing foot No.93-838954-00 on machine) O774 1070 Zigzag sewing foot All-purpose sewing foot Bobbin Darning foot Oil con Needles
Owner's Manual
Page 11
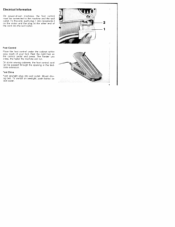
.... Dn some sewing cabinets, the foot control cord Dan be connected to the machine and the wall outlet. Rest the right foot on ace cover. Electrical Information On power-driven machines, the foot control must be passed through the opening in the bed late extension, root Drive ush sewlight plug into the wail outlet. To switch on sewlight, push button on Ihe control pedal and press.
.... Dn some sewing cabinets, the foot control cord Dan be connected to the machine and the wall outlet. Rest the right foot on ace cover. Electrical Information On power-driven machines, the foot control must be passed through the opening in the bed late extension, root Drive ush sewlight plug into the wail outlet. To switch on sewlight, push button on Ihe control pedal and press.

Owner's Manual
Page 12
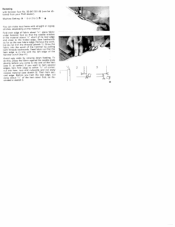
This applies likewise starting point of the needle hole in to 4). Lever B is indicated like this: A 0,8 Zigzag Sewing If you want to switch zigzag stitching flick from the center to the left of the needle vibration in straight stitching. Straight Stitching For straight-stitch sewing set: Lever A 0 Lever B Center i On pp. 22-32, the machine setting is used to move the needle from straight (A to lever A to desired 0) to stitch width (indicated by numbers I to the zigzag stitching. center or right. Lever B can be flicked to the right or left .
This applies likewise starting point of the needle hole in to 4). Lever B is indicated like this: A 0,8 Zigzag Sewing If you want to switch zigzag stitching flick from the center to the left of the needle vibration in straight stitching. Straight Stitching For straight-stitch sewing set: Lever A 0 Lever B Center i On pp. 22-32, the machine setting is used to move the needle from straight (A to lever A to desired 0) to stitch width (indicated by numbers I to the zigzag stitching. center or right. Lever B can be flicked to the right or left .
Owner's Manual
Page 18
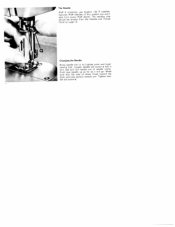
turn and pull Loosen needle set screw a. Push new needle up as far as it will go. Make sure that flat side of screw a needle half a clamp. Tighten nee dle set old needle out of shank faces toward the back and long groove toward you. Changing the Needle Bring needle bar to its highest point and lower sewing foot. esTeyhdselteemneaneaddrleeTsharvseiaazidel Chart on page 13. GashbeolneuulidfnroebmePfeacvfhfeorsnyeenePdfflarefosfmdoefthatleheirsN. The Needle Pfaff 9 machines use System 130 R needles.
turn and pull Loosen needle set screw a. Push new needle up as far as it will go. Make sure that flat side of screw a needle half a clamp. Tighten nee dle set old needle out of shank faces toward the back and long groove toward you. Changing the Needle Bring needle bar to its highest point and lower sewing foot. esTeyhdselteemneaneaddrleeTsharvseiaazidel Chart on page 13. GashbeolneuulidfnroebmePfeacvfhfeorsnyeenePdfflarefosfmdoefthatleheirsN. The Needle Pfaff 9 machines use System 130 R needles.

Owner's Manual
Page 22
When stitching sheer fabrics, set both threads interlock in the center of the material. Upper tension too tight or lower tenson too loose Upper tension too loose or lower tension too tight Both tensions properly balanced Correct Tension Regulation The tensions are properly balanced if both tensions a iittle lighter to prevent puckering. -
When stitching sheer fabrics, set both threads interlock in the center of the material. Upper tension too tight or lower tenson too loose Upper tension too loose or lower tension too tight Both tensions properly balanced Correct Tension Regulation The tensions are properly balanced if both tensions a iittle lighter to prevent puckering. -
Owner's Manual
Page 27
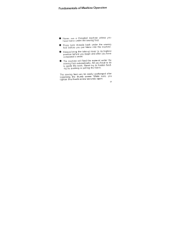
... the fabric. Fundamentals of Machine Operation • Never run a threaded machine unless you have fabric under the sewing foot. • Place both threads back under the All you have completed a seam. • The machine will feed the sewing foot automatically material under the sewing foot before you put fabric into the machine • Always bring the take-up lever to its highest position before you begin and after loosening the thumb screw.
... the fabric. Fundamentals of Machine Operation • Never run a threaded machine unless you have fabric under the sewing foot. • Place both threads back under the All you have completed a seam. • The machine will feed the sewing foot automatically material under the sewing foot before you put fabric into the machine • Always bring the take-up lever to its highest position before you begin and after loosening the thumb screw.

Owner's Manual
Page 28
Machine Setting: A 0, B • Quilting with the quilting gauge sews parallel rows of stitching at your Pfaff dealer). Pin or baste closed zipper on whether or not you want the edge of the fabric. Attract ive tea cosies, slippers, seat pads and covers can be quilted. Run a straight seam close to left edge of zipper, stitch across end and up the other side in one con tinuous operation, Use right edge...
Machine Setting: A 0, B • Quilting with the quilting gauge sews parallel rows of stitching at your Pfaff dealer). Pin or baste closed zipper on whether or not you want the edge of the fabric. Attract ive tea cosies, slippers, seat pads and covers can be quilted. Run a straight seam close to left edge of zipper, stitch across end and up the other side in one con tinuous operation, Use right edge...
Owner's Manual
Page 29
... pulling both threads backwards. Machine Setting: A 0 or 2 to within 1/2" of the hem (see sketch 2). Before you want to hem several edges, hem first edge to 3, B • You can make neat hems with hemmer foot No. 93-84] 551-00 (can be ob tained from your Pfaff dealer). Remove the work, but do this, press the fabric against the needle plate shortly before you come to the...
... pulling both threads backwards. Machine Setting: A 0 or 2 to within 1/2" of the hem (see sketch 2). Before you want to hem several edges, hem first edge to 3, B • You can make neat hems with hemmer foot No. 93-84] 551-00 (can be ob tained from your Pfaff dealer). Remove the work, but do this, press the fabric against the needle plate shortly before you come to the...

Owner's Manual
Page 30
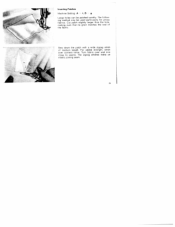
Use a long, wide zigzag stitch and sew edge with the needle taking one stitch into the fabric and the other over its edge (normal tension setting). 24 Overcasting prevents frayed edges. Overcasting Edges Machine Setting: A 2 to 4, B ..
Use a long, wide zigzag stitch and sew edge with the needle taking one stitch into the fabric and the other over its edge (normal tension setting). 24 Overcasting prevents frayed edges. Overcasting Edges Machine Setting: A 2 to 4, B ..
Owner's Manual
Page 31
IIc Turn fabric over corners twice. Inserting Patches Machine Setting: A 4, B • Large holes can be patched quickly The follow ng method may be used particularly for jersey fabrics. Cut patch slightly larger than the hole making sure that its grain matches the rest of rhe fabric. 4:1.1 Sew down the patch with a wide zigzag stitch of medium length For added strength, stitch over and trim close to seams. The zigzag stitches make an elastic joining seam.
IIc Turn fabric over corners twice. Inserting Patches Machine Setting: A 4, B • Large holes can be patched quickly The follow ng method may be used particularly for jersey fabrics. Cut patch slightly larger than the hole making sure that its grain matches the rest of rhe fabric. 4:1.1 Sew down the patch with a wide zigzag stitch of medium length For added strength, stitch over and trim close to seams. The zigzag stitches make an elastic joining seam.

Owner's Manual
Page 32
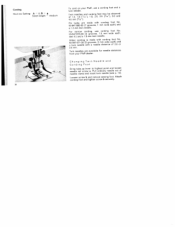
Sewing Buttonholes Machine Setting: A 1.5 (first notch), B Stitch length almost • *0* Use No. 50 embroidery thread. A buttonhole foot (see ill, at right) may be ob tained from your Pfaff dealer. Attach all-purpose sewing foot as instructed on a piece of the clear-view shoe. Sew on p 21. To obtain more prominent buttonholes, place a cotton filler thread in the left groove of scrac mate rial and regulate the stitch length correctly.
Sewing Buttonholes Machine Setting: A 1.5 (first notch), B Stitch length almost • *0* Use No. 50 embroidery thread. A buttonhole foot (see ill, at right) may be ob tained from your Pfaff dealer. Attach all-purpose sewing foot as instructed on a piece of the clear-view shoe. Sew on p 21. To obtain more prominent buttonholes, place a cotton filler thread in the left groove of scrac mate rial and regulate the stitch length correctly.

Owner's Manual
Page 33
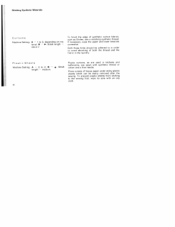
... seam. 5 Flick lever A to second notch and sew 4 to 6 bartacking stitches. 6 Move lever A to "0" and make 4 to 6 bartacking stitches, 4 Flick lever A back to 4 tying stitches. 7 Trim both the sewing and filler threads. Leave needle in fabric on right side of stitching, 3 Flick lever A to second notch (at "3") and make 3 to first notch and trim filler cord at end of first seam. Lower foot, take one stitch to the left, pull filler cord...
... seam. 5 Flick lever A to second notch and sew 4 to 6 bartacking stitches. 6 Move lever A to "0" and make 4 to 6 bartacking stitches, 4 Flick lever A back to 4 tying stitches. 7 Trim both the sewing and filler threads. Leave needle in fabric on right side of stitching, 3 Flick lever A to second notch (at "3") and make 3 to first notch and trim filler cord at end of first seam. Lower foot, take one stitch to the left, pull filler cord...
Owner's Manual
Page 36
...). Attach cording foot and tighten screw b securely. Cording Machine Setting: A 0, B = Stitch length medium ) a 1 - and a 1.2-mm twin needle. For narrow 93-847 675-00 cording, use a cording foot and a twin needle. each ) No. Changing Twin Needle and Bring take-up lever to highest point and needle set screw a. Pin tucks are available for needle distances From your Pfaff, use (5 grooves. see loosen out of 2.0 or 2.5 mm. Pull ordinary needle needle clamp and insert twin needle (see ill.) and a 1.6-mm twin needle. f- _g . 30 To cord on your Pfaff dealer...
...). Attach cording foot and tighten screw b securely. Cording Machine Setting: A 0, B = Stitch length medium ) a 1 - and a 1.2-mm twin needle. For narrow 93-847 675-00 cording, use a cording foot and a twin needle. each ) No. Changing Twin Needle and Bring take-up lever to highest point and needle set screw a. Pin tucks are available for needle distances From your Pfaff, use (5 grooves. see loosen out of 2.0 or 2.5 mm. Pull ordinary needle needle clamp and insert twin needle (see ill.) and a 1.6-mm twin needle. f- _g . 30 To cord on your Pfaff dealer...
Owner's Manual
Page 38
... of synthetic curtain fabrics. Place a piece of tissue paper under sticky plastic sheets which can be adhered to in order to the sewing foot, wipe its sole with synthetic thread or cotton and a fine needle. Both these hints should be easily removed after the sewing. If necessary, ease the upper and lower tensions somewhat. Stitch Plastic curtains, as Diolen, use a matching synthetic...
... of synthetic curtain fabrics. Place a piece of tissue paper under sticky plastic sheets which can be adhered to in order to the sewing foot, wipe its sole with synthetic thread or cotton and a fine needle. Both these hints should be easily removed after the sewing. If necessary, ease the upper and lower tensions somewhat. Stitch Plastic curtains, as Diolen, use a matching synthetic...

Owner's Manual
Page 41
Slip tip d into slot e and push face cover up until it upwards. I Removing the Face Cover Rep'acing the Face Cover To change needle bar the light bulb end, remove or the oil the parts at face cover by the pul ling it snaps into place. 35
Slip tip d into slot e and push face cover up until it upwards. I Removing the Face Cover Rep'acing the Face Cover To change needle bar the light bulb end, remove or the oil the parts at face cover by the pul ling it snaps into place. 35

Owner's Manual
Page 43
...). 2. Needle Thread Breaks Cause; above -mentioned may cause thread breakage Thread tension too tight. Check and correct threading as groove faces it will toward go and you. Remedy: See remedies listed under 1. Adlust tensions as instructed. Clean and oil hook raceway. rong needle. Needle too fine or too thick for the thread. rrouble Shooting Machine Skips Stitches Dause \Jeedle incorrectly inserted. make Use System 130 R needles only. Needle bent. Poor or knotty thread used. Use good...
...). 2. Needle Thread Breaks Cause; above -mentioned may cause thread breakage Thread tension too tight. Check and correct threading as groove faces it will toward go and you. Remedy: See remedies listed under 1. Adlust tensions as instructed. Clean and oil hook raceway. rong needle. Needle too fine or too thick for the thread. rrouble Shooting Machine Skips Stitches Dause \Jeedle incorrectly inserted. make Use System 130 R needles only. Needle bent. Poor or knotty thread used. Use good...


