

Owner's Manual
Page 1
... do not hesitate to master a large variety of sewing, embroidering and darning jobs easily and quickly. PFAFF- L ji CPFAFFI 78 CPFAFFi 79 Instructions CPFAFFi 78 and 79 Decorative Stitch Zigzag Sewing Machine Foreword ''our new Pfaff sewing machine will be glad to help you to contact your Pfaff. If you also can sew various functional seams as are used on non...
... do not hesitate to master a large variety of sewing, embroidering and darning jobs easily and quickly. PFAFF- L ji CPFAFFI 78 CPFAFFi 79 Instructions CPFAFFi 78 and 79 Decorative Stitch Zigzag Sewing Machine Foreword ''our new Pfaff sewing machine will be glad to help you to contact your Pfaff. If you also can sew various functional seams as are used on non...

Owner's Manual
Page 3
Essential Parts of Your Pfaff 78 17 16 15 14 13 2 17 14 o Face cover 1 Take-up lever 2 Thread guide 3 Top cover... 12 Reverse feed control 13 Bed cover 14 Transverse rotary hook (below bedplate) 15 Needle plate 16 Sewing foot thumb screw 17 Light switch 18 Stitch width control 19 Needle position lever 20 Needle thread tension 21... Presser bar lifter (on back of machine arm) 22 Needle set screw 23 Sewing foot 0 Face cover 1 Take-up lever 2 Thread guide 3 Top cover 4 Thread retainer stud 5 Spool ...
Essential Parts of Your Pfaff 78 17 16 15 14 13 2 17 14 o Face cover 1 Take-up lever 2 Thread guide 3 Top cover... 12 Reverse feed control 13 Bed cover 14 Transverse rotary hook (below bedplate) 15 Needle plate 16 Sewing foot thumb screw 17 Light switch 18 Stitch width control 19 Needle position lever 20 Needle thread tension 21... Presser bar lifter (on back of machine arm) 22 Needle set screw 23 Sewing foot 0 Face cover 1 Take-up lever 2 Thread guide 3 Top cover 4 Thread retainer stud 5 Spool ...

Owner's Manual
Page 4
To switch on the sewlight, push the button on the back of the machine and the plug at the other end of your foot and press down . To engage the motor, flick this lever to its top position. J S After you press, the faster the machine will run. The machines feature a ever (10) under neath the balance wheel which serves to swing the motor to its operative position. Push plug A into the receptable on the face cover (see ill.). 4 Place the foot control within easy reach of the cord into wall outlet. The harder you have completed sewing, flick this lever down the pedal.
To switch on the sewlight, push the button on the back of the machine and the plug at the other end of your foot and press down . To engage the motor, flick this lever to its top position. J S After you press, the faster the machine will run. The machines feature a ever (10) under neath the balance wheel which serves to swing the motor to its operative position. Push plug A into the receptable on the face cover (see ill.). 4 Place the foot control within easy reach of the cord into wall outlet. The harder you have completed sewing, flick this lever down the pedal.

Owner's Manual
Page 5
... -- the bobbin case s emoved just ike on the boobin tion knob away from the spindle. .1 8 4 E1Ezz. To get at o too 'ts On toe Pfaft 78. turning stop motion knob t9) toward the right. however, •,ou must brat open tree arm cover It, swinging 3 toward the left . 1 k For bobbin winding... the toread around thread retaner stud mechanism. Start the machine. To engage :he sewing mechanism ader the spindle, making sure that key A at its ocen .aton. Unci re 'eas ng the atch the ernoty 000Dm aroos cur On the Pfaff 79. B bobbin nas oeen wound, turn the s:on mo W'nd ...
... -- the bobbin case s emoved just ike on the boobin tion knob away from the spindle. .1 8 4 E1Ezz. To get at o too 'ts On toe Pfaft 78. turning stop motion knob t9) toward the right. however, •,ou must brat open tree arm cover It, swinging 3 toward the left . 1 k For bobbin winding... the toread around thread retaner stud mechanism. Start the machine. To engage :he sewing mechanism ader the spindle, making sure that key A at its ocen .aton. Unci re 'eas ng the atch the ernoty 000Dm aroos cur On the Pfaff 79. B bobbin nas oeen wound, turn the s:on mo W'nd ...
Owner's Manual
Page 7
...Thread the needle from front to the spool so that the thread is pressed against the machine base until the locking stud snaps into place (3). 1 To enlarge the sewing area of the Pfaff 79 for ordinary sewing operations, push the workplate onto the tree arm as far as illustrated: Please note that ...thread cannot unwind. On machines having no carrying case base. As you do this, hold on...
...Thread the needle from front to the spool so that the thread is pressed against the machine base until the locking stud snaps into place (3). 1 To enlarge the sewing area of the Pfaff 79 for ordinary sewing operations, push the workplate onto the tree arm as far as illustrated: Please note that ...thread cannot unwind. On machines having no carrying case base. As you do this, hold on...

Owner's Manual
Page 8
...in its center position (Fig. 2). ---/-z19 CPFAFFZ 2 Make sure take-up the bobbin thread, hold the needle thread and lower the sewing foot. Fundamentals of Machine Operation Turn Stitch control (6) clockwise (as indicated by operating the presser bar lifter (21) on the back of the desired stitch is ...at the bottom. Place both threads back under the sewing foot after you do this, check to draw up the bobbin thread. For ordinary sewing, needle position lever (19> should be in Fig. 1) until the symbol of the machine (see arrow). A Presser bar lifter up B = Presser bar...
...in its center position (Fig. 2). ---/-z19 CPFAFFZ 2 Make sure take-up the bobbin thread, hold the needle thread and lower the sewing foot. Fundamentals of Machine Operation Turn Stitch control (6) clockwise (as indicated by operating the presser bar lifter (21) on the back of the desired stitch is ...at the bottom. Place both threads back under the sewing foot after you do this, check to draw up the bobbin thread. For ordinary sewing, needle position lever (19> should be in Fig. 1) until the symbol of the machine (see arrow). A Presser bar lifter up B = Presser bar...

Owner's Manual
Page 9
...:: '!I go patterns 's explained on page 3. cussed on hl the zigzag-stitch symbol is at the bottom. Seti ng the macnine for sewing the various des go To sew onger straight-stitch seams, turn stitch control (6) on page 26 and foe following cages contain :nstruc uons 3r 'Jarious sev:ng operations. ...down the pedai. The number Indi cating the st:tch enght chosen should be rght as ar as desired. you press, the faster the machine will To sew in reverse or bacictack the end of the slot. wnle the following cages. nosneo :o be Qoposite the dot on '2". Tne stitch length s...
...:: '!I go patterns 's explained on page 3. cussed on hl the zigzag-stitch symbol is at the bottom. Seti ng the macnine for sewing the various des go To sew onger straight-stitch seams, turn stitch control (6) on page 26 and foe following cages contain :nstruc uons 3r 'Jarious sev:ng operations. ...down the pedai. The number Indi cating the st:tch enght chosen should be rght as ar as desired. you press, the faster the machine will To sew in reverse or bacictack the end of the slot. wnle the following cages. nosneo :o be Qoposite the dot on '2". Tne stitch length s...

Owner's Manual
Page 10
...to adjust the bobbin thread tension. Tighten screw (22) securely. Turn this screw right (with your machine contairs several sewing feet for a looser ten sion. Please note: Ease both tensions somewhat for sewing synthetic fabrics. 16 The accessory box which belongs to be set correctly if a slight re sistance ...tension on the upper tension dial. Numbers 0 to its shank faces :oward the back. top Both tensions correctly balanced. 3 To change the sewing foot, bring the needle bar to 10 indicate different degrees of the material. Insert new needle and push it up as far as it ...
...to adjust the bobbin thread tension. Tighten screw (22) securely. Turn this screw right (with your machine contairs several sewing feet for a looser ten sion. Please note: Ease both tensions somewhat for sewing synthetic fabrics. 16 The accessory box which belongs to be set correctly if a slight re sistance ...tension on the upper tension dial. Numbers 0 to its shank faces :oward the back. top Both tensions correctly balanced. 3 To change the sewing foot, bring the needle bar to 10 indicate different degrees of the material. Insert new needle and push it up as far as it ...

Owner's Manual
Page 11
... its original position On the Pfaff 79, the machine teed is done ny removing bed cover 13i and pressing the drop feed lever down and let it from the rear so that spnng clip c rests on the underside of the free arm. On tne Pfatf 78, this screw in sewing direction. To raise the... ma chine feed again, turn this is dropped by darn ing foot No. 93-102 826-91, attaching it return to be performed. Lower the presser bar lifter. To raise the machine feed, press th s lever down siantwise...
... its original position On the Pfaff 79, the machine teed is done ny removing bed cover 13i and pressing the drop feed lever down and let it from the rear so that spnng clip c rests on the underside of the free arm. On tne Pfatf 78, this screw in sewing direction. To raise the... ma chine feed again, turn this is dropped by darn ing foot No. 93-102 826-91, attaching it return to be performed. Lower the presser bar lifter. To raise the machine feed, press th s lever down siantwise...

Owner's Manual
Page 15
... inch larger than the hole and place it under the hole, matching its throw. into This 26 Inserting Patches l838 954 IJ Attach ordinary sewing foot. Trim away the ragged edges around the hole, cutting exactly along the edge of the patch. Elastic materials are stitched twice (see below...To overcast the edges weight fabrics, set the mum stitch width. fabric edge securely. i I Larger holes can be patched quickly. of light and machine for mediumits maxi Soft with the needle down in the material on "1' and the stitch width control in the same manner. 27 Then turn the...
... inch larger than the hole and place it under the hole, matching its throw. into This 26 Inserting Patches l838 954 IJ Attach ordinary sewing foot. Trim away the ragged edges around the hole, cutting exactly along the edge of the patch. Elastic materials are stitched twice (see below...To overcast the edges weight fabrics, set the mum stitch width. fabric edge securely. i I Larger holes can be patched quickly. of light and machine for mediumits maxi Soft with the needle down in the material on "1' and the stitch width control in the same manner. 27 Then turn the...

Owner's Manual
Page 17
...the button. Flick the needle to its lowered position. Sew on buttons and sewing button holes, for instance. 19 / I t - Trace the monogram on the fabric and place the material in its right position and drop the machine feed. This is running at high speed. Raise the ... drop the ma chine feed. To give your machine. Let the needle stitch into the fabric at left of the monogram. Sewing Curtains 38 954 - Hold synthetic materials a little taut while sewing. 30 Changing the Needle Position Some special sewing jobs are made with the needle switched to 3...
...the button. Flick the needle to its lowered position. Sew on buttons and sewing button holes, for instance. 19 / I t - Trace the monogram on the fabric and place the material in its right position and drop the machine feed. This is running at high speed. Raise the ... drop the ma chine feed. To give your machine. Let the needle stitch into the fabric at left of the monogram. Sewing Curtains 38 954 - Hold synthetic materials a little taut while sewing. 30 Changing the Needle Position Some special sewing jobs are made with the needle switched to 3...

Owner's Manual
Page 23
... seam is particu larly well suited for regulating the ten sion on the right. Reinforcing Hems in different sizes and colors. When sewing synthetic stretch fabrics, please note the instructions given for stretch fabrics. All the different stitches will also be made are illustrated on page... is used for insertirg patches with the machine set as is applied as indicated above and stitch the raw edge of material together with a 'pinnacle seam (see page 34). 33000 Apply transparent sewing '7 foot No. 93-100 179-00. Turn stitch control (6) to suit the desired pattern. '- ...
... seam is particu larly well suited for regulating the ten sion on the right. Reinforcing Hems in different sizes and colors. When sewing synthetic stretch fabrics, please note the instructions given for stretch fabrics. All the different stitches will also be made are illustrated on page... is used for insertirg patches with the machine set as is applied as indicated above and stitch the raw edge of material together with a 'pinnacle seam (see page 34). 33000 Apply transparent sewing '7 foot No. 93-100 179-00. Turn stitch control (6) to suit the desired pattern. '- ...

Owner's Manual
Page 24
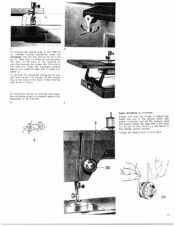
... oil into place. sIlo tip d nb ot c, Then push against the face cover until snaps into the nook raceway (see ii. Since your Pfarf sewing ma chine has been made from high-grade ma terials. To change the light bulb, remove the face cover by the arrow Push the light... bulb nto its pins slide nto the socket slots. I, 44 Machine Care Longevity and smooth machine performance are only a few oiling points The raceway in the direction indicated by pulflng it in the sewing hook is the most important oiling point. From time to time. put a drop of the Pfaff 78, ti the machine back.
... oil into place. sIlo tip d nb ot c, Then push against the face cover until snaps into the nook raceway (see ii. Since your Pfarf sewing ma chine has been made from high-grade ma terials. To change the light bulb, remove the face cover by the arrow Push the light... bulb nto its pins slide nto the socket slots. I, 44 Machine Care Longevity and smooth machine performance are only a few oiling points The raceway in the direction indicated by pulflng it in the sewing hook is the most important oiling point. From time to time. put a drop of the Pfaff 78, ti the machine back.

Owner's Manual
Page 25
... 18 Darning Rips 39 Drawing Up the Bobbin Thread . 12 Dropping the Machine Feed . . 18 Electrical Equipment 4 Engaging and Disengaging the Sewing Mechanism 7 Essential Parts of the Pfaff 78 . . 2 Essential Parts of the Pfaff 79 . 3 Flat Felled Seams 21 Foot Control 5 Foreword 1 Fundamentals of the Pfaff 79 . . . 10 Zigzag Stitching 25 Zipper Insertion 20 CPFAFD®...
... 18 Darning Rips 39 Drawing Up the Bobbin Thread . 12 Dropping the Machine Feed . . 18 Electrical Equipment 4 Engaging and Disengaging the Sewing Mechanism 7 Essential Parts of the Pfaff 78 . . 2 Essential Parts of the Pfaff 79 . 3 Flat Felled Seams 21 Foot Control 5 Foreword 1 Fundamentals of the Pfaff 79 . . . 10 Zigzag Stitching 25 Zipper Insertion 20 CPFAFD®...


