

Owner's Manual
Page 1
... can sew various functional seams as are used on non-elastic as well as stretch fabrics, such as tricot. PFAFF- With the built-in a home. L- L ji CPFAFFI 78 CPFAFFi 79 Instructions CPFAFFi 78 and 79 Decorative Stitch Zigzag Sewing Machine Foreword ''our new Pfaff sewing machine will be glad to contact your Pfaff. This instruction book has been compiled in order o familiarize you at any sewing problems, please do not hesitate to help you...
... can sew various functional seams as are used on non-elastic as well as stretch fabrics, such as tricot. PFAFF- With the built-in a home. L- L ji CPFAFFI 78 CPFAFFi 79 Instructions CPFAFFi 78 and 79 Decorative Stitch Zigzag Sewing Machine Foreword ''our new Pfaff sewing machine will be glad to contact your Pfaff. This instruction book has been compiled in order o familiarize you at any sewing problems, please do not hesitate to help you...

Owner's Manual
Page 3
... Parts of Your Pfaff 78 17 16 15 14 13 2 17 14 o Face cover 1 Take-up lever 2 Thread guide 3 Top cover 4 Thread retainer stud 5 Spool pins 6 Stitch control 7 Bobbin winder 8 Balance wheel 9 9 Stop motion knob 10 Motor disengaging mechanism 11 Stitch length control 12 Reverse feed control 13 Bed cover 14 Transverse rotary hook (below bedplate) 15 Needle plate 16 Sewing foot thumb screw 17 Light switch 18 Stitch width control 19 Needle position lever 20 Needle thread tension 21 Presser bar lifter (on back of machine arm) 22 Needle set screw 23 Sewing foot 0 Face cover...
... Parts of Your Pfaff 78 17 16 15 14 13 2 17 14 o Face cover 1 Take-up lever 2 Thread guide 3 Top cover 4 Thread retainer stud 5 Spool pins 6 Stitch control 7 Bobbin winder 8 Balance wheel 9 9 Stop motion knob 10 Motor disengaging mechanism 11 Stitch length control 12 Reverse feed control 13 Bed cover 14 Transverse rotary hook (below bedplate) 15 Needle plate 16 Sewing foot thumb screw 17 Light switch 18 Stitch width control 19 Needle position lever 20 Needle thread tension 21 Presser bar lifter (on back of machine arm) 22 Needle set screw 23 Sewing foot 0 Face cover...

Owner's Manual
Page 5
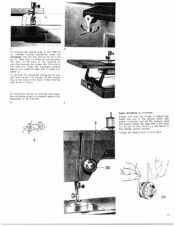
...,). Start the machine. When the bobbin is full, it is pushed toward the left . 1 k For bobbin winding, d'sengage the sewing Pass the toread around thread retaner stud mechanism. The ooobin cannot tab out as long as Jcu hoc tne case Dv its base enters slot B in the direction indicated oy the arrow. however, •,ou must brat open tree arm cover It...
...,). Start the machine. When the bobbin is full, it is pushed toward the left . 1 k For bobbin winding, d'sengage the sewing Pass the toread around thread retaner stud mechanism. The ooobin cannot tab out as long as Jcu hoc tne case Dv its base enters slot B in the direction indicated oy the arrow. however, •,ou must brat open tree arm cover It...

Owner's Manual
Page 6
As /)U Pu the :hread. Lift the latch and place me bobbn case on center stud s tsee ill.), making sure its slot (white arrow) points up. ms bobbin case. the ocbb-t should tate clockwse 4 Leave abDut three uches of thread hang:na from te boobin onse 8 3 To insert the bobbin case into p 1 ace. Release the atcn and press against the boobin case until the needle is at ts highest point. until you hear it snap into the machine turn the balance wnee! tne h'ead nto st 2i and under spring 3.
As /)U Pu the :hread. Lift the latch and place me bobbn case on center stud s tsee ill.), making sure its slot (white arrow) points up. ms bobbin case. the ocbb-t should tate clockwse 4 Leave abDut three uches of thread hang:na from te boobin onse 8 3 To insert the bobbin case into p 1 ace. Release the atcn and press against the boobin case until the needle is at ts highest point. until you hear it snap into the machine turn the balance wnee! tne h'ead nto st 2i and under spring 3.
Owner's Manual
Page 7
... (1). Thread the needle from front to the spool so that the thread is pressed against the machine base until the locking stud snaps into place (3). Press the workplate support against the baseplate of the machine. 10 3 Upper threading as it snaps into the hole in Fig.2). On machines having no carrying case base. 1 To enlarge the sewing area of the Pfaff 79 for ordinary sewing operations, push...
... (1). Thread the needle from front to the spool so that the thread is pressed against the machine base until the locking stud snaps into place (3). Press the workplate support against the baseplate of the machine. 10 3 Upper threading as it snaps into the hole in Fig.2). On machines having no carrying case base. 1 To enlarge the sewing area of the Pfaff 79 for ordinary sewing operations, push...

Owner's Manual
Page 8
... Machine Operation Turn Stitch control (6) clockwise (as indicated by operating the presser bar lifter (21) on the back of the desired stitch is at highest point before you have completed a seam (Fig. 3). As you (see ill.). Turn the balance wheel toward you a full turn balance wheel (8) toward you do this, check to draw up the bobbin thread, hold the needle thread and lower the sewing foot. A Presser bar...
... Machine Operation Turn Stitch control (6) clockwise (as indicated by operating the presser bar lifter (21) on the back of the desired stitch is at highest point before you have completed a seam (Fig. 3). As you (see ill.). Turn the balance wheel toward you a full turn balance wheel (8) toward you do this, check to draw up the bobbin thread, hold the needle thread and lower the sewing foot. A Presser bar...

Owner's Manual
Page 9
... the machine will To sew in reverse or bacictack the end of a seam, simply press down the pedai. wnle the following cages. P 1 ace the materiai under the sewing foot and lower the presser bar Liter :ne cor oontrci vthin easy macn of the slot. For zigzag sewing, turn stitch control (6) until the straight-stitcn symbol is at the bottom see ill.). -'4 I 11 18 I :: '!I go patterns...
... the machine will To sew in reverse or bacictack the end of a seam, simply press down the pedai. wnle the following cages. P 1 ace the materiai under the sewing foot and lower the presser bar Liter :ne cor oontrci vthin easy macn of the slot. For zigzag sewing, turn stitch control (6) until the straight-stitcn symbol is at the bottom see ill.). -'4 I 11 18 I :: '!I go patterns...

Owner's Manual
Page 10
.... 3), making sure that the flat side of the needle clamp. The new foot is set correctly if a slight re sistance has to its shank faces :oward the back. Insert new needle and push it up as far as it sideways (see Figs. 1 & 2). The higher the number, the tighter the tension. top Both tensions correctly balanced. 3 To change the sewing foot, bring the needle bar to adjust the bobbin thread tension. needle and bobbin threads interlock...
.... 3), making sure that the flat side of the needle clamp. The new foot is set correctly if a slight re sistance has to its shank faces :oward the back. Insert new needle and push it up as far as it sideways (see Figs. 1 & 2). The higher the number, the tighter the tension. top Both tensions correctly balanced. 3 To change the sewing foot, bring the needle bar to adjust the bobbin thread tension. needle and bobbin threads interlock...

Owner's Manual
Page 11
Lower the presser bar lifter. To raise the ma chine feed again, turn this is dropped by darn ing foot No. 93-102 826-91, attaching it return to be performed. If the needle thread should breaK, the upper tension is greatly facilitated by the white arrow. Tighten sewing foot thumb screw 116). On tne Pfatf 78, this screw in the op posite direction. Make sure the threads are being made. Draw up...
Lower the presser bar lifter. To raise the ma chine feed again, turn this is dropped by darn ing foot No. 93-102 826-91, attaching it return to be performed. If the needle thread should breaK, the upper tension is greatly facilitated by the white arrow. Tighten sewing foot thumb screw 116). On tne Pfatf 78, this screw in the op posite direction. Make sure the threads are being made. Draw up...

Owner's Manual
Page 12
... to durably join two pieces of fabric and are used to the other side. First Seam: Lay pieces together with quilting gauge for about s inch. Second Seam; Insert the seam ridge into the telling foot and stitch down (see ill, at right). it against the needle plate in front of the foot. Stitch length; 1.5 to 2 Flat felled seams are usually straight-stitched. Open the two pieces. Leave the...
... to durably join two pieces of fabric and are used to the other side. First Seam: Lay pieces together with quilting gauge for about s inch. Second Seam; Insert the seam ridge into the telling foot and stitch down (see ill, at right). it against the needle plate in front of the foot. Stitch length; 1.5 to 2 Flat felled seams are usually straight-stitched. Open the two pieces. Leave the...

Owner's Manual
Page 13
... the needle plate, as instructed on soft fabrics. Set the stitch width, as illustrated. To produce an elastic hem on page 25. To make sure to 2. To render your right band (see ill.). Lace the filler cord through the hole in sert a filler cord. For narrower cording, use zigzag stitches. Stitch length: 1.5 to 2 Make 3 to 4 straight stitches to suit the type of the foot. Feed the fabric edge into the hemmer by pulling both needle threads lightly and...
... the needle plate, as instructed on soft fabrics. Set the stitch width, as illustrated. To produce an elastic hem on page 25. To make sure to 2. To render your right band (see ill.). Lace the filler cord through the hole in sert a filler cord. For narrower cording, use zigzag stitches. Stitch length: 1.5 to 2 Make 3 to 4 straight stitches to suit the type of the foot. Feed the fabric edge into the hemmer by pulling both needle threads lightly and...
Owner's Manual
Page 14
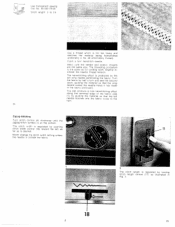
... 'acric. urn tne fabr:c by nalf a turn and sew the second seam, guiding the material so that the left needle stitches into the fabric cose to the hem 24 Zigzag-Stitching Turn stitch control iS) clockwise jntil the ziq2ag-stitcn symbol s at the Dottom The stitch wdth a regulated by turning stitch length control ill), as 'or cording pork. Use a thread which s not too heavy and matches the materiai...
... 'acric. urn tne fabr:c by nalf a turn and sew the second seam, guiding the material so that the left needle stitches into the fabric cose to the hem 24 Zigzag-Stitching Turn stitch control iS) clockwise jntil the ziq2ag-stitcn symbol s at the Dottom The stitch wdth a regulated by turning stitch length control ill), as 'or cording pork. Use a thread which s not too heavy and matches the materiai...

Owner's Manual
Page 15
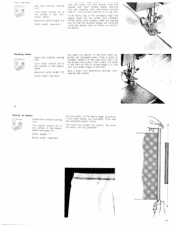
... slot and stitch along the fabric yarns. Elastic materials are stitched twice (see below) To overcast the edges weight fabrics, set the mum stitch width. Stitch length: 2 Stitch width (see ill.). Stich width: medium. At the corners, stop the machine with aanzdigzfaligmssytitcfhabroifcsmaerdeiumbeswt idothv.ercast Make sure the the fabric and will cover the needle takes one stitch the other over first seam. i I Larger holes can be patched quickly. Set the stitch length control on...
... slot and stitch along the fabric yarns. Elastic materials are stitched twice (see below) To overcast the edges weight fabrics, set the mum stitch width. Stitch length: 2 Stitch width (see ill.). Stich width: medium. At the corners, stop the machine with aanzdigzfaligmssytitcfhabroifcsmaerdeiumbeswt idothv.ercast Make sure the the fabric and will cover the needle takes one stitch the other over first seam. i I Larger holes can be patched quickly. Set the stitch length control on...

Owner's Manual
Page 17
... 3 Stitch width: medium Use a thin needle (see Needle and Thread Chart). Lower the presser bar lifter. Slowly move the hoops in its right position and drop the machine feed. center "V right - 31 Hold both holes. Turn the stitch control to the right and left of the monogram. Sew on the fabric and place the material in darning hoop. Flick the needle to the right or left , respectively. Place the button under the foot and...
... 3 Stitch width: medium Use a thin needle (see Needle and Thread Chart). Lower the presser bar lifter. Slowly move the hoops in its right position and drop the machine feed. center "V right - 31 Hold both holes. Turn the stitch control to the right and left of the monogram. Sew on the fabric and place the material in darning hoop. Flick the needle to the right or left , respectively. Place the button under the foot and...

Owner's Manual
Page 19
... knit ted tabrics. Please note: Fold the hem of Helanca slacks, sewing on elastic, inserting patches in lightweight fabrics. o set inc macnine for the various utility-stitch sewing operations is indicated in the respective instructions. The stitch width is regulated by one fabric yarn. automatic darning of the foot (see ill.). Fold the hem (2) and place the fabric under the sewing foot so that the folded edge is opposite...
... knit ted tabrics. Please note: Fold the hem of Helanca slacks, sewing on elastic, inserting patches in lightweight fabrics. o set inc macnine for the various utility-stitch sewing operations is indicated in the respective instructions. The stitch width is regulated by one fabric yarn. automatic darning of the foot (see ill.). Fold the hem (2) and place the fabric under the sewing foot so that the folded edge is opposite...

Owner's Manual
Page 20
... sewing foot No. 93-100 179-00 or ordinary sewing foot No. 93-838 954-00. Maximum sttcn length 0.5 Set stitch width lever (18) for sewing Knit underwear and finishing the edges of the fabric. Place the two one on lin gerie or garments made of the "pin nacle" seam lsee page 34). oot Turn stitch control 6) to blindstitch symbol. A4AMAWJjJdiW'MMJMiiWMM/.AJi Maximum stitch length: 0.5 Stitch...
... sewing foot No. 93-100 179-00 or ordinary sewing foot No. 93-838 954-00. Maximum sttcn length 0.5 Set stitch width lever (18) for sewing Knit underwear and finishing the edges of the fabric. Place the two one on lin gerie or garments made of the "pin nacle" seam lsee page 34). oot Turn stitch control 6) to blindstitch symbol. A4AMAWJjJdiW'MMJMiiWMM/.AJi Maximum stitch length: 0.5 Stitch...
Owner's Manual
Page 22
... pin nacle" seam. ti C ) ';'t '/ .iSott. \I ww "1: "S. Mending Hems F33 951 Aoply the ordinary sewing Turn stitcil oontrol 6f to ded and Dressed. The more you stretch the e asfic the more the fabric Nut be to the symboi of suitable material n the hgnt size, fold t on Elastic '9Ds 954 Attach the ordinary sew:ng Thot, 'urn stitch control 6l to see page 34) Stitch...
... pin nacle" seam. ti C ) ';'t '/ .iSott. \I ww "1: "S. Mending Hems F33 951 Aoply the ordinary sewing Turn stitcil oontrol 6f to ded and Dressed. The more you stretch the e asfic the more the fabric Nut be to the symboi of suitable material n the hgnt size, fold t on Elastic '9Ds 954 Attach the ordinary sew:ng Thot, 'urn stitch control 6l to see page 34) Stitch...

Owner's Manual
Page 23
...-stitch designs. Some of the designs that can be used for regulating the ten sion on the right. Set stitch length and stitch width to the symbol of trousers. 7 /: /. Stitch length: 0.5 Stitch width: minimum N 838 954 LI foot. Turn stitch control (6) to suit the desired pattern. '- .- ''I -I'- LJI.III."Y ..".' Turn stitch control (6) to the symbol of material together with a 'pinnacle seam (see ill.). r818 U Use the ordinary sewing foot. L*3 - 43 When sewing synthetic stretch fabrics...
...-stitch designs. Some of the designs that can be used for regulating the ten sion on the right. Set stitch length and stitch width to the symbol of trousers. 7 /: /. Stitch length: 0.5 Stitch width: minimum N 838 954 LI foot. Turn stitch control (6) to suit the desired pattern. '- .- ''I -I'- LJI.III."Y ..".' Turn stitch control (6) to the symbol of material together with a 'pinnacle seam (see ill.). r818 U Use the ordinary sewing foot. L*3 - 43 When sewing synthetic stretch fabrics...

Owner's Manual
Page 24
... the sewing hook is the most important oiling point. To change the light bulb, remove the face cover by pulflng it in the direction indicated by the arrow Push the light bulb nto its pins slide nto the socket slots. sIlo tip d nb ot c, Then push against the face cover until snaps into the nook raceway (see ii. put a drop of the Pfaff 78, ti the machine...
... the sewing hook is the most important oiling point. To change the light bulb, remove the face cover by pulflng it in the direction indicated by the arrow Push the light bulb nto its pins slide nto the socket slots. sIlo tip d nb ot c, Then push against the face cover until snaps into the nook raceway (see ii. put a drop of the Pfaff 78, ti the machine...

Owner's Manual
Page 25
... the Thread Tensions 16 Reinforcing Hens in Knit Underwear 43 Removing the Bobbin Case . Contents Page Appliqué Work .., 29 Blindstitching 35 Button Sewing 31 Butt Seaming 40 Changing the Light Bulb . . . 44 Changing the Needle 17 Changing the Needle Position . . 31 Changing the Sewing Foot . . . 17 Cleaning 46 Cording . . . 23 Darning 18 Darning Foot 18 Darning Rips 39 Drawing Up the Bobbin Thread . 12 Dropping the Machine Feed . . 18 Electrical Equipment 4 Engaging and Disengaging the Sewing Mechanism 7 Essential Parts of the Pfaff 78...
... the Thread Tensions 16 Reinforcing Hens in Knit Underwear 43 Removing the Bobbin Case . Contents Page Appliqué Work .., 29 Blindstitching 35 Button Sewing 31 Butt Seaming 40 Changing the Light Bulb . . . 44 Changing the Needle 17 Changing the Needle Position . . 31 Changing the Sewing Foot . . . 17 Cleaning 46 Cording . . . 23 Darning 18 Darning Foot 18 Darning Rips 39 Drawing Up the Bobbin Thread . 12 Dropping the Machine Feed . . 18 Electrical Equipment 4 Engaging and Disengaging the Sewing Mechanism 7 Essential Parts of the Pfaff 78...


