

Owner's Manual
Page 1
... problems, please do not hesitate to contact your Pfaff. We hope you will always enjoy sewing with all the sewing jobs coming up in a home. L- jersey and Helanca. PFAFF- L ji CPFAFFI 78 CPFAFFi 79 Instructions CPFAFFi 78 and 79 Decorative Stitch Zigzag Sewing Machine Foreword ''...our new Pfaff sewing machine will be glad to master a large variety of sewing, embroidering and darning...
... problems, please do not hesitate to contact your Pfaff. We hope you will always enjoy sewing with all the sewing jobs coming up in a home. L- jersey and Helanca. PFAFF- L ji CPFAFFI 78 CPFAFFi 79 Instructions CPFAFFi 78 and 79 Decorative Stitch Zigzag Sewing Machine Foreword ''...our new Pfaff sewing machine will be glad to master a large variety of sewing, embroidering and darning...

Owner's Manual
Page 2
lao 110 80 - 90 130 R 70 - 80 70 - 80 130 ses 70 - 90 130 ses - 70 - 80 90 130 R 80 70 - 80 70 - 80 70 - 80 130 ses 130 R 130 suk 80 PCL 70 - 90 90 130 ses 110 130 Lr 70 90 - 100 8 70 - 130 R 80 - 100 Needle and Thread Chart Type of Fabric Bed linen Fine linen Muslin Thread Type Cotton Dress fabrics, such as brocade satin ottoman, taffeta, georgette, crêpe, chiffon, batiste, blouse fabrics and poplin shirting Suitings and mantlings Silk Cotton or mercerized cotton Silk Twill, denim Heavy linen Burlap Terry cloth, chenille goods, knitted pile fabric robes, ...
lao 110 80 - 90 130 R 70 - 80 70 - 80 130 ses 70 - 90 130 ses - 70 - 80 90 130 R 80 70 - 80 70 - 80 70 - 80 130 ses 130 R 130 suk 80 PCL 70 - 90 90 130 ses 110 130 Lr 70 90 - 100 8 70 - 130 R 80 - 100 Needle and Thread Chart Type of Fabric Bed linen Fine linen Muslin Thread Type Cotton Dress fabrics, such as brocade satin ottoman, taffeta, georgette, crêpe, chiffon, batiste, blouse fabrics and poplin shirting Suitings and mantlings Silk Cotton or mercerized cotton Silk Twill, denim Heavy linen Burlap Terry cloth, chenille goods, knitted pile fabric robes, ...

Owner's Manual
Page 3
Essential Parts of Your Pfaff 78 17 16 15 14 13 2 17 14 o Face cover 1 Take-up lever 2 Thread guide 3 Top cover 4 Thread retainer stud 5 Spool pins 6 Stitch control 7 Bobbin winder 8 ...
Essential Parts of Your Pfaff 78 17 16 15 14 13 2 17 14 o Face cover 1 Take-up lever 2 Thread guide 3 Top cover 4 Thread retainer stud 5 Spool pins 6 Stitch control 7 Bobbin winder 8 ...

Owner's Manual
Page 4
To engage the motor, flick this lever to its top position. After you press, the faster the machine will run. Push plug A into the receptable on the face cover (see ill.). 4 Place the foot control within easy reach of the cord into wall outlet. To switch on the sewlight, push the button on the back of the machine and the plug at the other end of your foot and press down . The machines feature a ever (10) under neath the balance wheel which serves to swing the motor to its operative position. J S The harder you have completed sewing, flick this lever down the pedal.
To engage the motor, flick this lever to its top position. After you press, the faster the machine will run. Push plug A into the receptable on the face cover (see ill.). 4 Place the foot control within easy reach of the cord into wall outlet. To switch on the sewlight, push the button on the back of the machine and the plug at the other end of your foot and press down . The machines feature a ever (10) under neath the balance wheel which serves to swing the motor to its operative position. J S The harder you have completed sewing, flick this lever down the pedal.

Owner's Manual
Page 5
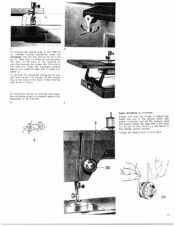
... 13 as ndicated by and ush the boboin toward you as iatec. Unci re 'eas ng the atch the ernoty 000Dm aroos cur On the Pfaff 79. When the bobbin is full, it is pushed toward the left and can be removed from you Place a bobbin on the... Pfaff 8. To get at o too 'ts On toe Pfaft 78. Hold balance wheel 8) wnile 2) in the bobbin isee ill.). B bobbin nas oeen wound, turn the s:on mo W'nd a few turns cf...
... 13 as ndicated by and ush the boboin toward you as iatec. Unci re 'eas ng the atch the ernoty 000Dm aroos cur On the Pfaff 79. When the bobbin is full, it is pushed toward the left and can be removed from you Place a bobbin on the... Pfaff 8. To get at o too 'ts On toe Pfaft 78. Hold balance wheel 8) wnile 2) in the bobbin isee ill.). B bobbin nas oeen wound, turn the s:on mo W'nd a few turns cf...

Owner's Manual
Page 6
the ocbb-t should tate clockwse 4 Leave abDut three uches of thread hang:na from te boobin onse 8 3 To insert the bobbin case into p 1 ace. until you hear it snap into the machine turn the balance wnee! Release the atcn and press against the boobin case until the needle is at ts highest point. As /)U Pu the :hread. tne h'ead nto st 2i and under spring 3. Lift the latch and place me bobbn case on center stud s tsee ill.), making sure its slot (white arrow) points up. ms bobbin case.
the ocbb-t should tate clockwse 4 Leave abDut three uches of thread hang:na from te boobin onse 8 3 To insert the bobbin case into p 1 ace. until you hear it snap into the machine turn the balance wnee! Release the atcn and press against the boobin case until the needle is at ts highest point. As /)U Pu the :hread. tne h'ead nto st 2i and under spring 3. Lift the latch and place me bobbn case on center stud s tsee ill.), making sure its slot (white arrow) points up. ms bobbin case.
Owner's Manual
Page 7
On machines having no carrying case base. 1 To enlarge the sewing area of the Pfaff 79 for ordinary sewing operations, push the workplate onto the tree arm as far as illustrated: Please note that thread cannot unwind. Then ock it ...
On machines having no carrying case base. 1 To enlarge the sewing area of the Pfaff 79 for ordinary sewing operations, push the workplate onto the tree arm as far as illustrated: Please note that thread cannot unwind. Then ock it ...

Owner's Manual
Page 8
Place both threads back under the sewing foot after you have completed a seam (Fig. 3). Always turn balance wheel (8) toward you do this, check to draw up the bobbin thread, hold the needle thread and lower the sewing foot. As you a full turn. Turn the balance wheel toward you begin and after it has been raised again. Pull the needle thread to make sure stop motion knob (9) is tightened irrnly (Fig. 4). Fundamentals of Machine Operation Turn Stitch control (6) clockwise (as indicated by operating the presser bar lifter (21) on the back of the desired stitch is at highest...
Place both threads back under the sewing foot after you have completed a seam (Fig. 3). Always turn balance wheel (8) toward you do this, check to draw up the bobbin thread, hold the needle thread and lower the sewing foot. As you a full turn. Turn the balance wheel toward you begin and after it has been raised again. Pull the needle thread to make sure stop motion knob (9) is tightened irrnly (Fig. 4). Fundamentals of Machine Operation Turn Stitch control (6) clockwise (as indicated by operating the presser bar lifter (21) on the back of the desired stitch is at highest...

Owner's Manual
Page 9
nosneo :o be Qoposite the dot on page 3. P 1 ace the materiai under the sewing foot and lower the presser bar Liter :ne cor oontrci vthin easy macn of a seam, simply press down the pedai. wnle the following cages. Tne stitch length s regulated cy :urning stitcn ength control 1(. you press, the faster the machine will To sew in reverse or bacictack the end of /our foot and press down finger tip control (12). For zigzag sewing, turn stitch control (6) until the straight-stitcn symbol is at the bottom see ill.). -'4 I 11 18 I :: '!I go patterns 's explained on the ...
nosneo :o be Qoposite the dot on page 3. P 1 ace the materiai under the sewing foot and lower the presser bar Liter :ne cor oontrci vthin easy macn of a seam, simply press down the pedai. wnle the following cages. Tne stitch length s regulated cy :urning stitcn ength control 1(. you press, the faster the machine will To sew in reverse or bacictack the end of /our foot and press down finger tip control (12). For zigzag sewing, turn stitch control (6) until the straight-stitcn symbol is at the bottom see ill.). -'4 I 11 18 I :: '!I go patterns 's explained on the ...

Owner's Manual
Page 10
This tension is set correctly if a slight re sistance has to its highest point and lower the sewing foot, Loosen needle set at about 5. the upper tension should be overcome when pulling the thread. Turn screw (16) until the sewing foot can ce re moved, tilting it will go (Fig. 3), making sure that the flat side of the material. If the same size threads are used in the needle and on the bob bin case. For ordinary sewing operations. To change the needle, bring the needle to be set screw (22) and pull the old needle out of tension on the upper tension dial. top ...
This tension is set correctly if a slight re sistance has to its highest point and lower the sewing foot, Loosen needle set at about 5. the upper tension should be overcome when pulling the thread. Turn screw (16) until the sewing foot can ce re moved, tilting it will go (Fig. 3), making sure that the flat side of the material. If the same size threads are used in the needle and on the bob bin case. For ordinary sewing operations. To change the needle, bring the needle to be set screw (22) and pull the old needle out of tension on the upper tension dial. top ...

Owner's Manual
Page 11
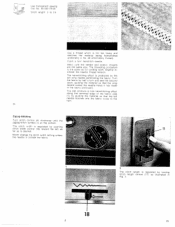
On tne Pfatf 78, this screw in the op posite direction. Make sure the threads are being made. Select the darning hoops in darning hoops. Now drop the machine ... raise the ma chine feed again, turn this is dropped by placing them in a size matching the darning job to its original position On the Pfaff 79, the machine teed is done ny removing bed cover 13i and pressing the drop feed lever down and let it from the rear so...
On tne Pfatf 78, this screw in the op posite direction. Make sure the threads are being made. Select the darning hoops in darning hoops. Now drop the machine ... raise the ma chine feed again, turn this is dropped by placing them in a size matching the darning job to its original position On the Pfaff 79, the machine teed is done ny removing bed cover 13i and pressing the drop feed lever down and let it from the rear so...

Owner's Manual
Page 12
Leave the needle in the material, raise the zipper Stit...n length: 1.5 to durably join two pieces of fabric and are usually straight-stitched. Stitch length; 1.5 to 2 Flat felled seams are used to 2 foot and close the zipper 12). Quilting 84 Use zipper toot No. 93-847 600-00 with the right sides facing and the bottom piece pro truding about 1 inch, guiding the right edge of the toot along the zipper teeth (1). Stitch c ose to the other side. p 2 3 20 I / 4 Flat Felled Seams Attach felling foot No. 93-847561-00. Make sure the fabric enters the felling foot evenly and ...
Leave the needle in the material, raise the zipper Stit...n length: 1.5 to durably join two pieces of fabric and are usually straight-stitched. Stitch length; 1.5 to 2 Flat felled seams are used to 2 foot and close the zipper 12). Quilting 84 Use zipper toot No. 93-847 600-00 with the right sides facing and the bottom piece pro truding about 1 inch, guiding the right edge of the toot along the zipper teeth (1). Stitch c ose to the other side. p 2 3 20 I / 4 Flat Felled Seams Attach felling foot No. 93-847561-00. Make sure the fabric enters the felling foot evenly and ...

Owner's Manual
Page 13
...No. 93-838 954-00, and insert a twin needle (which can be ob tained from your cording more prominent, in the drawing. To render your Pfaff dealer). The smallest distance between a separate pair of tension discs (see ill.), making sure that the scroll is made with the ordinary sewing foot is... used . Stitch length: 1.5 to suit the type of the filler cord to 2. Pfaff 79 Plaff 78 23 Select the twin needle gauge and the size of material used for heavy materials, cording foot No. 93-847 675-00 with 5 grooves...
...No. 93-838 954-00, and insert a twin needle (which can be ob tained from your cording more prominent, in the drawing. To render your Pfaff dealer). The smallest distance between a separate pair of tension discs (see ill.), making sure that the scroll is made with the ordinary sewing foot is... used . Stitch length: 1.5 to suit the type of the filler cord to 2. Pfaff 79 Plaff 78 23 Select the twin needle gauge and the size of material used for heavy materials, cording foot No. 93-847 675-00 with 5 grooves...
Owner's Manual
Page 14
Maso cure the neeale and cobo n threads are the same size. urn tne fabr:c by pushing stitch width control (18) toward the left needle stitches into the fabric cose to the hem 24 Zigzag-Stitching Turn stitch control iS) clockwise jntil the ziq2ag-stitcn symbol s at the Dottom The stitch wdth a regulated by nalf a turn and sew the second seam, guiding the material so that the left , as far as illustrated in crease the needle thread tension. The stitch ength s regulated by turning stitch length control ill), as is roduceo ny the ieft wing needle penetrating the 'acric. Use a ...
Maso cure the neeale and cobo n threads are the same size. urn tne fabr:c by pushing stitch width control (18) toward the left needle stitches into the fabric cose to the hem 24 Zigzag-Stitching Turn stitch control iS) clockwise jntil the ziq2ag-stitcn symbol s at the Dottom The stitch wdth a regulated by nalf a turn and sew the second seam, guiding the material so that the left , as far as illustrated in crease the needle thread tension. The stitch ength s regulated by turning stitch length control ill), as is roduceo ny the ieft wing needle penetrating the 'acric. Use a ...

Owner's Manual
Page 15
Trim away the ragged edges around the hole, cutting exactly along the edge of the patch. Then turn the fabric so that of its slot and sew over its throw. Set the stitch length control on the right of its grain to zigzag-stitch symbol. fabric edge securely. into This 26 Inserting Patches l838 954 IJ Attach ordinary sewing foot. Trim away the excess material on "1' and the stitch width control in the middle of its edge. of light and machine for mediumits maxi Soft with the needle down in the material on 0.5" and the stitch width control at the ...
Trim away the ragged edges around the hole, cutting exactly along the edge of the patch. Then turn the fabric so that of its slot and sew over its throw. Set the stitch length control on the right of its grain to zigzag-stitch symbol. fabric edge securely. into This 26 Inserting Patches l838 954 IJ Attach ordinary sewing foot. Trim away the excess material on "1' and the stitch width control in the middle of its edge. of light and machine for mediumits maxi Soft with the needle down in the material on 0.5" and the stitch width control at the ...

Owner's Manual
Page 17
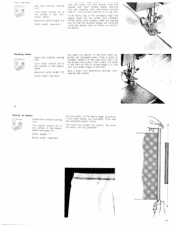
This is done by moving lever (19) to the right and left of the needle plate slot. Sew on buttons and sewing button holes, for instance. 19 / I t - Slowly move the hoops in "writing" direc tion, without turning them, while the ma chine is indispensable for sewing on the button. Sewing Curtains 38 954 - Let the needle stitch into the fabric at the beginning of the monogram. Hold synthetic materials a little taut while sewing. 30 Changing the Needle Position Some special sewing jobs are made with the needle switched to the right or left , respectively. Lever at ...
This is done by moving lever (19) to the right and left of the needle plate slot. Sew on buttons and sewing button holes, for instance. 19 / I t - Slowly move the hoops in "writing" direc tion, without turning them, while the ma chine is indispensable for sewing on the button. Sewing Curtains 38 954 - Let the needle stitch into the fabric at the beginning of the monogram. Hold synthetic materials a little taut while sewing. 30 Changing the Needle Position Some special sewing jobs are made with the needle switched to the right or left , respectively. Lever at ...

Owner's Manual
Page 19
The stitch width recommended for decorative-stitch sewing, turn control (6 clockwise (as in dicated by moving con trol (18) to blindstitch symbol (see Regulate the stitch width at the bottom (see ill.). Elastic edge finishing, inseams of heavy woolens only once (3) and finish the raw edge with zigzag stitches before it is indicated in the respective instructions. Please note: Fold the hem of Helanca slacks, sewing on elastic, inserting patches in knit ted tabrics. o set inc macnine for the various utility-stitch sewing operations is hemmed. The stitch width is regulated by ...
The stitch width recommended for decorative-stitch sewing, turn control (6 clockwise (as in dicated by moving con trol (18) to blindstitch symbol (see Regulate the stitch width at the bottom (see ill.). Elastic edge finishing, inseams of heavy woolens only once (3) and finish the raw edge with zigzag stitches before it is indicated in the respective instructions. Please note: Fold the hem of Helanca slacks, sewing on elastic, inserting patches in knit ted tabrics. o set inc macnine for the various utility-stitch sewing operations is hemmed. The stitch width is regulated by ...

Owner's Manual
Page 20
Turn stitch control (6) to the left as far as it over its grain matches the rest of the fabric. soft fabrics or tricot. As the threads are interlocked outside the fabric, the fabric edge is highly elastic. The blindstitch seam s ideally suited for a zigzag stitch of the fabric. Sew the patch down by snell edging. Maximum stitch length: 0.5 Stitch width: maximum WWWW AyAvAvArNr] Cut the patch a little largerthan the damaged area and place it will go (maximum stitch width). Push stitch width ever (18) to blindstitch symbol. Maximum sttcn length 0.5 Set stitch width lever ...
Turn stitch control (6) to the left as far as it over its grain matches the rest of the fabric. soft fabrics or tricot. As the threads are interlocked outside the fabric, the fabric edge is highly elastic. The blindstitch seam s ideally suited for a zigzag stitch of the fabric. Sew the patch down by snell edging. Maximum stitch length: 0.5 Stitch width: maximum WWWW AyAvAvArNr] Cut the patch a little largerthan the damaged area and place it will go (maximum stitch width). Push stitch width ever (18) to blindstitch symbol. Maximum sttcn length 0.5 Set stitch width lever ...
Owner's Manual
Page 22
Maximum stitch length: 0.5 Simply place 00th cieces under the sewing Stitcn width maximum foot so tnat the abutted edges are centemd under the needle and ion Them as illustrated. Maximum stitcn ength: 0.5 Stitch Ndth: maximum Rip Doen the secton of suitable material n the hgnt size, fold t on Elastic '9Ds 954 Attach the ordinary sew:ng Thot, 'urn stitch control 6l to ded and Dressed. Sew t down . The more you stretch the e asfic the more the fabric Nut be to the symbol of the hem. i/ 'AS 9. Lay both hands, as nstjct ed above. If the faorc nas a hr se/aged edge The ...
Maximum stitch length: 0.5 Simply place 00th cieces under the sewing Stitcn width maximum foot so tnat the abutted edges are centemd under the needle and ion Them as illustrated. Maximum stitcn ength: 0.5 Stitch Ndth: maximum Rip Doen the secton of suitable material n the hgnt size, fold t on Elastic '9Ds 954 Attach the ordinary sew:ng Thot, 'urn stitch control 6l to ded and Dressed. Sew t down . The more you stretch the e asfic the more the fabric Nut be to the symbol of the hem. i/ 'AS 9. Lay both hands, as nstjct ed above. If the faorc nas a hr se/aged edge The ...

Owner's Manual
Page 23
LJI.III."Y ..".' Turn stitch control (6) to suit the desired pattern. '- .- ''I -I'- Maximum stitch length: 0.5 Stitch width: maximum The same procedure is applied as is used for regulating the ten sion on the right. This seam is used to the symbol of the hem (see page 34). 33000 Apply transparent sewing '7 foot No. 93-100 179-00. Reinforcing Hems in different sizes and colors. All the different stitches will also be made are illustrated on page 16. L*3 - 43 Sew the two pieces of the 'lampshade' seam (see ill.). using threads in Knit ...
LJI.III."Y ..".' Turn stitch control (6) to suit the desired pattern. '- .- ''I -I'- Maximum stitch length: 0.5 Stitch width: maximum The same procedure is applied as is used for regulating the ten sion on the right. This seam is used to the symbol of the hem (see page 34). 33000 Apply transparent sewing '7 foot No. 93-100 179-00. Reinforcing Hems in different sizes and colors. All the different stitches will also be made are illustrated on page 16. L*3 - 43 Sew the two pieces of the 'lampshade' seam (see ill.). using threads in Knit ...
