

Owner's Manual
Page 2
... this book a valuable guide to easy sewing. He will be glad to help you understand the machine and give you valuable tips to master all ordinary sewing, This Instruction book will enable you to make sewing more fun for you at any sewing problems, please contact your Pfaff dealer. yourself with the exclusive features of a Pfaff 73, the sewing ornamental stitching and darning jobs that may come true. G. M. 3 CPFAFFD 73 INSTRUCTIONS...
... this book a valuable guide to easy sewing. He will be glad to help you understand the machine and give you valuable tips to master all ordinary sewing, This Instruction book will enable you to make sewing more fun for you at any sewing problems, please contact your Pfaff dealer. yourself with the exclusive features of a Pfaff 73, the sewing ornamental stitching and darning jobs that may come true. G. M. 3 CPFAFFD 73 INSTRUCTIONS...

Owner's Manual
Page 3
19 9 11 12 17 13 I Face cover 2 Take-up lever 3 Thread retainer 4 Spool pins 5 Stitch width dial (A) 6 Needle position lever 7 BobbIn winder 8 Balance wheel 9 Stop motion knob 10 Motor disengaging mechanism 11 Bobbin winder thread retainer 12 Reverse teed control 13 Stitch length control 14 Free arm 15 Free arm top cover 16 Free arm cap (enclosing transverse rotary hook) 2 DR62OA 17 Sewing foot 10 Sewing toot thumb screw 19 Light switch 20 Needle thread tension 21 Presser bar lifter 22 Needle set screw 23 Needle plate
19 9 11 12 17 13 I Face cover 2 Take-up lever 3 Thread retainer 4 Spool pins 5 Stitch width dial (A) 6 Needle position lever 7 BobbIn winder 8 Balance wheel 9 Stop motion knob 10 Motor disengaging mechanism 11 Bobbin winder thread retainer 12 Reverse teed control 13 Stitch length control 14 Free arm 15 Free arm top cover 16 Free arm cap (enclosing transverse rotary hook) 2 DR62OA 17 Sewing foot 10 Sewing toot thumb screw 19 Light switch 20 Needle thread tension 21 Presser bar lifter 22 Needle set screw 23 Needle plate

Owner's Manual
Page 13
... proper thread sizes and needles from this chart. For embroidery and darning work, a No. 50 thread should normally be used . Medium Fabrics such as georgette, chiffon, batiste, voile, lawn, silk. Very Heavy Fabrics such ...thread. Types of the finished seam is de pendent on the bobbin. Heavy Fabrics such as dress silks and cottons, sheer woolens, shirting, draperies. The same size threads should be thicker than the needle thread. However, the bobbin thread never should be used in the needle and on the correct relationship between needle, thread and fabric. Lightweight Fabrics...
... proper thread sizes and needles from this chart. For embroidery and darning work, a No. 50 thread should normally be used . Medium Fabrics such as georgette, chiffon, batiste, voile, lawn, silk. Very Heavy Fabrics such ...thread. Types of the finished seam is de pendent on the bobbin. Heavy Fabrics such as dress silks and cottons, sheer woolens, shirting, draperies. The same size threads should be thicker than the needle thread. However, the bobbin thread never should be used in the needle and on the correct relationship between needle, thread and fabric. Lightweight Fabrics...
Owner's Manual
Page 14
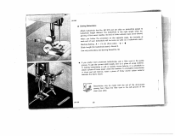
... and lower sewing foot. Insert new needle into opening of the shank taces toward the back and long groove toward you. Bent or blunt needles should not be used for all ordinary sewing and embroidery work. Make sure that the flat side of needle clamp and push it up as far as it will go. Loosen needle set screw a DR 080 13 [1 4 Important Facts about Needles On Pfaff 73 sewing machines, System 130 R, flat-shank needles...
... and lower sewing foot. Insert new needle into opening of the shank taces toward the back and long groove toward you. Bent or blunt needles should not be used for all ordinary sewing and embroidery work. Make sure that the flat side of needle clamp and push it up as far as it will go. Loosen needle set screw a DR 080 13 [1 4 Important Facts about Needles On Pfaff 73 sewing machines, System 130 R, flat-shank needles...

Owner's Manual
Page 15
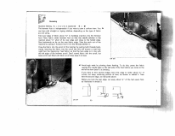
... right the needle from front to the press the thread against right so that it far to back. Bring take-up lever 4 thread down and into he thin the right and It suffices to left through the hole at its end. as high slot 5. top,ofp. Pull the thread between spool and tension. eyelets. Upper Threading Raise the presser bar lifter and...
... right the needle from front to the press the thread against right so that it far to back. Bring take-up lever 4 thread down and into he thin the right and It suffices to left through the hole at its end. as high slot 5. top,ofp. Pull the thread between spool and tension. eyelets. Upper Threading Raise the presser bar lifter and...

Owner's Manual
Page 17
... underside of the fabric. C a u s e: Upper tension too tight or lower tension too loose. Sketch I - C a u s e: Upper tension too loose or lower tension too tight. Lightly pull needle thread to draw bobbin thread up again. Turn balance wheel toward you will have perfect seams as sketched below (lii). If your left hand. DR 615 Correct Tension Regulation Balanced tensions are essential for sewing. Place both threads back under the sewing foot. The threads interlock on the...
... underside of the fabric. C a u s e: Upper tension too tight or lower tension too loose. Sketch I - C a u s e: Upper tension too loose or lower tension too tight. Lightly pull needle thread to draw bobbin thread up again. Turn balance wheel toward you will have perfect seams as sketched below (lii). If your left hand. DR 615 Correct Tension Regulation Balanced tensions are essential for sewing. Place both threads back under the sewing foot. The threads interlock on the...
Owner's Manual
Page 21
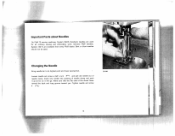
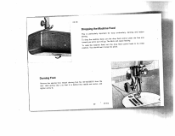
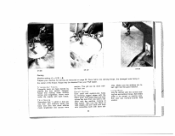
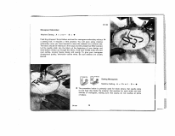
the 93-102826-91 from needle set screw, the and L r tighten screw b. 20 DR612 DR 616 • Dropping the Machine Feed This is behind No. feed control back to free arm its initial Darning Foot Remove the sewing foot. rear. Ttoowdarrodpyothueasmfaacrhainseitfweeildl ,gotu. rTnhethfeabdrricopwiflleecdeacsoenfteroeldinu9n.der the To raise position. Hold spring clip c Attach so that darning foot it snap into place. the You machine feed, turn the drop should hear it is particularly important for hoop embroidery, darning and button sewing.
the 93-102826-91 from needle set screw, the and L r tighten screw b. 20 DR612 DR 616 • Dropping the Machine Feed This is behind No. feed control back to free arm its initial Darning Foot Remove the sewing foot. rear. Ttoowdarrodpyothueasmfaacrhainseitfweeildl ,gotu. rTnhethfeabdrricopwiflleecdeacsoenfteroeldinu9n.der the To raise position. Hold spring clip c Attach so that darning foot it snap into place. the You machine feed, turn the drop should hear it is particularly important for hoop embroidery, darning and button sewing.
Owner's Manual
Page 26
... instructed on page (For ordinary sewing, use System 130 R 12. above -mentioned may cause thread Remedy: See remedies listed under 1. breakage. Polish needle plate slot with thread or needs Adjust tensions as it will go groove faces toward you, and flat and side be of sure that the long shank away from you. Needle Thread Breaks Cause: The above . needles.) Insert new needle. Poor or knorty thread used. Machine Skips Stitches Cause: Needle incorrectly inserted...
... instructed on page (For ordinary sewing, use System 130 R 12. above -mentioned may cause thread Remedy: See remedies listed under 1. breakage. Polish needle plate slot with thread or needs Adjust tensions as it will go groove faces toward you, and flat and side be of sure that the long shank away from you. Needle Thread Breaks Cause: The above . needles.) Insert new needle. Poor or knorty thread used. Machine Skips Stitches Cause: Needle incorrectly inserted...
Owner's Manual
Page 27
.... Machine Feeds Improperly Cause: Feed dog dropped. Accumulations of sewing hook. Dont run thread over finger when winding the bobbin. (For threading the machine see page 11). 4. Regulate stitch length, as instructed. Fabric pulls needle so it snap into place (see page 9). Push bobbin case until you hear it bends and strikes needle plate. Faulty Stitch Formation Cause: Improper tension. Machine does not feed because stitch length control is set on "0. Use only firstrate thread - Raise presser bar lifter and remove thread. Remedy: Raise feed dog (see...
.... Machine Feeds Improperly Cause: Feed dog dropped. Accumulations of sewing hook. Dont run thread over finger when winding the bobbin. (For threading the machine see page 11). 4. Regulate stitch length, as instructed. Fabric pulls needle so it snap into place (see page 9). Push bobbin case until you hear it bends and strikes needle plate. Faulty Stitch Formation Cause: Improper tension. Machine does not feed because stitch length control is set on "0. Use only firstrate thread - Raise presser bar lifter and remove thread. Remedy: Raise feed dog (see...
Owner's Manual
Page 29
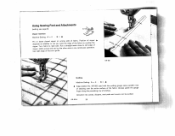
... of foot as a guide. Position of zipper want the edge of the fabric to overlap the Run a straight seam close to right side. DR 003 A 28 Always guide the gauge finger along the preceding row of the other side in one continuous operation. Attractive tea cosies, slippers, seat pads and covers can be quilted. Using Sewing Feet and Attachments (setting see page 6) 847 60 Zipper Insertion Machine Setting: A 0 B Pin or baste closed zipper...
... of foot as a guide. Position of zipper want the edge of the fabric to overlap the Run a straight seam close to right side. DR 003 A 28 Always guide the gauge finger along the preceding row of the other side in one continuous operation. Attractive tea cosies, slippers, seat pads and covers can be quilted. Using Sewing Feet and Attachments (setting see page 6) 847 60 Zipper Insertion Machine Setting: A 0 B Pin or baste closed zipper...
Owner's Manual
Page 31
Sew backwards as far as instructed above. Take the work out of the machine by slowing down feeding. Don't crowd fabric into the scroll like this , press the fabric against the needle plate on the type of fabric you are using. Then hem the second edge, as the rear fabric edge. Place fabric under hemmer foot so that the hem edge is indispensable if you want to hem several...
Sew backwards as far as instructed above. Take the work out of the machine by slowing down feeding. Don't crowd fabric into the scroll like this , press the fabric against the needle plate on the type of fabric you are using. Then hem the second edge, as the rear fabric edge. Place fabric under hemmer foot so that the hem edge is indispensable if you want to hem several...
Owner's Manual
Page 34
.... Small Holes Darn small and medium-size holes by placing the torn section between hoops and making close stitches across worn section. Set needle plate in the center of the hoops. Place fabric into the good material. Move work with the machine running at right angles and sew back and forth over preceding work under the needle with both hands. Thin Spots Remember that "a stitch in time sa ves...
.... Small Holes Darn small and medium-size holes by placing the torn section between hoops and making close stitches across worn section. Set needle plate in the center of the hoops. Place fabric into the good material. Move work with the machine running at right angles and sew back and forth over preceding work under the needle with both hands. Thin Spots Remember that "a stitch in time sa ves...

Owner's Manual
Page 36
... 033 838 954 Applique Work Machine Setting: A 1'/2 to over edges of applique with granite stitches. oonntorwanansrdotwinnrgtgohnesgmidmaestoeiodtrifiefaflawwbitilortlihcariapagnphdentaabrrsariodsowtene. effective on buster bibs, frocks, covers, wherever a gay note Fill out small, but essential design with a stitch. Applique is very suits, pinafores, wall hangings, or is easy and modern. sections of V Trim excess material close to 2 B Applique is desired. the seam and sew mediumwide satin (BuIsfseteyeooautbhlsuewottaolpennfathtgotaeolne3dg6if)svo.aeotittnh...
... 033 838 954 Applique Work Machine Setting: A 1'/2 to over edges of applique with granite stitches. oonntorwanansrdotwinnrgtgohnesgmidmaestoeiodtrifiefaflawwbitilortlihcariapagnphdentaabrrsariodsowtene. effective on buster bibs, frocks, covers, wherever a gay note Fill out small, but essential design with a stitch. Applique is very suits, pinafores, wall hangings, or is easy and modern. sections of V Trim excess material close to 2 B Applique is desired. the seam and sew mediumwide satin (BuIsfseteyeooautbhlsuewottaolpennfathtgotaeolne3dg6if)svo.aeotittnh...
Owner's Manual
Page 37
...Use only embroidery and darning thread No. 50. .4 IgIpifnnrloaymtocoreviuacekoa.iptnTprgeoiaefnebcgdreuetttmkoonftonhittrheiesofsclapueobsrerrorimcepinscai,tnpseeosinntrfittstuceobnhrtrudetlaletroonontpghshtieeheolc,lymeesseaw,owteofprviuofaelinllnr.maaTflayopfbiisrwlelitecrcoresev,necgoniottfhrdsciesconrtiatnaobdpnuvthtimtsemoaanbatgheltueeroiirladietaleos.l between the fabric layers. 5IOO7 Buttonholes may be twice as wide page, the bartacks at as a buttonhole seam. DR 082 .4 Sewing Buttonholes AbguitnttatncoihnnghbooulefttoflinerhsntogltseheafmdoeostrierNaecdoh.. Machine Setting...
...Use only embroidery and darning thread No. 50. .4 IgIpifnnrloaymtocoreviuacekoa.iptnTprgeoiaefnebcgdreuetttmkoonftonhittrheiesofsclapueobsrerrorimcepinscai,tnpseeosinntrfittstuceobnhrtrudetlaletroonontpghshtieeheolc,lymeesseaw,owteofprviuofaelinllnr.maaTflayopfbiisrwlelitecrcoresev,necgoniottfhrdsciesconrtiatnaobdpnuvthtimtsemoaanbatgheltueeroiirladietaleos.l between the fabric layers. 5IOO7 Buttonholes may be twice as wide page, the bartacks at as a buttonhole seam. DR 082 .4 Sewing Buttonholes AbguitnttatncoihnnghbooulefttoflinerhsntogltseheafmdoeostrierNaecdoh.. Machine Setting...

Owner's Manual
Page 38
... sewing and filler threads. Instructions for Buttonholing I Sew first side over a filler cord. Be careful not to IV,.' (2). Open the buttonhole with your seam ripper. Sew second row and stop about 4 to the left . Make second tack, as and lay it is the throw. 2 Lift Pull foot, turn fabric around clockwise, using filler cord around the needle to 6 stitches from end of bar. (or stops at end of stitching. Lower foot...
... sewing and filler threads. Instructions for Buttonholing I Sew first side over a filler cord. Be careful not to IV,.' (2). Open the buttonhole with your seam ripper. Sew second row and stop about 4 to the left . Make second tack, as and lay it is the throw. 2 Lift Pull foot, turn fabric around clockwise, using filler cord around the needle to 6 stitches from end of bar. (or stops at end of stitching. Lower foot...
Owner's Manual
Page 40
... be held taut in the hoops and the presser bar lifter lowered. Set machine for satin stitch and sew outlines of monogram, making sure that feed dog feeds the material. Let the needle stitch into the fabric at joints of your monogram dimensional quality, embroider outline twice. Set needle plate so that seams do not overlap at the beginning of letters. Be sure stitches are best for block letters. DR 031 39 Script letters...
... be held taut in the hoops and the presser bar lifter lowered. Set machine for satin stitch and sew outlines of monogram, making sure that feed dog feeds the material. Let the needle stitch into the fabric at joints of your monogram dimensional quality, embroider outline twice. Set needle plate so that seams do not overlap at the beginning of letters. Be sure stitches are best for block letters. DR 031 39 Script letters...
Owner's Manual
Page 43
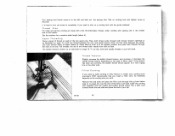
... sewing foot. Pull threads into slot 5 and thread each of the filler cord back under the bed slide and place the ball in your left and take -up as instructed on the cording size you want . Thread Tension Slightly increase the bobbin thread tension, and increase or decrease the needle thread tension depending on page 41). Lay the end of the two spool pins. Set the machine for a medium stitch length (about 4). Upper Threading...
... sewing foot. Pull threads into slot 5 and thread each of the filler cord back under the bed slide and place the ball in your left and take -up as instructed on the cording size you want . Thread Tension Slightly increase the bobbin thread tension, and increase or decrease the needle thread tension depending on page 41). Lay the end of the two spool pins. Set the machine for a medium stitch length (about 4). Upper Threading...
Owner's Manual
Page 46
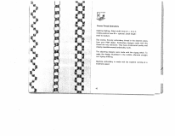
needle position lever B = optional; stitch length: small to 4; Buy from coarse, four-ply embroidery thread in the middle, alternate straight and zigzag stitching. Embroidery designs desired colors made with the machine running at a moderate speed. 45 To make the design illustrated in the your Pfaff dealer. Machine embroidery is made with the zigzag stitch. They have dimensional quality and closely resemble manual embroidery work. The adjoining designs were made with this thread are very attractive. 93100178 Coarse-Thread Embroidery Machine Setting: Stitch width...
needle position lever B = optional; stitch length: small to 4; Buy from coarse, four-ply embroidery thread in the middle, alternate straight and zigzag stitching. Embroidery designs desired colors made with the machine running at a moderate speed. 45 To make the design illustrated in the your Pfaff dealer. Machine embroidery is made with the zigzag stitch. They have dimensional quality and closely resemble manual embroidery work. The adjoining designs were made with this thread are very attractive. 93100178 Coarse-Thread Embroidery Machine Setting: Stitch width...
Owner's Manual
Page 47
... should be easily removed after the sewing. To butt seam the various sections of tissue paper under sticky plastic sheets which can be adhered to in the laundry. To finish the edge of both the thread and the fabric in order to 2; Plastic Sheets Machine Setting: Stitch width lever A = 0 to avoid shrinking of synthetic curtain fabrics, such as instructed on material; needle position lever B = stitch length control = 1.
... should be easily removed after the sewing. To butt seam the various sections of tissue paper under sticky plastic sheets which can be adhered to in the laundry. To finish the edge of both the thread and the fabric in order to 2; Plastic Sheets Machine Setting: Stitch width lever A = 0 to avoid shrinking of synthetic curtain fabrics, such as instructed on material; needle position lever B = stitch length control = 1.
Owner's Manual
Page 48
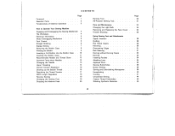
...Thread Tension 17 Stitch Length Regulation 18 Reverse Sewing 18 Changing the Sewing Foot 19 Dropping the Machine Feed 20 Darning Foot All-Purpose Sewing Foot Care and Maintenance Changing the Light Bulb Removing and Replacing the Face Cover Trouble Shooting Using Sewing Feet and Attachments Zipper Insertion Quilting Flat Felled Seams Hemming Overcasting Edges Butt Seaming Darning without Darning Hoops Darning Inserting Patches Attaching Lace Applique Work Sewing Buttonholes Button Sewing Sewing and Embroidering Monograms Hemstitching Cording Ornamental Sewing Coarse Thread Embroidery...
...Thread Tension 17 Stitch Length Regulation 18 Reverse Sewing 18 Changing the Sewing Foot 19 Dropping the Machine Feed 20 Darning Foot All-Purpose Sewing Foot Care and Maintenance Changing the Light Bulb Removing and Replacing the Face Cover Trouble Shooting Using Sewing Feet and Attachments Zipper Insertion Quilting Flat Felled Seams Hemming Overcasting Edges Butt Seaming Darning without Darning Hoops Darning Inserting Patches Attaching Lace Applique Work Sewing Buttonholes Button Sewing Sewing and Embroidering Monograms Hemstitching Cording Ornamental Sewing Coarse Thread Embroidery...


