

Owner's Manual
Page 2
... all the proud ordinary owner sewing, of a Pfaff 71, the embroidering and sewing darning hTnauhvmisebiefnorsrtgorfoutcittmeinopnosrotbamonoetksdewewtialilnilgsh.ejlopbsy.ouKeuepndiet rhstaannddy the machine and familiarize as a reference book in a home. problems, please contact your Plaff will become a lasting If you have any time. You machine which will be glad G.M.PFAFF AG Karisruhe-Durlach Branch Western Germany \ PFAFF 71 INSTRUCTIONS Foreword Your dream has come up in case you you with your...
... all the proud ordinary owner sewing, of a Pfaff 71, the embroidering and sewing darning hTnauhvmisebiefnorsrtgorfoutcittmeinopnosrotbamonoetksdewewtialilnilgsh.ejlopbsy.ouKeuepndiet rhstaannddy the machine and familiarize as a reference book in a home. problems, please contact your Plaff will become a lasting If you have any time. You machine which will be glad G.M.PFAFF AG Karisruhe-Durlach Branch Western Germany \ PFAFF 71 INSTRUCTIONS Foreword Your dream has come up in case you you with your...

Owner's Manual
Page 4
... cover 2. Needle plate 15. Needle thread tension 18. Motor disengaging mechanism 9, Bobbin winder thread retainer 10. Stitch length control 12. PlaIt rotary sewing hook 14. Sewing toot thumb screw 18. Bobbrn winder & Balance wheel 7. Presser bar lifter 19. Stop motion knob 8. Bed slide 13. Sewing foot The fo(Iowing feet are standard with this machine: 93-838 950-00 Presser loot, (attached to machine) 3 93-847551-00 Hemmer foot 93-847630-on Edge Stitcher, with guide Take-up lever 3. Thread retainer 4 Spool pins 5. Needle set screw 20...
... cover 2. Needle plate 15. Needle thread tension 18. Motor disengaging mechanism 9, Bobbin winder thread retainer 10. Stitch length control 12. PlaIt rotary sewing hook 14. Sewing toot thumb screw 18. Bobbrn winder & Balance wheel 7. Presser bar lifter 19. Stop motion knob 8. Bed slide 13. Sewing foot The fo(Iowing feet are standard with this machine: 93-838 950-00 Presser loot, (attached to machine) 3 93-847551-00 Hemmer foot 93-847630-on Edge Stitcher, with guide Take-up lever 3. Thread retainer 4 Spool pins 5. Needle set screw 20...
Owner's Manual
Page 5
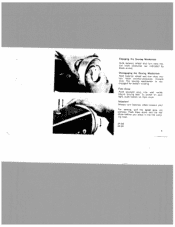
... For sewing, pull the spool pins out partway. Push them down into wall outlet. DR 506 DR 507 4 The sewing mechanism is dis engaged for bobbin winding. Foot Drive Push sewlight plug into the ma chine before you ). To switch on sewlight, push button on face cover. Engaging the Sewing Mechanism ...Hold balance wheel and turn balance wheel toward you place it into the carry ing case.
... For sewing, pull the spool pins out partway. Push them down into wall outlet. DR 506 DR 507 4 The sewing mechanism is dis engaged for bobbin winding. Foot Drive Push sewlight plug into the ma chine before you ). To switch on sewlight, push button on face cover. Engaging the Sewing Mechanism ...Hold balance wheel and turn balance wheel toward you place it into the carry ing case.

Owner's Manual
Page 6
Foot Control Place the foot control under the ca binet within easy reach of cord into receptacle 2 on back of machine, and plug 3 at other end of your foot. To do this, flick the lever down. completed sewing, flick the lever order to return the motor to its top position in inoperative position. Motor Disengaging Mechanism Power-driven machines feature a lever underneath the balance wheel which serves to...
Foot Control Place the foot control under the ca binet within easy reach of cord into receptacle 2 on back of machine, and plug 3 at other end of your foot. To do this, flick the lever down. completed sewing, flick the lever order to return the motor to its top position in inoperative position. Motor Disengaging Mechanism Power-driven machines feature a lever underneath the balance wheel which serves to...

Owner's Manual
Page 8
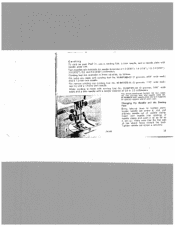
... thread on one of thread on the bobbin winder spindle, making sure that the key at position B for the maximum. Pass the thread through the rightharid thread guide, down and around the thread retainer stud, and up to the vertical po sition. position after loosening its base enters the slot in clockwise direction. \ Winding the Bobbin Disengage the sewing mechanism and raise the spool pins to the bobbin...
... thread on one of thread on the bobbin winder spindle, making sure that the key at position B for the maximum. Pass the thread through the rightharid thread guide, down and around the thread retainer stud, and up to the vertical po sition. position after loosening its base enters the slot in clockwise direction. \ Winding the Bobbin Disengage the sewing mechanism and raise the spool pins to the bobbin...

Owner's Manual
Page 10
Leave about 3" of thread hanging from the opening at its open latch so that the bobbin cannot fall out. R 5870 Ft 5868 9 Pull the thread under the tension spring until it emerges from the bobbin case. Hold the case by its end.
Leave about 3" of thread hanging from the opening at its open latch so that the bobbin cannot fall out. R 5870 Ft 5868 9 Pull the thread under the tension spring until it emerges from the bobbin case. Hold the case by its end.

Owner's Manual
Page 12
Genuine Plaff needles of this system are available from the Needle and Thread Chart on page 12. The needle size should be cho sen from every Pfaff dealer. Changing the Needle Bring needle bar to Its highest point and lower sewing foot. Loosen needle set screw a. Make sure that flat side of needle clamp. Push new needle up as far as it will go. I The Needle Pfaff 71 machines use System 130 R needles. Tighten needle set screw a half a turn and pull old needle out of shank faces toward the back and long groove toward you. DR 863 11
Genuine Plaff needles of this system are available from the Needle and Thread Chart on page 12. The needle size should be cho sen from every Pfaff dealer. Changing the Needle Bring needle bar to Its highest point and lower sewing foot. Loosen needle set screw a. Make sure that flat side of needle clamp. Push new needle up as far as it will go. I The Needle Pfaff 71 machines use System 130 R needles. Tighten needle set screw a half a turn and pull old needle out of shank faces toward the back and long groove toward you. DR 863 11

Owner's Manual
Page 15
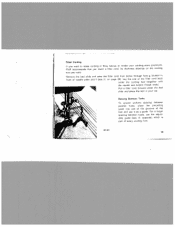
Lightly pull needle thread to draw bobbin thread up again. Place both threads back under the sewing foot. R 8213 14 Turn balance wheel toward you until the needle moves down and up through the needle hole. Drawing Up the Bobbin Thread Hold needle thread lightly in your left hand.
Lightly pull needle thread to draw bobbin thread up again. Place both threads back under the sewing foot. R 8213 14 Turn balance wheel toward you until the needle moves down and up through the needle hole. Drawing Up the Bobbin Thread Hold needle thread lightly in your left hand.

Owner's Manual
Page 19
... material work. presser foot No. 93-838 95OQO attached to your Pfaff. Make sure, you can start sewing Enjoy creative sewing with your machine, you tighten 18 All you have completed a seam. thumb screw 14 (page 3). Fundamentals of Machine Operation • Never run a threaded machine unless you have fabric under the sewing foot. • Place both threads back under the sewing to hasten feeding foot automatically. To exchange the sewing foot loosen this thumb screw securely again. lever...
... material work. presser foot No. 93-838 95OQO attached to your Pfaff. Make sure, you can start sewing Enjoy creative sewing with your machine, you tighten 18 All you have completed a seam. thumb screw 14 (page 3). Fundamentals of Machine Operation • Never run a threaded machine unless you have fabric under the sewing foot. • Place both threads back under the sewing to hasten feeding foot automatically. To exchange the sewing foot loosen this thumb screw securely again. lever...

Owner's Manual
Page 24
I OR 855 23 hoop embroidery and button sewing. The lever wilt be retained in this position and the fabric will cease feeding. The machine feed is dropped for darning. To raise the machine feed, press the lever down slantwise, then to its original position. Dropping the Machine Feed Remove the bed cover and press the drop feed ever down and let it return to the rear and up (as indicated by the white arrow).
I OR 855 23 hoop embroidery and button sewing. The lever wilt be retained in this position and the fabric will cease feeding. The machine feed is dropped for darning. To raise the machine feed, press the lever down slantwise, then to its original position. Dropping the Machine Feed Remove the bed cover and press the drop feed ever down and let it return to the rear and up (as indicated by the white arrow).
Owner's Manual
Page 27
... twin needle. Cording feet are available in three varieties, as it will go. For narrow cording use a cording foot, a twin needle, and a needle p'ate with cording foot No. 93-847 680-00 (7 grooves. 3/64" wide each) and a 1.2-mm twin needle. Wider cording is made with needle plate Twin needles slot. Make sure that the flat side of 1.2 (3/64"). 1.6 (1/16"), 1 8, 2.0 (5/64"). 2.5 (3/32"), 3.0, and 4.0 (5/32") millimeters. Tighten needle set screw a securely. OP 865 26 N I, -. Cording To cord on...
... twin needle. Cording feet are available in three varieties, as it will go. For narrow cording use a cording foot, a twin needle, and a needle p'ate with cording foot No. 93-847 680-00 (7 grooves. 3/64" wide each) and a 1.2-mm twin needle. Wider cording is made with needle plate Twin needles slot. Make sure that the flat side of 1.2 (3/64"). 1.6 (1/16"), 1 8, 2.0 (5/64"). 2.5 (3/32"), 3.0, and 4.0 (5/32") millimeters. Tighten needle set screw a securely. OP 865 26 N I, -. Cording To cord on...

Owner's Manual
Page 28
...,sbraiacndfuasiinentdc.rzeiaIgfszeatgheorlintedenescoironenatsheheastohtehbeerenneseiddSelee.t 27 the left hand. length. 50 embroidery thread, wider cording Upper Thread ftdtbPrhhioolrseantechctasredettosaoharfrbtehsaaauprcndpookdpuo. Turn sewing foot thumb screw b to slip on a cording foot with the Thread Size Pin with Set tucks and narrow cording are sewing silk in your left and take out the sewing foot. Slip on cording It is drawn threads in the needle and the machine for medium stitch made with a No.
...,sbraiacndfuasiinentdc.rzeiaIgfszeatgheorlintedenescoironenatsheheastohtehbeerenneseiddSelee.t 27 the left hand. length. 50 embroidery thread, wider cording Upper Thread ftdtbPrhhioolrseantechctasredettosaoharfrbtehsaaauprcndpookdpuo. Turn sewing foot thumb screw b to slip on a cording foot with the Thread Size Pin with Set tucks and narrow cording are sewing silk in your left and take out the sewing foot. Slip on cording It is drawn threads in the needle and the machine for medium stitch made with a No.
Owner's Manual
Page 29
... prominent Pfaff recommends that you want to make cording in your ap Spacing Between Tucks To ensure uniform spacing between tucks, use the adjust able guide (see ill, on the cording size you insert a filler cord. F. Lay the end of needle plate slot I (see ill, opposite) which is part of the foot and use it as a guide. Pull a filler cord forward under the cording foot (together with the needle and bobbin thread...
... prominent Pfaff recommends that you want to make cording in your ap Spacing Between Tucks To ensure uniform spacing between tucks, use the adjust able guide (see ill, on the cording size you insert a filler cord. F. Lay the end of needle plate slot I (see ill, opposite) which is part of the foot and use it as a guide. Pull a filler cord forward under the cording foot (together with the needle and bobbin thread...
Owner's Manual
Page 31
The thread size, threading procedure and thread tension are not recommended. 30 handkerchiefs, doilies and so forth, can be set screw a little further than for cording work (see page 27). are best suited to hemstitching, while woolly fabrics are the same as for ordinary needles. The stitch length can be obtained with Pfaff's System 130 twin needle. Particularly nice effects can be . Attach presser foot No. 93-838 954-00...
The thread size, threading procedure and thread tension are not recommended. 30 handkerchiefs, doilies and so forth, can be set screw a little further than for cording work (see page 27). are best suited to hemstitching, while woolly fabrics are the same as for ordinary needles. The stitch length can be obtained with Pfaff's System 130 twin needle. Particularly nice effects can be . Attach presser foot No. 93-838 954-00...

Owner's Manual
Page 32
... may be obtained by using varicolored embroidery and darning threads. Guide fabric of U seam, turn and sew second row. DROOl 31 ., 1 Sew first row. At the end Guide fabric in . along trccad in such a way and enlarged previously. the needle holes it has made or trace seamline on fabric. Procedure Fold fabric to mark seamline so that wing needle stitches a turn fabric half that wing needle penetrates Imitation hemstitching...
... may be obtained by using varicolored embroidery and darning threads. Guide fabric of U seam, turn and sew second row. DROOl 31 ., 1 Sew first row. At the end Guide fabric in . along trccad in such a way and enlarged previously. the needle holes it has made or trace seamline on fabric. Procedure Fold fabric to mark seamline so that wing needle stitches a turn fabric half that wing needle penetrates Imitation hemstitching...

Owner's Manual
Page 33
Interest ing effects can be used for many additional sewing operations. See your Pfaf[ dealer who will con siderably enlarge the range of applications of your machine. Such additional applications include felling, granite stitching, embroidering mono grams, sewing on wool, and straight-stitch embroidery with the multi-stitch ruffler and the bias binder. 32 Your Pfaff can also be glad to offer you various sewIng feet and attachments which will be obtained with four-ply thread.
Interest ing effects can be used for many additional sewing operations. See your Pfaf[ dealer who will con siderably enlarge the range of applications of your machine. Such additional applications include felling, granite stitching, embroidering mono grams, sewing on wool, and straight-stitch embroidery with the multi-stitch ruffler and the bias binder. 32 Your Pfaff can also be glad to offer you various sewIng feet and attachments which will be obtained with four-ply thread.
Owner's Manual
Page 36
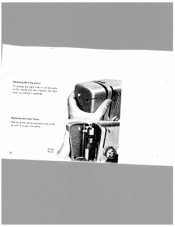
face cover DR 024 35 DR 512 Removing the Face Cover To at change the the needle hght bulb or oil bar end, remove cover by pulling ft upwards the the parts face Replacing the Face Cover Slip tip up until d it into slot e and push snaps into place.
face cover DR 024 35 DR 512 Removing the Face Cover To at change the the needle hght bulb or oil bar end, remove cover by pulling ft upwards the the parts face Replacing the Face Cover Slip tip up until d it into slot e and push snaps into place.

Owner's Manual
Page 37
Changing the Light Bulb The built-in , and turn left, and pull out. Replace face cover. When inserting a new light bulb, make sure its socket. OR 505 36 Slide bulb pins into its voltage agrees with the line voltage. turn right. To change the light bulb, remove the face cover, push the bulb into socket slots, press bulb in 15-watt sewing light illumi nates the area of stitching perfectly.
Changing the Light Bulb The built-in , and turn left, and pull out. Replace face cover. When inserting a new light bulb, make sure its socket. OR 505 36 Slide bulb pins into its voltage agrees with the line voltage. turn right. To change the light bulb, remove the face cover, push the bulb into socket slots, press bulb in 15-watt sewing light illumi nates the area of stitching perfectly.

Owner's Manual
Page 39
... of sewing Needle too thin or thread too heavy. Use correct needle (see page 14). Thread tension too tight. above -mentioned may cause thread breakage. Adjust tensions as instructed. Use good-quality threads only. Hook raceway is jammed or needs oiling. so it bends and Remedy: Replace needle at once to prevent further damage. and thread sizes Don't force the feeding the material lightly. Clean and oil hook raceway. 3. 2. Poor, knotty or rotten thread used. Fabric pulls needle strikes needle plate. motion. Guide...
... of sewing Needle too thin or thread too heavy. Use correct needle (see page 14). Thread tension too tight. above -mentioned may cause thread breakage. Adjust tensions as instructed. Use good-quality threads only. Hook raceway is jammed or needs oiling. so it bends and Remedy: Replace needle at once to prevent further damage. and thread sizes Don't force the feeding the material lightly. Clean and oil hook raceway. 3. 2. Poor, knotty or rotten thread used. Fabric pulls needle strikes needle plate. motion. Guide...
Owner's Manual
Page 40
... njjatatohmmrro,oecavikendev,riectthnpobeumaticfehakothdhoaaveknroddpmrafwoaoccofrethrwhkki.naeineyrgo, sseohthfnoeeuthldipenotmobweeetrchhheaaonnfhdiostlomhekde. 39 Machine does not Feed because stitch length control set on "O'. Regulate stitch length, as desired. Machine Feeds Improperly Press against bobbin case until you hear it snap into place. Take off needle plate and remove lint with a stiff brush. 5. Accumulations of lint packed between feed teeth, Remedy: Raise feed dog (see page 5). Cause: Feed dog dropped. Motor Idles Cause: Motor disengaging lever raised.
... njjatatohmmrro,oecavikendev,riectthnpobeumaticfehakothdhoaaveknroddpmrafwoaoccofrethrwhkki.naeineyrgo, sseohthfnoeeuthldipenotmobweeetrchhheaaonnfhdiostlomhekde. 39 Machine does not Feed because stitch length control set on "O'. Regulate stitch length, as desired. Machine Feeds Improperly Press against bobbin case until you hear it snap into place. Take off needle plate and remove lint with a stiff brush. 5. Accumulations of lint packed between feed teeth, Remedy: Raise feed dog (see page 5). Cause: Feed dog dropped. Motor Idles Cause: Motor disengaging lever raised.


