
Owner's Manual
Page 2
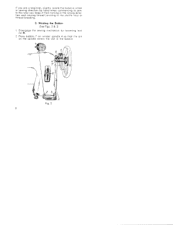
If you ore a beginner, slightly rotate the balance whee in sewing direction by loosening ioc nut R. 2. Fig. 2 2 Place bobbin 7 on winder spindle 4 so that the in on the spindle enters the slot in the shuttle race or thread breaking. 2. Winding the Bobbin (See Figs. 2 & 3) 1. Disengage the sewing mechanism by hand when commencing to sew In this way you keep it from turning in the wrong direc tion and causing thread jamming in the bobbin.
If you ore a beginner, slightly rotate the balance whee in sewing direction by loosening ioc nut R. 2. Fig. 2 2 Place bobbin 7 on winder spindle 4 so that the in on the spindle enters the slot in the shuttle race or thread breaking. 2. Winding the Bobbin (See Figs. 2 & 3) 1. Disengage the sewing mechanism by hand when commencing to sew In this way you keep it from turning in the wrong direc tion and causing thread jamming in the bobbin.

Owner's Manual
Page 3
... latch and remove the empty bobbin. Pull out the bobbin case with the forefinger of the thread wdl easily wind on the transverse spool pin. 4. When treadling, the end of your left hand, 3. Also, me thread may break when sewing. 3. As long as shown in Fig. 4. 4. Place spool on the .... The bobbin winder will stop automatically when the bobbin is placed on the bobbin. 5. Insert the full bobbin into the bobbin case so that the thread unwinds clockwise, as you hold the latch open, the bobbin cannot fall out. 5. 3. Changing the Bobbin 1. Engage the bobbin winder by hand as ...
... latch and remove the empty bobbin. Pull out the bobbin case with the forefinger of the thread wdl easily wind on the transverse spool pin. 4. When treadling, the end of your left hand, 3. Also, me thread may break when sewing. 3. As long as shown in Fig. 4. 4. Place spool on the .... The bobbin winder will stop automatically when the bobbin is placed on the bobbin. 5. Insert the full bobbin into the bobbin case so that the thread unwinds clockwise, as you hold the latch open, the bobbin cannot fall out. 5. 3. Changing the Bobbin 1. Engage the bobbin winder by hand as ...

Owner's Manual
Page 4
Hold the bobbin in the bobbin case, pull the thread into the slot (Fig. 6), and draw it under the tension spring (Fig, 7), leaving a loose end about 1 inch long outside the bobbin case. Fig. 5 4 Fig. 4 S -- 6.
Hold the bobbin in the bobbin case, pull the thread into the slot (Fig. 6), and draw it under the tension spring (Fig, 7), leaving a loose end about 1 inch long outside the bobbin case. Fig. 5 4 Fig. 4 S -- 6.

Owner's Manual
Page 5
... stud n the shuttle and turn it audibly snaps in place. Raise the presser bar lifter and thread the needle as fallows: (See Fig. 8). Fig. 6 Fig. 7 4. Lead the thread from spool pin 1 under thread guide 2, up and cound guide 3, down and between tenson discs 4, througn crsec spr:ng 5,...Failure to left through the eye 5 Push the bobbin case in bobbn case or needle breakage. Threading the Needle (See Fig. 8) The transverse soool pin ensures even unwinding of the thread and prevents thread breaking, which may result in until it until ifs position finger H is opposite the positcn ...
... stud n the shuttle and turn it audibly snaps in place. Raise the presser bar lifter and thread the needle as fallows: (See Fig. 8). Fig. 6 Fig. 7 4. Lead the thread from spool pin 1 under thread guide 2, up and cound guide 3, down and between tenson discs 4, througn crsec spr:ng 5,...Failure to left through the eye 5 Push the bobbin case in bobbn case or needle breakage. Threading the Needle (See Fig. 8) The transverse soool pin ensures even unwinding of the thread and prevents thread breaking, which may result in until it until ifs position finger H is opposite the positcn ...

Owner's Manual
Page 8
... and decreased by turn ing it counter-clockwise. ing screw S (Fig. 12) clockwise, and decreased by means of a small screw driver. Regulating the Thread Tensions The tension on the tension regulator cup greatly help in Fig. 13. 8 If observed, it to the left, Numbers and marks stamped on the... needle thread is regulated by turn . The tension is increased by turning it is n its highest position when beginning or end ing a seam. To obtain a...
... and decreased by turn ing it counter-clockwise. ing screw S (Fig. 12) clockwise, and decreased by means of a small screw driver. Regulating the Thread Tensions The tension on the tension regulator cup greatly help in Fig. 13. 8 If observed, it to the left, Numbers and marks stamped on the... needle thread is regulated by turn . The tension is increased by turning it is n its highest position when beginning or end ing a seam. To obtain a...

Owner's Manual
Page 10
... the Chart on '00 t:gnt. When using e thin needle with a thick t'ireod or o th.n thread in a thick needle, skipping of the fabric. In F q 1 , h- ChoosIng the Proper Noodle The Pfaff 30 use rusty needes nce the neat aooearance of the finished seom and 'he orevention of threoo break •ng... is lowered because ;t wi I automatically • care the tsnsion when raised. 7. ed in the material. tension on vie n'ooth finisn af 'e need 'e thread may occur as possible for oanory sewing operations, it .s ad visable ia se ect a neede one size arger than in s Z05 00 prapriate to the...
... the Chart on '00 t:gnt. When using e thin needle with a thick t'ireod or o th.n thread in a thick needle, skipping of the fabric. In F q 1 , h- ChoosIng the Proper Noodle The Pfaff 30 use rusty needes nce the neat aooearance of the finished seom and 'he orevention of threoo break •ng... is lowered because ;t wi I automatically • care the tsnsion when raised. 7. ed in the material. tension on vie n'ooth finisn af 'e need 'e thread may occur as possible for oanory sewing operations, it .s ad visable ia se ect a neede one size arger than in s Z05 00 prapriate to the...

Owner's Manual
Page 11
Needle and Thread Chart lypes of fabric 40 to 50 Oi.,in,nnd by weight of Fabrics Silk Cotton Needle Size Fine Fabrics 80 0 so •0 such as ...
Needle and Thread Chart lypes of fabric 40 to 50 Oi.,in,nnd by weight of Fabrics Silk Cotton Needle Size Fine Fabrics 80 0 so •0 such as ...

Owner's Manual
Page 13
...on R (for reverse). The shuttle moves freely in the divided shuttle race and is fitted with a central bobbin shuttle. Cleaning the Shuttle Race The Pfaff 30 is oscillated back and forth by the presser foot whether the work will feet smoothly and evenly or if staggering stitches and feed markings on...on the left of the stitch reguloor scale indicate the length of stitch in millimeters (rangina from 5 to be removed for cleaning and when thread should be used for embroider ng and darning. When moving the stitch regulator lever up beyond the zero mark, the machine will ease the pressure...
...on R (for reverse). The shuttle moves freely in the divided shuttle race and is fitted with a central bobbin shuttle. Cleaning the Shuttle Race The Pfaff 30 is oscillated back and forth by the presser foot whether the work will feet smoothly and evenly or if staggering stitches and feed markings on...on the left of the stitch reguloor scale indicate the length of stitch in millimeters (rangina from 5 to be removed for cleaning and when thread should be used for embroider ng and darning. When moving the stitch regulator lever up beyond the zero mark, the machine will ease the pressure...

Owner's Manual
Page 14
... away race cover R so thot shuttle G becomes accessible in the race. 2. Remove the shuttle by gripping its center stud c with thumb and forefinger of loose thread with a stiletto, rinse the shuttle race with cleaning fluid (kerosene), and apply sewing machine oil. To replace the shuttle, insert it into the shuttle race...
... away race cover R so thot shuttle G becomes accessible in the race. 2. Remove the shuttle by gripping its center stud c with thumb and forefinger of loose thread with a stiletto, rinse the shuttle race with cleaning fluid (kerosene), and apply sewing machine oil. To replace the shuttle, insert it into the shuttle race...
Owner's Manual
Page 18
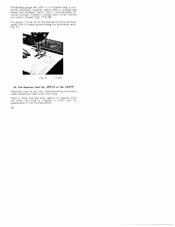
... either too wide or irregular in quilting tea cosies and childrens quilts, and is indispensable for sewing blouses, childrens dresses and similar articles with elastic thread. (Figs. 19 & 20). I . The Hemmer Feet Ne. 25576 or Ne. 25579 Hemming used to do it by hand. Fig. 21). The quilting gauge No. 25811...
... either too wide or irregular in quilting tea cosies and childrens quilts, and is indispensable for sewing blouses, childrens dresses and similar articles with elastic thread. (Figs. 19 & 20). I . The Hemmer Feet Ne. 25576 or Ne. 25579 Hemming used to do it by hand. Fig. 21). The quilting gauge No. 25811...

Owner's Manual
Page 23
in a color ma astcohfitngNot.ha4t0-of80thme amchaitneeriadl atroninbge darned. and tends 23 Ordinary to be placed applied. Fig. 25 R 4782 For darning, use thread in a hoop if Note that the means of hook presser bar S also when has to make tsheewidnagrnthtroeoadstiisfftwanisdtedcontosopicmuoucuhs. Heavyweight fabrics need the Darning Attachment is not be suspended by using the Darning Attach ment. (Fig. 25).
in a color ma astcohfitngNot.ha4t0-of80thme amchaitneeriadl atroninbge darned. and tends 23 Ordinary to be placed applied. Fig. 25 R 4782 For darning, use thread in a hoop if Note that the means of hook presser bar S also when has to make tsheewidnagrnthtroeoadstiisfftwanisdtedcontosopicmuoucuhs. Heavyweight fabrics need the Darning Attachment is not be suspended by using the Darning Attach ment. (Fig. 25).

Owner's Manual
Page 31
... slide. See remedies listed above reasons. Adjust upper and lower ten sions as instructed in Chapter 4. ter 6. 3 Machine improperly threaded. Needle either too thin or Select correct needle from too thick for any of Stitches Cause Needle inserted incorrectly.... Thread Breaking Cause Remedy Thread breaking may cause hard running of the mechanism. Thread tensions tao tight. Remedy Push needle up as far as instructed in Chap. Insert a new needle. ...
... slide. See remedies listed above reasons. Adjust upper and lower ten sions as instructed in Chapter 4. ter 6. 3 Machine improperly threaded. Needle either too thin or Select correct needle from too thick for any of Stitches Cause Needle inserted incorrectly.... Thread Breaking Cause Remedy Thread breaking may cause hard running of the mechanism. Thread tensions tao tight. Remedy Push needle up as far as instructed in Chap. Insert a new needle. ...

Owner's Manual
Page 32
... the bearings. Place the spool of silk. Peed dog jams in Chap race. Thread slipped off balance wheel). 32 straight. Mechanism clogged up be Remave thread with a thin tween balance wheel and needle. (If necessary, take bushing. Cause Poor or knotty threod used. ter 12.... Hard trj Cause Remedy Driving belt either too Either. Thread snarled up by thread. Shuttle race without oil or Dean and oil shuffle race. obstructed by Use only Pfaff sewing ma infenor oiL chine oil, never salad oil or glycerine. Shuffle race without...
... the bearings. Place the spool of silk. Peed dog jams in Chap race. Thread slipped off balance wheel). 32 straight. Mechanism clogged up be Remave thread with a thin tween balance wheel and needle. (If necessary, take bushing. Cause Poor or knotty threod used. ter 12.... Hard trj Cause Remedy Driving belt either too Either. Thread snarled up by thread. Shuttle race without oil or Dean and oil shuffle race. obstructed by Use only Pfaff sewing ma infenor oiL chine oil, never salad oil or glycerine. Shuffle race without...

Owner's Manual
Page 33
...use thicker needle. When inserting the bobbin case, push it run the thread over your finger when winding the bobbin but let it in unlil t snaps n place audibly. Thread too knotty, heavy Use only first-rate thread. Chart. Don't force the feeding mo ban, just guide the material...lightly. Bobbin case correctly. inserted in Chapter 6. Don't run through the bobbin winder tension. 33 to Needle too thin or thread Study Needle and Thread too thick. Increase pressure on thicker material. Bobbin wound unevenly. Needle Breakage Cause Remedy Needle bent and by point of shuttle...
...use thicker needle. When inserting the bobbin case, push it run the thread over your finger when winding the bobbin but let it in unlil t snaps n place audibly. Thread too knotty, heavy Use only first-rate thread. Chart. Don't force the feeding mo ban, just guide the material...lightly. Bobbin case correctly. inserted in Chapter 6. Don't run through the bobbin winder tension. 33 to Needle too thin or thread Study Needle and Thread too thick. Increase pressure on thicker material. Bobbin wound unevenly. Needle Breakage Cause Remedy Needle bent and by point of shuttle...

Owner's Manual
Page 34
Release tension and remov tween tension discs. Machine insufficiently oiled or oiled with kerosene. Noisy Running Cause Remedy Accumuiatons of oil in the shuttle Apply one or two drops c race, oiL Thread accumulated be- f necessary, also feed doc then readjust. Fig 35 34 Clean and oil machine a instructed in Chapter Needle plate improperly Unscrew needle plate anc mounted. thread. Caus Remedy Lock of packed Clean and oil snuttle roc mt in the shuttle raCe as instructed in Cnapters 1 crd 20.
Release tension and remov tween tension discs. Machine insufficiently oiled or oiled with kerosene. Noisy Running Cause Remedy Accumuiatons of oil in the shuttle Apply one or two drops c race, oiL Thread accumulated be- f necessary, also feed doc then readjust. Fig 35 34 Clean and oil machine a instructed in Chapter Needle plate improperly Unscrew needle plate anc mounted. thread. Caus Remedy Lock of packed Clean and oil snuttle roc mt in the shuttle raCe as instructed in Cnapters 1 crd 20.

Owner's Manual
Page 37
... 9. Using the Attachments 15. The Hemmer No. 25579 17. Regulating the Thread Tensions 7. Changing the Needle . 10. The Feed Cover Plate No. 25997 20..... 25553 . Index Chapter 1. Settng the Length of Stitch 11, Regulating the Pressure on the Materiul 12. Drawing Up the Bobbin Thread 6. Dropping the Feed Dog 14. Trouble Shooting V V Page 1 2 3 5 7 8 10 II 12 12 13 13 ... Felling Foot No. 25594 18. Care and Maintenance . . 21. Changing the Bobbn 4. Threading the Needle 5. Cleaning the Shuttle Race 13. Embroidering and Darning 19. Wmding the Bobbin 3.
... 9. Using the Attachments 15. The Hemmer No. 25579 17. Regulating the Thread Tensions 7. Changing the Needle . 10. The Feed Cover Plate No. 25997 20..... 25553 . Index Chapter 1. Settng the Length of Stitch 11, Regulating the Pressure on the Materiul 12. Drawing Up the Bobbin Thread 6. Dropping the Feed Dog 14. Trouble Shooting V V Page 1 2 3 5 7 8 10 II 12 12 13 13 ... Felling Foot No. 25594 18. Care and Maintenance . . 21. Changing the Bobbn 4. Threading the Needle 5. Cleaning the Shuttle Race 13. Embroidering and Darning 19. Wmding the Bobbin 3.


