

Owner's Manual
Page 5
...'t forget to hasten feeding by black arrow). Never run a threaded machine unless you have fabric under the sewing foot automatically. Never try to plug in the machine, though.) threader, or the work . When in this position, the needle can be threaded with the needle motor will go -- and the Before you begin and after you...
...'t forget to hasten feeding by black arrow). Never run a threaded machine unless you have fabric under the sewing foot automatically. Never try to plug in the machine, though.) threader, or the work . When in this position, the needle can be threaded with the needle motor will go -- and the Before you begin and after you...
Owner's Manual
Page 8
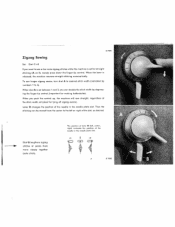
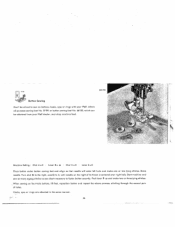
...straight stitching (A on 0), merely press down the finger-tip control. When you push the control up, the machine will sew straight, regardless of the needle in the needle plate slot. Dial G lengthens zigzag stitches or packs them more closely together (satin stitch). R 7999 Zigzag...) indicotes the position of the stitch width set between I to sew a few wide zigzag stitches while the machine is released, the mochine resumes straight stitching automatically. The position of lever B (left or right of the needle in the needle plote slot. 4- -+ cD cEP 7 R7995 When dial A ...
...straight stitching (A on 0), merely press down the finger-tip control. When you push the control up, the machine will sew straight, regardless of the needle in the needle plate slot. Dial G lengthens zigzag stitches or packs them more closely together (satin stitch). R 7999 Zigzag...) indicotes the position of the stitch width set between I to sew a few wide zigzag stitches while the machine is released, the mochine resumes straight stitching automatically. The position of lever B (left or right of the needle in the needle plote slot. 4- -+ cD cEP 7 R7995 When dial A ...

Owner's Manual
Page 13
... pull the thread into Bobbin Case As shown in illustration 1, hold bobbin in left hand and lift latci k with your forefinger. When you can see sewing hook. Hold the case by holding the latch. Pull out bobbin case with your left hand sa that the bobbin cannot fall out. 'F R 8001 ...Removing the Bobbin Case A Operate the Stopmatic lever to raise the needle, open the bed slide, so you release latch k the empty bobbin drops out. 12 Pull the thread under the machine with bobbin by its open latch, so that the thread end falls from the opening at...
... pull the thread into Bobbin Case As shown in illustration 1, hold bobbin in left hand and lift latci k with your forefinger. When you can see sewing hook. Hold the case by holding the latch. Pull out bobbin case with your left hand sa that the bobbin cannot fall out. 'F R 8001 ...Removing the Bobbin Case A Operate the Stopmatic lever to raise the needle, open the bed slide, so you release latch k the empty bobbin drops out. 12 Pull the thread under the machine with bobbin by its open latch, so that the thread end falls from the opening at...
Owner's Manual
Page 16
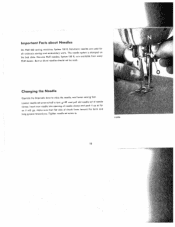
... side of shank faces toward the back and long groove toward you. R 6798 15 Important Facts about Needles On Pfaff 262 sewing machines, System 130 R, flat-shank needles are available from every Pfaff dealer. The needle system is stamped on the bed slide. Genuine Pfaff needles, System 130 R, are used . Bent or blunt needles should not be used for all ordinary...
... side of shank faces toward the back and long groove toward you. R 6798 15 Important Facts about Needles On Pfaff 262 sewing machines, System 130 R, flat-shank needles are available from every Pfaff dealer. The needle system is stamped on the bed slide. Genuine Pfaff needles, System 130 R, are used . Bent or blunt needles should not be used for all ordinary...
Owner's Manual
Page 20
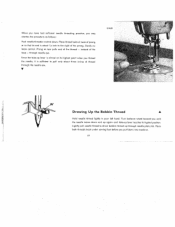
... its highest position. instead of the thread -- through needle plate slat. Turn balance wheel toward you put fabric into machine. 19 Place both threads back under sewing foot before you until the needle moves down . Lightly pull needle thread to the right of the prong. When you... have had sufficient needle threading practice, you thread the needle, it is about three inches...
... its highest position. instead of the thread -- through needle plate slat. Turn balance wheel toward you put fabric into machine. 19 Place both threads back under sewing foot before you until the needle moves down . Lightly pull needle thread to the right of the prong. When you... have had sufficient needle threading practice, you thread the needle, it is about three inches...

Owner's Manual
Page 24
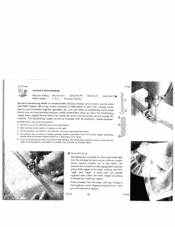
Fabric will cease feeding. 1 When control v is dropped for darning with the aid of the fabric resumes automatically when you startZsewing. 23 R6705 To lower feed below the needle plate, turn drop feed control v clock wise. Dropping the Machine Feed The machine feed is turned to the right as far as itwill go, feeding of the vibrator, for hoop embroidery and button sewing.
Fabric will cease feeding. 1 When control v is dropped for darning with the aid of the fabric resumes automatically when you startZsewing. 23 R6705 To lower feed below the needle plate, turn drop feed control v clock wise. Dropping the Machine Feed The machine feed is turned to the right as far as itwill go, feeding of the vibrator, for hoop embroidery and button sewing.

Owner's Manual
Page 25
... on new foot and tighten the screw securely. As the machine sews, the vibrator moves presser bar and darning foot up and down . Drop machine feed and lower presser bar lifter. The fabric is thus held down when it back and forth under the needle. (Only delicate fabrics should be moved freely when the... needle has risen clear again. Hold the fabric taut with both hands...
... on new foot and tighten the screw securely. As the machine sews, the vibrator moves presser bar and darning foot up and down . Drop machine feed and lower presser bar lifter. The fabric is thus held down when it back and forth under the needle. (Only delicate fabrics should be moved freely when the... needle has risen clear again. Hold the fabric taut with both hands...
Owner's Manual
Page 28
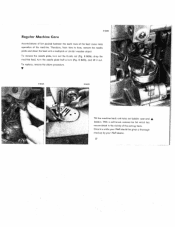
...lint which has accumulated in a while your Pfaff should be given a thorough checkup by your Pfaff dealer. 27 To replace, reverse the above procedure. Once in the vicinity of the machine. R 8455), and lift it out. V 8 8454 R 8455 Tilt the machine back and take out bobbin case and A... bobbin. 8 8030 Regular Machine Care Accumulations of lint packed between the tooth rows of the feed cause noisy operation of the sewing hook. R 8654), drop the machine feed, turn the needle plate half a turn out the thumb ...
...lint which has accumulated in a while your Pfaff should be given a thorough checkup by your Pfaff dealer. 27 To replace, reverse the above procedure. Once in the vicinity of the machine. R 8455), and lift it out. V 8 8454 R 8455 Tilt the machine back and take out bobbin case and A... bobbin. 8 8030 Regular Machine Care Accumulations of lint packed between the tooth rows of the feed cause noisy operation of the sewing hook. R 8654), drop the machine feed, turn the needle plate half a turn out the thumb ...

Owner's Manual
Page 30
... from you. Hook raceway is stamped an bed slide. (For ordinary sewing, use System 130R needles.) Insert new needle. Burrs or sharp edges on pages 16 and 17. Use good quality threads only. Trouble Shooting 1. Machine Skips Stitches Ca use : The above . Needle too fine or too thick for the thread. Thread tension too tight...
... from you. Hook raceway is stamped an bed slide. (For ordinary sewing, use System 130R needles.) Insert new needle. Burrs or sharp edges on pages 16 and 17. Use good quality threads only. Trouble Shooting 1. Machine Skips Stitches Ca use : The above . Needle too fine or too thick for the thread. Thread tension too tight...
Owner's Manual
Page 31
...top cover and through thread guide. Accumulations of sewing hook. Take off needle plate and remove lint with a stiff brush. 30 Use correct needle and thread sizes. Bobbin unevenly wound. the correct size for the needle and fabric. Machine Feeds Improperly Cause: Feed dog set too low..., does nat rise up enough above needle plate level. Bobbin case inserted incorrectly. Remedy: Hove your Pfaff dealer make the necessary...
...top cover and through thread guide. Accumulations of sewing hook. Take off needle plate and remove lint with a stiff brush. 30 Use correct needle and thread sizes. Bobbin unevenly wound. the correct size for the needle and fabric. Machine Feeds Improperly Cause: Feed dog set too low..., does nat rise up enough above needle plate level. Bobbin case inserted incorrectly. Remedy: Hove your Pfaff dealer make the necessary...
Owner's Manual
Page 35
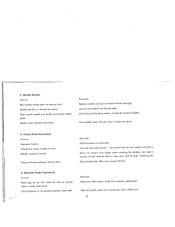
... fabric into the scroll, but filled with the left side do this will ensure a neat hem right from the beginning. If you are used to sew a uniform hem. Then hem the second edge, on 2 or 3. For a smooth, unpuckered hem, ease thread tension slightly and set dial A on instructed ...the hemmer by pulling both threads backwards, Inserting the fabric into the hemmer foot. Draw the fabric into the scroll of the machine by slowing down against the needle plate an feeding. Before you want to hem severol edges, hem first edge to within about 'Is" to facilitate insertion into...
... fabric into the scroll, but filled with the left side do this will ensure a neat hem right from the beginning. If you are used to sew a uniform hem. Then hem the second edge, on 2 or 3. For a smooth, unpuckered hem, ease thread tension slightly and set dial A on instructed ...the hemmer by pulling both threads backwards, Inserting the fabric into the hemmer foot. Draw the fabric into the scroll of the machine by slowing down against the needle plate an feeding. Before you want to hem severol edges, hem first edge to within about 'Is" to facilitate insertion into...
Owner's Manual
Page 36
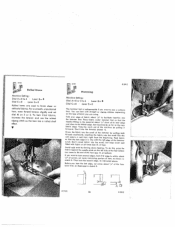
... C=O ' Lever E=O 4 Overcasting prevents frayed edges. R 5925 44088 Butt Seaming Machine Setting: Dial A=3 or 4 . Lever E=O Two similar pieces of sheet under the sewing foot so that the abutted edges are oined. Lever B= + Dial C=O . Worn bed sheets may be butted together and loined with the needle taking one stitch into the fabric and the other...
... C=O ' Lever E=O 4 Overcasting prevents frayed edges. R 5925 44088 Butt Seaming Machine Setting: Dial A=3 or 4 . Lever E=O Two similar pieces of sheet under the sewing foot so that the abutted edges are oined. Lever B= + Dial C=O . Worn bed sheets may be butted together and loined with the needle taking one stitch into the fabric and the other...

Owner's Manual
Page 39
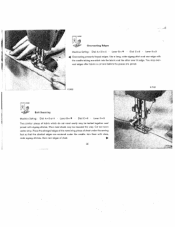
... a filler Dial C=O Lever E=O thread through the groove in the groove of the sewing foot. Lever 8=4 Trace cording pattern on thickness of filler thread used for many sewing lobs. both are guided in the sole of the foot. Finish the shirring with ... with rr o line of the fabric. For added effects sew place filler thread under rather than on thestress to 2'/2 . Set top of straight stitching. Single-Needle Cording 46121 R7162 Machine Setting: Shirrirsg DiolA=2 Lever B=4 Dial C=O Lever E=O Machine Setting: Dial A=2 to which the shirring will be exposed....
... a filler Dial C=O Lever E=O thread through the groove in the groove of the sewing foot. Lever 8=4 Trace cording pattern on thickness of filler thread used for many sewing lobs. both are guided in the sole of the foot. Finish the shirring with ... with rr o line of the fabric. For added effects sew place filler thread under rather than on thestress to 2'/2 . Set top of straight stitching. Single-Needle Cording 46121 R7162 Machine Setting: Shirrirsg DiolA=2 Lever B=4 Dial C=O Lever E=O Machine Setting: Dial A=2 to which the shirring will be exposed....
Owner's Manual
Page 42
... Scalloping can be used effectively as indicated above, place fabric under sewing foot and J guide needle along scalloped edge. I I When you are produced automatically. The...jiffy on numerous articles. The illustrations (left , alternating the rhythm and the direction of your Pfaff 262 Automatic. I 4612? As you have finished, trim excess fabric J along traced line. An...(see ( sketch) by using variegated thread. 41 R7150 Clamp work into em broidery hoops. Scroliwork Machine Setting: DialA=2to4 ' Lever B=+ Dial C=O Lever E=O Draw designs on a doubled J \ piece...
... Scalloping can be used effectively as indicated above, place fabric under sewing foot and J guide needle along scalloped edge. I I When you are produced automatically. The...jiffy on numerous articles. The illustrations (left , alternating the rhythm and the direction of your Pfaff 262 Automatic. I 4612? As you have finished, trim excess fabric J along traced line. An...(see ( sketch) by using variegated thread. 41 R7150 Clamp work into em broidery hoops. Scroliwork Machine Setting: DialA=2to4 ' Lever B=+ Dial C=O Lever E=O Draw designs on a doubled J \ piece...
Owner's Manual
Page 43
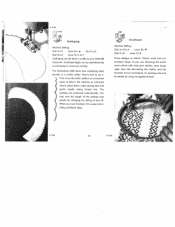
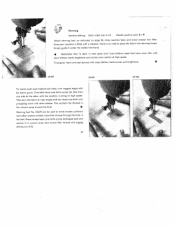
...) needle available at Pfaff stores at turning points, pivot fabric on needle, and proceed as directed above. 1? 7138 El 4 Hemstitching Hemstitching is in fabric on the right. 3 Lift sewing foot, turn fabric in the direction of arrow, and lower foot again. 4 Sew second row, as shown in sketch, guiding material parallel to be hemstitched. 2 Stop machine...
...) needle available at Pfaff stores at turning points, pivot fabric on needle, and proceed as directed above. 1? 7138 El 4 Hemstitching Hemstitching is in fabric on the right. 3 Lift sewing foot, turn fabric in the direction of arrow, and lower foot again. 4 Sew second row, as shown in sketch, guiding material parallel to be hemstitched. 2 Stop machine...

Owner's Manual
Page 44
...Pfaff on the left stitch exactly in the needle. When hem is finished, stitches will be visible on the right side of sheer and filmy fabrics. Use a No. 70 needle...material once (Fig. 1), unselvaged fabric twice (Fig. 2). Attach the guide so that needle takes left side. Machine Setting: Dial A=0 . 15669 Bhndstitching Machine Setting: Dial A=1 to 2 Lever B=q Stitch Length: Maximum Dial C=0 Lever E=0 Hemming... regular intervals. Set dial A so that its vertical flange goes through the sewing foot slot. L)JJ Automatic Blindstitching Used for draperies or curtains. Use thread...
...Pfaff on the left stitch exactly in the needle. When hem is finished, stitches will be visible on the right side of sheer and filmy fabrics. Use a No. 70 needle...material once (Fig. 1), unselvaged fabric twice (Fig. 2). Attach the guide so that needle takes left side. Machine Setting: Dial A=0 . 15669 Bhndstitching Machine Setting: Dial A=1 to 2 Lever B=q Stitch Length: Maximum Dial C=0 Lever E=0 Hemming... regular intervals. Set dial A so that its vertical flange goes through the sewing foot slot. L)JJ Automatic Blindstitching Used for draperies or curtains. Use thread...
Owner's Manual
Page 47
... in the same manner. 46 51951 Button Sewing Don't be obtained from your Pfaff. Start machine and sew as many zigzag stitches as you deem necessary to sew on buttons, hooks, eyes or rings with your Pfaff dealer, and drop machine feed. Turn dial A to the right, usually to 3, until needle on four-hole buttons, lift foot, reposition...
... in the same manner. 46 51951 Button Sewing Don't be obtained from your Pfaff. Start machine and sew as many zigzag stitches as you deem necessary to sew on buttons, hooks, eyes or rings with your Pfaff dealer, and drop machine feed. Turn dial A to the right, usually to 3, until needle on four-hole buttons, lift foot, reposition...
Owner's Manual
Page 48
...forth across and lengthwise. V DR 087 DR 089 Ta mend small and medium-size holes, trim ragged edges with the machine running at right angles and sew back and forth aver preceding work with short stitches made across the hale from one side to place the fabric into darning... hoops. This anchors the threads in the foot. Since your machine is fitted with a vibrator, there is no need to the other woolen articles. 53670 Darning Machine Setting: Stitch width dial A=0 Needle position lever B=4 Attach darning foot, as instructed on page 24, drop...
...forth across and lengthwise. V DR 087 DR 089 Ta mend small and medium-size holes, trim ragged edges with the machine running at right angles and sew back and forth aver preceding work with short stitches made across the hale from one side to place the fabric into darning... hoops. This anchors the threads in the foot. Since your machine is fitted with a vibrator, there is no need to the other woolen articles. 53670 Darning Machine Setting: Stitch width dial A=0 Needle position lever B=4 Attach darning foot, as instructed on page 24, drop...

Owner's Manual
Page 55
...Pfaff-deo ler. Pass the thread through eyelet 3, and thread the machine as required. Press the position spring together, and push pin 2 into the spring slot. attachments which are discussed on the preceding pages. Special application possibilities are not included in place firmly. Push the spooi of your sewing machine... can buythe transverse spool holder from a cross-wound spool, use the transverse spool holder. ss 4, All-Purpose Sewing Foot (with Clear-View Shoe) All-purpose sewing foot No. 51 991 is important to watch the needle penetrate ...
...Pfaff-deo ler. Pass the thread through eyelet 3, and thread the machine as required. Press the position spring together, and push pin 2 into the spring slot. attachments which are discussed on the preceding pages. Special application possibilities are not included in place firmly. Push the spooi of your sewing machine... can buythe transverse spool holder from a cross-wound spool, use the transverse spool holder. ss 4, All-Purpose Sewing Foot (with Clear-View Shoe) All-purpose sewing foot No. 51 991 is important to watch the needle penetrate ...
Owner's Manual
Page 56
... Lace Inserting Lace Inserting Patches with Elastic and Zigzag Seam Single-Needle Cording . Button Sewing Darning Darning without Foot . Cording Two-Needle Decorative Sewing Three Needle Decorative Sewing Automatic Embroidery . Page Essential Ports of Machine 2 Fundamentals of Machine Operation .4 The Stopmatic 4 Electrical Information .5 Straight Stitching 5 Zigzag Sewing .7 Setting Machine for Automatic Embroidery 8 Winding the Bobbin 10 Removing the Bobbin Case...
... Lace Inserting Lace Inserting Patches with Elastic and Zigzag Seam Single-Needle Cording . Button Sewing Darning Darning without Foot . Cording Two-Needle Decorative Sewing Three Needle Decorative Sewing Automatic Embroidery . Page Essential Ports of Machine 2 Fundamentals of Machine Operation .4 The Stopmatic 4 Electrical Information .5 Straight Stitching 5 Zigzag Sewing .7 Setting Machine for Automatic Embroidery 8 Winding the Bobbin 10 Removing the Bobbin Case...


