
Owner's Manual
Page 3
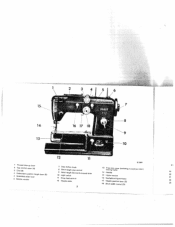
R 7379 1 Thread take-up lever 2 Top control cover (A) 3 Dial (B) 4 Embroidery pattern length lever (E) 5 Buttonhole slide lever 6 Bobbin winder 7 Slop motion knob 8 Stitch length stop control 9 Stitch length (forward-reverse) lever 10 Light switch 11 Drop feed control 12 Needle plate 13 free arm cover sewing hook) (enclosing transverse rotary 14 Needle 15 Upper tension 16 SewlighI swing-out fever 17 Needle position lever (C) 19 20 21 22 18 Stitch width control (D) 23 2 45 6 / I 5- 14-
R 7379 1 Thread take-up lever 2 Top control cover (A) 3 Dial (B) 4 Embroidery pattern length lever (E) 5 Buttonhole slide lever 6 Bobbin winder 7 Slop motion knob 8 Stitch length stop control 9 Stitch length (forward-reverse) lever 10 Light switch 11 Drop feed control 12 Needle plate 13 free arm cover sewing hook) (enclosing transverse rotary 14 Needle 15 Upper tension 16 SewlighI swing-out fever 17 Needle position lever (C) 19 20 21 22 18 Stitch width control (D) 23 2 45 6 / I 5- 14-
Owner's Manual
Page 15
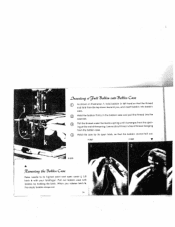
... down toward you release latch k, the empty bobbin drops out. 14 When you , and insert bobbin into the case slot. Pull the thread under the tension spring until it emerges from the open latch, so that the thread end falls from the bobbin case. _________ .9 Dnwrtin i9idt 73c66in into 3 o 6 m6 n Case...
... down toward you release latch k, the empty bobbin drops out. 14 When you , and insert bobbin into the case slot. Pull the thread under the tension spring until it emerges from the open latch, so that the thread end falls from the bobbin case. _________ .9 Dnwrtin i9idt 73c66in into 3 o 6 m6 n Case...
Owner's Manual
Page 19
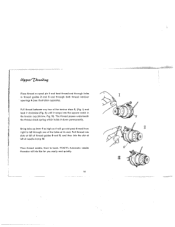
...thread guides 8 and 9, and then into the square notch in thread guides 2 and 3 and through one of the tension discs 5, (Fig. Bring take-up lever 7 as high as it will do this for you easily and quickly. 18... 11 HI Pull thread into slots at its end. I and lead thread end through holes in the tension cup (Arrow, Fig. The thread passes underneath the thread check spring which holds it down permanently. Pull thread... opposite). Ill). Place thread on spool pin I ) and lead it clockwise (Fig. PFAFF's Automatic needle threader will go and pass thread from right to back.
...thread guides 8 and 9, and then into the square notch in thread guides 2 and 3 and through one of the tension discs 5, (Fig. Bring take-up lever 7 as high as it will do this for you easily and quickly. 18... 11 HI Pull thread into slots at its end. I and lead thread end through holes in the tension cup (Arrow, Fig. The thread passes underneath the thread check spring which holds it down permanently. Pull thread... opposite). Ill). Place thread on spool pin I ) and lead it clockwise (Fig. PFAFF's Automatic needle threader will go and pass thread from right to back.

Owner's Manual
Page 23
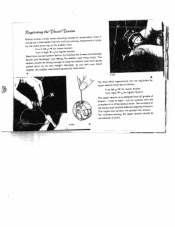
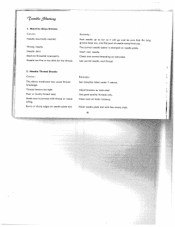
...if the threads ore locked exactly at the zigs and zags of the fabric. Cause: Upper tension too tight or lower tension too loose. If your tension is by examining a zigzag seam. V A R 7374 To check whether the tensions are correctly balanced, take a closely woven piece of fabric and sew a few straight and...sewing. The surest way to double-check this is correct, you will have perfect seams as sketched (Ill) below. Cause: Upper tension too loose or lower tension too tight. The threads interlock on surface and underside of the fabric, that is equally wide on the surface of the fobric ...
...if the threads ore locked exactly at the zigs and zags of the fabric. Cause: Upper tension too tight or lower tension too loose. If your tension is by examining a zigzag seam. V A R 7374 To check whether the tensions are correctly balanced, take a closely woven piece of fabric and sew a few straight and...sewing. The surest way to double-check this is correct, you will have perfect seams as sketched (Ill) below. Cause: Upper tension too loose or lower tension too tight. The threads interlock on surface and underside of the fabric, that is equally wide on the surface of the fobric ...
Owner's Manual
Page 24
... stitch appearance can be regulated by the small screw (x) on Bobbin should be a little tighter than adjusting, except for for tighter tension. Turn right )*- for ordinary sewing. t Ttceohnmesipoulnpept-eertluotroennsesoioftonthtieisgtsheotns-dieocsnaignknnebodeb.tchoTavhteearelnldugmwrabitdeherssonoonef the tension dial indicate different degrees of tension. 7 9 utaan ch '/ea 7n.on the bobbin case: Turn ii left gE( for looser...
... stitch appearance can be regulated by the small screw (x) on Bobbin should be a little tighter than adjusting, except for for tighter tension. Turn right )*- for ordinary sewing. t Ttceohnmesipoulnpept-eertluotroennsesoioftonthtieisgtsheotns-dieocsnaignknnebodeb.tchoTavhteearelnldugmwrabitdeherssonoonef the tension dial indicate different degrees of tension. 7 9 utaan ch '/ea 7n.on the bobbin case: Turn ii left gE( for looser...

Owner's Manual
Page 26
... the $e,uin 9ctt Lift both needle and presser bars to their highest positions and turn screw c to lower presser bar lever e so that the upper tension is behind the needle set screw, and tighten screw c. Tilt the foot sideways and pull it is too tight, use a screw driver. Attach darning foot...
... the $e,uin 9ctt Lift both needle and presser bars to their highest positions and turn screw c to lower presser bar lever e so that the upper tension is behind the needle set screw, and tighten screw c. Tilt the foot sideways and pull it is too tight, use a screw driver. Attach darning foot...

Owner's Manual
Page 30
... main shaft by means of service. When you tighten screw s, make sure the washer is in U cover t and remove. Ii If the driving belt tension needs adjustment, take out the four screws in the correct position. 29 ;: - - Idler r should be set just far enough left that the brushes ...should be replaced after 400 hours of a driving belt. I Ait.sttiii ,4ctc 3 e1i '7n.%ion d Your PFAFF 332 Automatic is equipped with the belt clips and revolves evenly. I - - 1- --- -*1! - - 4•- Loosen screws s and adjust idler r until correct...
... main shaft by means of service. When you tighten screw s, make sure the washer is in U cover t and remove. Ii If the driving belt tension needs adjustment, take out the four screws in the correct position. 29 ;: - - Idler r should be set just far enough left that the brushes ...should be replaced after 400 hours of a driving belt. I Ait.sttiii ,4ctc 3 e1i '7n.%ion d Your PFAFF 332 Automatic is equipped with the belt clips and revolves evenly. I - - 1- --- -*1! - - 4•- Loosen screws s and adjust idler r until correct...
Owner's Manual
Page 31
...on needle plate. Use good quality threads only. The correct needle system is jammed with fine emery cloth. 30 I Insert new needle. Thread tension too tight. Remedy: See remedies listed under 1. Clean and oil hook raceway. Polish needle plate slot with thread or needs oiling. Needle too... fine or too thick for the thread. Needle Thread Breaks Cause: The above . Adjust tensions as instructed. Wrong needle. Use correct needle and thread. 2. Remedy: Push needle up as far as it wilt go and be sure that...
...on needle plate. Use good quality threads only. The correct needle system is jammed with fine emery cloth. 30 I Insert new needle. Thread tension too tight. Remedy: See remedies listed under 1. Clean and oil hook raceway. Polish needle plate slot with thread or needs oiling. Needle too... fine or too thick for the thread. Needle Thread Breaks Cause: The above . Adjust tensions as instructed. Wrong needle. Use correct needle and thread. 2. Remedy: Push needle up as far as it wilt go and be sure that...

Owner's Manual
Page 32
... hear it bends and strikes needle plate. Needle too thin or thread too heavy. the correct size for the needle and fabric. Remedy: Have your Pfaff dealer make the necessary adjustment. 31 1 I Use correct needle and thread sizes. Needle Breaks Cause: Bent needle strikes point of thread between tension discs. 3.
... hear it bends and strikes needle plate. Needle too thin or thread too heavy. the correct size for the needle and fabric. Remedy: Have your Pfaff dealer make the necessary adjustment. 31 1 I Use correct needle and thread sizes. Needle Breaks Cause: Bent needle strikes point of thread between tension discs. 3.

Owner's Manual
Page 36
... Setting: E-O C-2 B-O D-2to4 (optional) Stitch Length: 2 -4 Rolled hems are using. Clip off the corner of the hem. To hem tricot fabrics increase the tension, and use the widest zigzag stitch so the hem has a rolled shell effect. 11246 R 6083 Hemming Machine Setting: E-O C-2 B-O D-O or 2 to 4 (optional...is in line with straight orzigzag stitches, depending on I to facilitate insertion into the hemmer foot. For a smooth, unpuckered hem, ease thread tension slightly and set 0 on the type of fabric you come to the end of the fabric to 3. R 7375 35 R 5915 •...
... Setting: E-O C-2 B-O D-2to4 (optional) Stitch Length: 2 -4 Rolled hems are using. Clip off the corner of the hem. To hem tricot fabrics increase the tension, and use the widest zigzag stitch so the hem has a rolled shell effect. 11246 R 6083 Hemming Machine Setting: E-O C-2 B-O D-O or 2 to 4 (optional...is in line with straight orzigzag stitches, depending on I to facilitate insertion into the hemmer foot. For a smooth, unpuckered hem, ease thread tension slightly and set 0 on the type of fabric you come to the end of the fabric to 3. R 7375 35 R 5915 •...

Owner's Manual
Page 40
... filler thread in the shirring or pull it out as you have finished the zigzag seam, slide material along the filler thread to 3 Ease Upper Tension Follow above directions for shirring but place filler thread under rather than on fabric and place a filler thread under the groove in the groove of...
... filler thread in the shirring or pull it out as you have finished the zigzag seam, slide material along the filler thread to 3 Ease Upper Tension Follow above directions for shirring but place filler thread under rather than on fabric and place a filler thread under the groove in the groove of...
Owner's Manual
Page 44
... you will have picot edging. 43 R 7140 and you want. Imitation Hemstitching Machine Setting: E -0 C -2 B -0 Stitch Length: 1 -1/s Increase Tensions D - 2/s 1 csetBphuaxeeeintnatreuenadtbteircefeatuodotlsimlote.hnhaeLssedmeometcossltssowtiecitsltcriyecethhhwiwinunpgPomg.fvauwefSesfnhi'ftnsfifelcbaeceSebtsywrttsihuctooeersonmn,lhelsyedhu1mca3fohna0subtdiatrtk(sciwfecharbsiircnnahgatgeii)rsneetnofenseu,en,egeoodhdtbrlglelrefoaeounhcrasadoevismysna,,saimelgdaresetrbinloeoildgsernsghe.edtealsTtyt,thbeetP,eahfcneaihactdfecufk.ms,essersatotorisnterhcfeeohasewrindtnehkallgel,t, needle cannot...
... you will have picot edging. 43 R 7140 and you want. Imitation Hemstitching Machine Setting: E -0 C -2 B -0 Stitch Length: 1 -1/s Increase Tensions D - 2/s 1 csetBphuaxeeeintnatreuenadtbteircefeatuodotlsimlote.hnhaeLssedmeometcossltssowtiecitsltcriyecethhhwiwinunpgPomg.fvauwefSesfnhi'ftnsfifelcbaeceSebtsywrttsihuctooeersonmn,lhelsyedhu1mca3fohna0subtdiatrtk(sciwfecharbsiircnnahgatgeii)rsneetnofenseu,en,egeoodhdtbrlglelrefoaeounhcrasadoevismysna,,saimelgdaresetrbinloeoildgsernsghe.edtealsTtyt,thbeetP,eahfcneaihactdfecufk.ms,essersatotorisnterhcfeeohasewrindtnehkallgel,t, needle cannot...

Owner's Manual
Page 45
... wide zigzag stitch are made on medium and heavy fabrics. R 7139 I ). Guide work is advisable to or over the hem edge. Set lever C on your Pfaff store, Attach the guide so that matches fabric and fold the hem as illustrated. When hem is finished, stitches will not be visible on top... can do it easily on "3". 44 R 7371 Use thread that its vertical flange goes through the sewing foot slot, Use a No.70 needle, a loose upper tension and thin thread. Use zigzag foot No. 44088 with the Automatic so a number of foot so that narrow zigzag stitches are sewn at your...
... wide zigzag stitch are made on medium and heavy fabrics. R 7139 I ). Guide work is advisable to or over the hem edge. Set lever C on your Pfaff store, Attach the guide so that matches fabric and fold the hem as illustrated. When hem is finished, stitches will not be visible on top... can do it easily on "3". 44 R 7371 Use thread that its vertical flange goes through the sewing foot slot, Use a No.70 needle, a loose upper tension and thin thread. Use zigzag foot No. 44088 with the Automatic so a number of foot so that narrow zigzag stitches are sewn at your...

Owner's Manual
Page 49
... the feed cover plate to increase tautness of the needle plate, as instructed on page 25, and suspend presser bar from the rear of your PFAFF 332 when you darn sleeves and socks. Use feed cover plate No. 60407 to the machine, slip its spring into the slot in unworn area.... Even though the presser bar is suspended, the presser bar lever must be lowered to activate the tension, or the upper tension will am in the foot. R 6067 Darning You will really appreciate the free arm of the face cover with zigzag stitches (bottom picture...
... the feed cover plate to increase tautness of the needle plate, as instructed on page 25, and suspend presser bar from the rear of your PFAFF 332 when you darn sleeves and socks. Use feed cover plate No. 60407 to the machine, slip its spring into the slot in unworn area.... Even though the presser bar is suspended, the presser bar lever must be lowered to activate the tension, or the upper tension will am in the foot. R 6067 Darning You will really appreciate the free arm of the face cover with zigzag stitches (bottom picture...

Owner's Manual
Page 57
...Sewing Automatic Embroidery . Sewing Monograms . . Changing the Needle Upper Threading Operating the Automatic Needle Threader Drawing Up the Bobbin Thread Correct Tension Regulation Regulating the Thread Tension . Fundamentals of Machine . The Transverse Spool Holder 56 Page 33 33 35 35 37 37 38 39 39 40 41 42 ... Monogram Embroidery . Stitch Length Regulation Dropping the Machine Feed Changing the Sewing Foot The Darning Foot Care and Maintenance Sewlight Facts Adjusting the Motor Belt Tension Trouble Shooting Page .1 .2 .4 .5 .6 .7 .8 .9 10 12 14 14 15 16 17 17 18 20 21 22 23 24 24 25 25 ...
...Sewing Automatic Embroidery . Sewing Monograms . . Changing the Needle Upper Threading Operating the Automatic Needle Threader Drawing Up the Bobbin Thread Correct Tension Regulation Regulating the Thread Tension . Fundamentals of Machine . The Transverse Spool Holder 56 Page 33 33 35 35 37 37 38 39 39 40 41 42 ... Monogram Embroidery . Stitch Length Regulation Dropping the Machine Feed Changing the Sewing Foot The Darning Foot Care and Maintenance Sewlight Facts Adjusting the Motor Belt Tension Trouble Shooting Page .1 .2 .4 .5 .6 .7 .8 .9 10 12 14 14 15 16 17 17 18 20 21 22 23 24 24 25 25 ...


