
Owner's Manual
Page 3
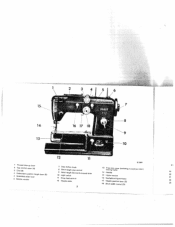
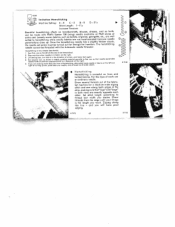
45 6 / I 5- 14- R 7379 1 Thread take-up lever 2 Top control cover (A) 3 Dial (B) 4 Embroidery pattern length lever (E) 5 Buttonhole slide lever 6 Bobbin winder 7 Slop motion knob 8 Stitch length stop control 9 Stitch length (forward-reverse) lever 10 Light switch 11 Drop feed control 12 Needle plate 13 free arm cover sewing hook) (enclosing transverse rotary 14 Needle 15 Upper tension 16 SewlighI swing-out fever 17 Needle position lever (C) 19 20 21 22 18 Stitch width control (D) 23 2
45 6 / I 5- 14- R 7379 1 Thread take-up lever 2 Top control cover (A) 3 Dial (B) 4 Embroidery pattern length lever (E) 5 Buttonhole slide lever 6 Bobbin winder 7 Slop motion knob 8 Stitch length stop control 9 Stitch length (forward-reverse) lever 10 Light switch 11 Drop feed control 12 Needle plate 13 free arm cover sewing hook) (enclosing transverse rotary 14 Needle 15 Upper tension 16 SewlighI swing-out fever 17 Needle position lever (C) 19 20 21 22 18 Stitch width control (D) 23 2
Owner's Manual
Page 6
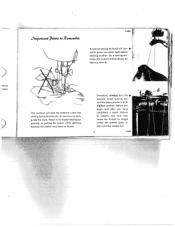
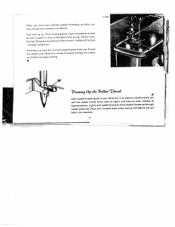
... or break. --4 Therefore, always turn the balance wheel toward you until the take -up lever is at its highest position before making another. Luqctant 7cins ic R 6808 A woman sewing by pushing or pulling the fabric while stitching because the needle may cause the thread to hasten feeding by hand will feed the material under the needle plate or slip out of the needle eye...
... or break. --4 Therefore, always turn the balance wheel toward you until the take -up lever is at its highest position before making another. Luqctant 7cins ic R 6808 A woman sewing by pushing or pulling the fabric while stitching because the needle may cause the thread to hasten feeding by hand will feed the material under the needle plate or slip out of the needle eye...
Owner's Manual
Page 10
To form the satin stitch graduolly de crease stitch length almost to desired stitch width (indicoted by numbers I - To change needle position, press ever C down and mov, into: Notch I to 4; Notch 2- Do not move C or D while needle is at the extreme right of the needle plate slot in straight sewing, and swings to the left to the right in fabric. 2 A Lever f lengthens zigzag stitches or pocks them more closely...
To form the satin stitch graduolly de crease stitch length almost to desired stitch width (indicoted by numbers I - To change needle position, press ever C down and mov, into: Notch I to 4; Notch 2- Do not move C or D while needle is at the extreme right of the needle plate slot in straight sewing, and swings to the left to the right in fabric. 2 A Lever f lengthens zigzag stitches or pocks them more closely...
Owner's Manual
Page 18
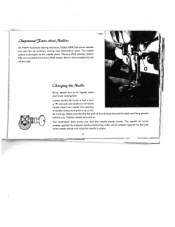
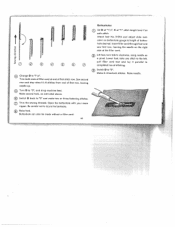
... used for all ordinary sewing and embroidery work. Tighten needle set screw o half a turn ,c-'tEC and pull old needle out of shank faces toward the back and long groove toward you how the needle clamp works. The needle set screw presses against the tapered needle positioning roller which presses against the flat side of needle clamp and push it up as far as it will go. Insert new needle into opening of the needle shank...
... used for all ordinary sewing and embroidery work. Tighten needle set screw o half a turn ,c-'tEC and pull old needle out of shank faces toward the back and long groove toward you how the needle clamp works. The needle set screw presses against the tapered needle positioning roller which presses against the flat side of needle clamp and push it up as far as it will go. Insert new needle into opening of the needle shank...
Owner's Manual
Page 22
... the '4 13cn6t '7hea' A Hold needle thread lightly in your left hand. Prong w now pulls end of the loop - Since take -up lever reaches its highest point when you thread the needle, pull about 1/2 inch to draw bobbin thread up through iJ needle plate slot. Place both threads back under sewing foot before you put fabric into machine. 21 Lightly pull needle thread to the!right of thread through needle eye.
... the '4 13cn6t '7hea' A Hold needle thread lightly in your left hand. Prong w now pulls end of the loop - Since take -up lever reaches its highest point when you thread the needle, pull about 1/2 inch to draw bobbin thread up through iJ needle plate slot. Place both threads back under sewing foot before you put fabric into machine. 21 Lightly pull needle thread to the!right of thread through needle eye.
Owner's Manual
Page 25
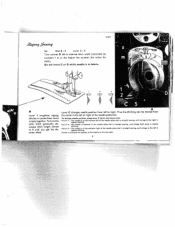
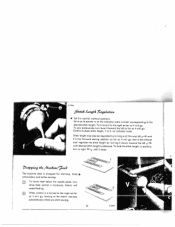
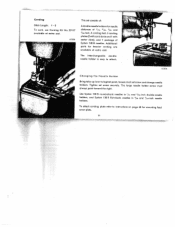
Control e stops stitch length, 1 to 5, on the indicator scale number corresponding to the desired stitch length. To lower feed below the needle plate, turn e right )- Set e so its pointer is dropped for darning, hoop embroidery and button sewing. Turn lever f to the right as far as it stops. 7 zc2inf7 tli? , 4 1ac4ine The machine feed is on indicator scale. Stitch length may also be regulated by turning f slowly toward the left until it will...
Control e stops stitch length, 1 to 5, on the indicator scale number corresponding to the desired stitch length. To lower feed below the needle plate, turn e right )- Set e so its pointer is dropped for darning, hoop embroidery and button sewing. Turn lever f to the right as far as it stops. 7 zc2inf7 tli? , 4 1ac4ine The machine feed is on indicator scale. Stitch length may also be regulated by turning f slowly toward the left until it will...
Owner's Manual
Page 31
Insert new needle. Check and correct threading as it wilt go and be sure that the long groove faces you, and flat part of needle away from you. Use correct needle and thread. 2. Use good quality threads only. Needle bent. Remedy: Push needle up as far as instructed. Hook race is stamped on needle plate slot. Remedy: See remedies listed under 1. Adjust tensions as instructed. Machine threaded improperly. Needle Thread Breaks Cause: The above . Clean and oil hook raceway. Thread tension too...
Insert new needle. Check and correct threading as it wilt go and be sure that the long groove faces you, and flat part of needle away from you. Use correct needle and thread. 2. Use good quality threads only. Needle bent. Remedy: Push needle up as far as instructed. Hook race is stamped on needle plate slot. Remedy: See remedies listed under 1. Adjust tensions as instructed. Machine threaded improperly. Needle Thread Breaks Cause: The above . Clean and oil hook raceway. Thread tension too...

Owner's Manual
Page 32
...-rote thread - - Faulty Stitch Formation Cause: Improper tension. Bobbin unevenly wound. the correct size for the needle and fabric. Bobbin case inserted incorrectly. 4. Use correct needle and thread sizes. Release upper tension by setting ii on top when winding the bobbin, cover and through thread but lead guide h. Machine Feeds Improperly Cause: Feed dog set too low and does not rise up enough above needle plate level. Needle Breaks Cause: Bent needle strikes point of thread between tension discs. Don't force the feeding motion. Pieces of sewing hook. Guide...
...-rote thread - - Faulty Stitch Formation Cause: Improper tension. Bobbin unevenly wound. the correct size for the needle and fabric. Bobbin case inserted incorrectly. 4. Use correct needle and thread sizes. Release upper tension by setting ii on top when winding the bobbin, cover and through thread but lead guide h. Machine Feeds Improperly Cause: Feed dog set too low and does not rise up enough above needle plate level. Needle Breaks Cause: Bent needle strikes point of thread between tension discs. Don't force the feeding motion. Pieces of sewing hook. Guide...

Owner's Manual
Page 33
... motion knob. If thread is loose and slips, or has shrunk and causes excessive pressure an bearings. Hook raceway lacks oil or is not being filled). Unwind and remove thread. Thread Jamming If thread jams in the sewing hook mechanism and blocks it out while rocking the balance wheel. Clean and oil hook raceway. Snarled thread between balance wheel and bushing. Bobbin winder working while sewing. (When a bobbin is obstructed by adjusting...
... motion knob. If thread is loose and slips, or has shrunk and causes excessive pressure an bearings. Hook raceway lacks oil or is not being filled). Unwind and remove thread. Thread Jamming If thread jams in the sewing hook mechanism and blocks it out while rocking the balance wheel. Clean and oil hook raceway. Snarled thread between balance wheel and bushing. Bobbin winder working while sewing. (When a bobbin is obstructed by adjusting...
Owner's Manual
Page 34
... (without quilting gauge). Use right edge of zipper insertion, follow directions in one continuous opera tion. R7104 Quilting Machine Setting: E-0 C-2 8-0 D -0 or 2 (optional) Stitch Length: I - 2 Edge Stitcher No. 41350. Run a straight seam close to the machine bed with the quilting gauge it sews parallel rows of stitching over the entire surface of fabric. Sew parallel rows of ' zipper, stitch across lower end and up the other types of foot as a guide. Pin or baste closed zipper on whether...
... (without quilting gauge). Use right edge of zipper insertion, follow directions in one continuous opera tion. R7104 Quilting Machine Setting: E-0 C-2 8-0 D -0 or 2 (optional) Stitch Length: I - 2 Edge Stitcher No. 41350. Run a straight seam close to the machine bed with the quilting gauge it sews parallel rows of stitching over the entire surface of fabric. Sew parallel rows of ' zipper, stitch across lower end and up the other types of foot as a guide. Pin or baste closed zipper on whether...

Owner's Manual
Page 36
... the hem. To hem tricot fabrics increase the tension, and use the widest zigzag stitch so the hem has a rolled shell effect. 11246 R 6083 Hemming Machine Setting: E-O C-2 B-O D-O or 2 to 4 (optional) Stitch Length: 2 -4 The hemmer foot is in line with straight orzigzag stitches, depending on the type of the fabric to finish sheer or deli cate fabrics. If you are used to facilitate insertion into the hemmer foot. Rolled Hems Machine Setting: E-O C-2 B-O D-2to4 (optional) Stitch Length: 2 -4 Rolled hems are using...
... the hem. To hem tricot fabrics increase the tension, and use the widest zigzag stitch so the hem has a rolled shell effect. 11246 R 6083 Hemming Machine Setting: E-O C-2 B-O D-O or 2 to 4 (optional) Stitch Length: 2 -4 The hemmer foot is in line with straight orzigzag stitches, depending on the type of the fabric to finish sheer or deli cate fabrics. If you are used to facilitate insertion into the hemmer foot. Rolled Hems Machine Setting: E-O C-2 B-O D-2to4 (optional) Stitch Length: 2 -4 Rolled hems are using...

Owner's Manual
Page 43
... to a child's collar. An exciting note may vary the length of the scallops by using variegated thread. 'V and guide needle along scalloped edge. First, trace collar pattern on fabric. As you have finished, trim excess fabric along traced line. Set machine (shown above), place fabric under sewing foot Machine Setting: E -0 C-2 B-0 D-2to4 Stitch Length: Minimum Draw designs on a doubled piece of fabric. Scalloped edges can be done in a liffy on numerous...
... to a child's collar. An exciting note may vary the length of the scallops by using variegated thread. 'V and guide needle along scalloped edge. First, trace collar pattern on fabric. As you have finished, trim excess fabric along traced line. Set machine (shown above), place fabric under sewing foot Machine Setting: E -0 C-2 B-0 D-2to4 Stitch Length: Minimum Draw designs on a doubled piece of fabric. Scalloped edges can be done in a liffy on numerous...
Owner's Manual
Page 44
..., pivot two lines fabric on ordinary needle. Set machine for a medium-wide zigzag stitch and sew along this type of work use on of the area to thread bar width you will have picot edging. 43 R 7140 and you desire. first row so that "zigs" and "zags" in above. Zigzag along both rows ore exactly opposite each other, Set stitch length according to be threaded with the Automatic needle threader. For this...
..., pivot two lines fabric on ordinary needle. Set machine for a medium-wide zigzag stitch and sew along this type of work use on of the area to thread bar width you will have picot edging. 43 R 7140 and you desire. first row so that "zigs" and "zags" in above. Zigzag along both rows ore exactly opposite each other, Set stitch length according to be threaded with the Automatic needle threader. For this...

Owner's Manual
Page 45
... is used on your Pfaff store, Attach the guide so that matches fabric and fold the hem as illustrated. Set lever C on medium and heavy fabrics. R 7139 I ). Next follow this procedure: Turn fabric wrong side up to pin or baste hem. On scivage edge or if bias seam binding is used for draperies or curtains Machine Setting: E -1 B-i A -6 C -1 Stitch Length 1 _V/s Blindstitching is a laborious task, You can buy at regular intervals. Guide work...
... is used on your Pfaff store, Attach the guide so that matches fabric and fold the hem as illustrated. Set lever C on medium and heavy fabrics. R 7139 I ). Next follow this procedure: Turn fabric wrong side up to pin or baste hem. On scivage edge or if bias seam binding is used for draperies or curtains Machine Setting: E -1 B-i A -6 C -1 Stitch Length 1 _V/s Blindstitching is a laborious task, You can buy at regular intervals. Guide work...
Owner's Manual
Page 47
... a filler cord. 46 Attach foot No. 51016 and adjust slide mdi cator on the right side of stitching. Buttonholes CD Set D at "1'/2", C at end of filler cord at "1", stitch length lever fan satin stitch. Raise needle. ® three fastening stitches. Lift foot turn fabric clockwise using needle as a pivot. Trim the sewing threads Open the buttonhole with your seam ripper Be careful not to "3". fi ff J c 0 -a CD ® ® 0 ® ® ® Change D to length of...
... a filler cord. 46 Attach foot No. 51016 and adjust slide mdi cator on the right side of stitching. Buttonholes CD Set D at "1'/2", C at end of filler cord at "1", stitch length lever fan satin stitch. Raise needle. ® three fastening stitches. Lift foot turn fabric clockwise using needle as a pivot. Trim the sewing threads Open the buttonhole with your seam ripper Be careful not to "3". fi ff J c 0 -a CD ® ® 0 ® ® ® Change D to length of...

Owner's Manual
Page 49
..., the presser bar lever must be released - - Machine Setting: E - 0 B -0 C -2 D -.3 Drop feed. Place thread back and forth across filler thread with darning hook No. 46128. R 6067 Darning You will be lowered to activate the tension, or the upper tension will really appreciate the free arm of your PFAFF 332 when you darn sleeves and socks. Sew across damaged spot (top picture) and anchor it in the front edge of the needle plate, as instructed on...
..., the presser bar lever must be released - - Machine Setting: E - 0 B -0 C -2 D -.3 Drop feed. Place thread back and forth across filler thread with darning hook No. 46128. R 6067 Darning You will be lowered to activate the tension, or the upper tension will really appreciate the free arm of your PFAFF 332 when you darn sleeves and socks. Sew across damaged spot (top picture) and anchor it in the front edge of the needle plate, as instructed on...

Owner's Manual
Page 50
... darned with the fabric grain. Then turn the fabric at high speed. First stitch back and forth across worn section. Use a thin No. 70 needle. 1. Stitch back and forth across the hole, first lengthwise, then cross wise. Raise machine feed and use forward and reverse stitch lever. Clamp fabric into darning hoop and move it freely under the needle. Small Holes Darn small and medium-size holes by trimming ragged edges with the normal sewing foot...
... darned with the fabric grain. Then turn the fabric at high speed. First stitch back and forth across worn section. Use a thin No. 70 needle. 1. Stitch back and forth across the hole, first lengthwise, then cross wise. Raise machine feed and use forward and reverse stitch lever. Clamp fabric into darning hoop and move it freely under the needle. Small Holes Darn small and medium-size holes by trimming ragged edges with the normal sewing foot...
Owner's Manual
Page 51
...7165 46121 Sewing Monograms Machine Setting: E -0 C-2 B-0 D - 2'/ to your Automatic. 50 Monogram Embroidery Machine Setting: E -0 C -2 B -0 D - Lower needle into fabric at its versatility and delight in the countless creative possibilities which it adds to 3 Stitch Length: Minimum The procedure below is primarily used for block letters. You will soon enoy creative embroidery once you the Ornamentograph, the in the hoop, the presser bar suspended and the presser bar lever lowered. Raise feed and set . 14 machine for monogram embroidery without a sewing foot...
...7165 46121 Sewing Monograms Machine Setting: E -0 C-2 B-0 D - 2'/ to your Automatic. 50 Monogram Embroidery Machine Setting: E -0 C -2 B -0 D - Lower needle into fabric at its versatility and delight in the countless creative possibilities which it adds to 3 Stitch Length: Minimum The procedure below is primarily used for block letters. You will soon enoy creative embroidery once you the Ornamentograph, the in the hoop, the presser bar suspended and the presser bar lever lowered. Raise feed and set . 14 machine for monogram embroidery without a sewing foot...
Owner's Manual
Page 52
... attach cording plate refer to attach. Additional parts for mounting feed cover plate. 51 The large needle holder screw must always point toward the right. The interchangeable doubleneedle holder is eosy to instructions on page 48 for heavier cording are available at extra cost. Tighten set screw and change needle holders. Use System 130 B round-shank needles in l/ and 5 /64-inch double-needle holders, and System 130 R flat-shank needles in 3/35 and 7 /o4-inch needle holders. To cord, use Cording Kit...
... attach cording plate refer to attach. Additional parts for mounting feed cover plate. 51 The large needle holder screw must always point toward the right. The interchangeable doubleneedle holder is eosy to instructions on page 48 for heavier cording are available at extra cost. Tighten set screw and change needle holders. Use System 130 B round-shank needles in l/ and 5 /64-inch double-needle holders, and System 130 R flat-shank needles in 3/35 and 7 /o4-inch needle holders. To cord, use Cording Kit...

Owner's Manual
Page 57
... Hems Hemming Overcasting Edges Butt Seaming Attaching Lace Inserting Lace Inserting Patches Single-Needle Cording Shirring Applique Work Openwork Embroidery Scalloping Scrollwork Imitation Hemstitching Blindstitching Automatic Blindstitching Sewing Buttonholes . . The Transverse Spool Holder 56 Page 33 33 35 35 37 37 38 39 39 40 41 42 42 45 47 48 50 50 51 53 54 54 55 Contents Foreword Essential Parts of Machine Operation Important Points to Remember . Button Sewing Darning Monogram Embroidery . Cording...
... Hems Hemming Overcasting Edges Butt Seaming Attaching Lace Inserting Lace Inserting Patches Single-Needle Cording Shirring Applique Work Openwork Embroidery Scalloping Scrollwork Imitation Hemstitching Blindstitching Automatic Blindstitching Sewing Buttonholes . . The Transverse Spool Holder 56 Page 33 33 35 35 37 37 38 39 39 40 41 42 42 45 47 48 50 50 51 53 54 54 55 Contents Foreword Essential Parts of Machine Operation Important Points to Remember . Button Sewing Darning Monogram Embroidery . Cording...


