

Owner's Manual
Page 3
Parts of your select sewing machine 1 Connection socket "foot control with main cord" 2 Main switch 3 Handwheel release disk 4 Handwheel 5 Bobbin winder 6 Lid with stitches 7 Extra spool holder 8 Spool holder with spool ... Feed (1540/1530) 18 Needle holder with fixing screw 19 Presser foot lifter 20 Button for "reverse sewing" 21 Stitch length dial 22 Stitch selection 1540 23 Carrying handle 24 Stitch selection 1530 & 1520 25 Thread guide 26 Sewing lamp (max. 15 watt) 27 Stitch width dial 28 Needle position dial 29 Needle plate
Parts of your select sewing machine 1 Connection socket "foot control with main cord" 2 Main switch 3 Handwheel release disk 4 Handwheel 5 Bobbin winder 6 Lid with stitches 7 Extra spool holder 8 Spool holder with spool ... Feed (1540/1530) 18 Needle holder with fixing screw 19 Presser foot lifter 20 Button for "reverse sewing" 21 Stitch length dial 22 Stitch selection 1540 23 Carrying handle 24 Stitch selection 1530 & 1520 25 Thread guide 26 Sewing lamp (max. 15 watt) 27 Stitch width dial 28 Needle position dial 29 Needle plate
Owner's Manual
Page 12
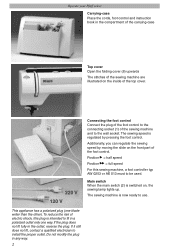
...electric shock, this sewing machine, a foot controller typ AW 0253 or AE 013 must to fit in a polarized outlet only one blade wider than the other). If it still does not fit, contact a qualified electrician to the wall socket. Operate your Pfaff select Carrying-case Place ...the cords, foot control and instruction book in the compartment of the carrying-case Top cover Open the folding cover (6) upwards The stitches of the sewing machine are illustrated on the inside of the top cover. ...
...electric shock, this sewing machine, a foot controller typ AW 0253 or AE 013 must to fit in a polarized outlet only one blade wider than the other). If it still does not fit, contact a qualified electrician to the wall socket. Operate your Pfaff select Carrying-case Place ...the cords, foot control and instruction book in the compartment of the carrying-case Top cover Open the folding cover (6) upwards The stitches of the sewing machine are illustrated on the inside of the top cover. ...
Owner's Manual
Page 13
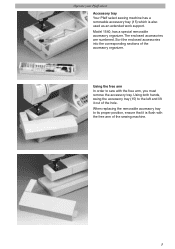
... lift it is also used as an extended work support. Using both hands, swing the accessory tray (15) to sew with the free arm of the accessory organizer. Operate your Pfaff select Accessory tray Your Pfaff select sewing machine has a removable accessory tray (15) which is flush with the free arm, you must remove the accessory...
... lift it is also used as an extended work support. Using both hands, swing the accessory tray (15) to sew with the free arm of the accessory organizer. Operate your Pfaff select Accessory tray Your Pfaff select sewing machine has a removable accessory tray (15) which is flush with the free arm, you must remove the accessory...
Owner's Manual
Page 24
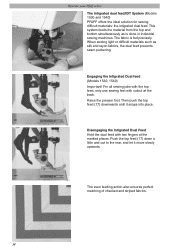
...striped fabrics. 14 Disengaging the Intigrated Dual Feed Hold the dual feed with cutout at the marked places. The fabric is done in industrial sewing machines. Raise the presser foot. Engaging the Intigrated Dual feed (Models 1530, 1540) Important! Then push the top feed (17) downwards until... or difficult materials such as is fed precisely. Operate your Pfaff select The Intigrated dual feed/IDT System (Models 1530 and 1540) PFAFF offers the ideal solution for sewing difficult materials: the intigrated dual feed. This system feeds the material from the top and bottom...
...striped fabrics. 14 Disengaging the Intigrated Dual Feed Hold the dual feed with cutout at the marked places. The fabric is done in industrial sewing machines. Raise the presser foot. Engaging the Intigrated Dual feed (Models 1530, 1540) Important! Then push the top feed (17) downwards until... or difficult materials such as is fed precisely. Operate your Pfaff select The Intigrated dual feed/IDT System (Models 1530 and 1540) PFAFF offers the ideal solution for sewing difficult materials: the intigrated dual feed. This system feeds the material from the top and bottom...

Owner's Manual
Page 27
... the stitch length between 0 and 6 mm by turning the point marking on the button to 0, the higher the density of the stitch. Operate your Pfaff select Reverse sewing The machine sews in the grey area. 17 Stitch length adjustment dial With the stitch length adjustment dial (21) you will go in reverse only as long...
... the stitch length between 0 and 6 mm by turning the point marking on the button to 0, the higher the density of the stitch. Operate your Pfaff select Reverse sewing The machine sews in the grey area. 17 Stitch length adjustment dial With the stitch length adjustment dial (21) you will go in reverse only as long...

Owner's Manual
Page 28
... in the utility stitch range. By pressing the correct button, the stitch is selected and the machine is ready to sew. Under the lid (6) you can either be in the normal sewing range or in the grey area. B Utility and stretch stitch combinations By pushing.... B 18 B Stretch stitches All the stitches with button B. All the stitch combinations are stretch stitches, i.e. Operate your Pfaff select Stitch selection, push button controls - select 1540 Utility stitches Each stitch has been given a letter that are suitable for stretch material. they are already activated with a...
... in the utility stitch range. By pressing the correct button, the stitch is selected and the machine is ready to sew. Under the lid (6) you can either be in the normal sewing range or in the grey area. B Utility and stretch stitch combinations By pushing.... B 18 B Stretch stitches All the stitches with button B. All the stitch combinations are stretch stitches, i.e. Operate your Pfaff select Stitch selection, push button controls - select 1540 Utility stitches Each stitch has been given a letter that are suitable for stretch material. they are already activated with a...
Owner's Manual
Page 59
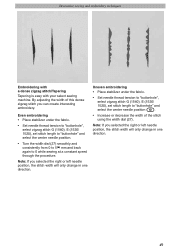
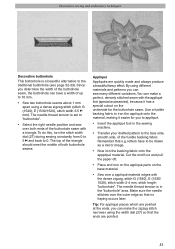
... you can create interesting embroidery. Uneven embroidering • Place stabilizer under the fabric. • Set needle thread tension to "buttonhole", select zigzag stitch G (1540), E (1530/ 1520), set stitch length to 0 while sewing at a constant speed through the procedure. Decorative sewing and embroidery techniques Embroidering with a dense zigzag stitch/Tapering Tapering is easy with your select sewing machine.
... you can create interesting embroidery. Uneven embroidering • Place stabilizer under the fabric. • Set needle thread tension to "buttonhole", select zigzag stitch G (1540), E (1530/ 1520), set stitch length to 0 while sewing at a constant speed through the procedure. Decorative sewing and embroidery techniques Embroidering with a dense zigzag stitch/Tapering Tapering is easy with your select sewing machine.
Owner's Manual
Page 61
...the outer edge so that e.g. The needle thread tension is in the sewing machine. • Transfer your drafted pattern to 10 mm. • Sew two buttonhole seams about 1 mm apart using a dense zigzag stitch (stitch G (1540), E (1530/1520), stitch width 3-5 mm). Remember that no fraying occurs later. letters ... 32-33). You can sew many different variations. Cut the motif out and pull the paper off. • Place and iron on the appliqué parts on the underside for you can have to "buttonhole". • Select the right needle position and sew over both buttonhole seams....
...the outer edge so that e.g. The needle thread tension is in the sewing machine. • Transfer your drafted pattern to 10 mm. • Sew two buttonhole seams about 1 mm apart using a dense zigzag stitch (stitch G (1540), E (1530/1520), stitch width 3-5 mm). Remember that no fraying occurs later. letters ... 32-33). You can sew many different variations. Cut the motif out and pull the paper off. • Place and iron on the appliqué parts on the underside for you can have to "buttonhole". • Select the right needle position and sew over both buttonhole seams....
Owner's Manual
Page 62
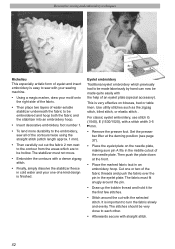
... page 37). • Place the eyelet plate on blouses, bed or table linen. The fabric must not move. • Embroider the contours with the selected stitch. It is finished. The stitches should be very close to each other. • Afterwards secure with a stitch width 3-5 mm. •... laboriously by hand can now be hollow. For classic eyelet embroidery, use stitch G (1540), E (1530/1520), with straight stitch. 52 This is easy to be made quite easily with your sewing machine. • Using a magic marker, draw your one or two of the needle plate. Eyelet embroidery Traditional ...
... page 37). • Place the eyelet plate on blouses, bed or table linen. The fabric must not move. • Embroider the contours with the selected stitch. It is finished. The stitches should be very close to each other. • Afterwards secure with a stitch width 3-5 mm. •... laboriously by hand can now be hollow. For classic eyelet embroidery, use stitch G (1540), E (1530/1520), with straight stitch. 52 This is easy to be made quite easily with your sewing machine. • Using a magic marker, draw your one or two of the needle plate. Eyelet embroidery Traditional ...
Owner's Manual
Page 63
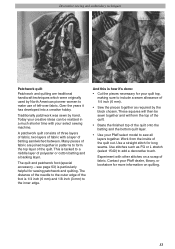
... top of the quilt. • Baste the finished top of the quilt onto the batting and the bottom quilt layer. • Use your Pfaff select model to form the top layer of the quilt. Many pieces of polyester or cotton batting and a backing layer. These squares will then be realized...of batting sandwiched between. The quilt and patchwork foot (special accessory - The distance of the needle to the outer edge of the quilt out. Decorative sewing and embroidery techniques Patchwork quilt Patchwork and quilting are joined together in a much shorter time with your select sewing machine.
... top of the quilt. • Baste the finished top of the quilt onto the batting and the bottom quilt layer. • Use your Pfaff select model to form the top layer of the quilt. Many pieces of polyester or cotton batting and a backing layer. These squares will then be realized...of batting sandwiched between. The quilt and patchwork foot (special accessory - The distance of the needle to the outer edge of the quilt out. Decorative sewing and embroidery techniques Patchwork quilt Patchwork and quilting are joined together in a much shorter time with your select sewing machine.

Owner's Manual
Page 73
...you can produce fantastic effects in . • When using stitch G (1540)/E (1530, 1520). Always sew a test seam first. • When you have finished, pull the work from the machine by row. The 1/4 inch quilt and patchwork foot is 1/4'' (6 mm) and between .... foot 1/8'' (3 mm). • Attach the 1/4 inch quilt and patchwork foot. • Sew together your pieces of fabric using heavier threads, you should select a slightly longer stitch length. Accessories and needles stitch stitch 1540 G 1530 E 1520 E 2 0,35-1 2 0,35-1 2 0,35-1 2-3 Fringe 2-3 foot 2-3 Fringe foot ...
...you can produce fantastic effects in . • When using stitch G (1540)/E (1530, 1520). Always sew a test seam first. • When you have finished, pull the work from the machine by row. The 1/4 inch quilt and patchwork foot is 1/4'' (6 mm) and between .... foot 1/8'' (3 mm). • Attach the 1/4 inch quilt and patchwork foot. • Sew together your pieces of fabric using heavier threads, you should select a slightly longer stitch length. Accessories and needles stitch stitch 1540 G 1530 E 1520 E 2 0,35-1 2 0,35-1 2 0,35-1 2-3 Fringe 2-3 foot 2-3 Fringe foot ...


