

Owner's Manual
Page 3
Parts of your select sewing machine 1 Connection socket "foot control with main cord" 2 Main switch 3 Handwheel release disk 4 Handwheel 5 Bobbin ...11 Threading path 12 Thread cutter 13 Needle threader (1540) 14 Presser foot holder with presser foot 15 Removable accessory tray 16 Base plate 17 IDT System / Integrated Dual Feed (1540/1530) 18 Needle holder with fi...xing screw 19 Presser foot lifter 20 Button for "reverse sewing" 21 Stitch length dial 22 Stitch selection 1540 23 Carrying handle 24 Stitch selection 1530 & 1520 25 Thread guide 26 Sewing lamp (max. 15 watt) 27 Stitch width dial ...
Parts of your select sewing machine 1 Connection socket "foot control with main cord" 2 Main switch 3 Handwheel release disk 4 Handwheel 5 Bobbin ...11 Threading path 12 Thread cutter 13 Needle threader (1540) 14 Presser foot holder with presser foot 15 Removable accessory tray 16 Base plate 17 IDT System / Integrated Dual Feed (1540/1530) 18 Needle holder with fi...xing screw 19 Presser foot lifter 20 Button for "reverse sewing" 21 Stitch length dial 22 Stitch selection 1540 23 Carrying handle 24 Stitch selection 1530 & 1520 25 Thread guide 26 Sewing lamp (max. 15 watt) 27 Stitch width dial ...

Owner's Manual
Page 6
... 2 67-70 48 Needle table Needle thread tension Needle threader Non-elastic stitches 64-65 15,23 11 24-25 27 26-29 2 Oiling the sewing machine Open overlock stitch Optional accessories Overlock stitches 68 28 58-66 28-29 48-51 52 30 59 3 63 Patchwork quilt Pennant stitch Placing...
... 2 67-70 48 Needle table Needle thread tension Needle threader Non-elastic stitches 64-65 15,23 11 24-25 27 26-29 2 Oiling the sewing machine Open overlock stitch Optional accessories Overlock stitches 68 28 58-66 28-29 48-51 52 30 59 3 63 Patchwork quilt Pennant stitch Placing...
Owner's Manual
Page 13
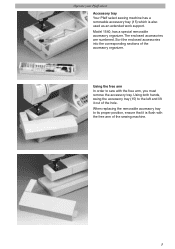
..., ensure that it out of the accessory organizer. When replacing the removable accessory tray to the left and lift it is also used as an extended work support. Sort the enclosed accessories into the corresponding sections of the hole. Operate your Pfaff select Accessory tray Your Pfaff select sewing machine has a removable accessory tray (15) which is flush...
..., ensure that it out of the accessory organizer. When replacing the removable accessory tray to the left and lift it is also used as an extended work support. Sort the enclosed accessories into the corresponding sections of the hole. Operate your Pfaff select Accessory tray Your Pfaff select sewing machine has a removable accessory tray (15) which is flush...
Owner's Manual
Page 61
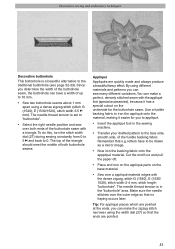
...G (1540), E (1530/ 1520), stitch width 2-4 mm, stitch length "buttonhole". By using different materials and patterns you determine the width of the buttonhole seam with a triangle. Remember that no fraying occurs later. The needle thread tension is in the sewing machine. • Transfer your drafted pattern...233; onto the material, making it has a special cutout on the base material. • Sew over a appliqué material edges with the appliqué foot (special accessories), because it easier for the buttonhole seam. Make sure the needle stitches over both buttonhole seams. ...
...G (1540), E (1530/ 1520), stitch width 2-4 mm, stitch length "buttonhole". By using different materials and patterns you determine the width of the buttonhole seam with a triangle. Remember that no fraying occurs later. The needle thread tension is in the sewing machine. • Transfer your drafted pattern...233; onto the material, making it has a special cutout on the base material. • Sew over a appliqué material edges with the appliqué foot (special accessories), because it easier for the buttonhole seam. Make sure the needle stitches over both buttonhole seams. ...
Owner's Manual
Page 62
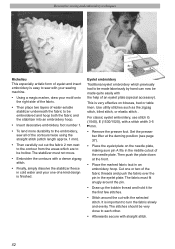
...), E (1530/1520), with straight stitch. 52 Set the presser bar lifter at the front. • Place the marked fabric taut in an embroidery hoop. Use utility stitches such as the zigzag stitch, blind stitch, or elastic stitch. . The stitches should be hollow. Decorative sewing and embroidery techniques ...stitch (stitch length approx. 1 mm). • Then carefully cut with the help of an eyelet plate (special accessory). Cut one -of-a-kind design is easy to sew with your sewing machine. • Using a magic marker, draw your one or two of the fabric threads and push the fabric ...
...), E (1530/1520), with straight stitch. 52 Set the presser bar lifter at the front. • Place the marked fabric taut in an embroidery hoop. Use utility stitches such as the zigzag stitch, blind stitch, or elastic stitch. . The stitches should be hollow. Decorative sewing and embroidery techniques ...stitch (stitch length approx. 1 mm). • Then carefully cut with the help of an eyelet plate (special accessory). Cut one -of-a-kind design is easy to sew with your sewing machine. • Using a magic marker, draw your one or two of the fabric threads and push the fabric ...
Owner's Manual
Page 63
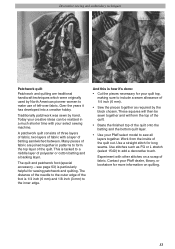
... of the quilt. • Baste the finished top of the quilt onto the batting and the bottom quilt layer. • Use your select sewing machine. Experiment with your Pfaff select model to add a decorative touch. Over the years it 's done: • Cut the pieces necessary for your... time with other stitches on a scrap of the foot is particularly helpful for more information on quilting. 53 The quilt and patchwork foot (special accessory - The distance of the needle to the outer edge of fabric. These squares will then be realized in patterns to form the top layer of...
... of the quilt. • Baste the finished top of the quilt onto the batting and the bottom quilt layer. • Use your select sewing machine. Experiment with your Pfaff select model to add a decorative touch. Over the years it 's done: • Cut the pieces necessary for your... time with other stitches on a scrap of the foot is particularly helpful for more information on quilting. 53 The quilt and patchwork foot (special accessory - The distance of the needle to the outer edge of fabric. These squares will then be realized in patterns to form the top layer of...

Owner's Manual
Page 70
... optical effect by pintucking. • Attach the pintuck foot. • Replace the sewing needle with 5 grooves and the large cording tongue. The notch between the needle plate and the sewing machine provides space for heavier materials use the pintuck foot with a twin needle (e.g. 130/... the pintuck effect, you start on "Bobbin thread tension"). Accessories and needles stitch 1540 G 0 2,5 1530 E 0 2,5 1520 E 0 2,5 5 Shirring 5 foot 5 Pintuck foot This classic heirloom sewing technique can attach a cording tongue (optional accessory) on the front edge of the needle plate. Tip:...
... optical effect by pintucking. • Attach the pintuck foot. • Replace the sewing needle with 5 grooves and the large cording tongue. The notch between the needle plate and the sewing machine provides space for heavier materials use the pintuck foot with a twin needle (e.g. 130/... the pintuck effect, you start on "Bobbin thread tension"). Accessories and needles stitch 1540 G 0 2,5 1530 E 0 2,5 1520 E 0 2,5 5 Shirring 5 foot 5 Pintuck foot This classic heirloom sewing technique can attach a cording tongue (optional accessory) on the front edge of the needle plate. Tip:...

Owner's Manual
Page 73
...row by holding the last loops. Many geometric pieces of fabric are joined together in . • When using stitch G (1540)/E (1530, 1520). Accessories and needles stitch stitch 1540 G 1530 E 1520 E 2 0,35-1 2 0,35-1 2 0,35-1 2-3 Fringe 2-3 foot 2-3 Fringe foot With this special foot for joining your fabric along ...a backing layer. For a seam allowance of 1/8'' guide your pieces of the foot. Always sew a test seam first. • When you have finished, pull the work from the machine by row. The 1/4 inch quilt and patchwork foot is tacked to form the top layer ...
...row by holding the last loops. Many geometric pieces of fabric are joined together in . • When using stitch G (1540)/E (1530, 1520). Accessories and needles stitch stitch 1540 G 1530 E 1520 E 2 0,35-1 2 0,35-1 2 0,35-1 2-3 Fringe 2-3 foot 2-3 Fringe foot With this special foot for joining your fabric along ...a backing layer. For a seam allowance of 1/8'' guide your pieces of the foot. Always sew a test seam first. • When you have finished, pull the work from the machine by row. The 1/4 inch quilt and patchwork foot is tacked to form the top layer ...

Owner's Manual
Page 78
... oiling Switch off the main switch It is very important to 20 hours of a small screwdriver into the left opening between needle plate and sewing machine. Otherwise, the machine is lying flat the back and push it down with the brush. • Apply a drop of oil (every 15 to clean ...until you hear it snap in the illustration and on flat at . The more care it needs. Removal: • Raise the sewing foot and remove the removable accessory tray. • Push the point of operation) to the right and the needle plate will rewardyou with a longer service life. Before ...
... oiling Switch off the main switch It is very important to 20 hours of a small screwdriver into the left opening between needle plate and sewing machine. Otherwise, the machine is lying flat the back and push it down with the brush. • Apply a drop of oil (every 15 to clean ...until you hear it snap in the illustration and on flat at . The more care it needs. Removal: • Raise the sewing foot and remove the removable accessory tray. • Push the point of operation) to the right and the needle plate will rewardyou with a longer service life. Before ...

Owner's Manual
Page 79
...as far as a special accessory) will go. • At the same time, turn the lamp a half turn anti-clockwise and remove it will make changing the lamp much easier. The sewing lamp is located inside the left side of the sewing machine Removal: • Hold the sewing machine tightly. • Push... • Insert the lamp in the diagonal socket and turn it is 15 watts! 69 Maintenance and trouble-shooting Changing the sewing lamp Switch off the main switch • Disconnect the mains plug and the foot control plug from the machine. • Take off the removable accessory tray (15).
...as far as a special accessory) will go. • At the same time, turn the lamp a half turn anti-clockwise and remove it will make changing the lamp much easier. The sewing lamp is located inside the left side of the sewing machine Removal: • Hold the sewing machine tightly. • Push... • Insert the lamp in the diagonal socket and turn it is 15 watts! 69 Maintenance and trouble-shooting Changing the sewing lamp Switch off the main switch • Disconnect the mains plug and the foot control plug from the machine. • Take off the removable accessory tray (15).


