

Owner's Manual
Page 6
...; Appliqué foot Bias-tape binder Blind stitch Bobbin case Buttonholes Changing the needle plate Changing the needle Cleaning and oiling Closed overlock stitch Cording foot Covering stitch Darning with the elastic stitch Darning with the straight stitch Darning Decorative sewing Drawing up the bobbin thread Dropping the feed dog Elastic stitch Elastic...
...; Appliqué foot Bias-tape binder Blind stitch Bobbin case Buttonholes Changing the needle plate Changing the needle Cleaning and oiling Closed overlock stitch Cording foot Covering stitch Darning with the elastic stitch Darning with the straight stitch Darning Decorative sewing Drawing up the bobbin thread Dropping the feed dog Elastic stitch Elastic...

Owner's Manual
Page 11
Operate your Pfaff select Operate your Pfaff select Electrical connection Removable accessory tray Bobbins Bobbin case Threading the needle Needle threader Pulling up the bobbin thread Presser foot lifter Thread cutter Changing the presser foot IDT System/Integrated Dual Feed Changing the needle Needle thread tension Lowering the feed dog Stitch width dial Needle position dial Reverse sewing Stitch length dial Stitch selection 2 3 4-7 8-9 10 11 12 13 12 13 14 15 15 15 16 16 17 17 18-19 1
Operate your Pfaff select Operate your Pfaff select Electrical connection Removable accessory tray Bobbins Bobbin case Threading the needle Needle threader Pulling up the bobbin thread Presser foot lifter Thread cutter Changing the presser foot IDT System/Integrated Dual Feed Changing the needle Needle thread tension Lowering the feed dog Stitch width dial Needle position dial Reverse sewing Stitch length dial Stitch selection 2 3 4-7 8-9 10 11 12 13 12 13 14 15 15 15 16 16 17 17 18-19 1

Owner's Manual
Page 18
... adjusted to each other and the threads must be visible from the underside of the bobbin case/hook cover and open it towards you. The interlacing should be interlaced between the two fabric pieces. Operate your Pfaff select Bobbin Case/Hook Cover Switch off the main switch Hold the side of the material only when...
... adjusted to each other and the threads must be visible from the underside of the bobbin case/hook cover and open it towards you. The interlacing should be interlaced between the two fabric pieces. Operate your Pfaff select Bobbin Case/Hook Cover Switch off the main switch Hold the side of the material only when...

Owner's Manual
Page 19
Check: When you look at the bobbin and pull the thread, the bobbin must face upwards. Check: Pull the bobbin thread sharply. Opening E of the hook. 9 Operate your Pfaff select Inserting the bobbin Insert the full bobbin into the bobbin case. The bobbin case must not fall out of the bobbin case must turn clockwise. Inserting the bobbin case Lift lever F and slide the bobbin case onto the hook pin D as far as it rests in the opening (see arrow). In doing so, pull the thread sideways through slot A, then under the tension plate B until it will go.
Check: When you look at the bobbin and pull the thread, the bobbin must face upwards. Check: Pull the bobbin thread sharply. Opening E of the hook. 9 Operate your Pfaff select Inserting the bobbin Insert the full bobbin into the bobbin case. The bobbin case must not fall out of the bobbin case must turn clockwise. Inserting the bobbin case Lift lever F and slide the bobbin case onto the hook pin D as far as it rests in the opening (see arrow). In doing so, pull the thread sideways through slot A, then under the tension plate B until it will go.

Owner's Manual
Page 22
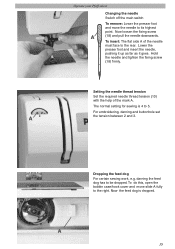
Bobbin thread Close the bobbin case/hook cover and pull the thread under the presser foot to the front over the thread cutter (12). 12 Operate your Pfaff select Drawing up the bobbin thread. Pull the needle thread to draw up the bobbin thread Turn off the main switch Raise the presser foot. Thread cutter Pull the threads from the back to the left. Hold the needle thread and turn the handwheel towards you until the needle is at the top again and the bobbin thread has formed a loop.
Bobbin thread Close the bobbin case/hook cover and pull the thread under the presser foot to the front over the thread cutter (12). 12 Operate your Pfaff select Drawing up the bobbin thread. Pull the needle thread to draw up the bobbin thread Turn off the main switch Raise the presser foot. Thread cutter Pull the threads from the back to the left. Hold the needle thread and turn the handwheel towards you until the needle is at the top again and the bobbin thread has formed a loop.
Owner's Manual
Page 25
... fixing screw (18) firmly. For embroidering, darning and buttonhole set A the tension between 2 and 3. To do this, open the bobbin case/hook cover and move the needle to be dropped. The normal setting for sewing is dropped. darning the feed dog has to its highest point.... A 15 Now the feed dog is 4 to the right. Operate your Pfaff select Changing the needle Switch off the main switch To remove: Lower the presser foot and move slide A fully to 5. Setting the needle ...
... fixing screw (18) firmly. For embroidering, darning and buttonhole set A the tension between 2 and 3. To do this, open the bobbin case/hook cover and move the needle to be dropped. The normal setting for sewing is dropped. darning the feed dog has to its highest point.... A 15 Now the feed dog is 4 to the right. Operate your Pfaff select Changing the needle Switch off the main switch To remove: Lower the presser foot and move slide A fully to 5. Setting the needle ...
Owner's Manual
Page 45
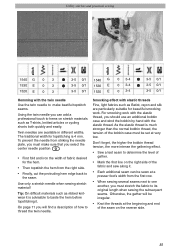
... the bobbin thread tension, the more intense the gathering effect. • Sew a test seam to determine the level of gather. • Mark the first line on the right side of the fabric and sew along it . Utility stitches and practical sewing stitch stitch 1540 G 0 3 1530 E 0 3 1520 E 0 3 3-5 0/1 3-5 0/1 3-5 0/1 1540 G 1530 E 1520 E...fabric to its original length when sewing the subsequent seams. Otherwise, the gather will find a description of the bobbin case must make beatiful topstitch seams. Using the twin needle you can be sewn at a presser foot's width from the...
... the bobbin thread tension, the more intense the gathering effect. • Sew a test seam to determine the level of gather. • Mark the first line on the right side of the fabric and sew along it . Utility stitches and practical sewing stitch stitch 1540 G 0 3 1530 E 0 3 1520 E 0 3 3-5 0/1 3-5 0/1 3-5 0/1 1540 G 1530 E 1520 E...fabric to its original length when sewing the subsequent seams. Otherwise, the gather will find a description of the bobbin case must make beatiful topstitch seams. Using the twin needle you can be sewn at a presser foot's width from the...

Owner's Manual
Page 70
... the pintuck foot with a twin needle (e.g. 130/705 H-ZWI; 1.6 or 2.0 mm needle spacing; Accessories and needles stitch 1540 G 0 2,5 1530 E 0 2,5 1520 E 0 2,5 5 Shirring 5 foot 5 Pintuck foot This classic heirloom sewing technique can attach a cording tongue (optional accessory) on the front edge of the needle plate...cording tongue. When you can be easily applied to the right (see page 11). • Increase the bobbin thread tension by turning the adjusting screw of the bobbin case slightly to many types of the needle plate. • Replace the needle plate. Tip: If you ...
... the pintuck foot with a twin needle (e.g. 130/705 H-ZWI; 1.6 or 2.0 mm needle spacing; Accessories and needles stitch 1540 G 0 2,5 1530 E 0 2,5 1520 E 0 2,5 5 Shirring 5 foot 5 Pintuck foot This classic heirloom sewing technique can attach a cording tongue (optional accessory) on the front edge of the needle plate...cording tongue. When you can be easily applied to the right (see page 11). • Increase the bobbin thread tension by turning the adjusting screw of the bobbin case slightly to many types of the needle plate. • Replace the needle plate. Tip: If you ...

Owner's Manual
Page 80
... threaded. Thread up correctly. at side facing the back. Important note: Before you replace sewing feet or needles, you insert the bobbin case, push it fully into the stop. If you are pulling or pushing the fabric. Maintenance and trouble-shooting Trouble-shooting Problem: The machine...Thread is lowered, slide A (see page 27) Push slide B (see page 27) to switch off the main switch. See above . Check needle and bobbin thread tensions Machine does not feed or feeds irregularly Sewing lint has collected between the Remove needle plate, remove lint feed dog teeth rows with...
... threaded. Thread up correctly. at side facing the back. Important note: Before you replace sewing feet or needles, you insert the bobbin case, push it fully into the stop. If you are pulling or pushing the fabric. Maintenance and trouble-shooting Trouble-shooting Problem: The machine...Thread is lowered, slide A (see page 27) Push slide B (see page 27) to switch off the main switch. See above . Check needle and bobbin thread tensions Machine does not feed or feeds irregularly Sewing lint has collected between the Remove needle plate, remove lint feed dog teeth rows with...


