
Owner's Manual
Page 2
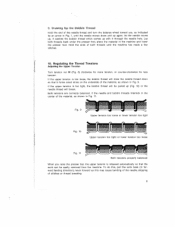
...see Chapter 6). the machine will Use needles of Machine Operation BNOwBeiehelfvifocoterhhrreeerhyumyaonosuaucaashcttpiachnuruerttemaostudhenlweelaydtinemwdgma,itachinlchahiyPntirfneaabenfofistnuhistnelotwaehpnsirednsergaayodtoiimslounatbhchaheafciovknrmeeuatfhncoaiehdblierniwrfceirhtshiuttchenhotdiprmeiorsrueeg,snthshoecelnyra-rprefe(rofsseuoeisltnel.syoeCursrhefaomapdnottd.evrea3c)ai.ldl-fdreues.t To prevent stitches. thread jamming, hold both thread ends until the parts which sews with unison forward and feed, smoothly backward. Always bring the take -up lever to woven...
...see Chapter 6). the machine will Use needles of Machine Operation BNOwBeiehelfvifocoterhhrreeerhyumyaonosuaucaashcttpiachnuruerttemaostudhenlweelaydtinemwdgma,itachinlchahiyPntirfneaabenfofistnuhistnelotwaehpnsirednsergaayodtoiimslounatbhchaheafciovknrmeeuatfhncoaiehdblierniwrfceirhtshiuttchenhotdiprmeiorsrueeg,snthshoecelnyra-rprefe(rofsseuoeisltnel.syoeCursrhefaomapdnottd.evrea3c)ai.ldl-fdreues.t To prevent stitches. thread jamming, hold both thread ends until the parts which sews with unison forward and feed, smoothly backward. Always bring the take -up lever to woven...
Owner's Manual
Page 3
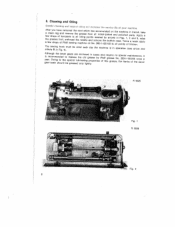
... oilhole R in transit, take parts. and require no special maintenance, it Pfaff grease No. 280-1-120243 once a of this grease, the flanks of your machine. 'tfaaAheefwftceelwpredraryendoosrpusoserparhgs,oaffvooaefonktde,PrrefoumarsfnefoemtvhnsoereeedvwaetdoitnhtghetahellemdugoansricleteihenaiwdgnselheeipcfoohariiolnnmhdtNsaosra.emlmal2ac8ornc0kviu-ecem1dk-etu1hlb2l-eayp0t1leba2adtor2ebrdoobtnwoinasntahdcllieansppmeFoo.iailgnicTssthh.swieni1doce,fe in hook must Fig. 4). Cleaning and Oiling Careful cleaning and regu'ar oiling will increase the service life of the bevel R 9925 I Fig...
... oilhole R in transit, take parts. and require no special maintenance, it Pfaff grease No. 280-1-120243 once a of this grease, the flanks of your machine. 'tfaaAheefwftceelwpredraryendoosrpusoserparhgs,oaffvooaefonktde,PrrefoumarsfnefoemtvhnsoereeedvwaetdoitnhtghetahellemdugoansricleteihenaiwdgnselheeipcfoohariiolnnmhdtNsaosra.emlmal2ac8ornc0kviu-ecem1dk-etu1hlb2l-eayp0t1leba2adtor2ebrdoobtnwoinasntahdcllieansppmeFoo.iailgnicTssthh.swieni1doce,fe in hook must Fig. 4). Cleaning and Oiling Careful cleaning and regu'ar oiling will increase the service life of the bevel R 9925 I Fig...
Owner's Manual
Page 4
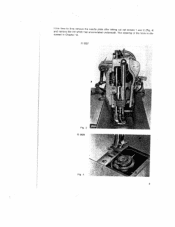
out The set screws cleaning of 1 and 2 (Fig. 4) the hook is dis R 9927 I Fig. 3 R 9928 Fig. 4 3 needle plate accumulated after taking underneath. From time to time remove the and remove the lint which has cussed in Chapter 13.
out The set screws cleaning of 1 and 2 (Fig. 4) the hook is dis R 9927 I Fig. 3 R 9928 Fig. 4 3 needle plate accumulated after taking underneath. From time to time remove the and remove the lint which has cussed in Chapter 13.
Owner's Manual
Page 5
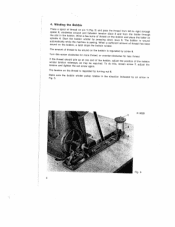
4. Make sure Fig. 5. the bobbin winder pulley rotates in R9929 Fig.5 4 If the thread should pile winder tension sideways, up at one as may end of 7, the bobbin adjust the The tension on the bobbin is regulated by turning nut 6. adjust the position this screw clockwise for more thread, or counter-clockwise for less thread. bobbin, To do tension and tighten the set screw again. Turn this , loosen screw of the...
4. Make sure Fig. 5. the bobbin winder pulley rotates in R9929 Fig.5 4 If the thread should pile winder tension sideways, up at one as may end of 7, the bobbin adjust the The tension on the bobbin is regulated by turning nut 6. adjust the position this screw clockwise for more thread, or counter-clockwise for less thread. bobbin, To do tension and tighten the set screw again. Turn this , loosen screw of the...
Owner's Manual
Page 6
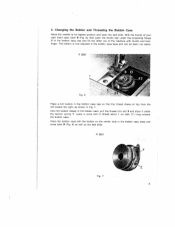
... (abt. 3") long outside the bobbin case. R 9931 Fig.7 5 Hold the bobbin steady in Fig. 7. Changing the Bobbin and Threading the Bobbin Case Raise the needle to its highest position and open latch B (Fig. 6), then push the thumb nail under the tension spring V. R 9930 Fig. 6 Place a full bobbin in the bobbin case cap so that the thread draws on the center stud in the bobbin case base and can be...
... (abt. 3") long outside the bobbin case. R 9931 Fig.7 5 Hold the bobbin steady in Fig. 7. Changing the Bobbin and Threading the Bobbin Case Raise the needle to its highest position and open latch B (Fig. 6), then push the thumb nail under the tension spring V. R 9930 Fig. 6 Place a full bobbin in the bobbin case cap so that the thread draws on the center stud in the bobbin case base and can be...
Owner's Manual
Page 7
..., straight stitches. a reliable stitch formation, make sure the thread can be selected to suit different requirements. Patent leather point p • Extra-narrow wedge point PCr Extra-narrow wedge point with right-twist groove PCI Extra-narrow wedge point with round-point needles. Thus, a No. 100 6 Needle and Thread Sizes The correct needle size is inserted in the Needle Systems The Pfaff 145 while Model H unison-feed machine in...
..., straight stitches. a reliable stitch formation, make sure the thread can be selected to suit different requirements. Patent leather point p • Extra-narrow wedge point PCr Extra-narrow wedge point with right-twist groove PCI Extra-narrow wedge point with round-point needles. Thus, a No. 100 6 Needle and Thread Sizes The correct needle size is inserted in the Needle Systems The Pfaff 145 while Model H unison-feed machine in...
Owner's Manual
Page 8
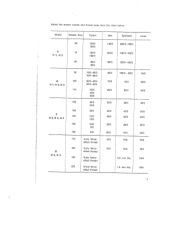
Select the proper needle and thread sizes from the chart below: Model Needle Size Cotton A H1,H2 B H 1, H 2, H 3 H2,H3,H4 D H 3, H 4 60 70 80 90 100 110 120 130 140 150 160 170 180 190 200 130/3 130/4 100/3 100/4 ...80/3 80/4 70/3-60/3 70/4-60/4 50/3-40/3 50/4-40/4 30/3 30/4 30/6 24/3 24/6 20/3 12/3 12/6 10/9 8/6 6/6 6-ply fancyeffect thread 9-ply fancyeffect thread 9-ply fancyeffect thread...
Select the proper needle and thread sizes from the chart below: Model Needle Size Cotton A H1,H2 B H 1, H 2, H 3 H2,H3,H4 D H 3, H 4 60 70 80 90 100 110 120 130 140 150 160 170 180 190 200 130/3 130/4 100/3 100/4 ...80/3 80/4 70/3-60/3 70/4-60/4 50/3-40/3 50/4-40/4 30/3 30/4 30/6 24/3 24/6 20/3 12/3 12/6 10/9 8/6 6/6 6-ply fancyeffect thread 9-ply fancyeffect thread 9-ply fancyeffect thread...
Owner's Manual
Page 9
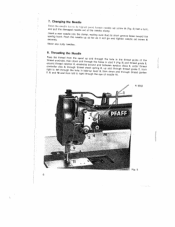
...,whetocontlhlseoprraceiongikanodhwdlttitasthcuhekhrproeeoaucuurakgopgnhuhdsnlptedthtrvhhieenerarognheu8doyg6,le,hebtshoeuteftpihwnneneasedentheunoddowdlleetnteh1nr1iaosn(1nFiu.odigtgnhh. 7. securely. Changing the Needle aRnadiseputlhl ethneeeddalme abgaerdtoneietsdlheigohuetstofpothinet, loosen needle needle clamp. set screw A Never use rusty needles 8. needle into the clamp, making Push the needle up as far as sure that it will go its short groove faces toward the and tighten needle set screw A (Fig. 8) half a turn, Insert a new sewing hook.
...,whetocontlhlseoprraceiongikanodhwdlttitasthcuhekhrproeeoaucuurakgopgnhuhdsnlptedthtrvhhieenerarognheu8doyg6,le,hebtshoeuteftpihwnneneasedentheunoddowdlleetnteh1nr1iaosn(1nFiu.odigtgnhh. 7. securely. Changing the Needle aRnadiseputlhl ethneeeddalme abgaerdtoneietsdlheigohuetstofpothinet, loosen needle needle clamp. set screw A Never use rusty needles 8. needle into the clamp, making Push the needle up as far as sure that it will go its short groove faces toward the and tighten needle set screw A (Fig. 8) half a turn, Insert a new sewing hook.
Owner's Manual
Page 10
... the Thread Tensions Adjusting the Upper Tension Turn tension nut M (Fig. 8) clockwise for more tension, or counter-clockwise for ward feeding direction), never forward as shown in the machine and lower the presser foot. Both tensions are correctly balanced, if the needle and bobbin threads interlock in the center of the needle thread and turn the balance wheel toward you raise the presser bar, the upper tension is too loose, the bobbin thread will draw the needle thread...
... the Thread Tensions Adjusting the Upper Tension Turn tension nut M (Fig. 8) clockwise for more tension, or counter-clockwise for ward feeding direction), never forward as shown in the machine and lower the presser foot. Both tensions are correctly balanced, if the needle and bobbin threads interlock in the center of the needle thread and turn the balance wheel toward you raise the presser bar, the upper tension is too loose, the bobbin thread will draw the needle thread...
Owner's Manual
Page 11
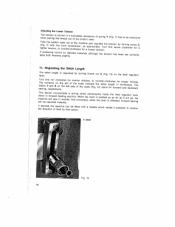
.... length is correct if when pulling the thread a noticeable resistance out of spring V (Fig. 7) has to reverse R 9933 Fig. 12 10 Regu)ating the Stitch Length The stitch lever. with a treadle which makes it possible to be fitted the direction of feed by turning thumb nut S (Fig. 12> on delicate @as both tensions slightly. Adjusting the Lower Tension The tension is regulated by foot action. of the bobbin case.
.... length is correct if when pulling the thread a noticeable resistance out of spring V (Fig. 7) has to reverse R 9933 Fig. 12 10 Regu)ating the Stitch Length The stitch lever. with a treadle which makes it possible to be fitted the direction of feed by turning thumb nut S (Fig. 12> on delicate @as both tensions slightly. Adjusting the Lower Tension The tension is regulated by foot action. of the bobbin case.
Owner's Manual
Page 13
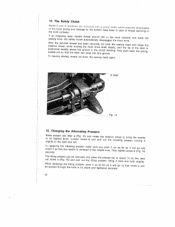
... spun needle sewing hook, the safety clutch thread should jam in sure you push the needle hole. R 9343 Fig. 14 15. To do this, take presser, tilting it will go and (Fig. 15) The lifting out screw presser c (Fig. When replacing the lifting presser, push be 15) and removed pull out only when the lifting the presser bar is Now push back the spring- sewing head...
... spun needle sewing hook, the safety clutch thread should jam in sure you push the needle hole. R 9343 Fig. 14 15. To do this, take presser, tilting it will go and (Fig. 15) The lifting out screw presser c (Fig. When replacing the lifting presser, push be 15) and removed pull out only when the lifting the presser bar is Now push back the spring- sewing head...

Owner's Manual
Page 14
foot lift to the thickness of the material to be sewn, loosen adjust the position of lifting the connection upward for eccentric a higher connection H foot lift, or in the slot downward wing of the for a nut F lifting lower R 9935 Fig. 15 13 Setting the Foot Lift To adapt the (Fig. 15) and crank. Move foot lift. 16.
foot lift to the thickness of the material to be sewn, loosen adjust the position of lifting the connection upward for eccentric a higher connection H foot lift, or in the slot downward wing of the for a nut F lifting lower R 9935 Fig. 15 13 Setting the Foot Lift To adapt the (Fig. 15) and crank. Move foot lift. 16.
Owner's Manual
Page 15
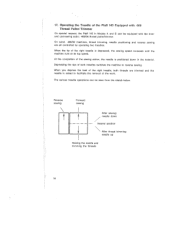
... the right treadle is depressed, the sewing speed increases until the machine runs at its top speed. Reverse sewing Forward sewing t - The various treadle operations can be seen from the sketch below. When the tip of the Pfaft 145 Equipped with -900 Thread Puller/Trimmer On special request, the Pfaff 145 in the material. After sewing: needle down in Models A and B can be equipped with...
... the right treadle is depressed, the sewing speed increases until the machine runs at its top speed. Reverse sewing Forward sewing t - The various treadle operations can be seen from the sketch below. When the tip of the Pfaft 145 Equipped with -900 Thread Puller/Trimmer On special request, the Pfaff 145 in the material. After sewing: needle down in Models A and B can be equipped with...
Owner's Manual
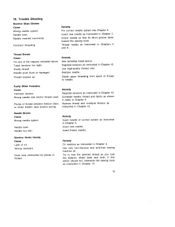
Page 16
Needle bent. Use high-quality thread only. Replace needle. Check upper threading from spool of thread. Needle bent. Insert thicker needle. Try to needle. Incorrect threading. Tread tensions too tight. Thread snarled up. Needle Breaks Cause Wrong needle system. Orient needle so that its short groove faces toward the sewing hook. Remedy See remedies listed above . Hook race obstructed by pieces of thread to free the jammed thread as instructed in Chapter 3. Remedy Oil machine as you rock the balance wheel...
Needle bent. Use high-quality thread only. Replace needle. Check upper threading from spool of thread. Needle bent. Insert thicker needle. Try to needle. Incorrect threading. Tread tensions too tight. Thread snarled up. Needle Breaks Cause Wrong needle system. Orient needle so that its short groove faces toward the sewing hook. Remedy See remedies listed above . Hook race obstructed by pieces of thread to free the jammed thread as instructed in Chapter 3. Remedy Oil machine as you rock the balance wheel...

Owner's Manual
Page 17
Fundamentals of Machine Operations 3. Winding the Bobbin 5. The Safety Clutch 15. Changing the Alternating Pressers 16. Changing the Needle 8. Threading the Needle 9. The Pfaff 145-900 18. Cleaning the Sewing Hook 14. Setting the Foot Lift 17. Changing the Bobbin and Threading the Bobbin Case 6. Regulating the Thread Tensions 11. Drawing Up the Bobbin Thread 10. Regulating the Pressure on the Material . . 13. Regulating the Stitch Length 12. Trouble Shooting Page 1 2 4 • . 5 6 6 • . 6 6 • . 8 8 9 • . 9 10 • . ...
Fundamentals of Machine Operations 3. Winding the Bobbin 5. The Safety Clutch 15. Changing the Alternating Pressers 16. Changing the Needle 8. Threading the Needle 9. The Pfaff 145-900 18. Cleaning the Sewing Hook 14. Setting the Foot Lift 17. Changing the Bobbin and Threading the Bobbin Case 6. Regulating the Thread Tensions 11. Drawing Up the Bobbin Thread 10. Regulating the Pressure on the Material . . 13. Regulating the Stitch Length 12. Trouble Shooting Page 1 2 4 • . 5 6 6 • . 6 6 • . 8 8 9 • . 9 10 • . ...
Owner's Manual
Page 19
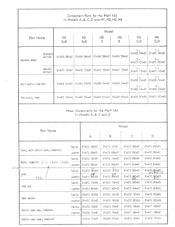
...010 848-05 91-010 848-05 9110 855 - 9110 855 9111 4951 91114981 9110 1571 Component Parts for the Pfaff 145 in Models A,B,C,D and H1,H2,H3,H4 Part Name Model Hi H2 H2 H3 H3 H4 A;B A;B C B C;D C;D Balance wheel Standard version 91-...Arm cover, rear 91-002 504-5 9i-02 504-45 9110 617-J5 91-002 5044-5 91-010 617-45 9110 617-Ji5 Hook Components for the Pfaff 145 in Models A, B, C and D Port Name Hook, with bobbin case, complete (hook, coWlete iAi C ' / , 7 Hook / jj_. ( Hook gib Hook washer Bobbin case cap, complete Bobbin case base, complete Model A B C D Fabric...
...010 848-05 91-010 848-05 9110 855 - 9110 855 9111 4951 91114981 9110 1571 Component Parts for the Pfaff 145 in Models A,B,C,D and H1,H2,H3,H4 Part Name Model Hi H2 H2 H3 H3 H4 A;B A;B C B C;D C;D Balance wheel Standard version 91-...Arm cover, rear 91-002 504-5 9i-02 504-45 9110 617-J5 91-002 5044-5 91-010 617-45 9110 617-Ji5 Hook Components for the Pfaff 145 in Models A, B, C and D Port Name Hook, with bobbin case, complete (hook, coWlete iAi C ' / , 7 Hook / jj_. ( Hook gib Hook washer Bobbin case cap, complete Bobbin case base, complete Model A B C D Fabric...


