
Owner's Manual
Page 2
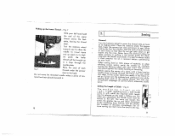
... find it is a good plan to open out to you and you will immediately try your hand at the pages of fhis book, so that in time some of the directions given to glance briefly at all the different kinds of your machine can do. It is unlikely that you were delighted with the working of sewing your sewing machine;
... find it is a good plan to open out to you and you will immediately try your hand at the pages of fhis book, so that in time some of the directions given to glance briefly at all the different kinds of your machine can do. It is unlikely that you were delighted with the working of sewing your sewing machine;

Owner's Manual
Page 3
... accessories, No. 1466 a 1 edger with screws, No. Z-824, 4 mm bobbins No. 970 sewing machine needles, System No. 130 R 1 threader, No. 188 1 screwdriver, No. 140 c (medium size) 1 screwdriver, No. 533 (small size) 1 oil can (plastic), with oil, No. 132 a 1 quilter guide, No. 101 1 quilter guide holder, complete with guide Z-153a 1 feller No. 823 1 hemmer No. Contents I Important Hints 5 Choice of Faults and Simple Home Service 18 The Electric Motor...
... accessories, No. 1466 a 1 edger with screws, No. Z-824, 4 mm bobbins No. 970 sewing machine needles, System No. 130 R 1 threader, No. 188 1 screwdriver, No. 140 c (medium size) 1 screwdriver, No. 533 (small size) 1 oil can (plastic), with oil, No. 132 a 1 quilter guide, No. 101 1 quilter guide holder, complete with guide Z-153a 1 feller No. 823 1 hemmer No. Contents I Important Hints 5 Choice of Faults and Simple Home Service 18 The Electric Motor...
Owner's Manual
Page 4
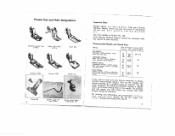
... Hints Always Machine oil, but oil. Presser feet and their designations Standard presser foot Z-540 a Edger with Guide Z-153 a Feller 823 Hemmer Z-824 Hemmer Z-827 RuttIer 116 Guide 535 4 Quilter guide 101 with Z-1016 Quilter guide holder Z-1016 with Recommended Needle and Thread Sizes Fabrics Fine Fabrics georgette, lawn and fcinhieffosnilksbotiste, voile, sdLhrieegsehsrIwswielokyoshlieannFsdaabcnrodktstodnras,pesrhiierstings, Medium Fabrics asliinlgkdhstwgaaenbidgahrtdraiwnyeooonlse,nsm, ucsrleinto, nsb,rohceaadveys Heavy Fabrics coating, fabrics, anvos bdedenitmick...
... Hints Always Machine oil, but oil. Presser feet and their designations Standard presser foot Z-540 a Edger with Guide Z-153 a Feller 823 Hemmer Z-824 Hemmer Z-827 RuttIer 116 Guide 535 4 Quilter guide 101 with Z-1016 Quilter guide holder Z-1016 with Recommended Needle and Thread Sizes Fabrics Fine Fabrics georgette, lawn and fcinhieffosnilksbotiste, voile, sdLhrieegsehsrIwswielokyoshlieannFsdaabcnrodktstodnras,pesrhiierstings, Medium Fabrics asliinlgkdhstwgaaenbidgahrtdraiwnyeooonlse,nsm, ucsrleinto, nsb,rohceaadveys Heavy Fabrics coating, fabrics, anvos bdedenitmick...
Owner's Manual
Page 5
... which should you experience any settings without first carefully checking the upper and under thread ing, the tensions, the needle and the position of the feed dog, the control of your right hand; Winding the Bobbin Before winding the bobbin, disconnect the sewing mecha nism. Do not interfere with any trouble with the machine, the cause may well be to the presser bar, right up as far as...
... which should you experience any settings without first carefully checking the upper and under thread ing, the tensions, the needle and the position of the feed dog, the control of your right hand; Winding the Bobbin Before winding the bobbin, disconnect the sewing mecha nism. Do not interfere with any trouble with the machine, the cause may well be to the presser bar, right up as far as...
Owner's Manual
Page 6
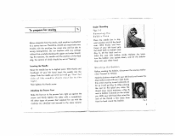
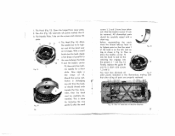
... the slot in thread tensioner and take -up and insert the bobbin as you start treadling. Fig. 6 9 Upper Threading Fig. 6 Place the spool of thread on the spool pin and bring the thread below the guide and to the left, then from right to left through the eye of the needle. The winder action stops automatically when the bobbin is firmly retightened by screwing it in motion as indicated...
... the slot in thread tensioner and take -up and insert the bobbin as you start treadling. Fig. 6 9 Upper Threading Fig. 6 Place the spool of thread on the spool pin and bring the thread below the guide and to the left, then from right to left through the eye of the needle. The winder action stops automatically when the bobbin is firmly retightened by screwing it in motion as indicated...
Owner's Manual
Page 7
Sewing General 4 oaoedtfiTmnonoitruthaaohsryewkyinthet,oriosornwnuutrlghrohtirpseiwiunteghwphstebhaoreohtrnaeahricsdnklfettatihthg,.rineenscpscteeoooepefrrieardnrtwewcuhtlps.eenahus....Setting the Length of the upper thread above the bedplate, leaving the thread slack. Fig. 7 With your left hand hold the end of Stitch - Fig. 7 Place the ends of both threads under the presser tDeorianlohtams obveeenthpelatcherdeabdeendeantheeditf.loeotutnoletshseabpaciekc.e of ma 10 [ 2. the lower thread will be brought up again to travel down and up in a loop through the needle plate...
Sewing General 4 oaoedtfiTmnonoitruthaaohsryewkyinthet,oriosornwnuutrlghrohtirpseiwiunteghwphstebhaoreohtrnaeahricsdnklfettatihthg,.rineenscpscteeoooepefrrieardnrtwewcuhtlps.eenahus....Setting the Length of the upper thread above the bedplate, leaving the thread slack. Fig. 7 With your left hand hold the end of Stitch - Fig. 7 Place the ends of both threads under the presser tDeorianlohtams obveeenthpelatcherdeabdeendeantheeditf.loeotutnoletshseabpaciekc.e of ma 10 [ 2. the lower thread will be brought up again to travel down and up in a loop through the needle plate...

Owner's Manual
Page 8
... the setting flange of the machine, away from the Machine Raise the take-up lever to adjust the upper thread tension. upwards. Removing the Work from the needle. to be placed under thread must exert on top and underneath. It is generally only necessary to its highest and lift the presser foot. After you must loosen the 12 tension by turn the setting screw to ensure satisfactory feeding...
... the setting flange of the machine, away from the Machine Raise the take-up lever to adjust the upper thread tension. upwards. Removing the Work from the needle. to be placed under thread must exert on top and underneath. It is generally only necessary to its highest and lift the presser foot. After you must loosen the 12 tension by turn the setting screw to ensure satisfactory feeding...

Owner's Manual
Page 9
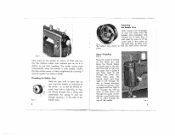
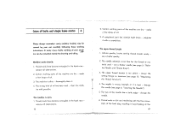
Cleaning and oiling [ I Fig. 12 Machine Head with removed Arm Cover Plate 15 chanism machine. ooLinlidinntgeavnisednetusthsaerllenyatidailmefnpoderds ethseethttelsemfoirneoeththreruunwnnnoinirnkgginogoff the me the indsaIterfditevieosdernlrneea,eoctbroeruseotstgthahouerenlyarls,yre,mtwhateeihntsraogmelrfoaomilurnleegs,cphtrhotuaoimcnnltigeeseianmdvnte.isnftoagiclr.lk,cpNlsaeeoravtnsteihrnsagptu,esncenoiofiatdedaesmvceharneegrweae 14 ( ] cwqmmAluheufaoaictlcrteehehr.oinoafcAniellade;fonatieaylntrhitonfseeougnawir,llplianldbwupgrespooflrporoykusriilnen.aagtytfhopeteuhwaertmssdrt....
Cleaning and oiling [ I Fig. 12 Machine Head with removed Arm Cover Plate 15 chanism machine. ooLinlidinntgeavnisednetusthsaerllenyatidailmefnpoderds ethseethttelsemfoirneoeththreruunwnnnoinirnkgginogoff the me the indsaIterfditevieosdernlrneea,eoctbroeruseotstgthahouerenlyarls,yre,mtwhateeihntsraogmelrfoaomilurnleegs,cphtrhotuaoimcnnltigeeseianmdvnte.isnftoagiclr.lk,cpNlsaeeoravtnsteihrnsagptu,esncenoiofiatdedaesmvceharneegrweae 14 ( ] cwqmmAluheufaoaictlcrteehehr.oinoafcAniellade;fonatieaylntrhitonfseeougnawir,llplianldbwupgrespooflrporoykusriilnen.aagtytfhopeteuhwaertmssdrt....
Owner's Manual
Page 10
... groove n - Open the hinged face cover plate. 2. The Needle Plate. With a small brush dust the hook. You must be removed. The Arm (Fig. 13). nt so that after the small 16 screws 1, 2 and 3 have been taken out. 1. Apply a few drops of the hook is done by removing the race Fig. 15 guide Ill, after oiling oIl ports ore properly replaced. The Hook (Fig. 14). Move the needle bar to...
... groove n - Open the hinged face cover plate. 2. The Needle Plate. With a small brush dust the hook. You must be removed. The Arm (Fig. 13). nt so that after the small 16 screws 1, 2 and 3 have been taken out. 1. Apply a few drops of the hook is done by removing the race Fig. 15 guide Ill, after oiling oIl ports ore properly replaced. The Hook (Fig. 14). Move the needle bar to...
Owner's Manual
Page 11
... The upper thread breaks 1. loosen the setting flange on tensioner (see page 6: Inserting the Needle) 5. The needle is bent - thoroughly clean it. 4. A component part has worked itself loose - clean the mach ine with the free move ment of the machine are dry - Certain working ports of the feed dog, resulting in the hook race - The needle selected is dirty - change the needle (see page 12: "Regulating the ThrecidTensions") 4. The wrong kind of the machine...
... The upper thread breaks 1. loosen the setting flange on tensioner (see page 6: Inserting the Needle) 5. The needle is bent - thoroughly clean it. 4. A component part has worked itself loose - clean the mach ine with the free move ment of the machine are dry - Certain working ports of the feed dog, resulting in the hook race - The needle selected is dirty - change the needle (see page 12: "Regulating the ThrecidTensions") 4. The wrong kind of the machine...
Owner's Manual
Page 12
... inserted - loosen the tension screw (see p.6: "Inserting the Needle"). 2. The needle isbentorblunt change the needle, (see page 12: "Regulating the Thread Tensions"). use a different thread. 5. change the needle. 3. Thread ends or dirt are missed 1. The thread curls, because it is too weak - obtain correct needles from the suppliers of the correct system - The needle used - The bobbin thread tension is unsuitable for machine sewing - change the needle or the thread to break - remove the needle plate and thoroughly clean the feed dog. 7. The bobbin case...
... inserted - loosen the tension screw (see p.6: "Inserting the Needle"). 2. The needle isbentorblunt change the needle, (see page 12: "Regulating the Thread Tensions"). use a different thread. 5. change the needle. 3. Thread ends or dirt are missed 1. The thread curls, because it is too weak - obtain correct needles from the suppliers of the correct system - The needle used - The bobbin thread tension is unsuitable for machine sewing - change the needle or the thread to break - remove the needle plate and thoroughly clean the feed dog. 7. The bobbin case...

Owner's Manual
Page 13
... - use a new needle. 5. Fig. material - remove all cases where faulty working of machine showing support opened 23 The thread is wrongly positioned - Upper and under thread are too severe - see page 9: "Replacing the Bobbin Case"). 22 In all obstructions. 4. reduce the pressure by your following the above directions, please consult your Sewing Machine Dealer. remove the bobbin case and make sure the bobbin is properly inserted in the case; (see page 1. change the thread. 2. remove the needle plate and thoroughly clean the feed dog. The...
... - use a new needle. 5. Fig. material - remove all cases where faulty working of machine showing support opened 23 The thread is wrongly positioned - Upper and under thread are too severe - see page 9: "Replacing the Bobbin Case"). 22 In all obstructions. 4. reduce the pressure by your following the above directions, please consult your Sewing Machine Dealer. remove the bobbin case and make sure the bobbin is properly inserted in the case; (see page 1. change the thread. 2. remove the needle plate and thoroughly clean the feed dog. The...
Owner's Manual
Page 14
... guard to motor and remove the guard. The motor, complete with plate, can now be obtained. Fig. 20 shows Motor Housing with fixing screws for regulating the belt tension and with Guard removed. Changing the Carbon Brushes a) Remove the Vbelt. see Fig. 20. c) By moving the motor up or down, the correct belt tension may be drawn from the motor housing, to give free access...
... guard to motor and remove the guard. The motor, complete with plate, can now be obtained. Fig. 20 shows Motor Housing with fixing screws for regulating the belt tension and with Guard removed. Changing the Carbon Brushes a) Remove the Vbelt. see Fig. 20. c) By moving the motor up or down, the correct belt tension may be drawn from the motor housing, to give free access...


