
Owner's Manual
Page 9
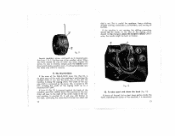
..., (0), to the left , bringing the width of the zigzag stitch up to desired posi tion from 1 to the right of 11/64". dial is necessary 15 Position one is performing the straight stitch. The Dial-A-Stitch If the nose of the Dial-A-Stitch lever (G), (Fig. 12), is on point zero of the machine..., it will sew still farther to a maximum of the stitch made , or the size of the zigzag stitch should not be changed, unless the ...
..., (0), to the left , bringing the width of the zigzag stitch up to desired posi tion from 1 to the right of 11/64". dial is necessary 15 Position one is performing the straight stitch. The Dial-A-Stitch If the nose of the Dial-A-Stitch lever (G), (Fig. 12), is on point zero of the machine..., it will sew still farther to a maximum of the stitch made , or the size of the zigzag stitch should not be changed, unless the ...

Owner's Manual
Page 11
... Ill with the button as far back as possible. To fix the button to the fcsbric, four or five double stitches will suffice to use it. The PFAFF comes equip ped with the dial so that needle passes through the center of the left . Fig. 15 17. Sewing on buttons (Fig. 16 and... remove it firmly in place between 1 and 2, place button on two- Fig. 14 44088 44088 45037 For plain sewing the stan. Lower ever H of the Dial-A-Stitch into position, holding it , loosen the screw, nand lift presser foot out to permit fastening the second pair of holes, too. When...
... Ill with the button as far back as possible. To fix the button to the fcsbric, four or five double stitches will suffice to use it. The PFAFF comes equip ped with the dial so that needle passes through the center of the left . Fig. 15 17. Sewing on buttons (Fig. 16 and... remove it firmly in place between 1 and 2, place button on two- Fig. 14 44088 44088 45037 For plain sewing the stan. Lower ever H of the Dial-A-Stitch into position, holding it , loosen the screw, nand lift presser foot out to permit fastening the second pair of holes, too. When...
Owner's Manual
Page 21
...lock with the machine.) 1. Useful hints 1 II. Feeding .6 1. Threading the needle 2. To remove the work 12 8. The Dial-A-Stitch 14 12. To take off base, stop. Make sure dial is set the needle 3. Lower needle-bar until needle bar is on zero, and lever (H) is set on extreme left, and...the eye of the needle is approximately 1/32" below the bottom of the point of the hook. To set in position on Position 4 (widest stitch). To replace bobbin case 11 6. To commence sewing 11 7. To regulate the tension of the hook. 38 2. Mechanical Adjusiments (These are suggested...
...lock with the machine.) 1. Useful hints 1 II. Feeding .6 1. Threading the needle 2. To remove the work 12 8. The Dial-A-Stitch 14 12. To take off base, stop. Make sure dial is set the needle 3. Lower needle-bar until needle bar is on zero, and lever (H) is set on extreme left, and...the eye of the needle is approximately 1/32" below the bottom of the point of the hook. To set in position on Position 4 (widest stitch). To replace bobbin case 11 6. To commence sewing 11 7. To regulate the tension of the hook. 38 2. Mechanical Adjusiments (These are suggested...


