

Owner's Manual
Page 2
... the must letter be connected L or coloured to be fitted. Please note: When 13 amperes plug is coloured brown marked with wool thread Page 19 19 20 20 21 22 23 24 25 26 28 29 30 31 32 34 35 36 38 39 40 42 43...57 Elastic triple zigzag stitch 57 Reinforcing hems in elastic fabrics 57 Decorative stitch mechanism 58 Ornamental stitch combinations 60/61/62 Needle and thread chart 63 Cleaning and oiling 64 Changing the light bulb 65 Trouble shooting 65 Carrying case 66 V&id for United Kingdom ony! ...
... the must letter be connected L or coloured to be fitted. Please note: When 13 amperes plug is coloured brown marked with wool thread Page 19 19 20 20 21 22 23 24 25 26 28 29 30 31 32 34 35 36 38 39 40 42 43...57 Elastic triple zigzag stitch 57 Reinforcing hems in elastic fabrics 57 Decorative stitch mechanism 58 Ornamental stitch combinations 60/61/62 Needle and thread chart 63 Cleaning and oiling 64 Changing the light bulb 65 Trouble shooting 65 Carrying case 66 V&id for United Kingdom ony! ...
Owner's Manual
Page 4
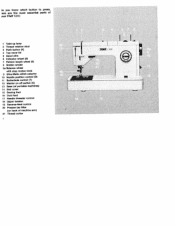
o you know which button to press, ere are the most essential parts of tour Pfaff 1213: 1 Take-up lever 2 Thread retainer stud 3 Push button (K) 4 Top cover lid 5 Spool pins 6 Indicator wheel (S) 7 Pattern length wheel (E) 8 Bobbin winder Ba Balance wheel with stop motion knob 9 Ultra-Matic ... Sewing foot 16 Dualfeed 17 Needle threader control 18 Upper tension 19 Reverse-teed control 20 Presser bar lifter (on back of machine aim) 21 Thread cutter 2 ErL H I a
o you know which button to press, ere are the most essential parts of tour Pfaff 1213: 1 Take-up lever 2 Thread retainer stud 3 Push button (K) 4 Top cover lid 5 Spool pins 6 Indicator wheel (S) 7 Pattern length wheel (E) 8 Bobbin winder Ba Balance wheel with stop motion knob 9 Ultra-Matic ... Sewing foot 16 Dualfeed 17 Needle threader control 18 Upper tension 19 Reverse-teed control 20 Presser bar lifter (on back of machine aim) 21 Thread cutter 2 ErL H I a

Owner's Manual
Page 5
_____ •PAFF 1222E • • and this is how your Pfaff 1214 or 1 222-E looks: 1 Take-up lever 2 Thread retainer stud 3 Push button (K) 4 Topcoverlid 5 Spool pins 6 7 Indicator wheel (S) Pattern length wheel (E) 8 Bobbin winder 8a Balance wheel with stop motion knob (Pfaff 1214) 9 Ultra-Matic stitch selector 10 Needle position control (D) 11 Buttonhole control (1) 12 Master... Sewing foot 16 Dualfeed 17 Needle threader control 18 Upper tension 19 Reverse-feed control 20 Presser bar lifter (on back of machine arm) 21 Thread cutter
_____ •PAFF 1222E • • and this is how your Pfaff 1214 or 1 222-E looks: 1 Take-up lever 2 Thread retainer stud 3 Push button (K) 4 Topcoverlid 5 Spool pins 6 7 Indicator wheel (S) Pattern length wheel (E) 8 Bobbin winder 8a Balance wheel with stop motion knob (Pfaff 1214) 9 Ultra-Matic stitch selector 10 Needle position control (D) 11 Buttonhole control (1) 12 Master... Sewing foot 16 Dualfeed 17 Needle threader control 18 Upper tension 19 Reverse-feed control 20 Presser bar lifter (on back of machine arm) 21 Thread cutter

Owner's Manual
Page 6
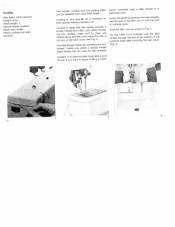
Just plug in the machine base, and plug B into socket A in the machine, wind the bobbin and thread the needle. All you have to do now is push button C which is the on-off control of your machine This button also switches on the glare-free sewing light. 4 Th. only a few simple steps are necessary. Push the master plug into the wall socket. Place the foot control under the table in a convenient position. o start sewing right away.
Just plug in the machine base, and plug B into socket A in the machine, wind the bobbin and thread the needle. All you have to do now is push button C which is the on-off control of your machine This button also switches on the glare-free sewing light. 4 Th. only a few simple steps are necessary. Push the master plug into the wall socket. Place the foot control under the table in a convenient position. o start sewing right away.

Owner's Manual
Page 7
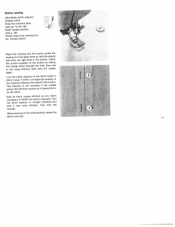
The seam produced in the middle of the fabric to page 21. To wind the bobbin, turn to form a lock stitch. The sewing mechanism must be disengaged (see page 7). If your seam doesn't look like the illustration, turn the machine on by -step bobbin winding instructions please refer to sew a seam: an upper and a lower thread. These two threads are locked together in this way is illustrated below. For step-by pushing button C (page 4). Before you start winding the bobbin remember that you need two threads to page 7.
The seam produced in the middle of the fabric to page 21. To wind the bobbin, turn to form a lock stitch. The sewing mechanism must be disengaged (see page 7). If your seam doesn't look like the illustration, turn the machine on by -step bobbin winding instructions please refer to sew a seam: an upper and a lower thread. These two threads are locked together in this way is illustrated below. For step-by pushing button C (page 4). Before you start winding the bobbin remember that you need two threads to page 7.

Owner's Manual
Page 9
...leffl. Push lever E against the bobbin, hold the balance wheel, and turn the stop motion knob of Pfaft machines 1213 and 1214 (8a on the foot control. Pass the thread from you . For details please refer to page 17. The sewing mechanism is re-engaged automatically on one of them. I to... wind the bobbin and disengage the sewing mechanism: Raise both spool pins and place a spool of thread on starting the machine, On the Pfaff 1222-E, the sewing mechanism is engaged or disengaged by pressing down on page 2> toward you . Start the bobbin winder by the ...
...leffl. Push lever E against the bobbin, hold the balance wheel, and turn the stop motion knob of Pfaft machines 1213 and 1214 (8a on the foot control. Pass the thread from you . For details please refer to page 17. The sewing mechanism is re-engaged automatically on one of them. I to... wind the bobbin and disengage the sewing mechanism: Raise both spool pins and place a spool of thread on starting the machine, On the Pfaff 1222-E, the sewing mechanism is engaged or disengaged by pressing down on page 2> toward you . Start the bobbin winder by the ...

Owner's Manual
Page 10
and under the spring. Fig. 2: Pull the thread into the bobbin case, making sure the thread end drops from the bobbin case. 2 Leave about three inches of thread hanging from the top down towards you draw the thread, the bobbin should rotate clock wise (as indicated by an arrow). As you . insert the bobbin into the bobbin se. $ Fig. 1: Insert the filled bobbin into the slot Fig. 3: . . .
and under the spring. Fig. 2: Pull the thread into the bobbin case, making sure the thread end drops from the bobbin case. 2 Leave about three inches of thread hanging from the top down towards you draw the thread, the bobbin should rotate clock wise (as indicated by an arrow). As you . insert the bobbin into the bobbin se. $ Fig. 1: Insert the filled bobbin into the slot Fig. 3: . . .

Owner's Manual
Page 12
By this notion, the thread is enclosed in Pfaff needle threader will then thread the needle for you quickly and easily. '1 ulf the thread to the right and down as ndicated by an arrow in the illustration below. [hen continue threading as shown in the Ilustration at right. [he built-in the top cover. ow "slot-thread" your machine ull the thread from the spool into the upper ension which is drawn into the slot n the top cover of your machine.
By this notion, the thread is enclosed in Pfaff needle threader will then thread the needle for you quickly and easily. '1 ulf the thread to the right and down as ndicated by an arrow in the illustration below. [hen continue threading as shown in the Ilustration at right. [he built-in the top cover. ow "slot-thread" your machine ull the thread from the spool into the upper ension which is drawn into the slot n the top cover of your machine.

Owner's Manual
Page 13
... should be in the illustration. On Pfaff machines 1213 and 1214, turn the balance wheel to its normal (horizontal) position (B on page 17). On Pfaff machines 1213 and 1214, turn the balance wheel until the prong reverses and pulls the thread through the needle eye completely. Push ...the needle threader control down with the automatic Pfaff need 'e with your left hand and at the...
... should be in the illustration. On Pfaff machines 1213 and 1214, turn the balance wheel to its normal (horizontal) position (B on page 17). On Pfaff machines 1213 and 1214, turn the balance wheel until the prong reverses and pulls the thread through the needle eye completely. Push ...the needle threader control down with the automatic Pfaff need 'e with your left hand and at the...

Owner's Manual
Page 17
...Stop matic mechanism is raised automatically to positions B and C. you 've finished sewing on your Pfaff 1222E. The sewing foot is to be pushed to its high est point. This position is used when the bobbin thread is raised, but the needle remains in the fabric and serves as in position A). flick... (as a pivot point for turning the PMF) 1222 material. Position A (illustrated below ) means that the sewing foot is used when -- With the models 1213/1214 the presser bar lifter can only be drawn up, in its lowest posi tion until the needle has stopped at its highest posi tion. Since...
...Stop matic mechanism is raised automatically to positions B and C. you 've finished sewing on your Pfaff 1222E. The sewing foot is to be pushed to its high est point. This position is used when the bobbin thread is raised, but the needle remains in the fabric and serves as in position A). flick... (as a pivot point for turning the PMF) 1222 material. Position A (illustrated below ) means that the sewing foot is used when -- With the models 1213/1214 the presser bar lifter can only be drawn up, in its lowest posi tion until the needle has stopped at its highest posi tion. Since...

Owner's Manual
Page 20
... foot, etc.) which are used for changing. To change the needle, lower the presser bar lifter and flick it sideways or backwards. A detailed Needle and Thread Chart is attached in the reverse order.
... foot, etc.) which are used for changing. To change the needle, lower the presser bar lifter and flick it sideways or backwards. A detailed Needle and Thread Chart is attached in the reverse order.

Owner's Manual
Page 21
...1. The higher the number, the tighter the tension. Then regulate the tensions as the one shown in the needle. '11 Always use the same size thread on page 10. 'The tension dial is regulated by arrows. In this screw to the right (with numbers 0 to the left (L) are set at...just right. Even so, your finger nail) for a tighter tension, or to 10. Perfect seams through properly balanced tensions V Both ten&ons btanced The thread tensions are indicated by turning the small knurled screw on the bobbin case. The lower tension is provided with your thumb rather than your seam...
...1. The higher the number, the tighter the tension. Then regulate the tensions as the one shown in the needle. '11 Always use the same size thread on page 10. 'The tension dial is regulated by arrows. In this screw to the right (with numbers 0 to the left (L) are set at...just right. Even so, your finger nail) for a tighter tension, or to 10. Perfect seams through properly balanced tensions V Both ten&ons btanced The thread tensions are indicated by turning the small knurled screw on the bobbin case. The lower tension is provided with your thumb rather than your seam...

Owner's Manual
Page 24
... foot scroll with 3 or 4 straight stitches. Fold the beginning of the left toe. Feed the fabric edge into the hemmer foot by pull ing both threads backwards, as instructed above. 2
... foot scroll with 3 or 4 straight stitches. Fold the beginning of the left toe. Feed the fabric edge into the hemmer foot by pull ing both threads backwards, as instructed above. 2

Owner's Manual
Page 27
... the hole lengthwise, with the machine running at right angles and sew back and forth over the preceding work with both hands. This anchors the threads in the un worn area around the hole. Triangular tears and rips are closely spaced. After you have finished darning, swing the reverse-feed control... the material flat with short stitches. Tubular articles, such as sleeves, trouser legs and stockings, can be easily darned on the free arm of the Pfaff 1222.
... the hole lengthwise, with the machine running at right angles and sew back and forth over the preceding work with both hands. This anchors the threads in the un worn area around the hole. Triangular tears and rips are closely spaced. After you have finished darning, swing the reverse-feed control... the material flat with short stitches. Tubular articles, such as sleeves, trouser legs and stockings, can be easily darned on the free arm of the Pfaff 1222.

Owner's Manual
Page 28
... wrong side of the fabric. ttach cording foot 0. 93-040 91 5-35. S S - .S When you have finished the zigzag seam, slide the material along the filler thread to distribute its fullness evenly. hirring wfth fiUer thread Itra-Matic stitch selector: idest zigzag stitch in the shirring makes it more durable. inserting a filler...
... wrong side of the fabric. ttach cording foot 0. 93-040 91 5-35. S S - .S When you have finished the zigzag seam, slide the material along the filler thread to distribute its fullness evenly. hirring wfth fiUer thread Itra-Matic stitch selector: idest zigzag stitch in the shirring makes it more durable. inserting a filler...
Owner's Manual
Page 30
...more pro minent Unless you want to apply cording to suit the type of material used for this purpose. On the Pfaff 1213 Portable, pull the filler thread through the slot at the bottom of the face cover (see Fig. 1). Select the distance between the twin needles... color. Cording on linen goods, dresses, blouses, etc. Twin needle, cording foot and cording plate can be obtained from your Pfaff dealer. Hold the filler cord as a trimming on woollens is made with a wool thread. parent materials, take a filler thread in Fig. 2. Cording is best made with grooves.
...more pro minent Unless you want to apply cording to suit the type of material used for this purpose. On the Pfaff 1213 Portable, pull the filler thread through the slot at the bottom of the face cover (see Fig. 1). Select the distance between the twin needles... color. Cording on linen goods, dresses, blouses, etc. Twin needle, cording foot and cording plate can be obtained from your Pfaff dealer. Hold the filler cord as a trimming on woollens is made with a wool thread. parent materials, take a filler thread in Fig. 2. Cording is best made with grooves.
Owner's Manual
Page 37
.... Sew as many zigzag stitches as it descends for its left hole exactly as you deem necessary to fasten the button securely. Then trim the threads. Turn the stitch selector to the stitch width in stitch range 9 which corresponds exactly to straight stitching and sew a few tying stitches. Turn the stitch...
.... Sew as many zigzag stitches as it descends for its left hole exactly as you deem necessary to fasten the button securely. Then trim the threads. Turn the stitch selector to the stitch width in stitch range 9 which corresponds exactly to straight stitching and sew a few tying stitches. Turn the stitch...

Owner's Manual
Page 38
...buttonhoes Mtach buttonhole too \Io. 93-040 924-91. Cut the buttonhole open with your seam ripper. Use No. 50 nachine embroidery thread as the first seam. 4. To set the machine for the central needie position is positioned below the setting mark. Even when buttonhole sewing... zigzag stitches for each subsequent buttonhole. Repeat this for the first bar. Pull the filler cord into place again with the fabric and the thread being used. Turn knob D clockwise until it toward ±, the stitches are packed together more closely (see ill, above , left seam...
...buttonhoes Mtach buttonhole too \Io. 93-040 924-91. Cut the buttonhole open with your seam ripper. Use No. 50 nachine embroidery thread as the first seam. 4. To set the machine for the central needie position is positioned below the setting mark. Even when buttonhole sewing... zigzag stitches for each subsequent buttonhole. Repeat this for the first bar. Pull the filler cord into place again with the fabric and the thread being used. Turn knob D clockwise until it toward ±, the stitches are packed together more closely (see ill, above , left seam...

Owner's Manual
Page 40
... were writing. Straight-lined monograms can be able to embroider monograms in a darning hoop and lower the presser bar lifter and draw up the bobbin thread. 42 Move the hoop slowly and evenly, and follow the traced outlines as if you want to give your monogram dimen sional quality, embroider the...
... were writing. Straight-lined monograms can be able to embroider monograms in a darning hoop and lower the presser bar lifter and draw up the bobbin thread. 42 Move the hoop slowly and evenly, and follow the traced outlines as if you want to give your monogram dimen sional quality, embroider the...

Owner's Manual
Page 42
...Attach darning foot No. 93-040 960-91. Run the machine and place the wool thread back and forth across the hole, packing the individual strands closely together. Once the hole is covered with wool thread Ultra-Matic stitch selector: zigzag stitch in stitch range 6 or 7. Knitted garments and ...articles made of stitching too closely since spots darned with this thread are best darned with thin embroidery and darning thread. Then sew back and forth over the darned area lengthwise, using a thin darning thread. Do not space the various lines of terry cloth are not as stiff...
...Attach darning foot No. 93-040 960-91. Run the machine and place the wool thread back and forth across the hole, packing the individual strands closely together. Once the hole is covered with wool thread Ultra-Matic stitch selector: zigzag stitch in stitch range 6 or 7. Knitted garments and ...articles made of stitching too closely since spots darned with this thread are best darned with thin embroidery and darning thread. Then sew back and forth over the darned area lengthwise, using a thin darning thread. Do not space the various lines of terry cloth are not as stiff...


