
User Manual
Page 7
... Flash 49 Using the Built-in Flash 49 Other Shooting Modes 53 Continuous Shooting 53 Self-Timer Shooting 55 Remote Control Shooting (Remote Control F: Sold Separately) ........59 Using Mirror Lock Up Function to Prevent Camera Shake 62 Playing Back Still Pictures 63 Playing Back Images 63 Enlarging Playback Images 65 Nine-Image Display...
... Flash 49 Using the Built-in Flash 49 Other Shooting Modes 53 Continuous Shooting 53 Self-Timer Shooting 55 Remote Control Shooting (Remote Control F: Sold Separately) ........59 Using Mirror Lock Up Function to Prevent Camera Shake 62 Playing Back Still Pictures 63 Playing Back Images 63 Enlarging Playback Images 65 Nine-Image Display...

User Manual
Page 10
8 Appendix 173 Default Settings 174 Functions Available with Various Lens Combinations .......... 178 Notes on [Using Aperture Ring 180 Cleaning the CCD 181 Optional Accessories 183 Error Messages 186 Troubleshooting 188 Main Specifications 190 Specifications for Remote Control F (Optional 192 Glossary 193 Index 198 WARRANTY POLICY 202
8 Appendix 173 Default Settings 174 Functions Available with Various Lens Combinations .......... 178 Notes on [Using Aperture Ring 180 Cleaning the CCD 181 Optional Accessories 183 Error Messages 186 Troubleshooting 188 Main Specifications 190 Specifications for Remote Control F (Optional 192 Glossary 193 Index 198 WARRANTY POLICY 202

User Manual
Page 16
14 Names of Working Parts Before Using Your Camera Camera 1 Lens mount index Shutter release button Main switch Self-Timer lamp/ Remote control receiver Lens unlock button 3 button i button M button Q button Mirror AF coupler Focus mode lever Lens information contacts e-dial L/Z button Four-way controller 4 button { button Battery cover Tripod socket
14 Names of Working Parts Before Using Your Camera Camera 1 Lens mount index Shutter release button Main switch Self-Timer lamp/ Remote control receiver Lens unlock button 3 button i button M button Q button Mirror AF coupler Focus mode lever Lens information contacts e-dial L/Z button Four-way controller 4 button { button Battery cover Tripod socket

User Manual
Page 24
22 LCD Panel Indications The following information appears in the LCD panel on top of the camera. 1 Before Using Your Camera 1 72 8 3 9 4 5 610 11 1 Shutter speed (p.134) 5 Focusing area (p.121) 2 Aperture (p.136) No indicator : Wide 3 Flash mode (p.49) M : Spot b : Built-in...112) 9 : Single frame shooting (Not displayed when set to Auto) j : Continuous shooting 9 Battery level g : Self-Timer shooting 10 EV compensation (p.141) h : Remote control shooting 11 Number of recordable images/ EV compensation value/PC (Pb) (PC = Personal Computer (mass storage), Pb = PictBridge)
22 LCD Panel Indications The following information appears in the LCD panel on top of the camera. 1 Before Using Your Camera 1 72 8 3 9 4 5 610 11 1 Shutter speed (p.134) 5 Focusing area (p.121) 2 Aperture (p.136) No indicator : Wide 3 Flash mode (p.49) M : Spot b : Built-in...112) 9 : Single frame shooting (Not displayed when set to Auto) j : Continuous shooting 9 Battery level g : Self-Timer shooting 10 EV compensation (p.141) h : Remote control shooting 11 Number of recordable images/ EV compensation value/PC (Pb) (PC = Personal Computer (mass storage), Pb = PictBridge)

User Manual
Page 61
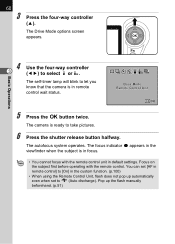
... OK Exit You can be released immediately after the shutter release button on the remote control unit is pressed. 3 1 Mount the camera to a tripod. h The shutter will be released three seconds after the shutter release button on the remote control unit is pressed. The Fn menu appears. i The shutter will be released with...
... OK Exit You can be released immediately after the shutter release button on the remote control unit is pressed. 3 1 Mount the camera to a tripod. h The shutter will be released three seconds after the shutter release button on the remote control unit is pressed. The Fn menu appears. i The shutter will be released with...
User Manual
Page 62
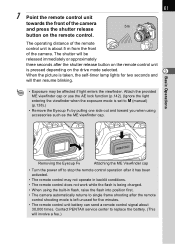
... to let you know that the camera is in remote control wait status. The self-timer lamp will blink to select h or i. The autofocus system operates. The focus indicator ] appears in focus. • You cannot focus with the remote control. The camera is in the viewfinder when the ...subject is ready to B (Auto discharge). You can set [AF in remote control] to [On] in default settings. Pop up automatically even when set to take...
... to let you know that the camera is in remote control wait status. The self-timer lamp will blink to select h or i. The autofocus system operates. The focus indicator ] appears in focus. • You cannot focus with the remote control. The camera is in the viewfinder when the ...subject is ready to B (Auto discharge). You can set [AF in remote control] to [On] in default settings. Pop up automatically even when set to take...
User Manual
Page 63
... in flash, raise the flash into position first. • The camera automatically returns to replace the battery. (This will then resume blinking. 61 7 Point the remote control unit towards the front of the camera 5m and press the shutter release button on the drive mode selected....Turn the power off to stop the remote control operation after it has been activated. • The remote control may be released immediately or approximately three seconds after the remote control shooting mode is about 30,000 times. Contact PENTAX service center to single frame shooting after...
... in flash, raise the flash into position first. • The camera automatically returns to replace the battery. (This will then resume blinking. 61 7 Point the remote control unit towards the front of the camera 5m and press the shutter release button on the drive mode selected....Turn the power off to stop the remote control operation after it has been activated. • The remote control may be released immediately or approximately three seconds after the remote control shooting mode is about 30,000 times. Contact PENTAX service center to single frame shooting after...

User Manual
Page 64
62 Using Mirror Lock Up Function to Prevent Camera Shake Use the Mirror Lock Up function if camera shake is evident even when Cable Switch (optional) or Remote Control Unit (optional) is used . Follow the procedure below to select [r (2 sec. Self-Timer is used . Basic Operations Avoid camera shake when mirror pops up and shutter...
62 Using Mirror Lock Up Function to Prevent Camera Shake Use the Mirror Lock Up function if camera shake is evident even when Cable Switch (optional) or Remote Control Unit (optional) is used . Follow the procedure below to select [r (2 sec. Self-Timer is used . Basic Operations Avoid camera shake when mirror pops up and shutter...
User Manual
Page 102
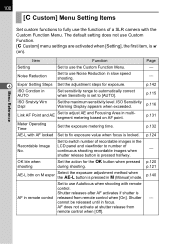
... in focus. OK btn when shooting Set to switch number of recordable images in a (Manual) mode. cannot be released until in remote control released from remote control when [Off]. p.124 Recordable Image No. p.120 p.121 AE-L bttn on AF point. AF does not activate at shutter ...based on M expsr Select the exposure adjustment method when the L button is pressed in the LCD panel and viewfinder to number of a SLR camera with remote control. p.140 Set to use Autofocus when shooting with the Custom Function Menu. p.142 p.115 ISO Snstvty Wrn Dspl Set the maximum ...
... in focus. OK btn when shooting Set to switch number of recordable images in a (Manual) mode. cannot be released until in remote control released from remote control when [Off]. p.124 Recordable Image No. p.120 p.121 AE-L bttn on AF point. AF does not activate at shutter ...based on M expsr Select the exposure adjustment method when the L button is pressed in the LCD panel and viewfinder to number of a SLR camera with remote control. p.140 Set to use Autofocus when shooting with the Custom Function Menu. p.142 p.115 ISO Snstvty Wrn Dspl Set the maximum ...

User Manual
Page 104
Adjust the method of the light source illuminating the subject. The Fn menu appears. Adjust the color for the color of flash discharge. p.53, p.55, p.59, p.143 p.49 p.112 p.115 102 Using the Fn Menu Menu Reference 4 Capture Mode Press the { button while taking a picture. Fn 200 OK Exit Press the four-way controller (2345) to set the operation. Four-way controller 2 3 4 5 Item Drive Mode Flash Mode White Balance Sensitivity Function Page Select Continuous shooting, Self-Timer, Remote control or Auto bracket. Set the sensitivity.
Adjust the method of the light source illuminating the subject. The Fn menu appears. Adjust the color for the color of flash discharge. p.53, p.55, p.59, p.143 p.49 p.112 p.115 102 Using the Fn Menu Menu Reference 4 Capture Mode Press the { button while taking a picture. Fn 200 OK Exit Press the four-way controller (2345) to set the operation. Four-way controller 2 3 4 5 Item Drive Mode Flash Mode White Balance Sensitivity Function Page Select Continuous shooting, Self-Timer, Remote control or Auto bracket. Set the sensitivity.

User Manual
Page 142
... shooting is available when using p (bulb) mode. The shutter remains open as long as the optional remote control's shutter release button is held down. • Noise reduction is a process to prevent camera shake when using the remote control shooting mode (p.59). Set in [Noise Reduction] in the [A Custom] menu. (p.100) • When in...
... shooting is available when using p (bulb) mode. The shutter remains open as long as the optional remote control's shutter release button is held down. • Noise reduction is a process to prevent camera shake when using the remote control shooting mode (p.59). Set in [Noise Reduction] in the [A Custom] menu. (p.100) • When in...
User Manual
Page 171
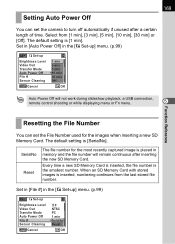
...new SD Memory Card is inserted, the file number is placed in memory and the file number will not work during slideshow playback, a USB connection, remote control shooting or while displaying menu or Fn menu. 5 Function Reference Resetting the File Number You can set the File Number used for the most... recently captured image is the smallest number. 169 Setting Auto Power Off You can set the camera to turn off automatically if unused after inserting the new SD Memory Card. SerialNo Reset The file number for the images when inserting a ...
...new SD Memory Card is inserted, the file number is placed in memory and the file number will not work during slideshow playback, a USB connection, remote control shooting or while displaying menu or Fn menu. 5 Function Reference Resetting the File Number You can set the File Number used for the most... recently captured image is the smallest number. 169 Setting Auto Power Off You can set the camera to turn off automatically if unused after inserting the new SD Memory Card. SerialNo Reset The file number for the images when inserting a ...

User Manual
Page 178
... Yes Yes Yes Yes Yes Yes Yes Yes Yes OK btn when shooting Off Yes Appendix AE-L bttn on M expsr Program Line Yes 6 AF in remote control FI with AF locked Recordable Image No.
... Yes Yes Yes Yes Yes Yes Yes Yes Yes OK btn when shooting Off Yes Appendix AE-L bttn on M expsr Program Line Yes 6 AF in remote control FI with AF locked Recordable Image No.

User Manual
Page 185
Optional Accessories 183 A number of 36 (ISO 100/ m). Remote Control F Shoot pictures from the outlet into your camera. Appendix The cord length is a remote shutter release cord. Its features include slave-sync flash, contrast-control-sync flash, AF spot beam, high-speed sync, wireless... flash and front/rear curtain-sync. AC Adapter D-AC10 This AC adapter supplies power from within 5 m of the front of the camera. 6 Flash ...
Optional Accessories 183 A number of 36 (ISO 100/ m). Remote Control F Shoot pictures from the outlet into your camera. Appendix The cord length is a remote shutter release cord. Its features include slave-sync flash, contrast-control-sync flash, AF spot beam, high-speed sync, wireless... flash and front/rear curtain-sync. AC Adapter D-AC10 This AC adapter supplies power from within 5 m of the front of the camera. 6 Flash ...

User Manual
Page 193
... lens information contacts) Lens used , E=Auto discharge, E>=Redeye reduct Auto discharge, 9=Single frame shooting, j=Continuous shooting, g=Self-timer, h=Remote control shooting, ?=Battery exhaustion warning, ]=Auto bracketing exposure (exposure setting steps can be set to set beep. Night Scene Portrait, a Flash...of 12 sec./2 sec. (with exposure bracketing (Selectable between 1/2EV and 1/3EV for Exposure setting steps) Appendix 191 6 Lens Mount Pentax KAF bayonet mount (K-mount with 50 mm f/1.4 lens at 2 sec. Operation confirmation: Possible to 1/2EV or 1/3EV), M=Center-weighted...
... lens information contacts) Lens used , E=Auto discharge, E>=Redeye reduct Auto discharge, 9=Single frame shooting, j=Continuous shooting, g=Self-timer, h=Remote control shooting, ?=Battery exhaustion warning, ]=Auto bracketing exposure (exposure setting steps can be set to set beep. Night Scene Portrait, a Flash...of 12 sec./2 sec. (with exposure bracketing (Selectable between 1/2EV and 1/3EV for Exposure setting steps) Appendix 191 6 Lens Mount Pentax KAF bayonet mount (K-mount with 50 mm f/1.4 lens at 2 sec. Operation confirmation: Possible to 1/2EV or 1/3EV), M=Center-weighted...
User Manual
Page 194
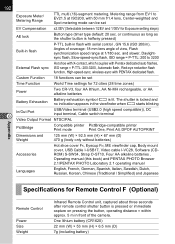
... Specifications for Remote Control F (Optional) Remote Control Power Size Weight Infrared Remote Control unit, captured about three seconds after remote control shutter button is halfway pressed) Built-in flash P-TTL built-in front of view, Flash synchronization speed range at ISO200, with PENTAX dedicated flash.... or continuous as long as the shutter button is pressed or immediate capture on pressing the button, operating distance = within approx. 5 m in flash with serial control , GN 15.6 (ISO 200/m), Angles of coverage: 18 mm lens angle of the camera...
... Specifications for Remote Control F (Optional) Remote Control Power Size Weight Infrared Remote Control unit, captured about three seconds after remote control shutter button is halfway pressed) Built-in flash P-TTL built-in front of view, Flash synchronization speed range at ISO200, with PENTAX dedicated flash.... or continuous as long as the shutter button is pressed or immediate capture on pressing the button, operating distance = within approx. 5 m in flash with serial control , GN 15.6 (ISO 200/m), Angles of coverage: 18 mm lens angle of the camera...

User Manual
Page 195
... Glossary 193 Appendix AdobeRGB Color space recommended by non-compatible software, the colors look lighter. In this camera, select from a computer. Alternatively, use the selftimer, the remote control unit, and the cable switch to determine exposure. The first one has no compensation, the second... is under-exposed and the third is open, the entire image appears as if flowing. Prevent camera shake by raising the sensitivity, ...
... Glossary 193 Appendix AdobeRGB Color space recommended by non-compatible software, the colors look lighter. In this camera, select from a computer. Alternatively, use the selftimer, the remote control unit, and the cable switch to determine exposure. The first one has no compensation, the second... is under-exposed and the third is open, the entire image appears as if flowing. Prevent camera shake by raising the sensitivity, ...

User Manual
Page 202
... 110 Rear Curtain Sync Flash ...... 157 [A Rec. Mode] Menu .... 98, 174 Recorded Pixels 31, 109 Red-eye reduction .......... 52, 157 Remaining image storage capacity 27 Remote Control 59 Reset 171, 172 Rotate 64 S Saturation 111 SD Memory Card 29 Select&Delete 75 Self-Timer 55 Sensitivity 115 Sepia...
... 110 Rear Curtain Sync Flash ...... 157 [A Rec. Mode] Menu .... 98, 174 Recorded Pixels 31, 109 Red-eye reduction .......... 52, 157 Remaining image storage capacity 27 Remote Control 59 Reset 171, 172 Rotate 64 S Saturation 111 SD Memory Card 29 Select&Delete 75 Self-Timer 55 Sensitivity 115 Sepia...