
UC-1 Manual
Page 2
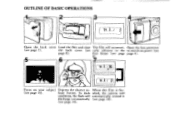
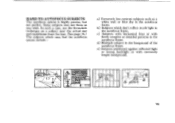
the back cover (see cally advance to the to switch on your subject (see page 13). When the film is fin- Open the back cover Load the film and close The film will automatica❑y rewind it (see page 8). Depress the shutter release button. ished, the camera will automati- In dark conditions, the flash will discharge automatically (see page 7). first frame (see page page 4). 8/ '943 36 O '94 3 Focus on power (see page 18). Open the lens protector (see page 14). OUTLINE OF BASIC OPERATIONS '94 3 ;
the back cover (see cally advance to the to switch on your subject (see page 13). When the film is fin- Open the back cover Load the film and close The film will automatica❑y rewind it (see page 8). Depress the shutter release button. ished, the camera will automati- In dark conditions, the flash will discharge automatically (see page 7). first frame (see page page 4). 8/ '943 36 O '94 3 Focus on power (see page 18). Open the lens protector (see page 14). OUTLINE OF BASIC OPERATIONS '94 3 ;
UC-1 Manual
Page 3
Also included are listed on your photographic enjoyment. This camera is a great companion to enhance your purchase of the PENTAX UC-1. The DATE model makes it easy to remember the dates when you took pictures. • Please read this manual carefully before operating the camera to ...
Also included are listed on your photographic enjoyment. This camera is a great companion to enhance your purchase of the PENTAX UC-1. The DATE model makes it easy to remember the dates when you took pictures. • Please read this manual carefully before operating the camera to ...
UC-1 Manual
Page 4
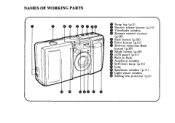
NAMES OF WORKING PARTS O el Strap lug (p.3) • Shutter release button (p.14) O Viewfinder window O Remote control receiver (p.28) oO Date button (p.33) Drive button (p.21) O Red-eye reduction flash button (p.20) 43 Mode button (p.20) O LCD panel (p.51) O Built-in flash ® Autofocus window Self-timer lamp (p.25) 031 Lens Spotbeam window (p.11) O• Light sensor window Sliding lens protector (p.4)
NAMES OF WORKING PARTS O el Strap lug (p.3) • Shutter release button (p.14) O Viewfinder window O Remote control receiver (p.28) oO Date button (p.33) Drive button (p.21) O Red-eye reduction flash button (p.20) 43 Mode button (p.20) O LCD panel (p.51) O Built-in flash ® Autofocus window Self-timer lamp (p.25) 031 Lens Spotbeam window (p.11) O• Light sensor window Sliding lens protector (p.4)
UC-1 Manual
Page 5
sure. • Do not apply force to strong vibrations, shock or pres- Damage of any kind will recover in normal temperatures. • Keep a spare battery on hand for extended periods in this operating manual are high such as leakage, overheating, explosions, etc. PRECAUTIONS FOR BATTERY The misuse of a battery can cause hazards such as in a bag, make sure the lens protector is closed : otherwise, battery power may be repaired under the terms of the warranty. do not dispose of the battery in low temperatures, but will not be wasted if the shutter release button is in...
sure. • Do not apply force to strong vibrations, shock or pres- Damage of any kind will recover in normal temperatures. • Keep a spare battery on hand for extended periods in this operating manual are high such as leakage, overheating, explosions, etc. PRECAUTIONS FOR BATTERY The misuse of a battery can cause hazards such as in a bag, make sure the lens protector is closed : otherwise, battery power may be repaired under the terms of the warranty. do not dispose of the battery in low temperatures, but will not be wasted if the shutter release button is in...
UC-1 Manual
Page 6
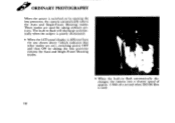
Ordinary photography 12 6. Viewfinder displays and shooting ranges 4. Lamp indications 1 5. Film loading 7 3. Taking pictures 13 7. Main switch and battery check 3. How to select modes /Red-eye reduction flash mode 20 Daylight-synchro shooting 22 Taking pictures at slow shutter speeds 23 Slow-shutter-speed-synch photography 23 Bulb shooting 24 Bulb-synchro shooting 24 Self-timer shooting 25 Using a wireless remote control 26 Panoramic format picture 30 DATE MODEL 33 MAINTENANCE CONSIDERATIONS Battery exhaustion warning 36 Installing/Replacing the...
Ordinary photography 12 6. Viewfinder displays and shooting ranges 4. Lamp indications 1 5. Film loading 7 3. Taking pictures 13 7. Main switch and battery check 3. How to select modes /Red-eye reduction flash mode 20 Daylight-synchro shooting 22 Taking pictures at slow shutter speeds 23 Slow-shutter-speed-synch photography 23 Bulb shooting 24 Bulb-synchro shooting 24 Self-timer shooting 25 Using a wireless remote control 26 Panoramic format picture 30 DATE MODEL 33 MAINTENANCE CONSIDERATIONS Battery exhaustion warning 36 Installing/Replacing the...
UC-1 Manual
Page 7
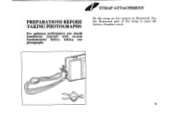
Use the illustrated part of the strap to open the battery chamber cover. 3 PREPARATIONS BEFORE TAKING PHOTOGRAPHS For optimum performance you should familiarize yourself with certain fundamentals before taking any photographs. STRAP ATTACHMENT Fit the strap on the camera as illustrated.
Use the illustrated part of the strap to open the battery chamber cover. 3 PREPARATIONS BEFORE TAKING PHOTOGRAPHS For optimum performance you should familiarize yourself with certain fundamentals before taking any photographs. STRAP ATTACHMENT Fit the strap on the camera as illustrated.
UC-1 Manual
Page 8
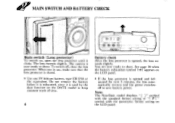
When not in use, make sure that the lens protector is exhausted, since it clicks. You are now ready to shoot. Note: The Non-Date model displays " [ " symbol with the standard format setting or "C P " symbol with the panoramic format setting on the LCD panel. The lens extends slightly. To switch off to save battery power. The camera is now ready to shoot. See page 36 when the battery exhaustion symbol (r.) appears on the LCD panel. • If the lens protector is opened , the lens extends slightly. MAIN SWITCH AND BATTERY CHECK -0)- 0)-) O Main switch (Lens protector) To ...
When not in use, make sure that the lens protector is exhausted, since it clicks. You are now ready to shoot. Note: The Non-Date model displays " [ " symbol with the standard format setting or "C P " symbol with the panoramic format setting on the LCD panel. The lens extends slightly. To switch off to save battery power. The camera is now ready to shoot. See page 36 when the battery exhaustion symbol (r.) appears on the LCD panel. • If the lens protector is opened , the lens extends slightly. MAIN SWITCH AND BATTERY CHECK -0)- 0)-) O Main switch (Lens protector) To ...
UC-1 Manual
Page 9
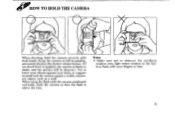
When using the flash with the camera positioned vertically, hold the camera securely with your body, or support yourself and the camera against a stable, stationary object, such as a wall. Note: • Make sure not to brace your elbows against your fingers or hair. 5 HOW TO HOLD THE CAMERA aw l When shooting, hold the camera so that the flash is likely to shake, and the picture will be blurred.) Try to obstruct the autofocus window, lens, light sensor window or the buiIt-in flash with both hands. Keep the camera as still as possible, and gently depress the shutter release ...
When using the flash with the camera positioned vertically, hold the camera securely with your body, or support yourself and the camera against a stable, stationary object, such as a wall. Note: • Make sure not to brace your elbows against your fingers or hair. 5 HOW TO HOLD THE CAMERA aw l When shooting, hold the camera so that the flash is likely to shake, and the picture will be blurred.) Try to obstruct the autofocus window, lens, light sensor window or the buiIt-in flash with both hands. Keep the camera as still as possible, and gently depress the shutter release ...
UC-1 Manual
Page 10
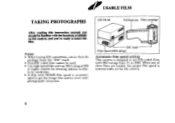
4110" USABLE FILM TAKING PHOTOGRAPHS DX FILM Perforations Film cart idge After reading this instruction manual you 're ready to 3200. When any of 800 or higher mainly for the camera. 6 BO , 0 0 0 0 0 0 0 0 0 i i i COON DX DX mark Film speed (ISO rating) Automatic film speed setting This camera is automatically set for shooting indoors in dimly-lit conditions. • A film with ISO ratings from 25 to insert the film. Notes: • When buying DX-coded films, ensure that the package bears the "DX" mark. • Non-DX coded film cannot be familiar with the functions ...
4110" USABLE FILM TAKING PHOTOGRAPHS DX FILM Perforations Film cart idge After reading this instruction manual you 're ready to 3200. When any of 800 or higher mainly for the camera. 6 BO , 0 0 0 0 0 0 0 0 0 i i i COON DX DX mark Film speed (ISO rating) Automatic film speed setting This camera is automatically set for shooting indoors in dimly-lit conditions. • A film with ISO ratings from 25 to insert the film. Notes: • When buying DX-coded films, ensure that the package bears the "DX" mark. • Non-DX coded film cannot be familiar with the functions ...
UC-1 Manual
Page 11
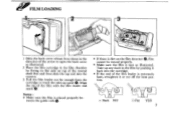
Take up spool 0. x Slack NO! FILM LOADING • (5) I Slide the back cover release lever down in the direction of the arrow to open the back cover as illustrated. tween the guide rails 9. • If there is dirt on top of the rewind shaft first and then slide the top end into the camera. 3 Pull the film leader out far enough from the cartridge to reach the take-up any slack in the film by pushing it back into the cartridge. • If the end of the film with the film leader end mark 0. Notes : • Make sure the film is taut as illustrated. 2 Place the film cartridge ...
Take up spool 0. x Slack NO! FILM LOADING • (5) I Slide the back cover release lever down in the direction of the arrow to open the back cover as illustrated. tween the guide rails 9. • If there is dirt on top of the rewind shaft first and then slide the top end into the camera. 3 Pull the film leader out far enough from the cartridge to reach the take-up any slack in the film by pushing it back into the cartridge. • If the end of the film with the film leader end mark 0. Notes : • Make sure the film is taut as illustrated. 2 Place the film cartridge ...
UC-1 Manual
Page 12
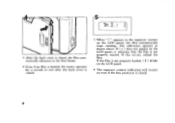
If the film is not properly loaded, ( E ) blinks on the LCD panel. • The exposure counter indication will remain on the LCD panel, the film automatically stops winding. If ( i ) does not appear on the LCD panel, it indicates that the film is closed . 5 When " / " appears in the exposure counter on even if the lens protector is not properly loaded. If this occurs, reload the film. The indication appears as shown above. '99 9. 1 4 After the back cover is closed, the film auto matically advances to the first frame. • Even if no film is loaded, the motor operates for a ...
If the film is not properly loaded, ( E ) blinks on the LCD panel. • The exposure counter indication will remain on the LCD panel, the film automatically stops winding. If ( i ) does not appear on the LCD panel, it indicates that the film is closed . 5 When " / " appears in the exposure counter on even if the lens protector is not properly loaded. If this occurs, reload the film. The indication appears as shown above. '99 9. 1 4 After the back cover is closed, the film auto matically advances to the first frame. • Even if no film is loaded, the motor operates for a ...
UC-1 Manual
Page 13
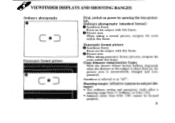
Panoramic format picture Autofocus frame Focus on the subject with this frame. 0 Picture area When taking a normal picture, compose the scene within this frame. Autofocus is automatically changed and compensated. Ordinary photography (standard format) Autofocus frame Focus on the subject with this frame. 0 Picture area When taking panoramic format pictures, compose the scene within this frame. Close distance compensation frame With the shutter release button halfway depressed, when the distance to as "AF". Shooting ranges (effective camera-to-subject distance) • The ...
Panoramic format picture Autofocus frame Focus on the subject with this frame. 0 Picture area When taking a normal picture, compose the scene within this frame. Autofocus is automatically changed and compensated. Ordinary photography (standard format) Autofocus frame Focus on the subject with this frame. 0 Picture area When taking panoramic format pictures, compose the scene within this frame. Close distance compensation frame With the shutter release button halfway depressed, when the distance to as "AF". Shooting ranges (effective camera-to-subject distance) • The ...

UC-1 Manual
Page 14
The shooting range from approx. 0.3m (lft) 10 to 0.6m (2ft). The shooting range from approx. 0.3m (l ft) to 0.6m (2ft). C II • When the close distance compensation frame appears in the viewfinder, the actual picture area shifts to Im (3.3ft). Close distance compensation frame Ordinary photography (Standard format) Panoramic format picture C II C II The shooting range from approx. 0.6m l.2ft) to the bottom and left sides without changing the size of the picture area.
The shooting range from approx. 0.3m (lft) 10 to 0.6m (2ft). The shooting range from approx. 0.3m (l ft) to 0.6m (2ft). C II • When the close distance compensation frame appears in the viewfinder, the actual picture area shifts to Im (3.3ft). Close distance compensation frame Ordinary photography (Standard format) Panoramic format picture C II C II The shooting range from approx. 0.6m l.2ft) to the bottom and left sides without changing the size of the picture area.
UC-1 Manual
Page 15
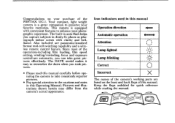
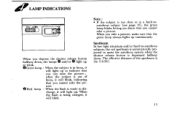
Ale LAMP INDICATIONS 1=1. .1= (oopa p&p arC When you depress the shutter release button halfway down . OGreen lamp : When the subject is ready to indicate that the green lamp always lights up or blink. Red lamp : When the flash is in focus, it will light up to discharge, it will light up. When you can take a picture, make sure that you take the picture ; Note : • If the subject is too close or is a hard-to assist the autofocus system when the shutter release button is automatically projected to - The effective distance of focus, it will blink, indicating that you...
Ale LAMP INDICATIONS 1=1. .1= (oopa p&p arC When you depress the shutter release button halfway down . OGreen lamp : When the subject is ready to indicate that the green lamp always lights up or blink. Red lamp : When the flash is in focus, it will light up to discharge, it will light up. When you can take a picture, make sure that you take the picture ; Note : • If the subject is too close or is a hard-to assist the autofocus system when the shutter release button is automatically projected to - The effective distance of focus, it will blink, indicating that you...
UC-1 Manual
Page 16
These modes are set), switching power OFF and then ON by sliding the lens protector restores the Auto and Single-Frame Shooting modes. • When the built-in flash automatically discharges, the camera uses a shutter speed of approx. 1/40th of a second when ISO l00 film is switched on by opening the lens protector, the camera automatically selects the Auto and Single-Frame Shooting modes. The built-in flash will discharge automatically when the subject is poorly illuminated. • When the LCD panel display is different from the one shown above (which indicates that other modes are used...
These modes are set), switching power OFF and then ON by sliding the lens protector restores the Auto and Single-Frame Shooting modes. • When the built-in flash automatically discharges, the camera uses a shutter speed of approx. 1/40th of a second when ISO l00 film is switched on by opening the lens protector, the camera automatically selects the Auto and Single-Frame Shooting modes. The built-in flash will discharge automatically when the subject is poorly illuminated. • When the LCD panel display is different from the one shown above (which indicates that other modes are used...
UC-1 Manual
Page 17
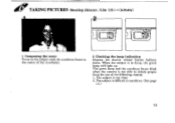
TAKING PICTURES Shooting distance : 0.3m (lft)-OO(infinity) AT 1 Composing the scene Focus on the subject with the autofocus frame in focus, the green lamp will light up. The subject is in the center of the following reasons. 1. When the subject is too close. 2. The green lamp and the autofocus frame blink when the camera is difficult to obtain proper focus for one of the viewfinder. 2 Checking the lamp indication Depress the shutter release button halfway down. The subject is not able to autofocus. (See page 15.) 13
TAKING PICTURES Shooting distance : 0.3m (lft)-OO(infinity) AT 1 Composing the scene Focus on the subject with the autofocus frame in focus, the green lamp will light up. The subject is in the center of the following reasons. 1. When the subject is too close. 2. The green lamp and the autofocus frame blink when the camera is difficult to obtain proper focus for one of the viewfinder. 2 Checking the lamp indication Depress the shutter release button halfway down. The subject is not able to autofocus. (See page 15.) 13
UC-1 Manual
Page 18
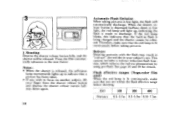
r. 3 Shooting Depress the shutter release button fully, and the shutter will automatically discharge. Then, the film automatically advances to focus on another subject, lift your subject's eye. Red-eye Shooting portraits with the flash may result in "red-eye", the red dot in your finger from the shutter release button and depress the shutter release button halfway down in low light, the flash will be released. Flash effective ranges (Nega-color film used) When the red lamp is lit continuously before shooting. ISO L Distance 100 200 400 0.3-3.7m 0.3-5.3m 0.35-7.5m See page ...
r. 3 Shooting Depress the shutter release button fully, and the shutter will automatically discharge. Then, the film automatically advances to focus on another subject, lift your subject's eye. Red-eye Shooting portraits with the flash may result in "red-eye", the red dot in your finger from the shutter release button and depress the shutter release button halfway down in low light, the flash will be released. Flash effective ranges (Nega-color film used) When the red lamp is lit continuously before shooting. ISO L Distance 100 200 400 0.3-3.7m 0.3-5.3m 0.35-7.5m See page ...
UC-1 Manual
Page 19
Some subjects may fool the autofocus system include : a) Extremely low-contrast subjects such as you wish. e) Subjects positioned against reflected light or strong backlight or with finely complex or detailed patterns in the autofocus frame. b) Subjects which may not focus as a white wall or blue sky in the autofocus frame. d) Multiple subject in the autofocus frame. HARD-TO-AUTOFOCUS SUBJECTS The autofocus system is highly precise, but not perfect. l- CJ 15 c) Subjects with horizontal lines or with extremely bright background. In such a case, use the focus-lock ...
Some subjects may fool the autofocus system include : a) Extremely low-contrast subjects such as you wish. e) Subjects positioned against reflected light or strong backlight or with finely complex or detailed patterns in the autofocus frame. b) Subjects which may not focus as a white wall or blue sky in the autofocus frame. d) Multiple subject in the autofocus frame. HARD-TO-AUTOFOCUS SUBJECTS The autofocus system is highly precise, but not perfect. l- CJ 15 c) Subjects with horizontal lines or with extremely bright background. In such a case, use the focus-lock ...
UC-1 Manual
Page 20
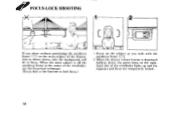
FOCUS-LOCK SHOOTING X C If you wish with the autofocus frame (0). 2 When the shutter release button is the function to lock focus.) I Focus on the subject as you shoot without positioning the autofocus frame (C)) on the righthand side of the illustration as shown above, only the background will be in the center of the viewfinder, use the focus-lock technique. (Focus lock is depressed halfway down, the green lamp on the main subject of the viewfinder lights up and the exposure and focus are temporarily locked. 16 When the main subject is off the autofocus frame in focus.
FOCUS-LOCK SHOOTING X C If you wish with the autofocus frame (0). 2 When the shutter release button is the function to lock focus.) I Focus on the subject as you shoot without positioning the autofocus frame (C)) on the righthand side of the illustration as shown above, only the background will be in the center of the viewfinder, use the focus-lock technique. (Focus lock is depressed halfway down, the green lamp on the main subject of the viewfinder lights up and the exposure and focus are temporarily locked. 16 When the main subject is off the autofocus frame in focus.
UC-1 Manual
Page 21
I II 3 While depressing the shutter release button halfway down, re-aim the camera or recompose the picture, then release the shutter. Note: • You can release focus lock simply by lifting your finger from the shutter release button. 17
I II 3 While depressing the shutter release button halfway down, re-aim the camera or recompose the picture, then release the shutter. Note: • You can release focus lock simply by lifting your finger from the shutter release button. 17
