
UC-1 Manual
Page 5
... "-F" and " -" sides facing correctly. • Never try to disassemble, short or recharge the battery. The battery should be repaired under the terms of the warranty. do not dispose of the battery in a fire, as it inoperable. NOTE Illustrations in this operating manual are high such as in... The electric circuitry inside of the camera may cause damage or render it may explode. • Battery performance may be wasted if the shutter release button is closed : otherwise, battery power may be temporarily hindered in low temperatures, but will not be inserted with great care. &#...
... "-F" and " -" sides facing correctly. • Never try to disassemble, short or recharge the battery. The battery should be repaired under the terms of the warranty. do not dispose of the battery in a fire, as it inoperable. NOTE Illustrations in this operating manual are high such as in... The electric circuitry inside of the camera may cause damage or render it may explode. • Battery performance may be wasted if the shutter release button is closed : otherwise, battery power may be temporarily hindered in low temperatures, but will not be inserted with great care. &#...
UC-1 Manual
Page 6
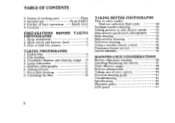
Strap attachment 2. Usable film 6 2. Main switch and battery check 3. TABLE OF CONTENTS • Names of working parts • Introduction • Outline of your camera 40 Practical shooting guide 42 Troubleshooting...synchro shooting 24 Self-timer shooting 25 Using a wireless remote control 26 Panoramic format picture 30 DATE MODEL 33 MAINTENANCE CONSIDERATIONS Battery exhaustion warning 36 Installing/Replacing the battery 37 Flash effective ranges 39 Red-eye phenomenon 39 Taking care of basic operations • Cautions Flaps Front foldout Inside cover...
Strap attachment 2. Usable film 6 2. Main switch and battery check 3. TABLE OF CONTENTS • Names of working parts • Introduction • Outline of your camera 40 Practical shooting guide 42 Troubleshooting...synchro shooting 24 Self-timer shooting 25 Using a wireless remote control 26 Panoramic format picture 30 DATE MODEL 33 MAINTENANCE CONSIDERATIONS Battery exhaustion warning 36 Installing/Replacing the battery 37 Flash effective ranges 39 Red-eye phenomenon 39 Taking care of basic operations • Cautions Flaps Front foldout Inside cover...
UC-1 Manual
Page 7
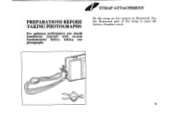
Use the illustrated part of the strap to open the battery chamber cover. 3 PREPARATIONS BEFORE TAKING PHOTOGRAPHS For optimum performance you should familiarize yourself with certain fundamentals before taking any photographs. STRAP ATTACHMENT Fit the strap on the camera as illustrated.
Use the illustrated part of the strap to open the battery chamber cover. 3 PREPARATIONS BEFORE TAKING PHOTOGRAPHS For optimum performance you should familiarize yourself with certain fundamentals before taking any photographs. STRAP ATTACHMENT Fit the strap on the camera as illustrated.
UC-1 Manual
Page 8
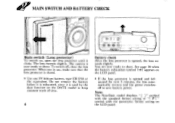
... the lens automatically retracts and the power switches off , close the lens protector. The camera is now ready to shoot. See page 36 when the battery exhaustion symbol (r.) appears on , open the lens protector until it is used by the date function on the LCD panel. MAIN SWITCH AND...) To switch on the LCD panel. • If the lens protector is opened , the lens extends slightly. The lens extends slightly. Do not remove the battery before it is exhausted, since it clicks. You are now ready to shoot. Note: The Non-Date model displays " [ " symbol with the standard format ...
... the lens automatically retracts and the power switches off , close the lens protector. The camera is now ready to shoot. See page 36 when the battery exhaustion symbol (r.) appears on , open the lens protector until it is used by the date function on the LCD panel. MAIN SWITCH AND...) To switch on the LCD panel. • If the lens protector is opened , the lens extends slightly. The lens extends slightly. Do not remove the battery before it is exhausted, since it clicks. You are now ready to shoot. Note: The Non-Date model displays " [ " symbol with the standard format ...
UC-1 Manual
Page 31
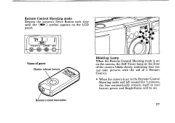
Remote Control Shooting mode Depress the camera's Drive Button each time until the (am ) symbol appears on the LCD panel. '9L 3Tr. I N7AAJUST Game DAT 0 0 Name of parts Shutter release button "42.. ...s•
Remote Control Shooting mode Depress the camera's Drive Button each time until the (am ) symbol appears on the LCD panel. '9L 3Tr. I N7AAJUST Game DAT 0 0 Name of parts Shutter release button "42.. ...s•
UC-1 Manual
Page 33
If the battery is exhausted, please have it replaced at your local Pentax Service center (there is a charge for this case, use the camera's shutter release button in the Self-Timer mode to take pictures. • The Remote ... camera's front : within approx.5 m (16.5ft) straight in front of the camera • The Remote Control may not work while the built-in a backlight situation. Battery life on the Remote Control About 30,000 commands can be issued using the Remote Control with...
If the battery is exhausted, please have it replaced at your local Pentax Service center (there is a charge for this case, use the camera's shutter release button in the Self-Timer mode to take pictures. • The Remote ... camera's front : within approx.5 m (16.5ft) straight in front of the camera • The Remote Control may not work while the built-in a backlight situation. Battery life on the Remote Control About 30,000 commands can be issued using the Remote Control with...
UC-1 Manual
Page 38
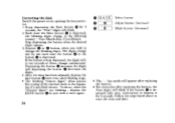
... digits and depressing the button 0 decreases the digits. 4. Select button Adjust button (increase) Mode button (decrease) • The- -- -bar marks will appear after replacing the battery. • For correction after replacing the battery, the Year digits will blink if the button 0 is kept depressed, the digits will blink. 2.
... digits and depressing the button 0 decreases the digits. 4. Select button Adjust button (increase) Mode button (decrease) • The- -- -bar marks will appear after replacing the battery. • For correction after replacing the battery, the Year digits will blink if the button 0 is kept depressed, the digits will blink. 2.
UC-1 Manual
Page 40
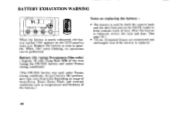
... performed. of Auto-Focus, Power Zoom, Flash, and external conditions such as possible. Battery life (using 24-exposure film rolls) : Approx. 30 rolls Using flash 50% of the time (using the CR123A battery and under Pentax testing conditions) (The CR123A battery was used by both the camera body and the date function on the...
... performed. of Auto-Focus, Power Zoom, Flash, and external conditions such as possible. Battery life (using 24-exposure film rolls) : Approx. 30 rolls Using flash 50% of the time (using the CR123A battery and under Pentax testing conditions) (The CR123A battery was used by both the camera body and the date function on the...
UC-1 Manual
Page 41
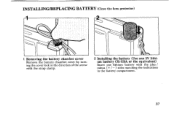
INSTALLING/REPLACING BATTERY (Close the lens protector) 1 Removing the battery chamber cover Remove the battery chamber cover by turning the cover lock in the direction of the arrow with the strap clamp. 2 Installing the battery (Use one 3V lithium battery CR-123A or the equivalent) Insert one lithium battery with the plus / minus (+ / - ) sides matching the indications in the battery compartment. 37
INSTALLING/REPLACING BATTERY (Close the lens protector) 1 Removing the battery chamber cover Remove the battery chamber cover by turning the cover lock in the direction of the arrow with the strap clamp. 2 Installing the battery (Use one 3V lithium battery CR-123A or the equivalent) Insert one lithium battery with the plus / minus (+ / - ) sides matching the indications in the battery compartment. 37
UC-1 Manual
Page 42
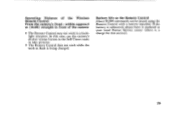
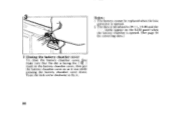
marks appear on the LCD panel when the battery chamber is opened . 2 The data is facing the ( mark on the battery chamber cover, then put the battery chamber cover on as it . 38 Turn the lock screw clockwise to 94 1 1, 1 0:00 and the . -- - - Notes : 1 The battery cannot be replaced when the lens protector is opened . (See page 34 for correcting data.) 3 Closing the battery chamber cover e ) To close the battery chamber cover, first make sure that the dot is initialized to fix it was while pressing the battery chamber cover down.
marks appear on the LCD panel when the battery chamber is opened . 2 The data is facing the ( mark on the battery chamber cover, then put the battery chamber cover on as it . 38 Turn the lock screw clockwise to 94 1 1, 1 0:00 and the . -- - - Notes : 1 The battery cannot be replaced when the lens protector is opened . (See page 34 for correcting data.) 3 Closing the battery chamber cover e ) To close the battery chamber cover, first make sure that the dot is initialized to fix it was while pressing the battery chamber cover down.
UC-1 Manual
Page 45
Compose your camera inspected at a Pentax service center. If the camera has not been used for an extended period, or is being prepared for battery leakage, traces of dirt or grease, or corrosion due to 14° F). • Electrical problems may often be caused by water, dirt or dust at ... appears on the extreme edges of the film frame. • The temperature range at which this nature are not covered under the terms of the Pentax warranty. 41
Compose your camera inspected at a Pentax service center. If the camera has not been used for an extended period, or is being prepared for battery leakage, traces of dirt or grease, or corrosion due to 14° F). • Electrical problems may often be caused by water, dirt or dust at ... appears on the extreme edges of the film frame. • The temperature range at which this nature are not covered under the terms of the Pentax warranty. 41

UC-1 Manual
Page 48
... the lens protector closed? If so, the film has been used up. The lens automatically retracts to save battery power. (See page 27.) 44 Replace it if it . (See page 4.) • Is the battery exhausted? Symptoms 1.The shutter cannot he released. Insert a new roll. (See page 18.) 2.My printed pictures don't look...
... the lens protector closed? If so, the film has been used up. The lens automatically retracts to save battery power. (See page 27.) 44 Replace it if it . (See page 4.) • Is the battery exhausted? Symptoms 1.The shutter cannot he released. Insert a new roll. (See page 18.) 2.My printed pictures don't look...
UC-1 Manual
Page 51
...Remote control : Infrared wireless remote control, Effective range : 5m when projected from the camera's front. One lithium battery CR123A or the equivalent. Battery exhaustion ( a ) appears on by the Pentax Service facility). 22.0 (W) X 50.0 (L) X 9.5 (D), 0.9" X 2.0 X 0.4", 9g (0.3oz) including ...sec.), Flash-OFF= Flash override, Bulb- Imprinting method : From front of shooting uses flash (under Pentax testing conditinos. Power source for Remote : Size & weight for One lithium battery CR1620 (replaced by half depression of the shutter release switch : Flash : button. Size & weight ...
...Remote control : Infrared wireless remote control, Effective range : 5m when projected from the camera's front. One lithium battery CR123A or the equivalent. Battery exhaustion ( a ) appears on by the Pentax Service facility). 22.0 (W) X 50.0 (L) X 9.5 (D), 0.9" X 2.0 X 0.4", 9g (0.3oz) including ...sec.), Flash-OFF= Flash override, Bulb- Imprinting method : From front of shooting uses flash (under Pentax testing conditinos. Power source for Remote : Size & weight for One lithium battery CR1620 (replaced by half depression of the shutter release switch : Flash : button. Size & weight ...
UC-1 Manual
Page 52
... authorized representatives shall not be liable for any kind, whether caused by defective material or workmanship or otherwise ; If your Pentax was purchased outside of the country where you wish to have it will take a considerable length of time before the equipment... equipment does not show evidence of impact, sand or liquid damage, mishandling, tampering, battery or chemical corrosion, operation contrary to operating instructions, or modification by the manufacturer's representatives in your Pentax returned to the manufacturer will be made with postage prepaid. WARRANTY POLICY All...
... authorized representatives shall not be liable for any kind, whether caused by defective material or workmanship or otherwise ; If your Pentax was purchased outside of the country where you wish to have it will take a considerable length of time before the equipment... equipment does not show evidence of impact, sand or liquid damage, mishandling, tampering, battery or chemical corrosion, operation contrary to operating instructions, or modification by the manufacturer's representatives in your Pentax returned to the manufacturer will be made with postage prepaid. WARRANTY POLICY All...

UC-1 Manual
Page 54
NAMES OF WORKING PARTS i t 0 a 0 50 ® Panorama mode selector switch (p.30) e0 Viewfinder eyepiece Green lamp indication (p.11) ®0 Red lamp indication (p.11) Film information window e Back cover release lever (p.7) e49 Tripod socket Battery chamber cover ® (p.37) Back cover (p.7) J
NAMES OF WORKING PARTS i t 0 a 0 50 ® Panorama mode selector switch (p.30) e0 Viewfinder eyepiece Green lamp indication (p.11) ®0 Red lamp indication (p.11) Film information window e Back cover release lever (p.7) e49 Tripod socket Battery chamber cover ® (p.37) Back cover (p.7) J
UC-1 Manual
Page 55
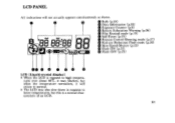
... when the temperature normalizes, it will not actually appears simultaneously as shown. ...„„ 'Ele Be!BB 69 Bulb (p.24) Q Data Information (p.33) e Exposure Counter (p.8) Battery Exhaustion Warning (p.36) e Film Rewind mode (p.19) Self-Timer (p.25) (9 Remote Control Shooting mode (p.27) Red-eye Reduction Flash mode (p.20) Slow-Speed-Shutter (p.23...
... when the temperature normalizes, it will not actually appears simultaneously as shown. ...„„ 'Ele Be!BB 69 Bulb (p.24) Q Data Information (p.33) e Exposure Counter (p.8) Battery Exhaustion Warning (p.36) e Film Rewind mode (p.19) Self-Timer (p.25) (9 Remote Control Shooting mode (p.27) Red-eye Reduction Flash mode (p.20) Slow-Speed-Shutter (p.23...


