
IQZoom 60S Manual
Page 5
Fig. 5 POWER C) , _ Fig. 8 Lc: 00900000000000 T 000000 Fig. 6 POWER (a) Cars Fig. 7 POWER (5 1\ 0.11.11 -7,-..,'s eo Fig. 9 Fig. 10 4
Fig. 5 POWER C) , _ Fig. 8 Lc: 00900000000000 T 000000 Fig. 6 POWER (a) Cars Fig. 7 POWER (5 1\ 0.11.11 -7,-..,'s eo Fig. 9 Fig. 10 4
IQZoom 60S Manual
Page 7
... INSERTING THE BATTERY 11 CHECKING THE BATTERY 11 SETTING THE FILM SPEED 12 LOADING THE FILM 12 AUTO POWER SAVING SYSTEM 13 HOLDING THE CAMERA 13 TAKING A PICTURE 14 AUTOMATIC FLASH PHOTOGRAPHY..15 AUTOMATIC EXPOSURE(AE) LOCK ....15 MODE SELECTION & LCD PANEL 16 AUTO FLASH MODE 17 RED EYE REDUCTION MODE 17 FILL-IN MODE 18 FLASH-OFF MODE 18 USING THE SELF-TIMER 19 AUTO FILM REWIND 19 MID-ROLL REWIND 19 DATE IMPRINTING (DATE MODEL ONLY) 20 DATE PRINT SETTING 20 DATE AND TIME ADJUSTMENT 20 SPECIFICATIONS...
... INSERTING THE BATTERY 11 CHECKING THE BATTERY 11 SETTING THE FILM SPEED 12 LOADING THE FILM 12 AUTO POWER SAVING SYSTEM 13 HOLDING THE CAMERA 13 TAKING A PICTURE 14 AUTOMATIC FLASH PHOTOGRAPHY..15 AUTOMATIC EXPOSURE(AE) LOCK ....15 MODE SELECTION & LCD PANEL 16 AUTO FLASH MODE 17 RED EYE REDUCTION MODE 17 FILL-IN MODE 18 FLASH-OFF MODE 18 USING THE SELF-TIMER 19 AUTO FILM REWIND 19 MID-ROLL REWIND 19 DATE IMPRINTING (DATE MODEL ONLY) 20 DATE PRINT SETTING 20 DATE AND TIME ADJUSTMENT 20 SPECIFICATIONS...
IQZoom 60S Manual
Page 8
... the battery. Be part particularly careful with the flash around your neck is danger of electric shock. • Wrapping the strap around the infants. • Never try to disassemble the camera your self. • Never touch internal parts of children. Also, do not the strap caught their neck. • Be sure to burn yourself during removal. FOR SAFE USE OF YOUR CAMERA...
... the battery. Be part particularly careful with the flash around your neck is danger of electric shock. • Wrapping the strap around the infants. • Never try to disassemble the camera your self. • Never touch internal parts of children. Also, do not the strap caught their neck. • Be sure to burn yourself during removal. FOR SAFE USE OF YOUR CAMERA...
IQZoom 60S Manual
Page 9
... not remove it to a Pentax service center for inspection. • Be careful not to subject the camera to disassemble the camera yourself. 8 To clean the external camera surfaces, - ference is recommended. • The electric circuits inside the camera contain high voltage working parts. Store it to hit a solid object. using a dry...In such a case, put the camera into a case or plastic bag so that any changes in contact with rain, water or any other liquid, because the camera is taken from the bag until temperature has stabilized. If the camera suffers a severe shock or impact,...
... not remove it to a Pentax service center for inspection. • Be careful not to subject the camera to disassemble the camera yourself. 8 To clean the external camera surfaces, - ference is recommended. • The electric circuits inside the camera contain high voltage working parts. Store it to hit a solid object. using a dry...In such a case, put the camera into a case or plastic bag so that any changes in contact with rain, water or any other liquid, because the camera is taken from the bag until temperature has stabilized. If the camera suffers a severe shock or impact,...
IQZoom 60S Manual
Page 10
... a spare battery on hand for replacement convenience when shooting outdoors or while traveling. • Be sure to the instructions outlined in this manual, charges will be assessed or a repair quotation will be provided. The battery should be repaired at no charge under the term of the warranty. PRECAUTIONS FOR BATTERY USAGE • Use two AA-size alkaline batteries. • Ni-cd battery cannot be...
... a spare battery on hand for replacement convenience when shooting outdoors or while traveling. • Be sure to the instructions outlined in this manual, charges will be assessed or a repair quotation will be provided. The battery should be repaired at no charge under the term of the warranty. PRECAUTIONS FOR BATTERY USAGE • Use two AA-size alkaline batteries. • Ni-cd battery cannot be...
IQZoom 60S Manual
Page 11
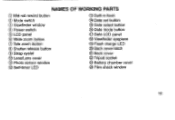
NAMES OF WORKING PARTS ©® 0 ® Mid-roll rewind button © Mode switch ® Viewfinder window ® Power switch © LCD panel ® Wide zoom button 0 Tele zoom button ® Shutter release button ® Strap eyelet Q Lens/Lens cover 0 Photo sensor window Self-timer LED is Built-in flash © Date set button Date select button 8 Date mode button Date LCD panel g Viewfinder eyepiece g Flash charge LED @ Back cover latch ® Back cover 0 Tripod socket a6 Battery chamber cover Film check window 10
NAMES OF WORKING PARTS ©® 0 ® Mid-roll rewind button © Mode switch ® Viewfinder window ® Power switch © LCD panel ® Wide zoom button 0 Tele zoom button ® Shutter release button ® Strap eyelet Q Lens/Lens cover 0 Photo sensor window Self-timer LED is Built-in flash © Date set button Date select button 8 Date mode button Date LCD panel g Viewfinder eyepiece g Flash charge LED @ Back cover latch ® Back cover 0 Tripod socket a6 Battery chamber cover Film check window 10

IQZoom 60S Manual
Page 12
... film before replacing the battery. INSERTING THE BATTERY 1. The half battery mark (ED) is displayed if the battery is displayed on the camera. When (ED) shown there is enough power to finish a roll of the battery is nearly exhausted. Insert the small loop at each power on the battery are aligned according to use it for a long period time. Push the battery chamber cover latch toward the open direction...
... film before replacing the battery. INSERTING THE BATTERY 1. The half battery mark (ED) is displayed if the battery is displayed on the camera. When (ED) shown there is enough power to finish a roll of the battery is nearly exhausted. Insert the small loop at each power on the battery are aligned according to use it for a long period time. Push the battery chamber cover latch toward the open direction...
IQZoom 60S Manual
Page 13
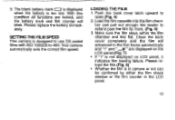
.... 6) 3. SETTING THE FILM SPEED This camera is not displayed on the LCD panel.(Fig. 7) • If "1" is designed to use DX-coded films with ISO 100/200 to 400. Close the back cover completely and the film will blink. Please reload the film.(Fig. 8) • Whether the film is too low. LOADING THE FILM 1. With this condition all functions are locked, and the battery mark and film...
.... 6) 3. SETTING THE FILM SPEED This camera is not displayed on the LCD panel.(Fig. 7) • If "1" is designed to use DX-coded films with ISO 100/200 to 400. Close the back cover completely and the film will blink. Please reload the film.(Fig. 8) • Whether the film is too low. LOADING THE FILM 1. With this condition all functions are locked, and the battery mark and film...
IQZoom 60S Manual
Page 14
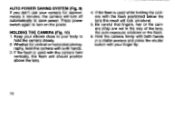
... your elbows close to your body to save power. If the flash is used with both hands. 3. Be careful that fingers, hair or the camera strap are not in a stable posture and press the shutter button with the flash positioned below the lens the result will turn on the power. AUTO POWER SAVING SYSTEM (Fig. 9) If you don't use your camera for vertical or horizontal...
... your elbows close to your body to save power. If the flash is used with both hands. 3. Be careful that fingers, hair or the camera strap are not in a stable posture and press the shutter button with the flash positioned below the lens the result will turn on the power. AUTO POWER SAVING SYSTEM (Fig. 9) If you don't use your camera for vertical or horizontal...

IQZoom 60S Manual
Page 15
... lightly with 35mm focal length). The lens will extend to take the picture; Press the power switch. The lens cover will open, and the lens barrel will zoom to the telephoto position if you push the zoom button W (35mm wide angle position). 4. Turn off . • Shooting distance: 35mm : 1.2m - The lens will appear. Look into camera. • If the camera is dirty or dusty. 2. OO) 60mm : 1.8m - (5.9ft O.) 14 Press the shutter release button...
... lightly with 35mm focal length). The lens will extend to take the picture; Press the power switch. The lens cover will open, and the lens barrel will zoom to the telephoto position if you push the zoom button W (35mm wide angle position). 4. Turn off . • Shooting distance: 35mm : 1.2m - The lens will appear. Look into camera. • If the camera is dirty or dusty. 2. OO) 60mm : 1.8m - (5.9ft O.) 14 Press the shutter release button...
IQZoom 60S Manual
Page 16
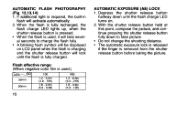
... panel when the flash is removed from the shutter release button before taking the picture. When the flash is fully recharged, the flash charge LED lights up, when the shutter release button is pressed. • When the flash is used , it will activate automatically. 2. Flash effective range: When negative color film is used .) Lens ISO 35mm 60mm 100 1.2 - 3.2m (3.9 - 10ft) 1.8 - 2.0m (5.9 - 6.6ft) 400 1.2 - 6.3m (3.9 - 21tt) 1.8 - 3.9m (5.9 - 13tt) 15 AUTOMATIC EXPOSURE (AE) LOCK 1.
... panel when the flash is removed from the shutter release button before taking the picture. When the flash is fully recharged, the flash charge LED lights up, when the shutter release button is pressed. • When the flash is used , it will activate automatically. 2. Flash effective range: When negative color film is used .) Lens ISO 35mm 60mm 100 1.2 - 3.2m (3.9 - 10ft) 1.8 - 2.0m (5.9 - 6.6ft) 400 1.2 - 6.3m (3.9 - 21tt) 1.8 - 3.9m (5.9 - 13tt) 15 AUTOMATIC EXPOSURE (AE) LOCK 1.

IQZoom 60S Manual
Page 17
... the camera is turned on the auto flash mode will be automatically selected. When the camera is on mode (fill in flash) (user decides to use flash) Flash-off mode (user decides not to select one of the selected modes and displays are as following: Auto mode (automatic self activating flash) (camera decides whether or not to use flash) Red-eye reduction mode (flash as auto mode) Flash-on . MODE SELECTION & LCD PANEL (Fig.15) Press the mode switch to use flash) Self-timer mode (flash auto mode...
... the camera is turned on the auto flash mode will be automatically selected. When the camera is on mode (fill in flash) (user decides to use flash) Flash-off mode (user decides not to select one of the selected modes and displays are as following: Auto mode (automatic self activating flash) (camera decides whether or not to use flash) Red-eye reduction mode (flash as auto mode) Flash-on . MODE SELECTION & LCD PANEL (Fig.15) Press the mode switch to use flash) Self-timer mode (flash auto mode...
IQZoom 60S Manual
Page 18
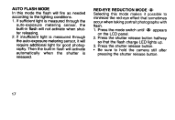
... photographs with flash. 1. If insufficient light is measured through the auto-exposure metering sensor, the built-in flash will activate automatically when the shutter is measured through the auto-exposure metering sensor, it possible to minimize the red-eye effect that the flash charge LED lights up. 3. Press the shutter release button. • Be sure to hold the camera still after pressing the shutter release button. 17 AUTO FLASH MODE In this mode makes...
... photographs with flash. 1. If insufficient light is measured through the auto-exposure metering sensor, the built-in flash will activate automatically when the shutter is measured through the auto-exposure metering sensor, it possible to minimize the red-eye effect that the flash charge LED lights up. 3. Press the shutter release button. • Be sure to hold the camera still after pressing the shutter release button. 17 AUTO FLASH MODE In this mode makes...
IQZoom 60S Manual
Page 19
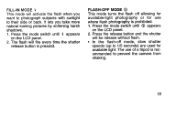
The flash will fire every time the shutter release button is recommended to prevent the camera from shaking. 18 Press the mode switch until appears on the LCD panel. 2. The use where flash photography is prohibited. 1. Press the mode switch until f appears on the LCD panel. 2. FLASH-OFF MODE This mode turns the flash off mode, slow shutter speeds (up to their side or back. It lets you want to photograph...
The flash will fire every time the shutter release button is recommended to prevent the camera from shaking. 18 Press the mode switch until appears on the LCD panel. 2. The use where flash photography is prohibited. 1. Press the mode switch until f appears on the LCD panel. 2. FLASH-OFF MODE This mode turns the flash off mode, slow shutter speeds (up to their side or back. It lets you want to photograph...
IQZoom 60S Manual
Page 20
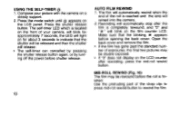
... front of exposures, the final two pictures may be released and then the shutter will light on the LCD panel. Press the mode switch until 0 appears on for approximately 7 seconds, the LED will release. • The self-timer can cancelled by pressing the shutter release button again, or by turning off the power before shutter release. 19 AUTO FILM REWIND 1. Make sure that the shutter will be rewound before opening the back cover. USING THE SELF-TIMER 6 1.
... front of exposures, the final two pictures may be released and then the shutter will light on the LCD panel. Press the mode switch until 0 appears on for approximately 7 seconds, the LED will release. • The self-timer can cancelled by pressing the shutter release button again, or by turning off the power before shutter release. 19 AUTO FILM REWIND 1. Make sure that the shutter will be rewound before opening the back cover. USING THE SELF-TIMER 6 1.

IQZoom 60S Manual
Page 21
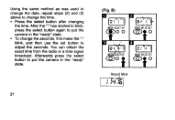
A) AUTO DATE N DE SELECT SET OO '0 i `4 ; +Year/Month/Day '0 1 1B +Day/Hour/Minute +Non Record I 71 I LI +Month/Day/Year ; '0 1 I Day/MonthNear DATE AND TIME ADJUSTMENT (Fig. The camera is set button to display the day, hour, and minute. 20 ing the battery. (Fig. B) (1) Press the mode button until the desired number is now ready to choose which number blinks. (3) Press the set . (1) Repeat steps (2) and (3) until the year, month...
A) AUTO DATE N DE SELECT SET OO '0 i `4 ; +Year/Month/Day '0 1 1B +Day/Hour/Minute +Non Record I 71 I LI +Month/Day/Year ; '0 1 I Day/MonthNear DATE AND TIME ADJUSTMENT (Fig. The camera is set button to display the day, hour, and minute. 20 ing the battery. (Fig. B) (1) Press the mode button until the desired number is now ready to choose which number blinks. (3) Press the set . (1) Repeat steps (2) and (3) until the year, month...
IQZoom 60S Manual
Page 22
... to put the camera in the "ready" state. • To change the time. • Press the select button after changing the time. You can obtain the exact time from the radio or a time signal broadcast. Using the same method as was used to change the date, repeat steps (2) and (3) above to change the seconds, first make the ":" blink, and then use the set button to adjust the seconds.
... to put the camera in the "ready" state. • To change the time. • Press the select button after changing the time. You can obtain the exact time from the radio or a time signal broadcast. Using the same method as was used to change the date, repeat steps (2) and (3) above to change the seconds, first make the ":" blink, and then use the set button to adjust the seconds.
IQZoom 60S Manual
Page 23
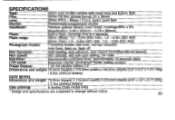
...22 Film: 35mm DX film; picture format: 24 x 36mm Lens: 35mm /F6.3 - 60mm / F10.2, motor zoom lens Shutter: Electronically-programmed shutter Viewfinder: Reverse galilean albada zoom finder; coverage:80% ± 5% Magnification: 0.49 x (35mm) - 0.78 x (60mm) Flash: Built-in flash, recharge time is 4 seconds Flash range: 35mm (Wide): 1.2 - 3.2m (ISO 100) ; 1.2 - 6.3m (ISO 400) 60mm (Tele): 1.8 - 2.0m (ISO 100) ; 1.8 - 3.9m (ISO 400) Photograph modes: Functional modes: self timer, red-eye reduction Auto flash, flash on, flash off Film transport: Auto loading, auto advance, auto...
...22 Film: 35mm DX film; picture format: 24 x 36mm Lens: 35mm /F6.3 - 60mm / F10.2, motor zoom lens Shutter: Electronically-programmed shutter Viewfinder: Reverse galilean albada zoom finder; coverage:80% ± 5% Magnification: 0.49 x (35mm) - 0.78 x (60mm) Flash: Built-in flash, recharge time is 4 seconds Flash range: 35mm (Wide): 1.2 - 3.2m (ISO 100) ; 1.2 - 6.3m (ISO 400) 60mm (Tele): 1.8 - 2.0m (ISO 100) ; 1.8 - 3.9m (ISO 400) Photograph modes: Functional modes: self timer, red-eye reduction Auto flash, flash on, flash off Film transport: Auto loading, auto advance, auto...

IQZoom 60S Manual
Page 24
...replaced without cost to you purchased the equipment or to operating instructions, or modification by defective material or workmanship or otherwise; The manufacturer or its written consent and shall not be liable for damages from delay or loss of use or from other indirect or consequential damages of parts...liquid damage, mishandling, tampering, battery or chemical corrosion, operation contrary to the manufacturer. Service will be rendered, and defective parts will take a considerable length of purchase. WARRANTY POLICY All Pentax cameras purchased through authorized bona fide ...
...replaced without cost to you purchased the equipment or to operating instructions, or modification by defective material or workmanship or otherwise; The manufacturer or its written consent and shall not be liable for damages from delay or loss of use or from other indirect or consequential damages of parts...liquid damage, mishandling, tampering, battery or chemical corrosion, operation contrary to the manufacturer. Service will be rendered, and defective parts will take a considerable length of purchase. WARRANTY POLICY All Pentax cameras purchased through authorized bona fide ...
IQZoom 60S Manual
Page 25
... the manufacturer. If the equipment is covered by warranty, repairs will be made and parts replaced free of the warranty policy. 24 Therefore, we recommend that you upon completion of its representatives will be returned to you review the warranty card supplied with the servicing. Always obtain a quotation for more information and to receive a copy of charge, and the...
... the manufacturer. If the equipment is covered by warranty, repairs will be made and parts replaced free of the warranty policy. 24 Therefore, we recommend that you upon completion of its representatives will be returned to you review the warranty card supplied with the servicing. Always obtain a quotation for more information and to receive a copy of charge, and the...


