
WVSF332 User Guide
Page 1
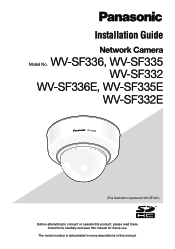
The model number is abbreviated in some descriptions in this manual for future use. Installation Guide Network Camera Model No. WV-SF336, WV-SF335 WV-SF332 WV-SF336E, WV-SF335E WV-SF332E WV-SF336 (This illustration represents WV-SF336.) Before attempting to connect or operate this product, please read these instructions carefully and save this manual.
The model number is abbreviated in some descriptions in this manual for future use. Installation Guide Network Camera Model No. WV-SF336, WV-SF335 WV-SF332 WV-SF336E, WV-SF335E WV-SF332E WV-SF336 (This illustration represents WV-SF336.) Before attempting to connect or operate this product, please read these instructions carefully and save this manual.
WVSF332 User Guide
Page 6
...HEREIN, AT ANY TIME, FOR THE IMPROVEMENTS OF THIS PUBLICATION AND/OR THE CORRESPONDING PRODUCT (S). Limitation of warranty IN NO EVENT SHALL Panasonic System Networks Co., Ltd. Disclaimer of liability THIS PUBLICATION IS PROVIDED "AS IS" WITHOUT WARRANTY OF ANY KIND, EITHER EXPRESS OR IMPLIED, INCLUDING... FOR DAMAGES, BROUGHT BY ANY PERSON OR ORGANIZATION BEING A PHOTOGENIC SUBJECT, DUE TO VIOLATION OF PRIVACY WITH THE RESULT OF THAT SURVEILLANCE-CAMERA'S PICTURE, INCLUDING SAVED DATA, FOR SOME REASON, BECOMES PUBLIC OR IS USED FOR THE PURPOSE OTHER THAN SURVEILLANCE; (7) LOSS OF REGISTERED...
...HEREIN, AT ANY TIME, FOR THE IMPROVEMENTS OF THIS PUBLICATION AND/OR THE CORRESPONDING PRODUCT (S). Limitation of warranty IN NO EVENT SHALL Panasonic System Networks Co., Ltd. Disclaimer of liability THIS PUBLICATION IS PROVIDED "AS IS" WITHOUT WARRANTY OF ANY KIND, EITHER EXPRESS OR IMPLIED, INCLUDING... FOR DAMAGES, BROUGHT BY ANY PERSON OR ORGANIZATION BEING A PHOTOGENIC SUBJECT, DUE TO VIOLATION OF PRIVACY WITH THE RESULT OF THAT SURVEILLANCE-CAMERA'S PICTURE, INCLUDING SAVED DATA, FOR SOME REASON, BECOMES PUBLIC OR IS USED FOR THE PURPOSE OTHER THAN SURVEILLANCE; (7) LOSS OF REGISTERED...
WVSF332 User Guide
Page 7
...Aspect ratio of 4:3), 640 x 360 (Aspect ratio of the PC and its network environment to monitor images from the camera can be simultaneously provided. * Either H.264 or MPEG-4 is necessary to configure the network settings of 16:9)) • Compatible with this notation are available when using ...describing the functions limited for specified models. Preface The network cameras WV-SF330 series are designed to operate using a PC on a PC via a network. By connecting to a network (LAN) or the Internet, images and audio from the camera on the PC. SF336 SF335 SF332 The functions with...
...Aspect ratio of 4:3), 640 x 360 (Aspect ratio of the PC and its network environment to monitor images from the camera can be simultaneously provided. * Either H.264 or MPEG-4 is necessary to configure the network settings of 16:9)) • Compatible with this notation are available when using ...describing the functions limited for specified models. Preface The network cameras WV-SF330 series are designed to operate using a PC on a PC via a network. By connecting to a network (LAN) or the Internet, images and audio from the camera on the PC. SF336 SF335 SF332 The functions with...

WVSF332 User Guide
Page 8
...the latest Adobe® Reader® from the PC to save H.264 videos and JPEG images on the SDHC/SD memory card manually at a network failure occurrence. (Download is possible.) * Recommended SDHC/SD memory card (☞ page 42) About the user manuals There are 2 sets of operating...to perform the settings and how to operate this function indicates the best focus position. A.) function SF335 SF332 During the manual focus adjustment, this camera. "WV-SF336, WV-SF335, WV-SF332" or "SF336, SF335, SF332" shown in the instructions and illustrations used in these operating instructions ...
...the latest Adobe® Reader® from the PC to save H.264 videos and JPEG images on the SDHC/SD memory card manually at a network failure occurrence. (Download is possible.) * Recommended SDHC/SD memory card (☞ page 42) About the user manuals There are 2 sets of operating...to perform the settings and how to operate this function indicates the best focus position. A.) function SF335 SF332 During the manual focus adjustment, this camera. "WV-SF336, WV-SF335, WV-SF332" or "SF336, SF335, SF332" shown in the instructions and illustrations used in these operating instructions ...
WVSF332 User Guide
Page 10
..., anti-spyware program, etc.). • Protect your attention is called to the following security risks. Network security As you will use this unit in locations where the camera or the cables can be trademarks or registered trademarks of their respective owners. q Leakage or theft of... to close the browser for added security. • Change the administrator password periodically for added security. • Do not install the camera in a network secured by a firewall, etc. • If this unit is connected to protect yourself against leakage or theft of the software provided with...
..., anti-spyware program, etc.). • Protect your attention is called to the following security risks. Network security As you will use this unit in locations where the camera or the cables can be trademarks or registered trademarks of their respective owners. q Leakage or theft of... to close the browser for added security. • Change the administrator password periodically for added security. • Do not install the camera in a network secured by a firewall, etc. • If this unit is connected to protect yourself against leakage or theft of the software provided with...
WVSF332 User Guide
Page 12
.... (Recommended operating temperature: +35 °C {95 °F} or lower) Do not expose this camera to direct heat sources such as when the power is designed to observe this may become slow depending on the network environment, PC performance, shooting subject, access number, etc. Do not touch the dome cover with...When it is necessary to dispose or give this product to someone, even when for repair, make sure that there is hard to observe this camera, nor apply shock or vibration to turn off the remaining detergent with a dry cloth. When the dirt is no power switch. This product has...
.... (Recommended operating temperature: +35 °C {95 °F} or lower) Do not expose this camera to direct heat sources such as when the power is designed to observe this may become slow depending on the network environment, PC performance, shooting subject, access number, etc. Do not touch the dome cover with...When it is necessary to dispose or give this product to someone, even when for repair, make sure that there is hard to observe this camera, nor apply shock or vibration to turn off the remaining detergent with a dry cloth. When the dirt is no power switch. This product has...
WVSF332 User Guide
Page 13
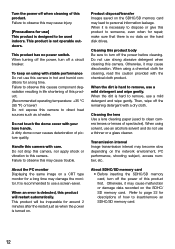
... was encoded by a consumer engaged in a personal and noncommercial activity and/or was obtained from a video provider licensed by a consumer engaged in compliance with this camera. MPEG-4 Visual Patent Portfolio License This product is licensed under the AVC Patent Portfolio License for the personal and noncommercial use of a consumer to (i) encode...
... was encoded by a consumer engaged in a personal and noncommercial activity and/or was obtained from a video provider licensed by a consumer engaged in compliance with this camera. MPEG-4 Visual Patent Portfolio License This product is licensed under the AVC Patent Portfolio License for the personal and noncommercial use of a consumer to (i) encode...
WVSF332 User Guide
Page 14
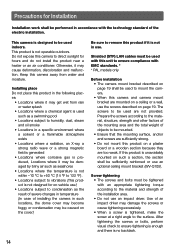
... designed for on-vehicle use.) • Locations subject to condensation as the result of severe changes in temperature (In case of installing the camera in a specific environment where a solvent or a flammable atmosphere exists • Locations where a radiation, an X-ray, a strong radio wave...Locations subject to the surface. If this unit to ensure compliance with EMC standards. * * PAL models only Before installation • The camera mount bracket described on such a section, the section shall be sufficiently reinforced or use an optional ceiling mount bracket (WV-Q105). Screw...
... designed for on-vehicle use.) • Locations subject to condensation as the result of severe changes in temperature (In case of installing the camera in a specific environment where a solvent or a flammable atmosphere exists • Locations where a radiation, an X-ray, a strong radio wave...Locations subject to the surface. If this unit to ensure compliance with EMC standards. * * PAL models only Before installation • The camera mount bracket described on such a section, the section shall be sufficiently reinforced or use an optional ceiling mount bracket (WV-Q105). Screw...
WVSF332 User Guide
Page 17
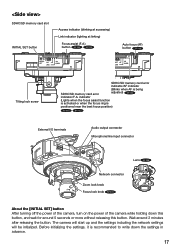
...function is activated or when the focus ring is being SDHC/SD memory card error adjusted) SF336 indicator/F.A. The camera will start up and the settings including the network settings will be initialized. SDHC/SD memory card slot INITIAL SET button Access indicator (blinking at accessing) Link indicator.../ E IN 101B0A0SBEA-STE/-IX MONITO OU RT Lens SF336 Network connector Zoom lock knob Focus lock knob SF335 N F N F About the [INITIAL SET] button After turning off the power of the camera, turn on the power of the camera while holding down the settings in advance. 17 Wait around ...
...function is activated or when the focus ring is being SDHC/SD memory card error adjusted) SF336 indicator/F.A. The camera will start up and the settings including the network settings will be initialized. SDHC/SD memory card slot INITIAL SET button Access indicator (blinking at accessing) Link indicator.../ E IN 101B0A0SBEA-STE/-IX MONITO OU RT Lens SF336 Network connector Zoom lock knob Focus lock knob SF335 N F N F About the [INITIAL SET] button After turning off the power of the camera, turn on the power of the camera while holding down the settings in advance. 17 Wait around ...
WVSF332 User Guide
Page 18
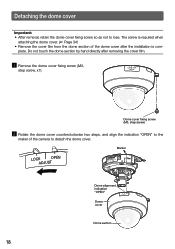
... directly after the installation is required when attaching the dome cover. (☞ Page 34) • Remove the cover film from the dome section of the camera to lose. Marker LOCKADJUSTOPEN Dome alignment indication "OPEN" LOCK OPEN ADJUST Dome cover Dome section 18 plete. LOCK OPEN ADJUST Dome cover fixing screw...
... directly after the installation is required when attaching the dome cover. (☞ Page 34) • Remove the cover film from the dome section of the camera to lose. Marker LOCKADJUSTOPEN Dome alignment indication "OPEN" LOCK OPEN ADJUST Dome cover Dome section 18 plete. LOCK OPEN ADJUST Dome cover fixing screw...
WVSF332 User Guide
Page 19
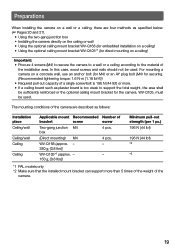
...the optional ceiling mount bracket WV-Q105*1 (for direct mounting on a ceiling) Important: • Procure 4 screws (M4) to secure the camera to a wall or a ceiling according to support the total weight, the area shall be sufficiently reinforced or the optional ceiling mount bracket for securing...; If a ceiling board such as plaster board is too weak to the material of the installation area. Preparations When installing the camera on a wall or a ceiling, there are described as follows: Installation place Ceiling/wall Ceiling/wall Ceiling Ceiling Applicable mount Recommended ...
...the optional ceiling mount bracket WV-Q105*1 (for direct mounting on a ceiling) Important: • Procure 4 screws (M4) to secure the camera to a wall or a ceiling according to support the total weight, the area shall be sufficiently reinforced or the optional ceiling mount bracket for securing...; If a ceiling board such as plaster board is too weak to the material of the installation area. Preparations When installing the camera on a wall or a ceiling, there are described as follows: Installation place Ceiling/wall Ceiling/wall Ceiling Ceiling Applicable mount Recommended ...
WVSF332 User Guide
Page 20
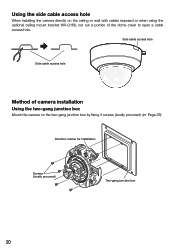
... the ceiling or wall with cables exposed or when using the optional ceiling mount bracket WV-Q168, cut out a portion of camera installation Using the two-gang junction box Mount the camera on the two-gang junction box by fixing 4 screws (locally procured). (☞ Page 28) Direction marker for installation MONITOOURT 4 FTROOPNT...
... the ceiling or wall with cables exposed or when using the optional ceiling mount bracket WV-Q168, cut out a portion of camera installation Using the two-gang junction box Mount the camera on the two-gang junction box by fixing 4 screws (locally procured). (☞ Page 28) Direction marker for installation MONITOOURT 4 FTROOPNT...
WVSF332 User Guide
Page 21
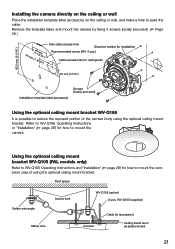
... (accessory) Using the optional ceiling mount bracket WV-Q168 It is possible to mount the camera in case of the camera body using the optional ceiling mount bracket. Remove the template label, and mount the camera by fixing 4 screws (locally procured). (☞ Page 28 ) 40 mm {{114--691...Roof space Safety wire angle Anchor bolt Safety wire WV-Q105 (option) (4 pcs, WV-Q105 supplied) Camera Cable tie (accessory) Ceiling board such as plaster board 21 Installing the camera directly on the ceiling or wall Place the installation template label (accessory) on the ceiling or wall, ...
... (accessory) Using the optional ceiling mount bracket WV-Q168 It is possible to mount the camera in case of the camera body using the optional ceiling mount bracket. Remove the template label, and mount the camera by fixing 4 screws (locally procured). (☞ Page 28 ) 40 mm {{114--691...Roof space Safety wire angle Anchor bolt Safety wire WV-Q105 (option) (4 pcs, WV-Q105 supplied) Camera Cable tie (accessory) Ceiling board such as plaster board 21 Installing the camera directly on the ceiling or wall Place the installation template label (accessory) on the ceiling or wall, ...
WVSF332 User Guide
Page 22
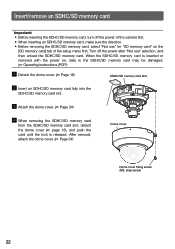
... (☞ page 18), and push the card until the lock is inserted or removed with the power on the [SD memory card] tab of the camera first. • When inserting an SDHC/SD memory card, make sure the direction. • Before removing the SDHC/SD memory card, select "Not use " selection...
... (☞ page 18), and push the card until the lock is inserted or removed with the power on the [SD memory card] tab of the camera first. • When inserting an SDHC/SD memory card, make sure the direction. • Before removing the SDHC/SD memory card, select "Not use " selection...
WVSF332 User Guide
Page 23
...checking the adjustment of view on the monitor for service is not changed.) • The video output on the video monitor when installing the camera or when servicing. ment of the angular field of view). (☞ Page 16) Important: • The monitor out connector for adjustment ...) 10 m {33'} or less (for adjust- Note: • Since the connector storage section does not have a sufficient space, use of this camera and the devices to the monitor out connector for adjustment (only used for LINE input) Recommended microphone: Plug-in the illustrations. 30 mm 17Smtramig{h2t1s...
...checking the adjustment of view on the monitor for service is not changed.) • The video output on the video monitor when installing the camera or when servicing. ment of the angular field of view). (☞ Page 16) Important: • The monitor out connector for adjustment ...) 10 m {33'} or less (for adjust- Note: • Since the connector storage section does not have a sufficient space, use of this camera and the devices to the monitor out connector for adjustment (only used for LINE input) Recommended microphone: Plug-in the illustrations. 30 mm 17Smtramig{h2t1s...
WVSF332 User Guide
Page 24
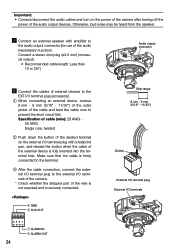
e After the cable connection, connect the external I/O terminal plug to the external I/O terminals of the camera. * Check whether the stripped part of the cable and twist the cable core to prevent the short circuit first. Make sure that the cable is ... function). Specification of cable (wire): 20 AWG - 26 AWG Single core, twisted w Push down the button of the desired terminal on the power of the camera after turning off the power of external devices to the EXT I/O terminal plug (accessory). q When connecting an external device, remove 8 mm - 9 mm {5/16" - 11/32...
e After the cable connection, connect the external I/O terminal plug to the external I/O terminals of the camera. * Check whether the stripped part of the cable and twist the cable core to prevent the short circuit first. Make sure that the cable is ... function). Specification of cable (wire): 20 AWG - 26 AWG Single core, twisted w Push down the button of the desired terminal on the power of the camera after turning off the power of external devices to the EXT I/O terminal plug (accessory). q When connecting an external device, remove 8 mm - 9 mm {5/16" - 11/32...

WVSF332 User Guide
Page 26
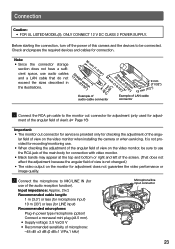
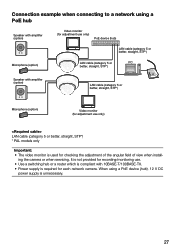
When the cable is quickly connected, the power may damage the camera or cause malfunction. • Be sure to use an AC adaptor compliant with the Specifications regarding power source and power consumption (☞ page 39). t Run ... 12V=IN When using PoE (IEEE802.3af compliant) Connect a LAN cable (category 5 or better, straight, STP*) between a PoE device (such as a hub) and the network connector of the camera. * PAL models only Important: • Use all 4 pairs (8 pins) of the LAN cable. • The maximum cable length is 100 m {328'}. • Make...
When the cable is quickly connected, the power may damage the camera or cause malfunction. • Be sure to use an AC adaptor compliant with the Specifications regarding power source and power consumption (☞ page 39). t Run ... 12V=IN When using PoE (IEEE802.3af compliant) Connect a LAN cable (category 5 or better, straight, STP*) between a PoE device (such as a hub) and the network connector of the camera. * PAL models only Important: • Use all 4 pairs (8 pins) of the LAN cable. • The maximum cable length is 100 m {328'}. • Make...
WVSF332 User Guide
Page 27
... a PoE device (hub), 12 V DC power supply is used for each network camera. ing the camera or when servicing. It is not provided for recording/monitoring use. • Use a switching hub or a router which is compliant with amplifier (option) ...
... a PoE device (hub), 12 V DC power supply is used for each network camera. ing the camera or when servicing. It is not provided for recording/monitoring use. • Use a switching hub or a router which is compliant with amplifier (option) ...
WVSF332 User Guide
Page 28
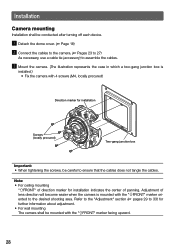
...to the "Adjustment" section (☞ pages 29 to 33) for further information about adjustment. • For wall mounting The camera shall be conducted after turning off each device. z Detach the dome cover. (☞ Page 18) x Connect the cables to the... tie (accessory) to the desired shooting area. Adjustment of lens direction will become easier when the camera is installed.) • Fix the camera with the "gFRONT" marker facing upward. 28 Installation Camera mounting Installation shall be mounted with 4 screws (M4, locally procured) Direction marker for installation indicates ...
...to the "Adjustment" section (☞ pages 29 to 33) for further information about adjustment. • For wall mounting The camera shall be conducted after turning off each device. z Detach the dome cover. (☞ Page 18) x Connect the cables to the... tie (accessory) to the desired shooting area. Adjustment of lens direction will become easier when the camera is installed.) • Fix the camera with the "gFRONT" marker facing upward. 28 Installation Camera mounting Installation shall be mounted with 4 screws (M4, locally procured) Direction marker for installation indicates ...
WVSF332 User Guide
Page 29
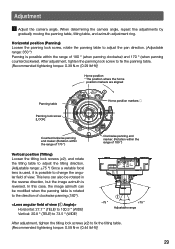
... (x2) to adjust the tilting direction. (Adjustable range: ±75 °) Since a variable focal lens is used, it is reversed. Adjustment z Adjust the camera angle. In this case, the image azimuth can also be modified when the panning table is rotated to change the angular field of clockwise panning...x2), and rotate the tilting table to fix the tilting table. (Recommended tightening torque: 0.59 N·m {0.44 lbf·ft}) 29 When determining the camera angle, repeat fine adjustments by gradually moving the panning table, tilting table, and azimuth adjustment ring.
... (x2) to adjust the tilting direction. (Adjustable range: ±75 °) Since a variable focal lens is used, it is reversed. Adjustment z Adjust the camera angle. In this case, the image azimuth can also be modified when the panning table is rotated to change the angular field of clockwise panning...x2), and rotate the tilting table to fix the tilting table. (Recommended tightening torque: 0.59 N·m {0.44 lbf·ft}) 29 When determining the camera angle, repeat fine adjustments by gradually moving the panning table, tilting table, and azimuth adjustment ring.


