
WVNP1000 User Guide
Page 1
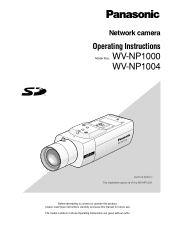
Network camera Operating Instructions WV-NP1000 Model Nos. The model numbers in these instructions carefully and save this manual for future use. Before attempting to connect or operate this product, please read these Operating Instructions are given without suffix. PUSH TO LOCK/EJECT WV-NP1004 WV-NP1004 (Lens is option.) The illustration above is of the WV-NP1004.
Network camera Operating Instructions WV-NP1000 Model Nos. The model numbers in these instructions carefully and save this manual for future use. Before attempting to connect or operate this product, please read these Operating Instructions are given without suffix. PUSH TO LOCK/EJECT WV-NP1004 WV-NP1004 (Lens is option.) The illustration above is of the WV-NP1004.
WVNP1000 User Guide
Page 2
... setup 28 Configure the settings relating to Panasonic alarm protocol [Panasonic alarm protocol setup 34 Configure the settings relating to the authentication [Authentication setup 35 Configure the settings of the servers [Server setup 37 Configuring the network settings [Network setup 39 Maintenance of the camera [Maintenance 46 Configure the Camera Settings such as Image Quality, Brightness...
... setup 28 Configure the settings relating to Panasonic alarm protocol [Panasonic alarm protocol setup 34 Configure the settings relating to the authentication [Authentication setup 35 Configure the settings of the servers [Server setup 37 Configuring the network settings [Network setup 39 Maintenance of the camera [Maintenance 46 Configure the Camera Settings such as Image Quality, Brightness...
WVNP1000 User Guide
Page 3
... on the video monitor connected to the VIDEO OUT connector of the camera and of how to configure the settings on the SETUP menu using a PC via a network and of companies and products contained in these operating instructions are of the camera. Adobe® Reader is not installed on the side of the... (book) • Operating Instructions (PDF, these operating instructions) These operating instructions contain descriptions of how to operate this product and of how to connect to a network.
... on the video monitor connected to the VIDEO OUT connector of the camera and of how to configure the settings on the SETUP menu using a PC via a network and of companies and products contained in these operating instructions are of the camera. Adobe® Reader is not installed on the side of the... (book) • Operating Instructions (PDF, these operating instructions) These operating instructions contain descriptions of how to operate this product and of how to connect to a network.
WVNP1000 User Guide
Page 4
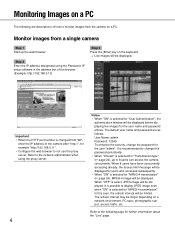
...interval may be limited. It is select, JPEG image will be longer depending on a network environment, PC spec, photographic subject, access traffic, etc. It is possible to monitor images from the camera on a PC. The default user name and password are descriptions of how to display ... using the proxy server. 4 Notes: • When "ON" is changed from a single camera Step 1 Start up to the network administrator when using the Panasonic IP setup software in the address box of the camera after "http://", for "MPEG-4 transmission". Important: • When the HTTP port number is ...
...interval may be limited. It is select, JPEG image will be longer depending on a network environment, PC spec, photographic subject, access traffic, etc. It is possible to monitor images from the camera on a PC. The default user name and password are descriptions of how to display ... using the proxy server. 4 Notes: • When "ON" is changed from a single camera Step 1 Start up to the network administrator when using the Panasonic IP setup software in the address box of the camera after "http://", for "MPEG-4 transmission". Important: • When the HTTP port number is ...
WVNP1000 User Guide
Page 5
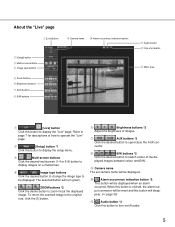
...close the AUX con- u AUX buttons *2 Click the desired button to the original size, click the [1] button. o Camera name The set camera name will be displayed. !0 Alarm occurrence indication button *2 This button will be reset and this button will disap- e ... button to display images on /off audio. 5 i B/W buttons *2 Click the desired button to be displayed. About the "Live" page q [Live] button o Camera name !0 Alarm occurrence indication button w [Setup] button e Multi-screen buttons r Image type buttons t Zoom buttons y Brightness buttons u AUX buttons i B/W buttons ...
...close the AUX con- u AUX buttons *2 Click the desired button to the original size, click the [1] button. o Camera name The set camera name will be displayed. !0 Alarm occurrence indication button *2 This button will be reset and this button will disap- e ... button to display images on /off audio. 5 i B/W buttons *2 Click the desired button to be displayed. About the "Live" page q [Live] button o Camera name !0 Alarm occurrence indication button w [Setup] button e Multi-screen buttons r Image type buttons t Zoom buttons y Brightness buttons u AUX buttons i B/W buttons ...
WVNP1000 User Guide
Page 6
... by only users whose access level is "1. Administrator" or "2. The picture will be displayed in this area. *1 Operable by only users whose access level is "1. Camera control" when "ON" is selected for "User authentication" ( page 35). *3 The access level to operate this button to page 35 for further information about the...access level. 6 !2 One shot button Click this button can be changed by the settings of "Authentication" on a newly opened window. !3 Main area Images from the camera will be displayed on the "Audio" tab. ( page 26) Refer to take a picture (a still picture).
... by only users whose access level is "1. Administrator" or "2. The picture will be displayed in this area. *1 Operable by only users whose access level is "1. Camera control" when "ON" is selected for "User authentication" ( page 35). *3 The access level to operate this button to page 35 for further information about the...access level. 6 !2 One shot button Click this button can be changed by the settings of "Authentication" on a newly opened window. !3 Main area Images from the camera will be displayed on the "Audio" tab. ( page 26) Refer to take a picture (a still picture).
WVNP1000 User Guide
Page 7
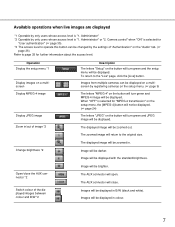
... letters "Setup" on the button will turn green and MPEG-4 image will be displayed. The AUX connector will open. Image will be displayed. Camera control" when "ON" is selected for "MPEG-4 transmission" on the setup menu, the [MPEG-4] button will not be displayed. ( page ...the [Live] button. The zoomed image will be displayed in B/W (black and white). Images will be displayed in colour. 7 Administrator" *2 Operable by registering cameras on the setup menu. ( page 9) The letters "MPEG-4" on the "Audio" tab. ( page 26) Refer to page 35 for "User authentication" ( ...
... letters "Setup" on the button will turn green and MPEG-4 image will be displayed. The AUX connector will open. Image will be displayed. Camera control" when "ON" is selected for "MPEG-4 transmission" on the setup menu, the [MPEG-4] button will not be displayed. ( page ...the [Live] button. The zoomed image will be displayed in B/W (black and white). Images will be displayed in colour. 7 Administrator" *2 Operable by registering cameras on the setup menu. ( page 9) The letters "MPEG-4" on the "Audio" tab. ( page 26) Refer to page 35 for "User authentication" ( ...
WVNP1000 User Guide
Page 8
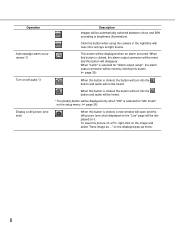
... (one shot) displayed on it. When "Latch" is clicked, a new window will open and the still picture (one shot) When this button when using the camera in the nighttime with near-infra red rays as ..." When this button is selected for "Alarm output setup", the alarm output connector will be reset...
... (one shot) displayed on it. When "Latch" is clicked, a new window will open and the still picture (one shot) When this button when using the camera in the nighttime with near-infra red rays as ..." When this button is selected for "Alarm output setup", the alarm output connector will be reset...
WVNP1000 User Guide
Page 9
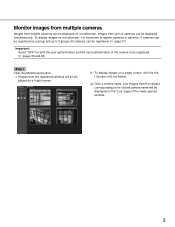
...and the host authentication of the newly opened window. 9 Live images from the camera corresponding to the clicked camera name will be displayed on a multiscreen, it is necessary to register cameras in advance. 4 cameras can be registered as a group and up to be registered. ( pages 35 ... 36) Step 1 Click the [Multiscreen] button. → Images from the registered cameras will be dis- To display images on the "Live" page of the camera to 4 cameras can be displayed simultaneously. Images from multiple cameras can be displayed on a single screen, click the the [1] button or [Live]...
...and the host authentication of the newly opened window. 9 Live images from the camera corresponding to the clicked camera name will be displayed on a multiscreen, it is necessary to register cameras in advance. 4 cameras can be registered as a group and up to be registered. ( pages 35 ... 36) Step 1 Click the [Multiscreen] button. → Images from the registered cameras will be dis- To display images on the "Live" page of the camera to 4 cameras can be displayed simultaneously. Images from multiple cameras can be displayed on a single screen, click the the [1] button or [Live]...
WVNP1000 User Guide
Page 10
...mail. When "ON" is selected for "Panasonic alarm protocol", the connected Panasonic device will be notified that the camera is in advance. Action at an alarm occurrence. The settings for "Video Motion Detection". Scene change detection alarm: When the camera lens is moved, the alarm action will...( page 5) The [Alarm occurrence indication] button will be displayed on the [Notification] tab of alarm occurrences by something such as the network disk recorder, is possible to the e-mail addresses registered in the alarm state. Up to 4 addresses can be sent at an alarm ...
...mail. When "ON" is selected for "Panasonic alarm protocol", the connected Panasonic device will be notified that the camera is in advance. Action at an alarm occurrence. The settings for "Video Motion Detection". Scene change detection alarm: When the camera lens is moved, the alarm action will...( page 5) The [Alarm occurrence indication] button will be displayed on the [Notification] tab of alarm occurrences by something such as the network disk recorder, is possible to the e-mail addresses registered in the alarm state. Up to 4 addresses can be sent at an alarm ...
WVNP1000 User Guide
Page 12
... By configuring the following settings, saving images which had been failed to transmit to transmit by mulfunction or error occurrence in files saved in the camera. User Name: admin Password: 12345 12 About SD memory card: Use ( page 22) File name: With time and date ( page 43) Obtain images on ...the SD memory card Step 1 Access the camera using the FTP periodic transmission function will be . Save images on the SD memory card when failed to transmit images by the FTP periodic transmission...
... By configuring the following settings, saving images which had been failed to transmit to transmit by mulfunction or error occurrence in files saved in the camera. User Name: admin Password: 12345 12 About SD memory card: Use ( page 22) File name: With time and date ( page 43) Obtain images on ...the SD memory card Step 1 Access the camera using the FTP periodic transmission function will be . Save images on the SD memory card when failed to transmit images by the FTP periodic transmission...
WVNP1000 User Guide
Page 13
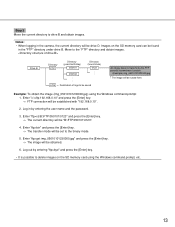
... An image failed to transmit by the FTP periodic transmission function (Example) img_05010101230000.jpg ↑ The image will be "B:\FTP\050101\0123". 4. Log in the camera, the current directory will be established with "192.168.0.10". 2. Images on the SD memory card using the Windows command prompt 1. Enter "c:\>ftp 192.168...
... An image failed to transmit by the FTP periodic transmission function (Example) img_05010101230000.jpg ↑ The image will be "B:\FTP\050101\0123". 4. Log in the camera, the current directory will be established with "192.168.0.10". 2. Images on the SD memory card using the Windows command prompt 1. Enter "c:\>ftp 192.168...
WVNP1000 User Guide
Page 14
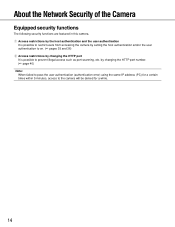
...It is possible to the camera will be denied for a certain times within 5 minutes, access to prevent illegal access such as port scanning, etc. About the Network Security of the Camera Equipped security functions The following security functions are featured in this camera. by changing the HTTP port... It is possible to restrict users from accessing the camera by setting the host authentication and/or the ...
...It is possible to the camera will be denied for a certain times within 5 minutes, access to prevent illegal access such as port scanning, etc. About the Network Security of the Camera Equipped security functions The following security functions are featured in this camera. by changing the HTTP port... It is possible to restrict users from accessing the camera by setting the host authentication and/or the ...
WVNP1000 User Guide
Page 15
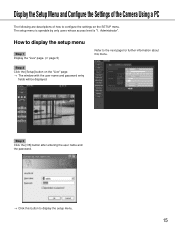
... the [OK] button after entering the user name and the password. → Click this menu. Display the Setup Menu and Configure the Settings of the Camera Using a PC The following are descriptions of how to configure the settings on the "Live" page. → The window with the user name and password...
... the [OK] button after entering the user name and the password. → Click this menu. Display the Setup Menu and Configure the Settings of the Camera Using a PC The following are descriptions of how to configure the settings on the "Live" page. → The window with the user name and password...
WVNP1000 User Guide
Page 17
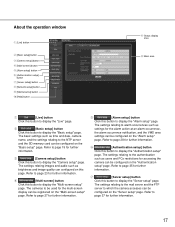
...be configured on the "Server setup" page. The settings relating to the mail server and the FTP server to which the camera accesses can be configured on the "Basic setup" page. t [Alarm setup] button Click this page. Refer to page 35... be used for further information. About the operation window q [Live] button w [Basic setup] button e [Camera setup] button r [Multi-screen] button t [Alarm setup] button y [Authentication setup] button u [Server setup] button i [Network setup] button o [Maintenance] button !0 [Help] button !1 Status display area !2 Main area q [Live]...
...be configured on the "Server setup" page. The settings relating to the mail server and the FTP server to which the camera accesses can be configured on the "Basic setup" page. t [Alarm setup] button Click this page. Refer to page 35... be used for further information. About the operation window q [Live] button w [Basic setup] button e [Camera setup] button r [Multi-screen] button t [Alarm setup] button y [Authentication setup] button u [Server setup] button i [Network setup] button o [Maintenance] button !0 [Help] button !1 Status display area !2 Main area q [Live]...
WVNP1000 User Guide
Page 18
...] button Click this button to display the "Help" page. !1 Status display area The name of the camera whose settings currently being configured will be performed on the "Network setup" page. Refer to page 46 for further information. !0 [Help] button Click this button to display... the "Network setup" page. There are tabs for further information. The network settings and the settings relating to page 39 for some setup menus. 18 Refer to DDNS (Dynamic DNS), SNMP (Simple Network management Protocol) and FTP (File Transfer Protocol...
...] button Click this button to display the "Help" page. !1 Status display area The name of the camera whose settings currently being configured will be performed on the "Network setup" page. Refer to page 46 for further information. !0 [Help] button Click this button to display... the "Network setup" page. There are tabs for further information. The network settings and the settings relating to page 39 for some setup menus. 18 Refer to DDNS (Dynamic DNS), SNMP (Simple Network management Protocol) and FTP (File Transfer Protocol...
WVNP1000 User Guide
Page 19
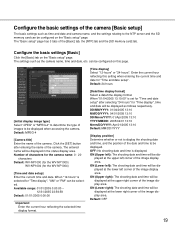
... image type] Select "JPEG" or "MPEG-4" to determine the type of images to be displayed in the status display area. Number of characters for the camera name: 0 - 20 characters Default: WV-NP1000 (for the WV-NP1000) WV-NP1004 (for "Time display", "AM" or "PM" can be displayed at the...format. ON (Upper right): The shooting date and time will be configured on the "Basic setup" page. The "Basic setup" page has 3 tabs of the camera. Enter the current hour reflecting this page. [Time display] Select "12-hours" or "24-hours". Configure the basic settings [Basic] Click the [Basic] ...
... image type] Select "JPEG" or "MPEG-4" to determine the type of images to be displayed in the status display area. Number of characters for the camera name: 0 - 20 characters Default: WV-NP1000 (for the WV-NP1000) WV-NP1004 (for "Time display", "AM" or "PM" can be displayed at the...format. ON (Upper right): The shooting date and time will be configured on the "Basic setup" page. The "Basic setup" page has 3 tabs of the camera. Enter the current hour reflecting this page. [Time display] Select "12-hours" or "24-hours". Configure the basic settings [Basic] Click the [Basic] ...
WVNP1000 User Guide
Page 21
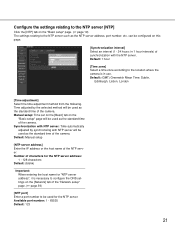
...[NTP server address] Enter the IP address or the host name of the camera. Default: 1 hour [Time zone] Select a time zone according to the location where the camera is necessary to configure the DNS settings on the [Network] tab of the "Network setup" page. ( page 39) [NTP port] Enter a port number to... the NTP server such as the standard time of the NTP server. Time adjusted by synchronizing with NTP server will be used for "NTP server address", it is in 1 hour intervals) of the camera. Manual...
...[NTP server address] Enter the IP address or the host name of the camera. Default: 1 hour [Time zone] Select a time zone according to the location where the camera is necessary to configure the DNS settings on the [Network] tab of the "Network setup" page. ( page 39) [NTP port] Enter a port number to... the NTP server such as the standard time of the NTP server. Time adjusted by synchronizing with NTP server will be used for "NTP server address", it is in 1 hour intervals) of the camera. Manual...

WVNP1000 User Guide
Page 22
... SD memory card is formatted. • Do not turn the power of the "Network setup" page. • Format the SD memory card only by clicking the [Execute] button on the setup menu. Otherwise, the camera may not work properly with this page. [Format] To format the SD memory card...available size due to use the SD memory card. Important: • Before formatting the SD memory card, it is necessary to select "Not use Panasonic's SD memory card. Important: • Before removing the SD memory card from the cam- Indication ----------KB/----------KB Description The SD card memory is ...
... SD memory card is formatted. • Do not turn the power of the "Network setup" page. • Format the SD memory card only by clicking the [Execute] button on the setup menu. Otherwise, the camera may not work properly with this page. [Format] To format the SD memory card...available size due to use the SD memory card. Important: • Before formatting the SD memory card, it is necessary to select "Not use Panasonic's SD memory card. Important: • Before removing the SD memory card from the cam- Indication ----------KB/----------KB Description The SD card memory is ...
WVNP1000 User Guide
Page 23
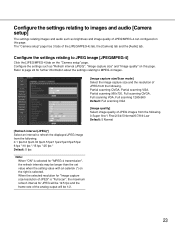
...brightness and image quality of the analog output will be 12.5 fps and the frame rate of JPEG/MPEG-4 can configured on this page. The "Camera setup" page has 3 tabs of JPEG from the following . Partial scanning QVGA, Partial scanning VGA, Partial scanning 960x720, Full scanning QVGA, Full...longer than the set value when the setting value with an asterisk (*) on the right is selected. Configure the settings relating to images and audio [Camera setup] The settings relating images and audio such as "Refresh interval (JPEG)", "Image capture size" and "Image quality" on this page. Configure...
...brightness and image quality of the analog output will be 12.5 fps and the frame rate of JPEG/MPEG-4 can configured on this page. The "Camera setup" page has 3 tabs of JPEG from the following . Partial scanning QVGA, Partial scanning VGA, Partial scanning 960x720, Full scanning QVGA, Full...longer than the set value when the setting value with an asterisk (*) on the right is selected. Configure the settings relating to images and audio [Camera setup] The settings relating images and audio such as "Refresh interval (JPEG)", "Image capture size" and "Image quality" on this page. Configure...


