
Operating Instructions
Page 1
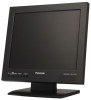
Before attempting to connect or operate this product, please read these instructions carefully and save this manual for future use. WV-LC1900 Video Monitor WV-LC1900 This illustration represents WV-LC1900. Video Monitor Operating Instructions WV-LC1700 Model Nos.
Before attempting to connect or operate this product, please read these instructions carefully and save this manual for future use. WV-LC1900 Video Monitor WV-LC1900 This illustration represents WV-LC1900. Video Monitor Operating Instructions WV-LC1700 Model Nos.
Operating Instructions
Page 5
...and Their Functions 8 Front View ...8 Rear View ...8 Installations ...10 Installation this monitor in a rack 10 Connections ...12 Connection Example ...12 Camera Connection ...13 Connection with Two or More Video Monitors 13 Digital Disk Recorder Connection 13 PC Connection ...13 Power-On ...14 Audio... Volume Control ...15 Video Adjustment and Setup ...15 Video Adjustment (Video Input, S-Video Input 15 Video Adjustment (PC Input Connector 17 Setting ...
...and Their Functions 8 Front View ...8 Rear View ...8 Installations ...10 Installation this monitor in a rack 10 Connections ...12 Connection Example ...12 Camera Connection ...13 Connection with Two or More Video Monitors 13 Digital Disk Recorder Connection 13 PC Connection ...13 Power-On ...14 Audio... Volume Control ...15 Video Adjustment and Setup ...15 Video Adjustment (Video Input, S-Video Input 15 Video Adjustment (PC Input Connector 17 Setting ...
Operating Instructions
Page 6
...a 19"-type (V) (WV-LC1900) LCD panel. This product can be mounted on the rear side are no user-serviceable parts inside. It may cause damage or allow water to enter this product. • Do not expose this product. Preface This is a video monitor provided with high-speed ...response, high resolution • Supporting composite video signal, S-video signal, and analog RGB signal for personal computer (PC) • Automatically switchable NTSC and PAL system...
...a 19"-type (V) (WV-LC1900) LCD panel. This product can be mounted on the rear side are no user-serviceable parts inside. It may cause damage or allow water to enter this product. • Do not expose this product. Preface This is a video monitor provided with high-speed ...response, high resolution • Supporting composite video signal, S-video signal, and analog RGB signal for personal computer (PC) • Automatically switchable NTSC and PAL system...

Operating Instructions
Page 8
... o LCD panel Note: Take care not to another external device. Major Operating Instructions and Their Functions Front View Rear View @1 @2 @3 @4 */165 4&-&$5 .&/6 4&-&$5 "6%*0 Video Monitor WV-LC1900 wr y q et u i o !0 q Power button Powers on or off , it lights in red while the power supply is available. t Selection buttons (SELECT: C, D) These buttons move ...
... o LCD panel Note: Take care not to another external device. Major Operating Instructions and Their Functions Front View Rear View @1 @2 @3 @4 */165 4&-&$5 .&/6 4&-&$5 "6%*0 Video Monitor WV-LC1900 wr y q et u i o !0 q Power button Powers on or off , it lights in red while the power supply is available. t Selection buttons (SELECT: C, D) These buttons move ...
Operating Instructions
Page 9
... OF RANGE" will appear on the screen. • This monitor does not support plug-and-play. 9 When an S-video signal and composite video signal are supplied from an external device. !6 S-video input connector (S-VIDEO IN) Accepts an S-video signal from a device at the same time, the S-video signal is used, remove the clamp. @3 Security slot You can...
... OF RANGE" will appear on the screen. • This monitor does not support plug-and-play. 9 When an S-video signal and composite video signal are supplied from an external device. !6 S-video input connector (S-VIDEO IN) Accepts an S-video signal from a device at the same time, the S-video signal is used, remove the clamp. @3 Security slot You can...
Operating Instructions
Page 12
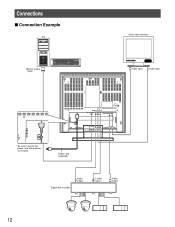
Power cord (supplied) Digital disk recorder Audio output S-video output Video output 12 Connections Connection Example PC Monitor output (VGA) Other video monitors Video input Audio input * Be sure to secure the power cord with a power cord clamp.
Power cord (supplied) Digital disk recorder Audio output S-video output Video output 12 Connections Connection Example PC Monitor output (VGA) Other video monitors Video input Audio input * Be sure to secure the power cord with a power cord clamp.
Operating Instructions
Page 13
... connector of PC (or another device). Camera Connection Connect the video output connector of camera to the VIDEO IN connector with an audio cable. Connection with Two or More Video Monitors • Connect the VIDEO OUT connector of this monitor to the video input connector of another monitor with a coaxial cable. Digital Disk Recorder Connection To Perform Recording...
... connector of PC (or another device). Camera Connection Connect the video output connector of camera to the VIDEO IN connector with an audio cable. Connection with Two or More Video Monitors • Connect the VIDEO OUT connector of this monitor to the video input connector of another monitor with a coaxial cable. Digital Disk Recorder Connection To Perform Recording...

Operating Instructions
Page 14
... input signals as follows. Press the INPUT SELECT button. VIDEO A Notes: • When no input signal is detected due to p. 12) 1. Signal name VIDEO A VIDEO B S-VIDEO PC Input signal type Composite video A Composite video B S-video PC (Analog RGB) • When the loss of the connected PC. (Refer to the monitor, "NO SIGNAL" will be displayed on the screen...
... input signals as follows. Press the INPUT SELECT button. VIDEO A Notes: • When no input signal is detected due to p. 12) 1. Signal name VIDEO A VIDEO B S-VIDEO PC Input signal type Composite video A Composite video B S-video PC (Analog RGB) • When the loss of the connected PC. (Refer to the monitor, "NO SIGNAL" will be displayed on the screen...

Operating Instructions
Page 15
...the volume level is displayed on the selected input signal. AUDIO 22 Video Adjustment and Setup Video Adjustment (Video Input, S-Video Input) Setup of the PAL system is no signal PAL: When a video signal input of this monitor will be displayed. Notes: • The menu title display differs ...Move the cursor to p. 13.) • If the power is displayed as specified below. For video input (A): VIDEO A IN For video input (B): VIDEO B IN For S-video input: S-VIDEO IN VIDEO B IN NTSC BRIGHTNESS 00 CONTRAST 00 SHARPNESS 00 COLOR 00 TINT 00 H-POINT 00 COLOR TEMP 6500K...
...the volume level is displayed on the selected input signal. AUDIO 22 Video Adjustment and Setup Video Adjustment (Video Input, S-Video Input) Setup of the PAL system is no signal PAL: When a video signal input of this monitor will be displayed. Notes: • The menu title display differs ...Move the cursor to p. 13.) • If the power is displayed as specified below. For video input (A): VIDEO A IN For video input (B): VIDEO B IN For S-video input: S-VIDEO IN VIDEO B IN NTSC BRIGHTNESS 00 CONTRAST 00 SHARPNESS 00 COLOR 00 TINT 00 H-POINT 00 COLOR TEMP 6500K...

Operating Instructions
Page 16
... S-VIDEO) will be reset to the default status. To return to the top menu, move the cursor to be 1:1, black strips are slightly lost. The monitor display return to the factory default. 5. Setting value - 20 to + 20 - 20 to + 20 - 7 to + 7 - 20 to + 20 - 20 to + 20 - .... Notes: • The respective setting items are used in common for the video input B and S-video input. • "TINT" can be set up . -: Color density level goes down. +: Tint becomes more greenish. -: Tint becomes more , the monitor display returns to display. The aspect ratio of the NTSC system. 3 Move ...
... S-VIDEO) will be reset to the default status. To return to the top menu, move the cursor to be 1:1, black strips are slightly lost. The monitor display return to the factory default. 5. Setting value - 20 to + 20 - 20 to + 20 - 7 to + 7 - 20 to + 20 - 20 to + 20 - .... Notes: • The respective setting items are used in common for the video input B and S-video input. • "TINT" can be set up . -: Color density level goes down. +: Tint becomes more greenish. -: Tint becomes more , the monitor display returns to display. The aspect ratio of the NTSC system. 3 Move ...
Operating Instructions
Page 17
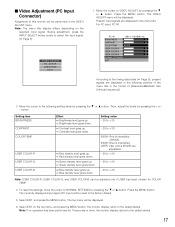
... or more, the monitor display returns to NORMAL SETTINGS by pressing the C or D button. The top menu will be displayed. Press the MENU button. Select EXIT, and press the MENU button. Press the MENU button. USER: User colors (R/G/B) are displayed in the VIDEO ADJUST menu. The ... 20 to + 20 - 20 to + 20 - 20 to the factory default. 5. button. Move the cursor to select the input signal. ( Page 8) VIDEO ADJUST PC SETUP LANGUAGE EXIT 1. Setting item BRIGHTNESS CONTRAST COLOR TEMP USER COLOR-R USER COLOR-G USER COLOR-B Effect +: Brightness level goes up. -: Brightness level goes...
... or more, the monitor display returns to NORMAL SETTINGS by pressing the C or D button. The top menu will be displayed. Press the MENU button. Select EXIT, and press the MENU button. Press the MENU button. USER: User colors (R/G/B) are displayed in the VIDEO ADJUST menu. The ... 20 to + 20 - 20 to + 20 - 20 to the factory default. 5. button. Move the cursor to select the input signal. ( Page 8) VIDEO ADJUST PC SETUP LANGUAGE EXIT 1. Setting item BRIGHTNESS CONTRAST COLOR TEMP USER COLOR-R USER COLOR-G USER COLOR-B Effect +: Brightness level goes up. -: Brightness level goes...
Operating Instructions
Page 18
...button. However, proper adjustment is not required in ordinary cases. 1. Press the MENU button. Move the cursor to p. 9.) • This monitor does not support plug-and-play. Note: Since this unit detects input signals and makes automatic adjustments as required, this setting is not supported... is enlarged. -: Clock is contracted. +: Phase is increased. -: Phase is , however, not a malfunction. • According to the situation of video signals, it takes several seconds to 10-odd seconds to the timing data table ( Page 9), present signals are displayed in the format of PC Input...
...button. However, proper adjustment is not required in ordinary cases. 1. Press the MENU button. Move the cursor to p. 9.) • This monitor does not support plug-and-play. Note: Since this unit detects input signals and makes automatic adjustments as required, this setting is not supported... is enlarged. -: Clock is contracted. +: Phase is increased. -: Phase is , however, not a malfunction. • According to the situation of video signals, it takes several seconds to 10-odd seconds to the timing data table ( Page 9), present signals are displayed in the format of PC Input...
Operating Instructions
Page 19
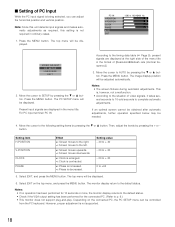
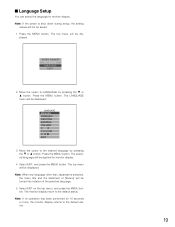
...dis- Select EXIT on the top menu, and press the MENU button. Language Setup You can select the language for 10 seconds or more, the monitor display returns to the default status. Move the cursor to the desired language by pressing the C or D button. Move the cursor to LANGUAGE ... EXIT 3. Note: If the power is selected, the menu title and the statement of the selected language. 5. played. VIDEO ADJUST PC SETUP LANGUAGE EXIT 2. Press the MENU button. The monitor display return to the default status. 19 Select EXIT, and press the MENU button. Note: If no operation has been...
...dis- Select EXIT on the top menu, and press the MENU button. Language Setup You can select the language for 10 seconds or more, the monitor display returns to the default status. Move the cursor to the desired language by pressing the C or D button. Move the cursor to LANGUAGE ... EXIT 3. Note: If the power is selected, the menu title and the statement of the selected language. 5. played. VIDEO ADJUST PC SETUP LANGUAGE EXIT 2. Press the MENU button. The monitor display return to the default status. 19 Select EXIT, and press the MENU button. Note: If no operation has been...

Operating Instructions
Page 20
.... If a trouble cannot be corrected even after checking and trying remedy, contact your dealer. Check if the power plug is properly connected to restart this monitor. - Check the cables are worn out. The power cord gets hot when bent or stretched. Check whether the cable is damaged. The power cord insulation... picture is displayed. Press the reset switch to the AC outlet. - Troubleshooting Check the following before requesting repair. If the picture display position is displayed. "VIDEO LOSS" appears in the center of this unit. 8 - 9 8 - 9 20
.... If a trouble cannot be corrected even after checking and trying remedy, contact your dealer. Check if the power plug is properly connected to restart this monitor. - Check the cables are worn out. The power cord gets hot when bent or stretched. Check whether the cable is damaged. The power cord insulation... picture is displayed. Press the reset switch to the AC outlet. - Troubleshooting Check the following before requesting repair. If the picture display position is displayed. "VIDEO LOSS" appears in the center of this unit. 8 - 9 8 - 9 20

Operating Instructions
Page 21
...: Composite video input / Y/C video input: NTSC/PAL (auto) Horizontal resolution: 500 or more TV lines Video input (VIDEO-A IN, VIDEO-B IN): 1.0 V [P-P]/75 Ω (BNC), composite video signal Video output (VIDEO-A OUT, VIDEO-B OUT): Auto-termination loop-thru (BNC) S-video input (S-VIDEO IN): ...monitor stand) 423 mm (W) x 390 mm (H) x 80 mm (D) {16-11/16" (W) 15-3/8" (H) x 3-1/8" (D)} (including the monitor stand) Weight: WV-LC1700: 9.0 kg {20 lbs.} (including the monitor stand) 7.7 kg {17 lbs.} (excluding the monitor stand) WV-LC1900: 10 kg {22 lbs.} (including the monitor...
...: Composite video input / Y/C video input: NTSC/PAL (auto) Horizontal resolution: 500 or more TV lines Video input (VIDEO-A IN, VIDEO-B IN): 1.0 V [P-P]/75 Ω (BNC), composite video signal Video output (VIDEO-A OUT, VIDEO-B OUT): Auto-termination loop-thru (BNC) S-video input (S-VIDEO IN): ...monitor stand) 423 mm (W) x 390 mm (H) x 80 mm (D) {16-11/16" (W) 15-3/8" (H) x 3-1/8" (D)} (including the monitor stand) Weight: WV-LC1700: 9.0 kg {20 lbs.} (including the monitor stand) 7.7 kg {17 lbs.} (excluding the monitor stand) WV-LC1900: 10 kg {22 lbs.} (including the monitor...
Operating Instructions
Page 22
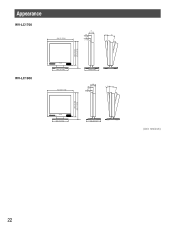
Appearance WV-LC1700 404 {15-15/16} 77 {3-1/16} 41 {1-5/8} 28 {1-1/8} 5° 15° 365 {14-3/8} 415 {16-5/16} WV-LC1900 INPUT SELECT MENU INPUT SELECT SELECT MENU AUDIO SELECT AUDIO Video Monitor WV-LD1700 Video Monitor WV-LC1700 265 {10-7/16} 236 {9-5/16} 423 {16-11/16} 80 50 {3-3/16} {2} 30 {1-3/16} 5° 15° 390 {15-3/8} 440 {17-5/16} INPUT SELECT MENU INPUT SELECT SELECT MENU AUDIO SELECT AUDIO Video Monitor WV-LD1700 Video Monitor WV-LC1900 265 {10-7/16} 236 {9-5/16} (Unit: mm/inch) 22
Appearance WV-LC1700 404 {15-15/16} 77 {3-1/16} 41 {1-5/8} 28 {1-1/8} 5° 15° 365 {14-3/8} 415 {16-5/16} WV-LC1900 INPUT SELECT MENU INPUT SELECT SELECT MENU AUDIO SELECT AUDIO Video Monitor WV-LD1700 Video Monitor WV-LC1700 265 {10-7/16} 236 {9-5/16} 423 {16-11/16} 80 50 {3-3/16} {2} 30 {1-3/16} 5° 15° 390 {15-3/8} 440 {17-5/16} INPUT SELECT MENU INPUT SELECT SELECT MENU AUDIO SELECT AUDIO Video Monitor WV-LD1700 Video Monitor WV-LC1900 265 {10-7/16} 236 {9-5/16} (Unit: mm/inch) 22


