
Operating Instructions
Page 1
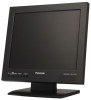
Video Monitor Operating Instructions WV-LC1700 Model Nos. Before attempting to connect or operate this product, please read these instructions carefully and save this manual for future use. WV-LC1900 Video Monitor WV-LC1900 This illustration represents WV-LC1900.
Video Monitor Operating Instructions WV-LC1700 Model Nos. Before attempting to connect or operate this product, please read these instructions carefully and save this manual for future use. WV-LC1900 Video Monitor WV-LC1900 This illustration represents WV-LC1900.
Operating Instructions
Page 5
... ...6 Features ...6 Precautions ...6 Major Operating Instructions and Their Functions 8 Front View ...8 Rear View ...8 Installations ...10 Installation this monitor in a rack 10 Connections ...12 Connection Example ...12 Camera Connection ...13 Connection with Two or More Video Monitors 13 Digital Disk Recorder Connection 13 PC Connection ...13 Power-On ...14 Audio Volume Control ...15 Video...
... ...6 Features ...6 Precautions ...6 Major Operating Instructions and Their Functions 8 Front View ...8 Rear View ...8 Installations ...10 Installation this monitor in a rack 10 Connections ...12 Connection Example ...12 Camera Connection ...13 Connection with Two or More Video Monitors 13 Digital Disk Recorder Connection 13 PC Connection ...13 Power-On ...14 Audio Volume Control ...15 Video...
Operating Instructions
Page 6
..., do not remove screws or covers. 6 There are compliant with a 17"-type (V) (WVLC1700) or a 19"-type (V) (WV-LC1900) LCD panel. Take immediate action if this product and also cause electric shocks. Preface This is a video monitor provided with the VESA* standard (100 mm {315/16"} pitch). Turn the power off immediately and...
..., do not remove screws or covers. 6 There are compliant with a 17"-type (V) (WVLC1700) or a 19"-type (V) (WV-LC1900) LCD panel. Take immediate action if this product and also cause electric shocks. Preface This is a video monitor provided with the VESA* standard (100 mm {315/16"} pitch). Turn the power off immediately and...

Operating Instructions
Page 7
... spots may cause trouble or damage. • Use only the supplied power cord or AC adapter. • Be sure to clean this product on the monitor screen. To use a mild detergent and wipe gently. • Do not operate this product beyond its specified temperature, humidity, or power source ratings. Use a dry...
... spots may cause trouble or damage. • Use only the supplied power cord or AC adapter. • Be sure to clean this product on the monitor screen. To use a mild detergent and wipe gently. • Do not operate this product beyond its specified temperature, humidity, or power source ratings. Use a dry...

Operating Instructions
Page 8
... This indicator lights green while power is OFF. Major Operating Instructions and Their Functions Front View Rear View @1 @2 @3 @4 */165 4&-&$5 .&/6 4&-&$5 "6%*0 Video Monitor WV-LC1900 wr y q et u i o !0 q Power button Powers on or off , it lights in red while the power supply is available... IN) Connect the power cord (accessory). !3 PC input connector (PC IN) Accepts an analog RGB signal from the connected cable even while the monitor is supplied to another external device. Note: For timing data this connector supports, refer to p. 9 "Timing data chart for PC input". !4 ...
... This indicator lights green while power is OFF. Major Operating Instructions and Their Functions Front View Rear View @1 @2 @3 @4 */165 4&-&$5 .&/6 4&-&$5 "6%*0 Video Monitor WV-LC1900 wr y q et u i o !0 q Power button Powers on or off , it lights in red while the power supply is available... IN) Connect the power cord (accessory). !3 PC input connector (PC IN) Accepts an analog RGB signal from the connected cable even while the monitor is supplied to another external device. Note: For timing data this connector supports, refer to p. 9 "Timing data chart for PC input". !4 ...
Operating Instructions
Page 9
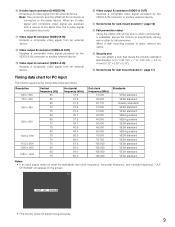
... signal does not meet the standards (dot clock frequency, horizontal frequency, and vertical frequency), "OUT OF RANGE" will appear on the screen. • This monitor does not support plug-and-play. 9 Note: This connector and the VIDEO-B IN connector is connected to 4 mm) {0.12" x 0.28" x 0.15...page 10) @2 Fall prevention clamp Using the clamp with strong wire or chain (commercially available), secure the monitor to a sufficiently strong wall or pillar for PC input This monitor supports the timing data listed as follows. When an S-video signal and composite video signal are supplied from...
... signal does not meet the standards (dot clock frequency, horizontal frequency, and vertical frequency), "OUT OF RANGE" will appear on the screen. • This monitor does not support plug-and-play. 9 Note: This connector and the VIDEO-B IN connector is connected to 4 mm) {0.12" x 0.28" x 0.15...page 10) @2 Fall prevention clamp Using the clamp with strong wire or chain (commercially available), secure the monitor to a sufficiently strong wall or pillar for PC input This monitor supports the timing data listed as follows. When an S-video signal and composite video signal are supplied from...

Operating Instructions
Page 10
...• Do not block the ventilation opening or slots on the cover. • Do not mount the monitor on the rear of the monitor. Note: The removed stand cover, monitor stand and screws should be retained for rack mount bracket c Install the rack mount brackets on places subject ...to constant vibrations. Screw (M4) z Remove the screw of monitor stand, and then remove the monitor stand. Stand cover Screw (M4) Monitor stand Screw holes for future use. That may cause trouble or damage. Fix the rack mount brackets firmly...
...• Do not block the ventilation opening or slots on the cover. • Do not mount the monitor on the rear of the monitor. Note: The removed stand cover, monitor stand and screws should be retained for rack mount bracket c Install the rack mount brackets on places subject ...to constant vibrations. Screw (M4) z Remove the screw of monitor stand, and then remove the monitor stand. Stand cover Screw (M4) Monitor stand Screw holes for future use. That may cause trouble or damage. Fix the rack mount brackets firmly...

Operating Instructions
Page 11
... procured). Rack mounting screws (locally procured) Important: During angle adjustments, be more than 5 times the total weight of the area on the wall where the monitor is to 20 °. Never press the LCD panel. Fix this unit. The angle can be adjusted from 0 ° down to be mounted, and the...
... procured). Rack mounting screws (locally procured) Important: During angle adjustments, be more than 5 times the total weight of the area on the wall where the monitor is to 20 °. Never press the LCD panel. Fix this unit. The angle can be adjusted from 0 ° down to be mounted, and the...
Operating Instructions
Page 12
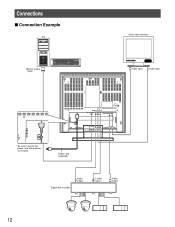
Power cord (supplied) Digital disk recorder Audio output S-video output Video output 12 Connections Connection Example PC Monitor output (VGA) Other video monitors Video input Audio input * Be sure to secure the power cord with a power cord clamp.
Power cord (supplied) Digital disk recorder Audio output S-video output Video output 12 Connections Connection Example PC Monitor output (VGA) Other video monitors Video input Audio input * Be sure to secure the power cord with a power cord clamp.
Operating Instructions
Page 13
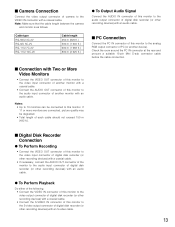
... m {820 ft.} 500 m {1 640 ft.} 600 m {1 968 ft.} 800 m {2 625 ft.} To Output Audio Signal Connect the AUDIO IN connector of this monitor to the audio input connector of digital disk recorder (or other recording devices) with an audio cable. Check the room around the PC IN connector.... • Total length of camera to the VIDEO IN connector with a coaxial cable. • If necessary, connect the AUDIO OUT connector of the monitor to the video output connector of digital disk recorder (or other recording devices) with a coaxial cable. • Connect the S-VIDEO IN connector of digital...
... m {820 ft.} 500 m {1 640 ft.} 600 m {1 968 ft.} 800 m {2 625 ft.} To Output Audio Signal Connect the AUDIO IN connector of this monitor to the audio input connector of digital disk recorder (or other recording devices) with an audio cable. Check the room around the PC IN connector.... • Total length of camera to the VIDEO IN connector with a coaxial cable. • If necessary, connect the AUDIO OUT connector of the monitor to the video output connector of digital disk recorder (or other recording devices) with a coaxial cable. • Connect the S-VIDEO IN connector of digital...

Operating Instructions
Page 14
... PC VIDEO B/ S-VIDEO The signal name will be displayed on the screen. "VIDEO LOSS" will continue to be displayed on the screen. The monitor will be displayed until an input signal is detected due to p. 12) 1. Press the INPUT SELECT button. Power-On Before operation, check the ...connections between monitors and external devices (cameras, digital disk recorders, etc.) (Refer to cable disconnection, etc., "VIDEO LOSS" will be displayed on the upper ...
... PC VIDEO B/ S-VIDEO The signal name will be displayed on the screen. "VIDEO LOSS" will continue to be displayed on the screen. The monitor will be displayed until an input signal is detected due to p. 12) 1. Press the INPUT SELECT button. Power-On Before operation, check the ...connections between monitors and external devices (cameras, digital disk recorders, etc.) (Refer to cable disconnection, etc., "VIDEO LOSS" will be displayed on the upper ...

Operating Instructions
Page 15
... displayed on the selected input signal. Press the MENU button. AUDIO 22 Video Adjustment and Setup Video Adjustment (Video Input, S-Video Input) Setup of this monitor will not be performed in the menu title. Notes: • The menu title display differs depending on the screen. -: Audio volume level goes down during...
... displayed on the selected input signal. Press the MENU button. AUDIO 22 Video Adjustment and Setup Video Adjustment (Video Input, S-Video Input) Setup of this monitor will not be performed in the menu title. Notes: • The menu title display differs depending on the screen. -: Audio volume level goes down during...

Operating Instructions
Page 16
...color is of the image. button. To return to the top menu, move the cursor to EXIT by pressing the C or D button. The monitor display return to the factory default. 5. Setting item BRIGHTNESS CONTRAST SHARPNESS COLOR TINT (NTSC system only) H-POSITION COLOR TEMP SCAN Effect +: Brightness ..., move the cursor to be set up . -: Color density level goes down. +: Tint becomes more greenish. -: Tint becomes more , the monitor display returns to display. Since the enlarged aspect ratio remains to EXIT by pressing the C or D button. Note: If no operation has been performed...
...color is of the image. button. To return to the top menu, move the cursor to EXIT by pressing the C or D button. The monitor display return to the factory default. 5. Setting item BRIGHTNESS CONTRAST SHARPNESS COLOR TINT (NTSC system only) H-POSITION COLOR TEMP SCAN Effect +: Brightness ..., move the cursor to be set up . -: Color density level goes down. +: Tint becomes more greenish. -: Tint becomes more , the monitor display returns to display. Since the enlarged aspect ratio remains to EXIT by pressing the C or D button. Note: If no operation has been performed...
Operating Instructions
Page 17
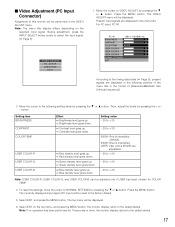
... EXIT on the selected input signal. The VIDEO ADJUST menu will be adjusted only if USER has been chosen for 10 seconds or more, the monitor display returns to the default status. Press the MENU button. Setting value - 20 to + 20 - 20 to select the input signal. ( Page 8) VIDEO ...LANGUAGE EXIT 1. Video Adjustment (PC Input Connector) Adjustment of [Resolution@Refresh rate (Vertical frequency)]. 3. USER: User colors (R/G/B) are displayed in the format of this monitor will be reset to + 20 Note: USER COLOR-R, USER COLOR-G, and USER COLOR-B can be performed in the menu title. The...
... EXIT on the selected input signal. The VIDEO ADJUST menu will be adjusted only if USER has been chosen for 10 seconds or more, the monitor display returns to the default status. Press the MENU button. Setting value - 20 to + 20 - 20 to select the input signal. ( Page 8) VIDEO ...LANGUAGE EXIT 1. Video Adjustment (PC Input Connector) Adjustment of [Resolution@Refresh rate (Vertical frequency)]. 3. USER: User colors (R/G/B) are displayed in the format of this monitor will be reset to + 20 Note: USER COLOR-R, USER COLOR-G, and USER COLOR-B can be performed in the menu title. The...
Operating Instructions
Page 18
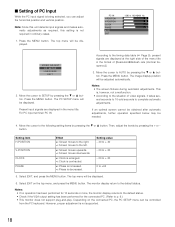
...The top menu will be needed. 4. If an optimal screen cannot be obtained after automatic adjustments, further operation specified below may be adjusted automatically. The monitor display return to p. 9.) • This monitor does not support plug-and-play. Notes: • If no operation has been performed for 10 seconds or more, the... monitor display returns to the default status. • Check if the VGA output setting has been performed for the connected PC. (Refer to the default ...
...The top menu will be needed. 4. If an optimal screen cannot be obtained after automatic adjustments, further operation specified below may be adjusted automatically. The monitor display return to p. 9.) • This monitor does not support plug-and-play. Notes: • If no operation has been performed for 10 seconds or more, the... monitor display returns to the default status. • Check if the VGA output setting has been performed for the connected PC. (Refer to the default ...
Operating Instructions
Page 19
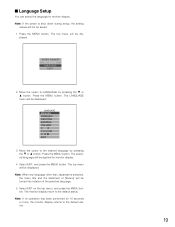
... button. Select EXIT on the top menu, and press the MENU button. Language Setup You can select the language for 10 seconds or more, the monitor display returns to the default status. 19 Note: If the power is selected, the menu title and the statement of the selected language. 5. Press the... MENU button. The monitor display return to the default status. The LANGUAGE menu will be dis- Note: When any language other than Japanese is shut down during setup, the...
... button. Select EXIT on the top menu, and press the MENU button. Language Setup You can select the language for 10 seconds or more, the monitor display returns to the default status. 19 Note: If the power is selected, the menu title and the statement of the selected language. 5. Press the... MENU button. The monitor display return to the default status. The LANGUAGE menu will be dis- Note: When any language other than Japanese is shut down during setup, the...

Operating Instructions
Page 20
... displayed. Check whether the external devices such as the camera are worn out. Symptom Cause/solution Reference pages Power is properly connected to restart this monitor. - Check if the power plug is not turned on the screen, and no picture is displayed. → Check the specifications of this unit. 8 -...may occur. If the picture display position is being selected. When the PC input signal does not meet the standards of this monitor, no image is observed by pressing the front buttons. Troubleshooting Check the following before requesting repair. Check if the power plug ...
... displayed. Check whether the external devices such as the camera are worn out. Symptom Cause/solution Reference pages Power is properly connected to restart this monitor. - Check if the power plug is not turned on the screen, and no picture is displayed. → Check the specifications of this unit. 8 -...may occur. If the picture display position is being selected. When the PC input signal does not meet the standards of this monitor, no image is observed by pressing the front buttons. Troubleshooting Check the following before requesting repair. Check if the power plug ...

Operating Instructions
Page 21
... (H) x 236 mm (D) {16-11/16" (W) 17-5/16" (H) x 9-1/16" (D)} (including the monitor stand) 423 mm (W) x 390 mm (H) x 80 mm (D) {16-11/16" (W) 15-3/8" (H) x 3-1/8" (D)} (including the monitor stand) Weight: WV-LC1700: 9.0 kg {20 lbs.} (including the monitor stand) 7.7 kg {17 lbs.} (excluding the monitor stand) WV-LC1900: 10 kg {22 lbs.} (including the monitor stand) 8.7 kg {19 lbs.} (excluding the...
... (H) x 236 mm (D) {16-11/16" (W) 17-5/16" (H) x 9-1/16" (D)} (including the monitor stand) 423 mm (W) x 390 mm (H) x 80 mm (D) {16-11/16" (W) 15-3/8" (H) x 3-1/8" (D)} (including the monitor stand) Weight: WV-LC1700: 9.0 kg {20 lbs.} (including the monitor stand) 7.7 kg {17 lbs.} (excluding the monitor stand) WV-LC1900: 10 kg {22 lbs.} (including the monitor stand) 8.7 kg {19 lbs.} (excluding the...
Operating Instructions
Page 22
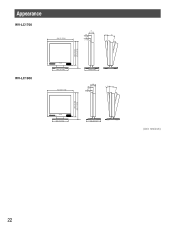
Appearance WV-LC1700 404 {15-15/16} 77 {3-1/16} 41 {1-5/8} 28 {1-1/8} 5° 15° 365 {14-3/8} 415 {16-5/16} WV-LC1900 INPUT SELECT MENU INPUT SELECT SELECT MENU AUDIO SELECT AUDIO Video Monitor WV-LD1700 Video Monitor WV-LC1700 265 {10-7/16} 236 {9-5/16} 423 {16-11/16} 80 50 {3-3/16} {2} 30 {1-3/16} 5° 15° 390 {15-3/8} 440 {17-5/16} INPUT SELECT MENU INPUT SELECT SELECT MENU AUDIO SELECT AUDIO Video Monitor WV-LD1700 Video Monitor WV-LC1900 265 {10-7/16} 236 {9-5/16} (Unit: mm/inch) 22
Appearance WV-LC1700 404 {15-15/16} 77 {3-1/16} 41 {1-5/8} 28 {1-1/8} 5° 15° 365 {14-3/8} 415 {16-5/16} WV-LC1900 INPUT SELECT MENU INPUT SELECT SELECT MENU AUDIO SELECT AUDIO Video Monitor WV-LD1700 Video Monitor WV-LC1700 265 {10-7/16} 236 {9-5/16} 423 {16-11/16} 80 50 {3-3/16} {2} 30 {1-3/16} 5° 15° 390 {15-3/8} 440 {17-5/16} INPUT SELECT MENU INPUT SELECT SELECT MENU AUDIO SELECT AUDIO Video Monitor WV-LD1700 Video Monitor WV-LC1900 265 {10-7/16} 236 {9-5/16} (Unit: mm/inch) 22


