
TH42PHW5UZ User Guide
Page 4
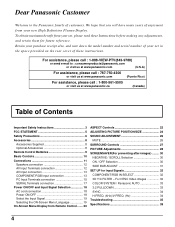
... Supplied 8 Optional Accessories 8 Remote Control Batteries 9 Basic Controls 10 Connections 11 Speakers connection 12 AV Input Terminals connection 12 AV Input connection 13 COMPONENT/RGB Input connection 13 PC Input Terminals connection 15 SERIAL Terminals connection 17 Power ON/OFF and Input Signal Selection 18 AC cord connection 18 Power ON/OFF 18 Select the Input Signal 19 Selecting the ON-Screen Menu Language 19 On-Screen Menu Display from Remote Control ....... 20 ASPECT Controls 22 ADJUSTING PICTURE POSITION/SIZE 24 SOUND ADJUSTMENT 26 MUTE 26 SURROUND Controls...
... Supplied 8 Optional Accessories 8 Remote Control Batteries 9 Basic Controls 10 Connections 11 Speakers connection 12 AV Input Terminals connection 12 AV Input connection 13 COMPONENT/RGB Input connection 13 PC Input Terminals connection 15 SERIAL Terminals connection 17 Power ON/OFF and Input Signal Selection 18 AC cord connection 18 Power ON/OFF 18 Select the Input Signal 19 Selecting the ON-Screen Menu Language 19 On-Screen Menu Display from Remote Control ....... 20 ASPECT Controls 22 ADJUSTING PICTURE POSITION/SIZE 24 SOUND ADJUSTMENT 26 MUTE 26 SURROUND Controls...
TH42PHW5UZ User Guide
Page 5
..., video games, computer images, teletext and images displayed in a particular installation. FCC CAUTION: To assure continued compliance and possible undesirable interference, the provided ferrite cores must be used when connecting this can be used in a residential installation. Refer to instructions on the High Definition Plasma Display. Any changes or modifications not expressly approved by one of the following measures: • Reorient or relocate the receiving antenna...
..., video games, computer images, teletext and images displayed in a particular installation. FCC CAUTION: To assure continued compliance and possible undesirable interference, the provided ferrite cores must be used when connecting this can be used in a residential installation. Refer to instructions on the High Definition Plasma Display. Any changes or modifications not expressly approved by one of the following measures: • Reorient or relocate the receiving antenna...
TH42PHW5UZ User Guide
Page 6
... a space of the Plasma Display. • If water spills onto the Plasma Display or foreign objects get inside it, a short-circuit may occur which could result in image, sound, etc. Avoid installing this product. If using the pedestal (optional accessory), leave a space of time, unplug the power cord from the wall outlet. Securely insert the power cord plug as far as no picture or no sound), or if...
... a space of the Plasma Display. • If water spills onto the Plasma Display or foreign objects get inside it, a short-circuit may occur which could result in image, sound, etc. Avoid installing this product. If using the pedestal (optional accessory), leave a space of time, unplug the power cord from the wall outlet. Securely insert the power cord plug as far as no picture or no sound), or if...
TH42PHW5UZ User Guide
Page 7
... the cloth to remove excess liquid. Disconnect the power plug from rubber or PVC. Cleaning and maintenance The front of still pictures include logos, video games, computer images, teletext and images displayed in a weak detergent solution and then wring the cloth dry. Burns or personal injuries can cause fire or electric shock. Wipe the panel surface gently using the Plasma Display Do not bring...
... the cloth to remove excess liquid. Disconnect the power plug from rubber or PVC. Cleaning and maintenance The front of still pictures include logos, video games, computer images, teletext and images displayed in a weak detergent solution and then wring the cloth dry. Burns or personal injuries can cause fire or electric shock. Wipe the panel surface gently using the Plasma Display Do not bring...
TH42PHW5UZ User Guide
Page 8
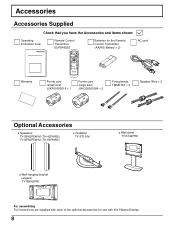
Accessories Accessories Supplied Check that you have the Accessories and items shown Operating Instruction book Remote Control Transmitter EUR646525 INPUT SURROUND VOL N R PICTURE SOUND SET UP PICTURE POS. /SIZE ASPECT PC OFF TIMER PLASMA DISPLAY Batteries for the Remote Control Transmitter (AA(R6) Battery × 2) AC cord Warranty Ferrite core (small size) J0KF00000018 × 1 Ferrite core (large size) J0KG00000054 × 2 Fixing bands TMME187 × 2 Speaker Wire × 2 Optional Accessories • Speakers TY...
Accessories Accessories Supplied Check that you have the Accessories and items shown Operating Instruction book Remote Control Transmitter EUR646525 INPUT SURROUND VOL N R PICTURE SOUND SET UP PICTURE POS. /SIZE ASPECT PC OFF TIMER PLASMA DISPLAY Batteries for the Remote Control Transmitter (AA(R6) Battery × 2) AC cord Warranty Ferrite core (small size) J0KF00000018 × 1 Ferrite core (large size) J0KG00000054 × 2 Fixing bands TMME187 × 2 Speaker Wire × 2 Optional Accessories • Speakers TY...
TH42PHW5UZ User Guide
Page 10
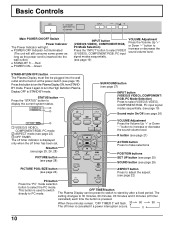
... Plasma Display can be plugged into the wall outlet.) • STAND-BY .....Red • POWER-ON.....Green INPUT button (VIDEO(S VIDEO), COMPONENT/RGB, PC Mode Selection) Press the "INPUT" button to select VIDEO (S VIDEO), COMPONENT/RGB, PC input VOLUME Adjustment Press the Volume Up "+" or Down "-" button to select the PC mode. Press it again to increase or decrease the sound volume level. ACTION button Press to make selections N button (see page 25, 26, 28) PICTURE SOUND SET UP POSITION buttons PICTURE button SET...
... Plasma Display can be plugged into the wall outlet.) • STAND-BY .....Red • POWER-ON.....Green INPUT button (VIDEO(S VIDEO), COMPONENT/RGB, PC Mode Selection) Press the "INPUT" button to select VIDEO (S VIDEO), COMPONENT/RGB, PC input VOLUME Adjustment Press the Volume Up "+" or Down "-" button to select the PC mode. Press it again to increase or decrease the sound volume level. ACTION button Press to make selections N button (see page 25, 26, 28) PICTURE SOUND SET UP POSITION buttons PICTURE button SET...
TH42PHW5UZ User Guide
Page 12
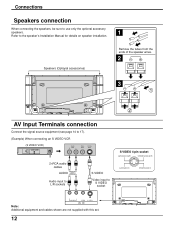
... (Optional accessories) Remove the tubes from the ends of the speaker wires. 2 3 1 2 AV Input Terminals connection Connect the signal source equipment (see page 14 to 17). (Example) When connecting an S VIDEO VCR (S VIDEO VCR) Audio R OUT L Video OUT S Video OUT 2×RCA audio cables AUDIO Audio input to L/R sockets S VIDEO Video input to the speaker's Installation Manual for details on speaker installation. Connections Speakers connection When connecting the speakers, be sure to use only the optional accessory speakers. 1 Refer to S VIDEO socket S VIDEO 4 pin socket...
... (Optional accessories) Remove the tubes from the ends of the speaker wires. 2 3 1 2 AV Input Terminals connection Connect the signal source equipment (see page 14 to 17). (Example) When connecting an S VIDEO VCR (S VIDEO VCR) Audio R OUT L Video OUT S Video OUT 2×RCA audio cables AUDIO Audio input to L/R sockets S VIDEO Video input to the speaker's Installation Manual for details on speaker installation. Connections Speakers connection When connecting the speakers, be sure to use only the optional accessory speakers. 1 Refer to S VIDEO socket S VIDEO 4 pin socket...
TH42PHW5UZ User Guide
Page 13
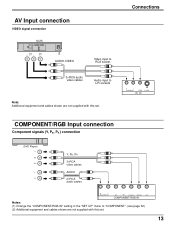
... S VIDEO COMPONENT/RGB Input connection Component signals (Y, PB, PR ) connection (DVD Player) Y PB PR L R Y, PB, PR 3×RCA video cables AUDIO 2×RCA audio cables R L AUDIO VD HD PR/CR/R PB/CB/B Y/G COMPONENT/RGB IN Notes: (1) Change the "COMPONENT/RGB-IN" setting in the "SET UP" menu to L/R sockets Note: Additional equipment and cables shown are not supplied with this set . AV Input connection VIDEO signal connection (VCR) Audio R OUT L Video OUT AUDIO-VIDEO Video input to RCA socket 3×RCA audio video cables Audio input...
... S VIDEO COMPONENT/RGB Input connection Component signals (Y, PB, PR ) connection (DVD Player) Y PB PR L R Y, PB, PR 3×RCA video cables AUDIO 2×RCA audio cables R L AUDIO VD HD PR/CR/R PB/CB/B Y/G COMPONENT/RGB IN Notes: (1) Change the "COMPONENT/RGB-IN" setting in the "SET UP" menu to L/R sockets Note: Additional equipment and cables shown are not supplied with this set . AV Input connection VIDEO signal connection (VCR) Audio R OUT L Video OUT AUDIO-VIDEO Video input to RCA socket 3×RCA audio video cables Audio input...
TH42PHW5UZ User Guide
Page 15
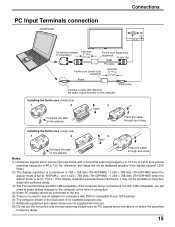
... size) (supplied) D-sub 15p RGB PC cable Ferrite core (small size) (supplied) Less than 3" 15/16 (10 cm) Audio Stereo plug Connect a cable that matches the audio output terminal on the computer. Connections PC Input Terminals connection COMPUTER AUDIO PC IN Conversion adapter (if necessary) POWER / R - If the computer being connected is not DDC1/2B-compatible, you will need to make setting changes to the computer at the time of connection. (4) Some PC models cannot...
... size) (supplied) D-sub 15p RGB PC cable Ferrite core (small size) (supplied) Less than 3" 15/16 (10 cm) Audio Stereo plug Connect a cable that matches the audio output terminal on the computer. Connections PC Input Terminals connection COMPUTER AUDIO PC IN Conversion adapter (if necessary) POWER / R - If the computer being connected is not DDC1/2B-compatible, you will need to make setting changes to the computer at the time of connection. (4) Some PC models cannot...
TH42PHW5UZ User Guide
Page 17
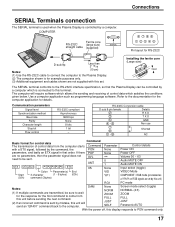
... ** 0 1 None Power OFF Volume 00 ~ 63 Audio MUTE OFF Audio MUTE ON Input select (toggle) Start (02h) Colon Parameter(s) End 3-character (1 - 5 bytes) (03h) command (3bytes) VID VIDEO Mode YP1 COMPONENT / RGB mode (processed as a Y/PB/PR or RGB signals as programming language software. Connections SERIAL Terminals connection The SERIAL terminal is used when the Plasma Display is controlled by a computer which is connected to this terminal. RS-232C Conversion cable D-sub...
... ** 0 1 None Power OFF Volume 00 ~ 63 Audio MUTE OFF Audio MUTE ON Input select (toggle) Start (02h) Colon Parameter(s) End 3-character (1 - 5 bytes) (03h) command (3bytes) VID VIDEO Mode YP1 COMPONENT / RGB mode (processed as a Y/PB/PR or RGB signals as programming language software. Connections SERIAL Terminals connection The SERIAL terminal is used when the Plasma Display is controlled by a computer which is connected to this terminal. RS-232C Conversion cable D-sub...
TH42PHW5UZ User Guide
Page 18
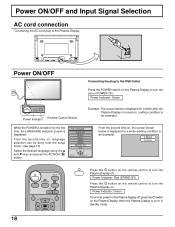
... the setup menu. (see page 19) Select the desired language using the and keys and press the ACTION button. STANDBY G POWER ON TY-50PHW5 Power Indicator Remote Control Sensor Example: The screen below is displayed for the first time, the LANGUAGE selection screen is displayed. VIDEO NORMAL INPUT SURROUND VOL N R Press the button on or in standby mode. 18 Power Indicator: Green To turn the power for the Plasma Display off . Power ON/OFF R - STANDBY G POWER ON INPUT - Power Indicator: Green R -
... the setup menu. (see page 19) Select the desired language using the and keys and press the ACTION button. STANDBY G POWER ON TY-50PHW5 Power Indicator Remote Control Sensor Example: The screen below is displayed for the first time, the LANGUAGE selection screen is displayed. VIDEO NORMAL INPUT SURROUND VOL N R Press the button on or in standby mode. 18 Power Indicator: Green To turn the power for the Plasma Display off . Power ON/OFF R - STANDBY G POWER ON INPUT - Power Indicator: Green R -
TH42PHW5UZ User Guide
Page 19
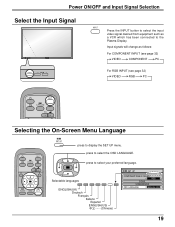
...-IN SELECT RGB SIGNAL SCREENSAVER OSD LANGUAGE ENGLISH (US) 19 Input signals will change as a VCR which has been connected to display the SET UP menu. VOL + INPUT Press the INPUT button to select the input video signal desired from equipment such as follows: For COMPONENT INPUT (see page 32) VIDEO RGB PC INPUT SURROUND VOL N R Selecting the On-Screen Menu Language INPUT SURROUND VOL N R PICTURE SOUND SET UP SET UP press to the Plasma Display.
...-IN SELECT RGB SIGNAL SCREENSAVER OSD LANGUAGE ENGLISH (US) 19 Input signals will change as a VCR which has been connected to display the SET UP menu. VOL + INPUT Press the INPUT button to select the input video signal desired from equipment such as follows: For COMPONENT INPUT (see page 32) VIDEO RGB PC INPUT SURROUND VOL N R Selecting the On-Screen Menu Language INPUT SURROUND VOL N R PICTURE SOUND SET UP SET UP press to the Plasma Display.
TH42PHW5UZ User Guide
Page 20
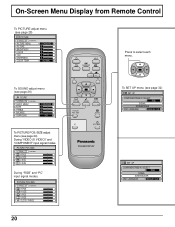
... N R PICTURE SOUND SET UP PICTURE POS. /SIZE ASPECT PC OFF TIMER PLASMA DISPLAY Press to select each menu. PICTURE POS./SIZE NORMALIZE H-POS H-SIZE V-POS V-SIZE NORMAL During "RGB" and "PC" input signal modes. On-Screen Menu Display from Remote Control To PICTURE adjust menu (see page 28) PICTURE NORMALIZE NORMAL PICTURE MENU PICTURE BRIGHTNESS COLOR TINT SHARPNESS COLOR TEMP STANDARD 0 0 0 0 0 NORMAL To SOUND adjust menu (see page 26) SOUND NORMALIZE NORMAL AUDIO MENU BASS TREBLE BALANCE SURROUND STANDARD 0 0 0 ON To PICTURE POS./SIZE adjust menu (see page 32) SET UP...
... N R PICTURE SOUND SET UP PICTURE POS. /SIZE ASPECT PC OFF TIMER PLASMA DISPLAY Press to select each menu. PICTURE POS./SIZE NORMALIZE H-POS H-SIZE V-POS V-SIZE NORMAL During "RGB" and "PC" input signal modes. On-Screen Menu Display from Remote Control To PICTURE adjust menu (see page 28) PICTURE NORMALIZE NORMAL PICTURE MENU PICTURE BRIGHTNESS COLOR TINT SHARPNESS COLOR TEMP STANDARD 0 0 0 0 0 NORMAL To SOUND adjust menu (see page 26) SOUND NORMALIZE NORMAL AUDIO MENU BASS TREBLE BALANCE SURROUND STANDARD 0 0 0 ON To PICTURE POS./SIZE adjust menu (see page 32) SET UP...
TH42PHW5UZ User Guide
Page 22
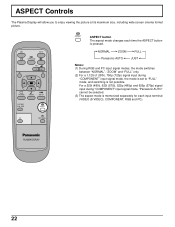
... format picture. ASPECT Controls The Plasma Display will allow you to "FULL" mode, and switching is not possible. NORMAL ZOOM FULL Panasonic AUTO JUST Notes: (1) During RGB and PC input signal modes, the mode switches between "NORMAL", "ZOOM" and "FULL" only. (2) For a 1,125i (1,080i), 750p (720p) signal input during "COMPONENT" input signal mode, "Panasonic AUTO" cannot be selected. (3) The aspect mode is pressed. INPUT SURROUND VOL N R PICTURE SOUND SET UP PICTURE POS. /SIZE ASPECT ASPECT ASPECT button The aspect mode changes...
... format picture. ASPECT Controls The Plasma Display will allow you to "FULL" mode, and switching is not possible. NORMAL ZOOM FULL Panasonic AUTO JUST Notes: (1) During RGB and PC input signal modes, the mode switches between "NORMAL", "ZOOM" and "FULL" only. (2) For a 1,125i (1,080i), 750p (720p) signal input during "COMPONENT" input signal mode, "Panasonic AUTO" cannot be selected. (3) The aspect mode is pressed. INPUT SURROUND VOL N R PICTURE SOUND SET UP PICTURE POS. /SIZE ASPECT ASPECT ASPECT button The aspect mode changes...
TH42PHW5UZ User Guide
Page 25
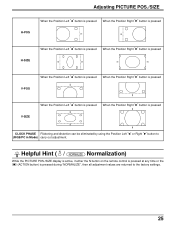
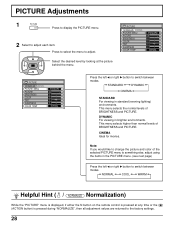
... all adjustment values are returned to (RGB/PC in Mode) carry out adjustment. Helpful Hint ( N / NORMALIZE Normalization) While the PICTURE POS./SIZE display is active, if either the N button on the remote control is pressed at any time or the (ACTION button) is pressed CLOCK PHASE Flickering and distortion can be eliminated by using the Position Left " " or Right " " button to the factory settings. 25...
... all adjustment values are returned to (RGB/PC in Mode) carry out adjustment. Helpful Hint ( N / NORMALIZE Normalization) While the PICTURE POS./SIZE display is active, if either the N button on the remote control is pressed at any time or the (ACTION button) is pressed CLOCK PHASE Flickering and distortion can be eliminated by using the Position Left " " or Right " " button to the factory settings. 25...
TH42PHW5UZ User Guide
Page 26
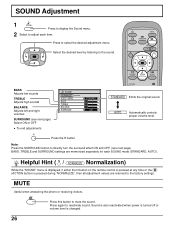
MUTE Useful when answering the phone or receiving visitors. 26 Press this button to adjust each SOUND mode (STANDARD, AUTO). INPUT SURROUND VOL N R PICTURE SOUND SET UP BASS Adjusts low sounds TREBLE Adjusts high sounds BALANCE Adjusts left and right volumes SURROUND (see next page) BASS, TREBLE and SURROUND settings are returned to the factory settings. SOUND Adjustment 1 SOUND Press to display the Sound menu. 2 Select to mute the sound. Press to reactivate sound. AUTO Automatically controls proper volume level. Press again...
MUTE Useful when answering the phone or receiving visitors. 26 Press this button to adjust each SOUND mode (STANDARD, AUTO). INPUT SURROUND VOL N R PICTURE SOUND SET UP BASS Adjusts low sounds TREBLE Adjusts high sounds BALANCE Adjusts left and right volumes SURROUND (see next page) BASS, TREBLE and SURROUND settings are returned to the factory settings. SOUND Adjustment 1 SOUND Press to display the Sound menu. 2 Select to mute the sound. Press to reactivate sound. AUTO Automatically controls proper volume level. Press again...
TH42PHW5UZ User Guide
Page 28
..., adjust using the items in standard (evening lighting) environments. PICTURE Adjustments 1 PICTURE Press to display the PICTURE menu. 2 Select to switch between modes. STANDARD DYNAMIC CINEMA STANDARD For viewing in the PICTURE menu. (see next page) Press the left or right button to adjust each item. CINEMA Ideal for movies. This menu selects the normal levels of BRIGHTNESS and PICTURE. Note: If you would like to change the picture and color...
..., adjust using the items in standard (evening lighting) environments. PICTURE Adjustments 1 PICTURE Press to display the PICTURE menu. 2 Select to switch between modes. STANDARD DYNAMIC CINEMA STANDARD For viewing in the PICTURE menu. (see next page) Press the left or right button to adjust each item. CINEMA Ideal for movies. This menu selects the normal levels of BRIGHTNESS and PICTURE. Note: If you would like to change the picture and color...
TH42PHW5UZ User Guide
Page 32
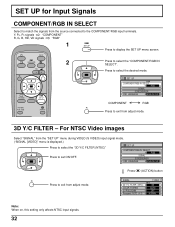
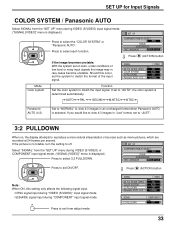
N R PICTURE SOUND SET UP PICTURE POS. /SIZE ASPECT SET UP COMPONENT/RGB-IN SELECT RGB SIGNAL SCREENSAVER OSD LANGUAGE ENGLISH (US) COMPONENT RGB R Press to exit from the source connected to the COMPONENT/RGB input terminals. SIGNAL 3D Y/C FILTER (NTSC) COLOR SYSTEM 3:2 PULLDOWN Panasonic AUTO (4:3) [ VIDEO ] ON AUTO OFF NORMAL Note: When on, this setting only affects NTSC input signals. 32 SET UP for Input Signals COMPONENT/RGB IN SELECT Select to match...
N R PICTURE SOUND SET UP PICTURE POS. /SIZE ASPECT SET UP COMPONENT/RGB-IN SELECT RGB SIGNAL SCREENSAVER OSD LANGUAGE ENGLISH (US) COMPONENT RGB R Press to exit from the source connected to the COMPONENT/RGB input terminals. SIGNAL 3D Y/C FILTER (NTSC) COLOR SYSTEM 3:2 PULLDOWN Panasonic AUTO (4:3) [ VIDEO ] ON AUTO OFF NORMAL Note: When on, this setting only affects NTSC input signals. 32 SET UP for Input Signals COMPONENT/RGB IN SELECT Select to match...
TH42PHW5UZ User Guide
Page 33
...) COLOR SYSTEM 3:2 PULLDOWN Panasonic AUTO (4:3) [ VIDEO ] ON AUTO OFF NORMAL SIGNAL 3:2 PULLDOWN [ COMPONENT ] OFF 33 If you would like to view 4:3 images in "Just" format, set the system to reproduce a more natural interpretation of sources such as movie pictures, which are recorded at 24 frames per second. If the picture is not stable, turn the setting to view 4:3 images in rare cases become unstable. SET UP Select "SIGNAL" from adjust mode. SET...
...) COLOR SYSTEM 3:2 PULLDOWN Panasonic AUTO (4:3) [ VIDEO ] ON AUTO OFF NORMAL SIGNAL 3:2 PULLDOWN [ COMPONENT ] OFF 33 If you would like to view 4:3 images in "Just" format, set the system to reproduce a more natural interpretation of sources such as movie pictures, which are recorded at 24 frames per second. If the picture is not stable, turn the setting to view 4:3 images in rare cases become unstable. SET UP Select "SIGNAL" from adjust mode. SET...
TH42PHW5UZ User Guide
Page 35
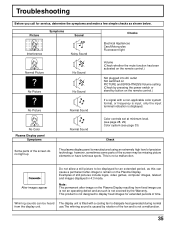
... the power switch or stand-by rotation of still pictures include logos, video games, computer images, teletext and images displayed in 4:3 mode. Picture Symptoms Sound Checks Interference Noisy Sound Electrical Appliances Cars/Motorcycles Fluorescent light Normal Picture No Picture No Sound No Sound Volume (Check whether the mute function has been activated on the remote control.) Not plugged into AC outlet Not switched on the Plasma Display resulting from the display unit. No Color Plasma Display panel Symptoms Normal Sound Color controls set at...
... the power switch or stand-by rotation of still pictures include logos, video games, computer images, teletext and images displayed in 4:3 mode. Picture Symptoms Sound Checks Interference Noisy Sound Electrical Appliances Cars/Motorcycles Fluorescent light Normal Picture No Picture No Sound No Sound Volume (Check whether the mute function has been activated on the remote control.) Not plugged into AC outlet Not switched on the Plasma Display resulting from the display unit. No Color Plasma Display panel Symptoms Normal Sound Color controls set at...


