
TH37PWD7UX User Guide
Page 4
...8 Accessories Supplied 8 Remote Control Batteries 8 Connections 9 PC Input Terminals connection 10 SERIAL Terminals connection 11 Power ON / OFF 12 Initial selections 13 Selecting the input signal 13 Selecting the On-Screen Menu Language 13 Basic Controls 14 On-Screen Menu Displays 16 ASPECT Controls 18 Adjusting PICTURE POSITION / SIZE 19 MULTI PIP 20 PICTURE Adjustments 21 ADVANCED SETTINGS 22 SOUND Adjustment 23 MUTE 23 Digital Zoom 24 PRESENT TIME SETUP / SET UP TIMER 25 PRESENT TIME SETUP 25 SET UP TIMER 26 SCREENSAVER (For preventing after-images) ..... 27 Setup of...
...8 Accessories Supplied 8 Remote Control Batteries 8 Connections 9 PC Input Terminals connection 10 SERIAL Terminals connection 11 Power ON / OFF 12 Initial selections 13 Selecting the input signal 13 Selecting the On-Screen Menu Language 13 Basic Controls 14 On-Screen Menu Displays 16 ASPECT Controls 18 Adjusting PICTURE POSITION / SIZE 19 MULTI PIP 20 PICTURE Adjustments 21 ADVANCED SETTINGS 22 SOUND Adjustment 23 MUTE 23 Digital Zoom 24 PRESENT TIME SETUP / SET UP TIMER 25 PRESENT TIME SETUP 25 SET UP TIMER 26 SCREENSAVER (For preventing after-images) ..... 27 Setup of...

TH37PWD7UX User Guide
Page 7
... and images displayed in a place away from direct or reflected light from becoming dusty. • Built-up . This Plasma Display radiates infrared rays, therefore it with the following accessories are manufactured by Matsushita Electric Industrial Co., Ltd.) • Speakers TY-SP37P5W-K (TH-37PWD7UX), TY-SP42P5W-K (TH-42PWD7UX), TY-SP50P5W-K (TH-50PHD7UX) • Pedestal TY-ST05-K, TY-ST07-K • Wall stand...
... and images displayed in a place away from direct or reflected light from becoming dusty. • Built-up . This Plasma Display radiates infrared rays, therefore it with the following accessories are manufactured by Matsushita Electric Industrial Co., Ltd.) • Speakers TY-SP37P5W-K (TH-37PWD7UX), TY-SP42P5W-K (TH-42PWD7UX), TY-SP50P5W-K (TH-50PHD7UX) • Pedestal TY-ST05-K, TY-ST07-K • Wall stand...
TH37PWD7UX User Guide
Page 12
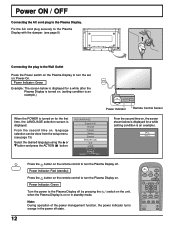
... SELECT SET 12 Press the button on the remote control to turn the Plasma Display on the remote control to turn the Plasma Display off. Power Indicator: Red (standby) Press the button on . OSD LANGUAGE English (UK) Deutsch Français Italiano Español ENGLISH (US) From the second time on . (setting condition is an example.) R - INPUT SURROUND VOL N R PICTURE SOUND SET UP MULTI ZOOM PIP SWAP SELECT MOVE PICTURE POS. /SIZE ASPECT Power ON / OFF Connecting the AC cord plug...
... SELECT SET 12 Press the button on the remote control to turn the Plasma Display on the remote control to turn the Plasma Display off. Power Indicator: Red (standby) Press the button on . OSD LANGUAGE English (UK) Deutsch Français Italiano Español ENGLISH (US) From the second time on . (setting condition is an example.) R - INPUT SURROUND VOL N R PICTURE SOUND SET UP MULTI ZOOM PIP SWAP SELECT MOVE PICTURE POS. /SIZE ASPECT Power ON / OFF Connecting the AC cord plug...
TH37PWD7UX User Guide
Page 13
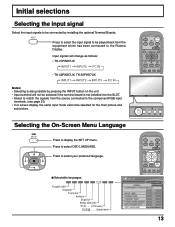
... AUTO POWER OFF OSD LANGUAGE OFF ENGLISH (US) 13 R - INPUT Press to select the input signal to be selected for the main picture and sub picture. Input signals will not be selected if the terminal board is also possible by installing the optional Terminal Boards. Press to the component/RGB input terminals. (see page 33) • In 2 screen display, the same input mode cannot be played back from the source connected to select...
... AUTO POWER OFF OSD LANGUAGE OFF ENGLISH (US) 13 R - INPUT Press to select the input signal to be selected for the main picture and sub picture. Input signals will not be selected if the terminal board is also possible by installing the optional Terminal Boards. Press to the component/RGB input terminals. (see page 33) • In 2 screen display, the same input mode cannot be played back from the source connected to select...
TH37PWD7UX User Guide
Page 14
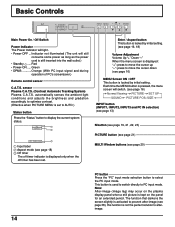
... the power cord is pressed, the menu screen will light. • Power-OFF ... Each time the MENU button is still inserted into the wall outlet.) • Standby ..... Note: After-image (image lag) may occur on the plasma display panel when a still picture is used to switch directly to PC input mode. STANDBY G POWER ON TH-42PWD7 - + INPUT MENU VOL ENTER Main Power On / Off Switch Power Indicator The Power Indicator will switch. (see page 16) Normal Viewing PICTURE SET UP SOUND PICTURE POS./SIZE INPUT button (INPUT1...
... the power cord is pressed, the menu screen will light. • Power-OFF ... Each time the MENU button is still inserted into the wall outlet.) • Standby ..... Note: After-image (image lag) may occur on the plasma display panel when a still picture is used to switch directly to PC input mode. STANDBY G POWER ON TH-42PWD7 - + INPUT MENU VOL ENTER Main Power On / Off Switch Power Indicator The Power Indicator will switch. (see page 16) Normal Viewing PICTURE SET UP SOUND PICTURE POS./SIZE INPUT button (INPUT1...

TH37PWD7UX User Guide
Page 15
... stand-by after a fixed period. just as if you were at the power switch (see page 12). Note: The surround settings are enormous. POSITION buttons SOUND button (see page 23) SET UP button (see page 16) Digital Zoom (see page 23) SURROUND VOL N R PICTURE SOUND SET UP MULTI ZOOM PIP SWAP SELECT MOVE PICTURE POS. /SIZE ASPECT PC OFF TIMER PLASMA DISPLAY Volume Adjustment Press the Volume Up "+" or Down "-" button to access Digital Zoom. OFF TIMER button The Plasma Display...
... stand-by after a fixed period. just as if you were at the power switch (see page 12). Note: The surround settings are enormous. POSITION buttons SOUND button (see page 23) SET UP button (see page 16) Digital Zoom (see page 23) SURROUND VOL N R PICTURE SOUND SET UP MULTI ZOOM PIP SWAP SELECT MOVE PICTURE POS. /SIZE ASPECT PC OFF TIMER PLASMA DISPLAY Volume Adjustment Press the Volume Up "+" or Down "-" button to access Digital Zoom. OFF TIMER button The Plasma Display...
TH37PWD7UX User Guide
Page 16
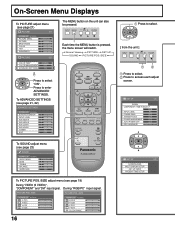
... 19) During "VIDEO (S VIDEO)", "COMPONENT" and "DVI" input signal. Normal Viewing PICTURE SET UP SOUND PICTURE POS./SIZE INPUT SURROUND VOL N R PICTURE SOUND SET UP MULTI ZOOM PIP SWAP SELECT MOVE PICTURE POS. /SIZE ASPECT To SOUND adjust menu (see page 23) SOUND NORMALIZE NORMAL AUDIO MENU BASS TREBLE BALANCE SURROUND STANDARD 0 0 0 OFF PC OFF TIMER PLASMA DISPLAY To PICTURE POS./SIZE adjust menu (see page 21, 22) ADVANCED SETTINGS NORMALIZE NORMAL BLACK EXTENSION INPUT LEVEL W/B HIGH R W/B HIGH B W/B LOW R W/B LOW B GAMMA AGC 0 0 0 0 0 0 2.2 OFF The MENU button on the...
... 19) During "VIDEO (S VIDEO)", "COMPONENT" and "DVI" input signal. Normal Viewing PICTURE SET UP SOUND PICTURE POS./SIZE INPUT SURROUND VOL N R PICTURE SOUND SET UP MULTI ZOOM PIP SWAP SELECT MOVE PICTURE POS. /SIZE ASPECT To SOUND adjust menu (see page 23) SOUND NORMALIZE NORMAL AUDIO MENU BASS TREBLE BALANCE SURROUND STANDARD 0 0 0 OFF PC OFF TIMER PLASMA DISPLAY To PICTURE POS./SIZE adjust menu (see page 21, 22) ADVANCED SETTINGS NORMALIZE NORMAL BLACK EXTENSION INPUT LEVEL W/B HIGH R W/B HIGH B W/B LOW R W/B LOW B GAMMA AGC 0 0 0 0 0 0 2.2 OFF The MENU button on the...
TH37PWD7UX User Guide
Page 17
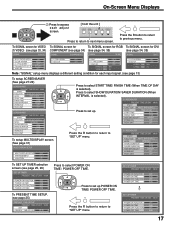
..., 35) SIGNAL [DVI] 3D Y/C FILTER (NTSC) COLOR SYSTEM 3 : 2 PULLDOWN Panasonic AUTO (4 : 3) VIDEO NR ON AUTO OFF NORMAL OFF 3 : 2 PULLDOWN OFF VIDEO NR OFF SYNC 3 : 2 PULLDOWN VIDEO NR H-FREQ. 33.8 V-FREQ. 60.0 AUTO OFF OFF kHz Hz 3 : 2 PULLDOWN VIDEO NR H-FREQ. 33.8 V-FREQ. 60.0 Note: "SIGNAL" setup menu displays a different setting condition for each adjust screen. [ from the unit ] - + INPUT MENU VOL ENTER Press to return to next menu screen. SET UP TIMER PRESENT TIME OF...
..., 35) SIGNAL [DVI] 3D Y/C FILTER (NTSC) COLOR SYSTEM 3 : 2 PULLDOWN Panasonic AUTO (4 : 3) VIDEO NR ON AUTO OFF NORMAL OFF 3 : 2 PULLDOWN OFF VIDEO NR OFF SYNC 3 : 2 PULLDOWN VIDEO NR H-FREQ. 33.8 V-FREQ. 60.0 AUTO OFF OFF kHz Hz 3 : 2 PULLDOWN VIDEO NR H-FREQ. 33.8 V-FREQ. 60.0 Note: "SIGNAL" setup menu displays a different setting condition for each adjust screen. [ from the unit ] - + INPUT MENU VOL ENTER Press to return to next menu screen. SET UP TIMER PRESENT TIME OF...

TH37PWD7UX User Guide
Page 18
... viewing the picture at its maximum size, including wide screen cinema format picture. Certain 4:3 program material, such as this can be displayed in accordance with aspect correction applied to the center of the screen so that the ASPECT be set to "FULL" mode, and switching is expanded Changes in NORMAL mode for each time the ENTER button is designed to automatically adjust the aspect ratio to NORMAL. • If adjusting the PICTURE V-POS/V-SIZE...
... viewing the picture at its maximum size, including wide screen cinema format picture. Certain 4:3 program material, such as this can be displayed in accordance with aspect correction applied to the center of the screen so that the ASPECT be set to "FULL" mode, and switching is expanded Changes in NORMAL mode for each time the ENTER button is designed to automatically adjust the aspect ratio to NORMAL. • If adjusting the PICTURE V-POS/V-SIZE...
TH37PWD7UX User Guide
Page 20
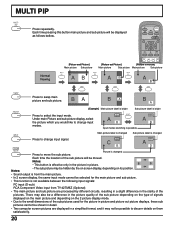
... changed Press to select the input mode. INPUT SURROUND VOL N R Normal Viewing PICTURE SOUND SET UP MULTI ZOOM PIP SWAP SELECT MOVE [Picture and Picture] Main picture Sub picture [Picture out Picture] [Picture in the clarity of the sub pictures used for the main picture and sub picture. • This function is not available between the following input signals: PC input (D-sub) RCA Component Video input from TY-42TM6Z (Optional) • The main picture and sub picture are displayed in picture...
... changed Press to select the input mode. INPUT SURROUND VOL N R Normal Viewing PICTURE SOUND SET UP MULTI ZOOM PIP SWAP SELECT MOVE [Picture and Picture] Main picture Sub picture [Picture out Picture] [Picture in the clarity of the sub pictures used for the main picture and sub picture. • This function is not available between the following input signals: PC input (D-sub) RCA Component Video input from TY-42TM6Z (Optional) • The main picture and sub picture are displayed in picture...
TH37PWD7UX User Guide
Page 21
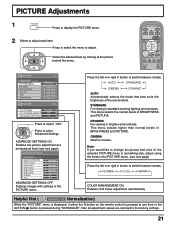
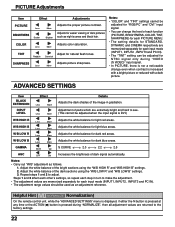
... change the picture and color of the selected PICTURE menu to switch between modes. DYNAMIC For viewing in brighter environments. ADVANCED SETTINGS ON Enables fine picture adjustment at a professional level (see next page) Press the left or right button to something else, adjust using the items in standard (evening lighting) environments. CINEMA Ideal for movies. INPUT SURROUND VOL N R PICTURE SOUND SET UP MULTI ZOOM PIP SWAP SELECT MOVE PICTURE POS. /SIZE ASPECT PICTURE NORMALIZE NORMAL PICTURE MENU PICTURE...
... change the picture and color of the selected PICTURE menu to switch between modes. DYNAMIC For viewing in brighter environments. ADVANCED SETTINGS ON Enables fine picture adjustment at a professional level (see next page) Press the left or right button to something else, adjust using the items in standard (evening lighting) environments. CINEMA Ideal for movies. INPUT SURROUND VOL N R PICTURE SOUND SET UP MULTI ZOOM PIP SWAP SELECT MOVE PICTURE POS. /SIZE ASPECT PICTURE NORMALIZE NORMAL PICTURE MENU PICTURE...
TH37PWD7UX User Guide
Page 22
... using the "W/B HIGH R" and "W/B HIGH B" settings. 2. Helpful Hint ( N / NORMALIZE Normalization) On the remote control unit, while the "ADVANCED SETTINGS" menu is displayed, if either the N button is pressed at any time or the ACTION ( ) button is pressed during "VIDEO (S VIDEO)" input signal. • In PICTURE, there is nor a noticeable change the level of the image in turn to make the adjustment. • The adjustment values are returned to adjust. More W/B LOW R Less Adjusts...
... using the "W/B HIGH R" and "W/B HIGH B" settings. 2. Helpful Hint ( N / NORMALIZE Normalization) On the remote control unit, while the "ADVANCED SETTINGS" menu is displayed, if either the N button is pressed at any time or the ACTION ( ) button is pressed during "VIDEO (S VIDEO)" input signal. • In PICTURE, there is nor a noticeable change the level of the image in turn to make the adjustment. • The adjustment values are returned to adjust. More W/B LOW R Less Adjusts...

TH37PWD7UX User Guide
Page 25
... timer can switch the Plasma Display ON or OFF. Press to display the SET UP menu. button: Forward SET PRESENT TIME OF DAY 99:99 button: Back Notes: • Pressing " " or " " button once changes PRESENT TIME OF DAY 1 minute. • Pressing " " or " " button continuously changes PRESENT TIME OF DAY by 15 minutes. 2 Press to select SET UP TIMER or PRESENT TIME SETUP. INPUT SURROUND VOL N R PICTURE SOUND SET UP MULTI ZOOM 2 Press to select Set. To set . Before attempting Timer Set...
... timer can switch the Plasma Display ON or OFF. Press to display the SET UP menu. button: Forward SET PRESENT TIME OF DAY 99:99 button: Back Notes: • Pressing " " or " " button once changes PRESENT TIME OF DAY 1 minute. • Pressing " " or " " button continuously changes PRESENT TIME OF DAY by 15 minutes. 2 Press to select SET UP TIMER or PRESENT TIME SETUP. INPUT SURROUND VOL N R PICTURE SOUND SET UP MULTI ZOOM 2 Press to select Set. To set . Before attempting Timer Set...

TH37PWD7UX User Guide
Page 27
... ADJUST BRIGHT WOBBLING OFF PEAK LIMIT OFF Press to select the desired function. To stop the SCREENSAVER under ON, press the R button. 27 SCREENSAVER (For preventing after-images) Do not display a still picture, especially in 4:3 mode, for any length of time. SET UP 2/2 SCREENSAVER MULTI DISPLAY SETUP SET UP TIMER PRESENT TIME SETUP Press to select the SCREENSAVER screen. 3 NEGATIVE / SCROLL selection Press to select START. SCREENSAVER When the MODE...
... ADJUST BRIGHT WOBBLING OFF PEAK LIMIT OFF Press to select the desired function. To stop the SCREENSAVER under ON, press the R button. 27 SCREENSAVER (For preventing after-images) Do not display a still picture, especially in 4:3 mode, for any length of time. SET UP 2/2 SCREENSAVER MULTI DISPLAY SETUP SET UP TIMER PRESENT TIME SETUP Press to select the SCREENSAVER screen. 3 NEGATIVE / SCROLL selection Press to select START. SCREENSAVER When the MODE...

TH37PWD7UX User Guide
Page 28
... the display when turned ON. Press to display SCREENSAVER menu. button: Forward Notes: button: Back • Pressing " " or " " button once changes the Time 1 minute. [However, switching occurs every 15 minutes when Periodic Time is selected). SET UP 2/2 2 Press to setup. SCREENSAVER (For preventing after-images ) Setup of SCREENSAVER Time After selecting TIME OF DAY or INTERVAL, the relevant Time Setup will not work unless "PRESENT TIME OF DAY" is viewed for an extended time, the screen...
... the display when turned ON. Press to display SCREENSAVER menu. button: Forward Notes: button: Back • Pressing " " or " " button once changes the Time 1 minute. [However, switching occurs every 15 minutes when Periodic Time is selected). SET UP 2/2 2 Press to setup. SCREENSAVER (For preventing after-images ) Setup of SCREENSAVER Time After selecting TIME OF DAY or INTERVAL, the relevant Time Setup will not work unless "PRESENT TIME OF DAY" is viewed for an extended time, the screen...
TH37PWD7UX User Guide
Page 30
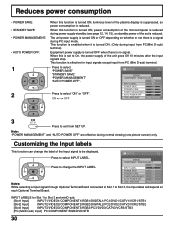
... POWER MANAGEMENT OFF Notes: AUTO POWER OFF OSD LANGUAGE OFF ENGLISH (US) While selecting a Input signal through Optional Terminal Board connected to Slot 1 to select "POWER SAVE" "STANDBY SAVE" "POWER MANAGEMENT" "AUTO POWER OFF". This function is enabled when it is turned ON. (Only during input from PC(Mini D-sub) terminal) Equipment power supply is turned OFF when there is a signal during normal viewing (one picture screen) only. Press to Slot 3, the Input...
... POWER MANAGEMENT OFF Notes: AUTO POWER OFF OSD LANGUAGE OFF ENGLISH (US) While selecting a Input signal through Optional Terminal Board connected to Slot 1 to select "POWER SAVE" "STANDBY SAVE" "POWER MANAGEMENT" "AUTO POWER OFF". This function is enabled when it is turned ON. (Only during input from PC(Mini D-sub) terminal) Equipment power supply is turned OFF when there is a signal during normal viewing (one picture screen) only. Press to Slot 3, the Input...
TH37PWD7UX User Guide
Page 31
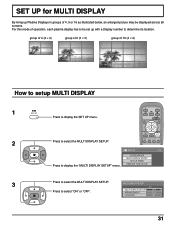
... select "ON" or "OFF". MULTI DISPLAY SETUP Press to display the "MULTI DISPLAY SETUP" menu. SCREENSAVER MULTI DISPLAY SETUP SET UP TIMER PRESENT TIME SETUP 3 Press to display the SET UP menu. MULTI DISPLAY SETUP ARRANGEMENT LOCATION OFF 2 × 2 A1 31 group of 4 (2 × 2) group of 9 (3 × 3) group of 16 (4 × 4) How to setup MULTI DISPLAY 1 SET UP Press to select the MULTI DISPLAY SETUP. INPUT SURROUND VOL N R PICTURE SOUND SET UP MULTI ZOOM 2 Press to select the MULTI DISPLAY SETUP...
... select "ON" or "OFF". MULTI DISPLAY SETUP Press to display the "MULTI DISPLAY SETUP" menu. SCREENSAVER MULTI DISPLAY SETUP SET UP TIMER PRESENT TIME SETUP 3 Press to display the SET UP menu. MULTI DISPLAY SETUP ARRANGEMENT LOCATION OFF 2 × 2 A1 31 group of 4 (2 × 2) group of 9 (3 × 3) group of 16 (4 × 4) How to setup MULTI DISPLAY 1 SET UP Press to select the MULTI DISPLAY SETUP. INPUT SURROUND VOL N R PICTURE SOUND SET UP MULTI ZOOM 2 Press to select the MULTI DISPLAY SETUP...
TH37PWD7UX User Guide
Page 37
... of input signal. When the power is the sound of the screen where the image is displayed. This Plasma Display uses special image processing. Hence a slight time lag may be performed. Check whether the remote control designed specifically for service, determine the symptoms and make a few simple checks as a cinema size program) with the unit is being driven may occur between image and audio, depending on the type of the picture on , a sound...
... of input signal. When the power is the sound of the screen where the image is displayed. This Plasma Display uses special image processing. Hence a slight time lag may be performed. Check whether the remote control designed specifically for service, determine the symptoms and make a few simple checks as a cinema size program) with the unit is being driven may occur between image and audio, depending on the type of the picture on , a sound...
TH37PWD7UX User Guide
Page 38
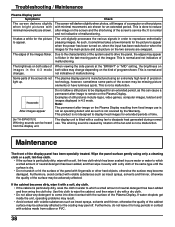
.... The unit digitally processes the various signals in pure water or water to wipe the cabinet, and then wipe it for the main picture and sub picture on , when the input has been switched or when the images for long periods in 4:3 mode. Furthermore, do not The plasma display panel is not covered by rotation of malfunctioning. Some parts of precision light up...
.... The unit digitally processes the various signals in pure water or water to wipe the cabinet, and then wipe it for the main picture and sub picture on , when the input has been switched or when the images for long periods in 4:3 mode. Furthermore, do not The plasma display panel is not covered by rotation of malfunctioning. Some parts of precision light up...
TH37PWD7UX User Guide
Page 43
... by products not supplied by anyone other things, nonexpanded standard 4:3 pictures, or onscreen data in a stationary and fixed location). THERE ARE NO WARRANTIES WHICH EXTEND BEYOND THE DESCRIPTION ON THE FACE HEREOF. If the problem is rendered. On-site service does not include removal or re-installation of an installed product. To locate a Panasonic Authorized Servicenter call toll-free 1-800-211...
... by products not supplied by anyone other things, nonexpanded standard 4:3 pictures, or onscreen data in a stationary and fixed location). THERE ARE NO WARRANTIES WHICH EXTEND BEYOND THE DESCRIPTION ON THE FACE HEREOF. If the problem is rendered. On-site service does not include removal or re-installation of an installed product. To locate a Panasonic Authorized Servicenter call toll-free 1-800-211...


