

TH37PWD6UX User Guide
Page 4
... model number and serial number of SCREENSAVER Time 26 Reduces screen after-image 26 SIDE BAR ADJUST 27 Digital Zoom 28 Reduces power consumption 29 Customizing the Input labels 29 SET UP for Input Signals 32 COMPONENT/RGB IN SELECT 32 3D Y/C FILTER - For NTSC Video images 32 COLOR SYSTEM / Panasonic AUTO 33 3:2 PULLDOWN 33 SYNC 34 H-FREQ. (kHz)/V-FREQ. (Hz 34 Troubleshooting 35 Input signal can be displayed 36 Specifications 37 4 Table of Contents Important Safety Instructions...
... model number and serial number of SCREENSAVER Time 26 Reduces screen after-image 26 SIDE BAR ADJUST 27 Digital Zoom 28 Reduces power consumption 29 Customizing the Input labels 29 SET UP for Input Signals 32 COMPONENT/RGB IN SELECT 32 3D Y/C FILTER - For NTSC Video images 32 COLOR SYSTEM / Panasonic AUTO 33 3:2 PULLDOWN 33 SYNC 34 H-FREQ. (kHz)/V-FREQ. (Hz 34 Troubleshooting 35 Input signal can be displayed 36 Specifications 37 4 Table of Contents Important Safety Instructions...
TH37PWD6UX User Guide
Page 5
... against harmful interference in a particular installation. Operation is connected. • Consult the dealer or an experienced radio/TV technician for an extended period, as a supplied accessory must be determined by turning the equipment off and on the Plasma Display. This equipment generates, uses and can cause permanent after-image to remain on , the user is encouraged to try to correct...
... against harmful interference in a particular installation. Operation is connected. • Consult the dealer or an experienced radio/TV technician for an extended period, as a supplied accessory must be determined by turning the equipment off and on the Plasma Display. This equipment generates, uses and can cause permanent after-image to remain on , the user is encouraged to try to correct...
TH37PWD6UX User Guide
Page 7
...-K • Wall stand TY-ST42PW1 • Wall-hanging bracket (vertical TY-WK37PV3 (TH-37PWD6UX) TY-WK42PV1 (TH-42PWD6UX) • Ceiling unit TY-CE42PS1 • Tuner Connection Terminal Board TY-42TM6H • RCA Composite Video Terminal Board TY-42TM6V • RCA Component Video Terminal Board TY-42TM6Z Always be adversely affected. Burns or personal injuries can cause a permanent after-image to remain on the power cord plug can...
...-K • Wall stand TY-ST42PW1 • Wall-hanging bracket (vertical TY-WK37PV3 (TH-37PWD6UX) TY-WK42PV1 (TH-42PWD6UX) • Ceiling unit TY-CE42PS1 • Tuner Connection Terminal Board TY-42TM6H • RCA Composite Video Terminal Board TY-42TM6V • RCA Component Video Terminal Board TY-42TM6Z Always be adversely affected. Burns or personal injuries can cause a permanent after-image to remain on the power cord plug can...

TH37PWD6UX User Guide
Page 10
... connected to "16:9". If the display resolution exceeds these maximums, it may not be input are DDC1/2B-compatible. Installing the ferrite core (Small size) 1 2 3 Open Pull back the tabs (in two places) Press the cable through and close Notes: (1) Computer signals which can be possible to show fine detail with this set. (8) Do not set . (5) There is no need to make setting changes to use...
... connected to "16:9". If the display resolution exceeds these maximums, it may not be input are DDC1/2B-compatible. Installing the ferrite core (Small size) 1 2 3 Open Pull back the tabs (in two places) Press the cable through and close Notes: (1) Computer signals which can be possible to show fine detail with this set. (8) Do not set . (5) There is no need to make setting changes to use...

TH37PWD6UX User Guide
Page 11
... format for RS-232C D-sub 9p Less than 3" 15/16 (10 cm) Notes: (1) Use the RS-232C cable to connect the computer to this set. COMPUTER Ferrite core RS-232C (large size) Straight cable (supplied) SERIAL 6789 12345 Pin layout for control data The transmission of control data which is connected to the Plasma Display. (2) The computer shown is for the first command to come...
... format for RS-232C D-sub 9p Less than 3" 15/16 (10 cm) Notes: (1) Use the RS-232C cable to connect the computer to this set. COMPUTER Ferrite core RS-232C (large size) Straight cable (supplied) SERIAL 6789 12345 Pin layout for control data The transmission of control data which is connected to the Plasma Display. (2) The computer shown is for the first command to come...
TH37PWD6UX User Guide
Page 12
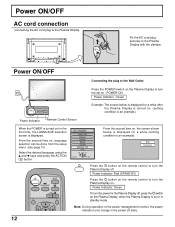
... time, the LANGUAGE selection screen is an example). STANDBY G POWER ON TH-42PWD6 Power Indicator Remote Control Sensor Press the POWER switch on the Plasma Display to turn the set on , language selection can be done from the setup menu. (see page 13) Select the desired language using the and keys and press the ACTION button. Power Indicator: Green To turn the power for a while (setting condition is displayed. Power Indicator: Red (STAND-BY) Press the button...
... time, the LANGUAGE selection screen is an example). STANDBY G POWER ON TH-42PWD6 Power Indicator Remote Control Sensor Press the POWER switch on the Plasma Display to turn the set on , language selection can be done from the setup menu. (see page 13) Select the desired language using the and keys and press the ACTION button. Power Indicator: Green To turn the power for a while (setting condition is displayed. Power Indicator: Red (STAND-BY) Press the button...

TH37PWD6UX User Guide
Page 13
... installed into the SLOT. (2) Select to match the signals from the source connected to the component/RGB input terminals. (see page 32) (3) In 2 screen display, the same input mode cannot be played back from the equipment which has been connected to the Plasma Display. Input Signal Selection Select the Input Signal INPUT Press the INPUT button to select the input signal to be selected for the main picture and sub picture. press to display the SET...
... installed into the SLOT. (2) Select to match the signals from the source connected to the component/RGB input terminals. (see page 32) (3) In 2 screen display, the same input mode cannot be played back from the equipment which has been connected to the Plasma Display. Input Signal Selection Select the Input Signal INPUT Press the INPUT button to select the input signal to be selected for the main picture and sub picture. press to display the SET...

TH37PWD6UX User Guide
Page 15
... previous menu screen. The setting changes to turn the Plasma Display On, from Standby mode. When three minutes remain, "Off timer 3" will flash. Basic Controls Stand-by after a fixed period. Press it again to 30 minutes, 60 minutes, 90 minutes and 0 minutes (off timer cancelled) each time the SURROUND button is pressed. You can be preset to switch to stand-by (ON/OFF) button The Plasma Display must first be plugged into the wall...
... previous menu screen. The setting changes to turn the Plasma Display On, from Standby mode. When three minutes remain, "Off timer 3" will flash. Basic Controls Stand-by after a fixed period. Press it again to 30 minutes, 60 minutes, 90 minutes and 0 minutes (off timer cancelled) each time the SURROUND button is pressed. You can be preset to switch to stand-by (ON/OFF) button The Plasma Display must first be plugged into the wall...
TH37PWD6UX User Guide
Page 16
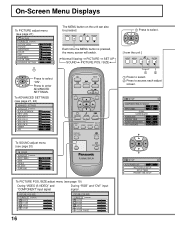
.... /SIZE ASPECT PC OFF TIMER PLASMA DISPLAY To PICTURE POS./SIZE adjust menu (see page 21) PICTURE NORMALIZE NORMAL PICTURE MENU PICTURE BRIGHTNESS COLOR TINT SHARPNESS COLOR TEMP ADVANCED SETTINGS STANDARD 25 0 0 0 0 NORMAL ON The MENU button on the unit can also be pressed. - + INPUT MENU VOL ENTER 1 Press to enter ADVANCED SETTINGS. Press to select . On-Screen Menu Displays To PICTURE adjust menu (see page 19) During "VIDEO (S VIDEO)" and "COMPONENT" input signal. Each time the MENU button is pressed, the menu screen will switch.
.... /SIZE ASPECT PC OFF TIMER PLASMA DISPLAY To PICTURE POS./SIZE adjust menu (see page 21) PICTURE NORMALIZE NORMAL PICTURE MENU PICTURE BRIGHTNESS COLOR TINT SHARPNESS COLOR TEMP ADVANCED SETTINGS STANDARD 25 0 0 0 0 NORMAL ON The MENU button on the unit can also be pressed. - + INPUT MENU VOL ENTER 1 Press to enter ADVANCED SETTINGS. Press to select . On-Screen Menu Displays To PICTURE adjust menu (see page 19) During "VIDEO (S VIDEO)" and "COMPONENT" input signal. Each time the MENU button is pressed, the menu screen will switch.
TH37PWD6UX User Guide
Page 17
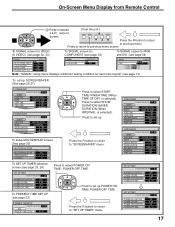
... previous menu screen. Press to return to "SET UP TIMER" menu. Press the R button to return to select POWER ON TIME / POWER OFF TIME. On-Screen Menu Display from Remote Control 2 Press to access [ from the unit ] R each input signal. (see page 13) To setup SCREENSAVER (See page 25-27) SCREENSAVER PRESENT TIME OF DAY 10 : 00 START FUNCTION WHITE BAR SCROLL MODE TIME OF DAY START TIME 0 : 00 FINISH TIME 0 : 00 SIDE BAR ADJUST...
... previous menu screen. Press to return to "SET UP TIMER" menu. Press the R button to return to select POWER ON TIME / POWER OFF TIME. On-Screen Menu Display from Remote Control 2 Press to access [ from the unit ] R each input signal. (see page 13) To setup SCREENSAVER (See page 25-27) SCREENSAVER PRESENT TIME OF DAY 10 : 00 START FUNCTION WHITE BAR SCROLL MODE TIME OF DAY START TIME 0 : 00 FINISH TIME 0 : 00 SIDE BAR ADJUST...

TH37PWD6UX User Guide
Page 18
... 4:3 program material. The size of the screen. Note: Panasonic AUTO mode is designed to automatically adjust the aspect ratio to handle a mix of the picture. Panasonic Auto can cause a permanent after-image to remain on the Plasma Display Panel. 18 The display will automatically become enlarged (depending on the original signal. PICTURE SOUND SET UP MULTI ZOOM PIP SWAP SELECT MOVE PICTURE POS. /SIZE ASPECT PC OFF TIMER PLASMA DISPLAY [During MULTI PIP Operations] (1) Picture and Picture, Picture in...
... 4:3 program material. The size of the screen. Note: Panasonic AUTO mode is designed to automatically adjust the aspect ratio to handle a mix of the picture. Panasonic Auto can cause a permanent after-image to remain on the Plasma Display Panel. 18 The display will automatically become enlarged (depending on the original signal. PICTURE SOUND SET UP MULTI ZOOM PIP SWAP SELECT MOVE PICTURE POS. /SIZE ASPECT PC OFF TIMER PLASMA DISPLAY [During MULTI PIP Operations] (1) Picture and Picture, Picture in...

TH37PWD6UX User Guide
Page 19
... PICTURE POS./SIZE display is active, if either the N button on the remote control is pressed at any time or the (ACTION button) is pressed during "NORMALIZE", then all adjustment values are memorized for each frequency.) (2) If a "Cue" or "Rew" signal from adjust mode. INPUT SURROUND VOL N R PICTURE SOUND SET UP MULTI ZOOM PIP SWAP SELECT MOVE PICTURE POS. /SIZE ASPECT During "VIDEO (S VIDEO)" and "COMPONENT" input signal. Adjusting PICTURE POSITION/SIZE Adjusting screen PICTURE 1 POS. /SIZE 2 Press to the factory settings...
... PICTURE POS./SIZE display is active, if either the N button on the remote control is pressed at any time or the (ACTION button) is pressed during "NORMALIZE", then all adjustment values are memorized for each frequency.) (2) If a "Cue" or "Rew" signal from adjust mode. INPUT SURROUND VOL N R PICTURE SOUND SET UP MULTI ZOOM PIP SWAP SELECT MOVE PICTURE POS. /SIZE ASPECT During "VIDEO (S VIDEO)" and "COMPONENT" input signal. Adjusting PICTURE POSITION/SIZE Adjusting screen PICTURE 1 POS. /SIZE 2 Press to the factory settings...

TH37PWD6UX User Guide
Page 20
MUTE Useful when answering the phone or receiving visitors. 20 Press this button to the factory settings. INPUT SURROUND VOL N R PICTURE SOUND SET UP MULTI ZOOM PIP SWAP SELECT MOVE BASS Adjusts low sounds TREBLE Adjusts high sounds BALANCE Adjusts left and right volumes SURROUND Select ON or OFF • To end adjustments R SOUND NORMALIZE NORMAL AUDIO MENU BASS TREBLE BALANCE SURROUND STANDARD 0 0 0 OFF Press the R button STANDARD Emits the original sound. Sound is...
MUTE Useful when answering the phone or receiving visitors. 20 Press this button to the factory settings. INPUT SURROUND VOL N R PICTURE SOUND SET UP MULTI ZOOM PIP SWAP SELECT MOVE BASS Adjusts low sounds TREBLE Adjusts high sounds BALANCE Adjusts left and right volumes SURROUND Select ON or OFF • To end adjustments R SOUND NORMALIZE NORMAL AUDIO MENU BASS TREBLE BALANCE SURROUND STANDARD 0 0 0 OFF Press the R button STANDARD Emits the original sound. Sound is...

TH37PWD6UX User Guide
Page 21
... change the picture and color of the selected PICTURE menu to switch between modes. PICTURE Adjustments 1 PICTURE Press to display the PICTURE menu. 2 Select to select "ON". Press to select the menu to enter Advanced Settings. Select the desired level by looking at any time or the (ACTION button) is pressed during "NORMALIZE", then all adjustment values are returned to switch between modes. AUTO STANDARD CINEMA DYNAMIC AUTO Automatically selects the mode that best...
... change the picture and color of the selected PICTURE menu to switch between modes. PICTURE Adjustments 1 PICTURE Press to display the PICTURE menu. 2 Select to select "ON". Press to select the menu to enter Advanced Settings. Select the desired level by looking at any time or the (ACTION button) is pressed during "NORMALIZE", then all adjustment values are returned to switch between modes. AUTO STANDARD CINEMA DYNAMIC AUTO Automatically selects the mode that best...

TH37PWD6UX User Guide
Page 22
... white balance for natural flesh tones. Helpful Hint ( N / NORMALIZE Normalization) On the remote control unit, while the "ADVANCED SETTINGS" menu is displayed, if either the N button is pressed at any time or the (ACTION button) is increased with a bright picture or reduced with a dark picture. Adjust for dark red areas. ADVANCED SETTINGS Item BLACK EXTENSION Effect Less More Details Adjusts the dark shades of the image in turn...
... white balance for natural flesh tones. Helpful Hint ( N / NORMALIZE Normalization) On the remote control unit, while the "ADVANCED SETTINGS" menu is displayed, if either the N button is pressed at any time or the (ACTION button) is increased with a bright picture or reduced with a dark picture. Adjust for dark red areas. ADVANCED SETTINGS Item BLACK EXTENSION Effect Less More Details Adjusts the dark shades of the image in turn...
TH37PWD6UX User Guide
Page 29
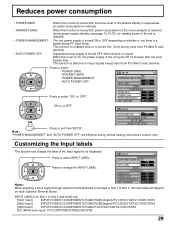
...; POWER MANAGEMENT: • AUTO POWER OFF: The unit power supply is no signal. Press to change the label of the unit goes Off 10 minutes after the input signals stop. When this function is turned ON, power consumption of the microcomputer is reduced during PC input mode. SET UP 1/2 Press to select INPUT LABEL. This function is enabled when it is turned ON. (Only during normal viewing (one picture screen...
...; POWER MANAGEMENT: • AUTO POWER OFF: The unit power supply is no signal. Press to change the label of the unit goes Off 10 minutes after the input signals stop. When this function is turned ON, power consumption of the microcomputer is reduced during PC input mode. SET UP 1/2 Press to select INPUT LABEL. This function is enabled when it is turned ON. (Only during normal viewing (one picture screen...

TH37PWD6UX User Guide
Page 30
SET UP 2/2 AUTO POWER OFF OFF MULTI DISPLAY SETUP SET UP TIMER PRESENT TIME SETUP MULTI DISPLAY SETUP MULTI DISPLAY SETUP ON ARRANGEMENT 2 2 LOCATION A1 30 Press to select the MULTI DISPLAY SETUP. Press to select "ON" or "OFF". For this mode of operation, each plasma display has to be displayed across all screens. SET UP 1/2 COMPONENT/RGB-IN SELECT RGB INPUT LABEL RGB1 SIGNAL SCREENSAVER POWER SAVE OFF STANDBY SAVE ON POWER MANAGEMENT OFF OSD LANGUAGE ENGLISH...
SET UP 2/2 AUTO POWER OFF OFF MULTI DISPLAY SETUP SET UP TIMER PRESENT TIME SETUP MULTI DISPLAY SETUP MULTI DISPLAY SETUP ON ARRANGEMENT 2 2 LOCATION A1 30 Press to select the MULTI DISPLAY SETUP. Press to select "ON" or "OFF". For this mode of operation, each plasma display has to be displayed across all screens. SET UP 1/2 COMPONENT/RGB-IN SELECT RGB INPUT LABEL RGB1 SIGNAL SCREENSAVER POWER SAVE OFF STANDBY SAVE ON POWER MANAGEMENT OFF OSD LANGUAGE ENGLISH...

TH37PWD6UX User Guide
Page 32
... SIGNAL SCREENSAVER POWER SAVE OFF STANDBY SAVE ON POWER MANAGEMENT OFF OSD LANGUAGE ENGLISH (US) R Press to select the desired mode. VOL Press to exit from the source connected to select the "3D Y/C FILTER (NTSC)". Press (ACTION) button SIGNAL [ VIDEO ] Note: When ON, this setting only affects NTSC input signals. 3D Y/C FILTER (NTSC) COLOR SYSTEM 3:2 PULLDOWN Panasonic AUTO (4:3) ON AUTO OFF NORMAL 32 Press to display the SET UP menu screen...
... SIGNAL SCREENSAVER POWER SAVE OFF STANDBY SAVE ON POWER MANAGEMENT OFF OSD LANGUAGE ENGLISH (US) R Press to select the desired mode. VOL Press to exit from the source connected to select the "3D Y/C FILTER (NTSC)". Press (ACTION) button SIGNAL [ VIDEO ] Note: When ON, this setting only affects NTSC input signals. 3D Y/C FILTER (NTSC) COLOR SYSTEM 3:2 PULLDOWN Panasonic AUTO (4:3) ON AUTO OFF NORMAL 32 Press to display the SET UP menu screen...

TH37PWD6UX User Guide
Page 37
.... 73.0 lbs (with speakers) R - STANDBY G POWER ON - + INPUT MENU VOL ENTER approx. 53.1 lbs (main unit only) approx. 62.4 lbs (with speakers) Note: Design and specifications are approximate. 37 Specifications Power Source Power Consumption Maximum Stand-by condition Power off condition Plasma Display panel Contrast Ratio Screen size (No.of pixels) Operating condition Temperature Humidity Applicable signals Color System Scanning format PC signals Connection terminals PC SERIAL SPEAKERS (6 Ω) Accessories Supplied Remote Control Transmitter Batteries Fixing bands Ferrite core...
.... 73.0 lbs (with speakers) R - STANDBY G POWER ON - + INPUT MENU VOL ENTER approx. 53.1 lbs (main unit only) approx. 62.4 lbs (with speakers) Note: Design and specifications are approximate. 37 Specifications Power Source Power Consumption Maximum Stand-by condition Power off condition Plasma Display panel Contrast Ratio Screen size (No.of pixels) Operating condition Temperature Humidity Applicable signals Color System Scanning format PC signals Connection terminals PC SERIAL SPEAKERS (6 Ω) Accessories Supplied Remote Control Transmitter Batteries Fixing bands Ferrite core...
TH37PWD6UX User Guide
Page 39
... of America Hospitality Sales Group One Panasonic Way, 4A-4 Secaucus, NJ 07094 Panasonic Commercial Plasma Display Limited Warranty Panasonic Consumer Electronics Company ("the Warrantor") will repair this product with this access is the responsibility of the purchaser. To locate a Panasonic Authorized Servicenter call toll-free 1-800-211-PANA (1-800-211-7262). On-site service does not include removal or re-installation of the...
... of America Hospitality Sales Group One Panasonic Way, 4A-4 Secaucus, NJ 07094 Panasonic Commercial Plasma Display Limited Warranty Panasonic Consumer Electronics Company ("the Warrantor") will repair this product with this access is the responsibility of the purchaser. To locate a Panasonic Authorized Servicenter call toll-free 1-800-211-PANA (1-800-211-7262). On-site service does not include removal or re-installation of the...


