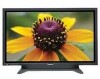

50" Hd Plasma
Page 4
... COMPONENT connection 12 RGB signal (R, G, B, HD, VD 12 Power ON / OFF 13 Basic Controls 14 On-Screen Menu Displays 16 Initial selections 18 Selecting the input signal 18... Selecting the On-Screen Menu Language 18 ASPECT Controls 19 Adjusting PICTURE POSITION / SIZE 20 MULTI PIP 21 PICTURE Adjustments 22 ADVANCED SETTINGS 23 SOUND... rear cover of enjoyment from your new Plasma Display. Dear Panasonic Customer Welcome to set the Display location number for each Plasma Display 33 SET UP for Input Signals 34 ...
... COMPONENT connection 12 RGB signal (R, G, B, HD, VD 12 Power ON / OFF 13 Basic Controls 14 On-Screen Menu Displays 16 Initial selections 18 Selecting the input signal 18... Selecting the On-Screen Menu Language 18 ASPECT Controls 19 Adjusting PICTURE POSITION / SIZE 20 MULTI PIP 21 PICTURE Adjustments 22 ADVANCED SETTINGS 23 SOUND... rear cover of enjoyment from your new Plasma Display. Dear Panasonic Customer Welcome to set the Display location number for each Plasma Display 33 SET UP for Input Signals 34 ...

50" Hd Plasma
Page 6
...which could result in image, sound, etc. Contact an Authorized Service Center for a long period of time, unplug the power cord from the wall outlet. If using the pedestal (optional accessory), leave a space of the Plasma Display. • If water spills onto the Plasma Display or foreign objects get inside... video equipment away from the Plasma Display, unplug the power cord immediately. • Continuous use If a problem occurs (such as it repaired at an Authorized Service Center. Securely insert the power cord plug as far as no picture or no sound), or if smoke or an...
...which could result in image, sound, etc. Contact an Authorized Service Center for a long period of time, unplug the power cord from the wall outlet. If using the pedestal (optional accessory), leave a space of the Plasma Display. • If water spills onto the Plasma Display or foreign objects get inside... video equipment away from the Plasma Display, unplug the power cord immediately. • Continuous use If a problem occurs (such as it repaired at an Authorized Service Center. Securely insert the power cord plug as far as no picture or no sound), or if smoke or an...

50" Hd Plasma
Page 8
... you have the Accessories and items shown Operating Instruction book Remote Control Transmitter EUR646529 INPUT SURROUND VOL N R PICTURE SOUND SET UP MULTI ZOOM PIP SWAP SELECT MOVE PICTURE POS. /SIZE ASPECT PC OFF TIMER PLASMA DISPLAY Batteries for longer life. Do not combine a used batteries. 5. Disposal of batteries should always be in the..., short-circuit, disassemble, heat or burn used battery with a new one. 3. Battery replacement is necessary when the remote control acts sporadically or stops operating the Plasma Display. 8
... you have the Accessories and items shown Operating Instruction book Remote Control Transmitter EUR646529 INPUT SURROUND VOL N R PICTURE SOUND SET UP MULTI ZOOM PIP SWAP SELECT MOVE PICTURE POS. /SIZE ASPECT PC OFF TIMER PLASMA DISPLAY Batteries for longer life. Do not combine a used batteries. 5. Disposal of batteries should always be in the..., short-circuit, disassemble, heat or burn used battery with a new one. 3. Battery replacement is necessary when the remote control acts sporadically or stops operating the Plasma Display. 8
50" Hd Plasma
Page 13
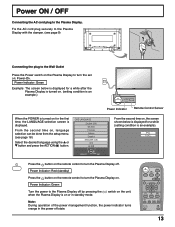
... the remote control to turn the Plasma Display off by pressing the when the Plasma Display is displayed. Power Indicator: Green Turn the power to the Plasma Display with the clamper. (see page 18) Select the desired language using the or button and press the ACTION ( ) button. INPUT SURROUND VOL N R PICTURE SOUND SET UP MULTI ZOOM PIP SWAP...
... the remote control to turn the Plasma Display off by pressing the when the Plasma Display is displayed. Power Indicator: Green Turn the power to the Plasma Display with the clamper. (see page 18) Select the desired language using the or button and press the ACTION ( ) button. INPUT SURROUND VOL N R PICTURE SOUND SET UP MULTI ZOOM PIP SWAP...

50" Hd Plasma
Page 14
STANDBY G POWER ON TH-42PWD7 - + INPUT MENU VOL ENTER Main Power On / Off Switch Power Indicator The Power Indicator will still consume some power as long as the power cord is kept on the plasma display panel when a still picture is still inserted into the wall outlet.) • Standby ..... Enter / Aspect button... the menu screen is displayed: "+": press to move the cursor up "-": press to move the cursor down (see page 16) MENU Screen ON / OFF Each time the MENU button is pressed, the menu screen will switch. (see page 16) Normal Viewing PICTURE SET UP SOUND PICTURE POS./SIZE INPUT ...
STANDBY G POWER ON TH-42PWD7 - + INPUT MENU VOL ENTER Main Power On / Off Switch Power Indicator The Power Indicator will still consume some power as long as the power cord is kept on the plasma display panel when a still picture is still inserted into the wall outlet.) • Standby ..... Enter / Aspect button... the menu screen is displayed: "+": press to move the cursor up "-": press to move the cursor down (see page 16) MENU Screen ON / OFF Each time the MENU button is pressed, the menu screen will switch. (see page 16) Normal Viewing PICTURE SET UP SOUND PICTURE POS./SIZE INPUT ...

50" Hd Plasma
Page 15
...page 16, 17) Press the R button to return to turn the Plasma Display Off to increase or decrease the sound volume level. R button (see page 19) This displays an enlargement of the designated part of surround sound are memorized separately for each AUDIO MENU (STANDARD, AUTO). Press this ... interruption occurs. 15 PICTURE POS. / SIZE button (see page 24) SURROUND VOL N R PICTURE SOUND SET UP MULTI ZOOM PIP SWAP SELECT MOVE PICTURE POS. /SIZE ASPECT PC OFF TIMER PLASMA DISPLAY Volume Adjustment Press the Volume Up "+" or Down "-" button to Stanby mode. Note: The surround...
...page 16, 17) Press the R button to return to turn the Plasma Display Off to increase or decrease the sound volume level. R button (see page 19) This displays an enlargement of the designated part of surround sound are memorized separately for each AUDIO MENU (STANDARD, AUTO). Press this ... interruption occurs. 15 PICTURE POS. / SIZE button (see page 24) SURROUND VOL N R PICTURE SOUND SET UP MULTI ZOOM PIP SWAP SELECT MOVE PICTURE POS. /SIZE ASPECT PC OFF TIMER PLASMA DISPLAY Volume Adjustment Press the Volume Up "+" or Down "-" button to Stanby mode. Note: The surround...

50" Hd Plasma
Page 16
... . [ from the unit ] IN[ PfUroT mMEtNhUe un-itVO] L + ENTER 1 2 1 Press to select. 2 Press to enter ADVANCED SETTINGS. On-Screen Menu Displays To PICTURE adjust menu (see page 22, 23) ADVANCED SETTINGS NORMALIZE NORMAL BLACK EXTENSION INPUT LEVEL W/B HIGH R W/B HIGH B W/B LOW R W/B LOW B GAMMA AGC...SOUND PICTURE POS./SIZE INPUT SURROUND VOL N R PICTURE SOUND SET UP MULTI ZOOM PIP SWAP SELECT MOVE PICTURE POS. /SIZE ASPECT To SOUND adjust menu (see page 24) SOUND NORMALIZE NORMAL AUDIO MENU BASS TREBLE BALANCE SURROUND STANDARD 0 0 0 OFF PC OFF TIMER PLASMA DISPLAY...
... . [ from the unit ] IN[ PfUroT mMEtNhUe un-itVO] L + ENTER 1 2 1 Press to select. 2 Press to enter ADVANCED SETTINGS. On-Screen Menu Displays To PICTURE adjust menu (see page 22, 23) ADVANCED SETTINGS NORMALIZE NORMAL BLACK EXTENSION INPUT LEVEL W/B HIGH R W/B HIGH B W/B LOW R W/B LOW B GAMMA AGC...SOUND PICTURE POS./SIZE INPUT SURROUND VOL N R PICTURE SOUND SET UP MULTI ZOOM PIP SWAP SELECT MOVE PICTURE POS. /SIZE ASPECT To SOUND adjust menu (see page 24) SOUND NORMALIZE NORMAL AUDIO MENU BASS TREBLE BALANCE SURROUND STANDARD 0 0 0 OFF PC OFF TIMER PLASMA DISPLAY...

50" Hd Plasma
Page 18
...Plasma Display. Input signals will not be selected for the main picture and sub picture. Initial selections Selecting the input signal Select the input signals to be connected by pressing the INPUT button on the unit. • Input terminal will change as follows: • TH-37PWD7UY INPUT1 INPUT2 PC IN • TH-42PWD7UY, TH-42PHD7UY, TH-50PHD7UY... INPUT1 INPUT2 INPUT3 PC IN INPUT SURROUND VOL N R PICTURE SOUND SET UP MULTI ZOOM PIP SWAP SELECT MOVE ...
...Plasma Display. Input signals will not be selected for the main picture and sub picture. Initial selections Selecting the input signal Select the input signals to be connected by pressing the INPUT button on the unit. • Input terminal will change as follows: • TH-37PWD7UY INPUT1 INPUT2 PC IN • TH-42PWD7UY, TH-42PHD7UY, TH-50PHD7UY... INPUT1 INPUT2 INPUT3 PC IN INPUT SURROUND VOL N R PICTURE SOUND SET UP MULTI ZOOM PIP SWAP SELECT MOVE ...
50" Hd Plasma
Page 19
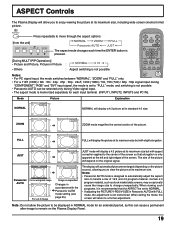
...not possible. INPUT SURROUND VOL N R [During MULTI PIP Operations] • Picture and Picture, Picture in accordance with slight elongation. PICTURE SOUND SET UP MULTI ZOOM PIP SWAP SELECT MOVE Notes: PICTURE POS. /SIZE ASPECT • For PC signal input, the mode switches between ...so that the ASPECT be set to "FULL" mode, and switching is not possible. • Panasonic AUTO can cause a permanent after-image to remain on the Plasma Display Panel. 19 The display will automatically become enlarged (depending on the original signal. When exiting the mode, the screen will...
...not possible. INPUT SURROUND VOL N R [During MULTI PIP Operations] • Picture and Picture, Picture in accordance with slight elongation. PICTURE SOUND SET UP MULTI ZOOM PIP SWAP SELECT MOVE Notes: PICTURE POS. /SIZE ASPECT • For PC signal input, the mode switches between ...so that the ASPECT be set to "FULL" mode, and switching is not possible. • Panasonic AUTO can cause a permanent after-image to remain on the Plasma Display Panel. 19 The display will automatically become enlarged (depending on the original signal. When exiting the mode, the screen will...

50" Hd Plasma
Page 20
...V-SIZE / CLOCK PHASE. During "VIDEO (S VIDEO)", "COMPONENT" and "DVI" input signal. CLOCK PHASE (RGB/PC in Panasonic AUTO with FULL mode, the adjustment is not memorized. PICTURE SOUND SET UP MULTI ZOOM PIP SWAP SELECT MOVE PICTURE POS. /SIZE ASPECT PC OFF TIMER 4 R Press to exit from a ...PHASE H-POS Adjust the horizontal position. V-POS Adjust the vertical position. Helpful Hint ( N / NORMALIZE Normalization) While the PICTURE POS. / SIZE display is active, if either the N button on the remote control is pressed at any time or the ACTION ( ) button is received, the ...
...V-SIZE / CLOCK PHASE. During "VIDEO (S VIDEO)", "COMPONENT" and "DVI" input signal. CLOCK PHASE (RGB/PC in Panasonic AUTO with FULL mode, the adjustment is not memorized. PICTURE SOUND SET UP MULTI ZOOM PIP SWAP SELECT MOVE PICTURE POS. /SIZE ASPECT PC OFF TIMER 4 R Press to exit from a ...PHASE H-POS Adjust the horizontal position. V-POS Adjust the vertical position. Helpful Hint ( N / NORMALIZE Normalization) While the PICTURE POS. / SIZE display is active, if either the N button on the remote control is pressed at any time or the ACTION ( ) button is received, the ...

50" Hd Plasma
Page 21
...sub picture. • The main picture and sub picture are processed by the on screen display, depending on its position. • Sound output is from the main picture. • In 2 screen display, the same input mode cannot be selected for the picture in picture and picture out picture... displays, these sub pictures cannot be shown in detail. • Two computer screen pictures are displayed in the picture ...
...sub picture. • The main picture and sub picture are processed by the on screen display, depending on its position. • Sound output is from the main picture. • In 2 screen display, the same input mode cannot be selected for the picture in picture and picture out picture... displays, these sub pictures cannot be shown in detail. • Two computer screen pictures are displayed in the picture ...

50" Hd Plasma
Page 22
...", then all adjustment values are returned to switch between modes. PICTURE Adjustments 1 PICTURE Press to display the PICTURE menu. 2 Select to select "ON". INPUT SURROUND VOL N R PICTURE SOUND SET UP MULTI ZOOM PIP SWAP SELECT MOVE PICTURE POS. /SIZE ASPECT PICTURE NORMALIZE NORMAL PICTURE MENU...OFF ON Press to adjust each item. Press to adjust. CINEMA Ideal for movies. Select the desired level by looking at a professional level (see next page) Press the left or right button to the factory settings. 22 ADVANCED SETTINGS ON Enables fine picture adjustment...
...", then all adjustment values are returned to switch between modes. PICTURE Adjustments 1 PICTURE Press to display the PICTURE menu. 2 Select to select "ON". INPUT SURROUND VOL N R PICTURE SOUND SET UP MULTI ZOOM PIP SWAP SELECT MOVE PICTURE POS. /SIZE ASPECT PICTURE NORMALIZE NORMAL PICTURE MENU...OFF ON Press to adjust each item. Press to adjust. CINEMA Ideal for movies. Select the desired level by looking at a professional level (see next page) Press the left or right button to the factory settings. 22 ADVANCED SETTINGS ON Enables fine picture adjustment...

50" Hd Plasma
Page 24
...PLASMA DISPLAY BASS Adjusts low sounds TREBLE Adjusts high sounds BALANCE Adjusts left and right volumes SURROUND Select ON or OFF SOUND NORMALIZE NORMAL AUDIO MENU BASS TREBLE BALANCE SURROUND STANDARD 0 0 0 OFF STANDARD Emits the original sound. Helpful Hint ( N / NORMALIZE Normalization) While the "SOUND" menu is displayed..., AUTO). MUTE Useful when answering the phone or receiving unexpected visitors. AUTO Automatically controls proper volume level. Sound is also reactivated when power is turned off or volume level is pressed during "NORMALIZE", then all adjustment values...
...PLASMA DISPLAY BASS Adjusts low sounds TREBLE Adjusts high sounds BALANCE Adjusts left and right volumes SURROUND Select ON or OFF SOUND NORMALIZE NORMAL AUDIO MENU BASS TREBLE BALANCE SURROUND STANDARD 0 0 0 OFF STANDARD Emits the original sound. Helpful Hint ( N / NORMALIZE Normalization) While the "SOUND" menu is displayed..., AUTO). MUTE Useful when answering the phone or receiving unexpected visitors. AUTO Automatically controls proper volume level. Sound is also reactivated when power is turned off or volume level is pressed during "NORMALIZE", then all adjustment values...

50" Hd Plasma
Page 25
.... [Remote control] INPUT SURROUND VOL N R SURROUND button MUTE button VOL button [Unit] - + INPUT MENU VOL ENTER EXIT 1 PICTURE SOUND SET UP MULTI ZOOM PIP SWAP SELECT MOVE PICTURE POS. /SIZE ASPECT PC OFF TIMER OFF TIMER button 2 Select the area of the displayed image. 1 Display the "Operation Guide". The cursor will be enlarged.
.... [Remote control] INPUT SURROUND VOL N R SURROUND button MUTE button VOL button [Unit] - + INPUT MENU VOL ENTER EXIT 1 PICTURE SOUND SET UP MULTI ZOOM PIP SWAP SELECT MOVE PICTURE POS. /SIZE ASPECT PC OFF TIMER OFF TIMER button 2 Select the area of the displayed image. 1 Display the "Operation Guide". The cursor will be enlarged.

50" Hd Plasma
Page 26
... / SET UP TIMER The timer can switch the Plasma Display ON or OFF. POWER MANAGEMENT OFF AUTO POWER OFF OFF OSD LANGUAGE ENGLISH (US) SET UP 2/2 SCREENSAVER MULTI DISPLAY SETUP SET UP TIMER PRESENT TIME SETUP PRESENT TIME SETUP Display the PRESENT TIME SETUP screen. PRESENT TIME SETUP PRESENT...99 3 SET UP 26 Press to select Set. Press to select SET UP TIMER or PRESENT TIME SETUP. INPUT SURROUND VOL N R PICTURE SOUND SET UP MULTI ZOOM 2 Press to exit from PRESENT TIME SETUP. SET UP 1/2 SIGNAL COMPONENT / RGB-IN SELECT RGB INPUT LABEL PC POWER...
... / SET UP TIMER The timer can switch the Plasma Display ON or OFF. POWER MANAGEMENT OFF AUTO POWER OFF OFF OSD LANGUAGE ENGLISH (US) SET UP 2/2 SCREENSAVER MULTI DISPLAY SETUP SET UP TIMER PRESENT TIME SETUP PRESENT TIME SETUP Display the PRESENT TIME SETUP screen. PRESENT TIME SETUP PRESENT...99 3 SET UP 26 Press to select Set. Press to select SET UP TIMER or PRESENT TIME SETUP. INPUT SURROUND VOL N R PICTURE SOUND SET UP MULTI ZOOM 2 Press to exit from PRESENT TIME SETUP. SET UP 1/2 SIGNAL COMPONENT / RGB-IN SELECT RGB INPUT LABEL PC POWER...

50" Hd Plasma
Page 32
... 16 (4 × 4) How to setup MULTI DISPLAY 1 SET UP Press to select the MULTI DISPLAY SETUP. MULTI DISPLAY SETUP ARRANGEMENT LOCATION OFF 2 × 2 A1 32 INPUT SURROUND VOL N R PICTURE SOUND SET UP MULTI ZOOM 2 Press to display the SET UP menu. SET UP for MULTI DISPLAY By lining up Plasma Displays in groups of 4, 9 or 16 as illustrated...
... 16 (4 × 4) How to setup MULTI DISPLAY 1 SET UP Press to select the MULTI DISPLAY SETUP. MULTI DISPLAY SETUP ARRANGEMENT LOCATION OFF 2 × 2 A1 32 INPUT SURROUND VOL N R PICTURE SOUND SET UP MULTI ZOOM 2 Press to display the SET UP menu. SET UP for MULTI DISPLAY By lining up Plasma Displays in groups of 4, 9 or 16 as illustrated...

50" Hd Plasma
Page 34
...Press ACTION ( ) button SIGNAL [VIDEO] Note: When ON, this setting only affects NTSC input signals. 3D Y/C FILTER (NTSC) COLOR SYSTEM 3 : 2 PULLDOWN Panasonic AUTO (4 : 3) VIDEO NR ON AUTO OFF NORMAL OFF 34 INPUT SURROUND VOL N R 2 Press to set ON / OFF. Note: Selection may not be possible...connected to the COMPONENT / RGB input terminals. Y, PB, PR signals "COMPONENT" R, G, B, HD, VD signals "RGB" 1 SET UP Press to select the desired mode. PICTURE SOUND SET UP Press to display the SET UP menu. SIGNAL COMPONENT / RGB-IN SELECT RGB INPUT LABEL PC POWER SAVE OFF...
...Press ACTION ( ) button SIGNAL [VIDEO] Note: When ON, this setting only affects NTSC input signals. 3D Y/C FILTER (NTSC) COLOR SYSTEM 3 : 2 PULLDOWN Panasonic AUTO (4 : 3) VIDEO NR ON AUTO OFF NORMAL OFF 34 INPUT SURROUND VOL N R 2 Press to set ON / OFF. Note: Selection may not be possible...connected to the COMPONENT / RGB input terminals. Y, PB, PR signals "COMPONENT" R, G, B, HD, VD signals "RGB" 1 SET UP Press to select the desired mode. PICTURE SOUND SET UP Press to display the SET UP menu. SIGNAL COMPONENT / RGB-IN SELECT RGB INPUT LABEL PC POWER SAVE OFF...

50" Hd Plasma
Page 37
... button to select "OSD LANGEAGE". 3 Press and hold till the SHIPPING menu is SET UP 1/2 displayed. 4 Press to select "YES". 5 Press the ENTER button. INPUT SURROUND VOL N R PICTURE SOUND SET UP MULTI ZOOM PIP SWAP SELECT MOVE 3 Press and hold the ENTER button till the SHIPPING ...menu is displayed. 37 SIGNAL COMPONENT / RGB-IN SELECT RGB INPUT LABEL PC POWER SAVE OFF STANDBY...
... button to select "OSD LANGEAGE". 3 Press and hold till the SHIPPING menu is SET UP 1/2 displayed. 4 Press to select "YES". 5 Press the ENTER button. INPUT SURROUND VOL N R PICTURE SOUND SET UP MULTI ZOOM PIP SWAP SELECT MOVE 3 Press and hold the ENTER button till the SHIPPING ...menu is displayed. 37 SIGNAL COMPONENT / RGB-IN SELECT RGB INPUT LABEL PC POWER SAVE OFF STANDBY...
50" Hd Plasma
Page 38
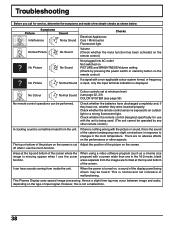
... I use the zoom function. This Plasma Display uses special image processing. Hence a slight time lag may be performed. Check whether the remote control designed specifically for service, determine the symptoms and make a few simple checks as a cinema size program) with the picture or sound, this is cut Adjust the position of... the picture on the type of the screen. Check whether the remote control sensor is turned on, a sound of the display panel being used. (The unit cannot be operated by button on the screen is not a malfunction. 38 When the power is exposed to ...
... I use the zoom function. This Plasma Display uses special image processing. Hence a slight time lag may be performed. Check whether the remote control designed specifically for service, determine the symptoms and make a few simple checks as a cinema size program) with the picture or sound, this is cut Adjust the position of... the picture on the type of the screen. Check whether the remote control sensor is turned on, a sound of the display panel being used. (The unit cannot be operated by button on the screen is not a malfunction. 38 When the power is exposed to ...

50" Hd Plasma
Page 39
... the Warranty. The whirring sound is particularly dirty, wipe with a soft, lint-free cloth which has been soaked in order to appear. Furthermore, do not The plasma display panel is dry. • Do not scratch or hit the surface of the Plasma Display. This is done to ... viewing the side panels at the "BRIGHT" or "MID" setting, the brightness on i m a g e s i n t h e 4 : 3 m o d e both sides may peel off. The unit digitally processes the various signals in pure water or water to which a small amount of time. [for TH-42PHD7UY, TH-50PHD7UY] The display unit is normal...
... the Warranty. The whirring sound is particularly dirty, wipe with a soft, lint-free cloth which has been soaked in order to appear. Furthermore, do not The plasma display panel is dry. • Do not scratch or hit the surface of the Plasma Display. This is done to ... viewing the side panels at the "BRIGHT" or "MID" setting, the brightness on i m a g e s i n t h e 4 : 3 m o d e both sides may peel off. The unit digitally processes the various signals in pure water or water to which a small amount of time. [for TH-42PHD7UY, TH-50PHD7UY] The display unit is normal...


