
50" Hd Plasma
Page 4
...Terminals connection 10 SERIAL Terminals connection 11 AV & COMPONENT connection 12 RGB signal (R, G, B, HD, VD 12 Power ON / OFF 13 Basic Controls 14 On-Screen Menu Displays 16 Initial selections 18 Selecting the input signal 18 Selecting the On-Screen Menu Language 18 ASPECT Controls 19 Adjusting ...cover of enjoyment from your new Plasma Display. We hope that you will have many years of these Instructions before making any adjustments, and retain them for Input Signals 34 COMPONENT / RGB IN SELECT 34 3D Y/C FILTER 34 COLOR SYSTEM / Panasonic AUTO 35 3:2 PULLDOWN / VIDEO ...
...Terminals connection 10 SERIAL Terminals connection 11 AV & COMPONENT connection 12 RGB signal (R, G, B, HD, VD 12 Power ON / OFF 13 Basic Controls 14 On-Screen Menu Displays 16 Initial selections 18 Selecting the input signal 18 Selecting the On-Screen Menu Language 18 ASPECT Controls 19 Adjusting ...cover of enjoyment from your new Plasma Display. We hope that you will have many years of these Instructions before making any adjustments, and retain them for Input Signals 34 COMPONENT / RGB IN SELECT 34 3D Y/C FILTER 34 COLOR SYSTEM / Panasonic AUTO 35 3:2 PULLDOWN / VIDEO ...

50" Hd Plasma
Page 10
...) SDA HD/SYNC VD SCL 10 If the computer being connected is not DDC1/2B-compatible, you will not be displayed properly if the signals exceed 1,200 lines.) • The display resolution is set to "NORMAL", and 852 × 480 dots (TH-37PWD7UY, TH42PWD7UY), 1,024 × 768 dots (TH-42PHD7UY), 1,366 × 768 dots (TH-50PHD7UY) when the...
...) SDA HD/SYNC VD SCL 10 If the computer being connected is not DDC1/2B-compatible, you will not be displayed properly if the signals exceed 1,200 lines.) • The display resolution is set to "NORMAL", and 852 × 480 dots (TH-37PWD7UY, TH42PWD7UY), 1,024 × 768 dots (TH-42PHD7UY), 1,366 × 768 dots (TH-50PHD7UY) when the...

50" Hd Plasma
Page 11
...Panasonic AUTO With the power off, this display responds to the computer. Communication parameters Signal level Synchronization method Baud rate Parity Character length Stop bit Flow control RS-232C compliant Asynchronous 9600 bps None 8 bits 1 bit - Connections SERIAL Terminals connection The SERIAL terminal is used when the Plasma Display... shown are not supplied with a STX signal, followed by the command, the parameters, and lastly an ETX signal in that the Plasma Display can be controlled by a computer which is connected to the Plasma Display. • The computer shown is sent...
...Panasonic AUTO With the power off, this display responds to the computer. Communication parameters Signal level Synchronization method Baud rate Parity Character length Stop bit Flow control RS-232C compliant Asynchronous 9600 bps None 8 bits 1 bit - Connections SERIAL Terminals connection The SERIAL terminal is used when the Plasma Display... shown are not supplied with a STX signal, followed by the command, the parameters, and lastly an ETX signal in that the Plasma Display can be controlled by a computer which is connected to the Plasma Display. • The computer shown is sent...

50" Hd Plasma
Page 12
RGB signal (R, G, B, HD, VD) Computer RGB Camcorder or VIDEO IN VIDEO OUT R AUDIO L PR/CR/R PB/CB/B Y/G COMPONENT/RGB... and adapter plugs shown are not supplied with this set . Connections AV & COMPONENT connection COMPONENT VIDEO OUT RR Example of input signal source DVD Y, PB, PR, PB OUT Y Digital TV-SET-TOP-BOX (DTV-STB) L AUDIO OUT R RCA-BNC adapter... plug AUDIO SLOT1 Example of input signal source S VIDEO VCR CAMCORDER R AUDIO L IN VIDEO IN VIDEO OUT S VIDEO IN AV SLOT2 R AUDIO L PR/CR/R PB/CB...
RGB signal (R, G, B, HD, VD) Computer RGB Camcorder or VIDEO IN VIDEO OUT R AUDIO L PR/CR/R PB/CB/B Y/G COMPONENT/RGB... and adapter plugs shown are not supplied with this set . Connections AV & COMPONENT connection COMPONENT VIDEO OUT RR Example of input signal source DVD Y, PB, PR, PB OUT Y Digital TV-SET-TOP-BOX (DTV-STB) L AUDIO OUT R RCA-BNC adapter... plug AUDIO SLOT1 Example of input signal source S VIDEO VCR CAMCORDER R AUDIO L IN VIDEO IN VIDEO OUT S VIDEO IN AV SLOT2 R AUDIO L PR/CR/R PB/CB...

50" Hd Plasma
Page 14
... ON TH-42PWD7 - + INPUT MENU VOL ENTER Main Power On / Off Switch Power Indicator The Power Indicator will still consume some power as long as the power cord is kept on the plasma display panel when a still picture is still inserted into the wall outlet.) • Standby ..... Green • DPMS Orange (With PC input signal...
... ON TH-42PWD7 - + INPUT MENU VOL ENTER Main Power On / Off Switch Power Indicator The Power Indicator will still consume some power as long as the power cord is kept on the plasma display panel when a still picture is still inserted into the wall outlet.) • Standby ..... Green • DPMS Orange (With PC input signal...

50" Hd Plasma
Page 16
...ASPECT To SOUND adjust menu (see page 24) SOUND NORMALIZE NORMAL AUDIO MENU BASS TREBLE BALANCE SURROUND STANDARD 0 0 0 OFF PC OFF TIMER PLASMA DISPLAY To PICTURE POS./SIZE adjust menu (see page 22, 23) ADVANCED SETTINGS NORMALIZE NORMAL BLACK EXTENSION INPUT LEVEL W/B HIGH R W/B HIGH B ...Press to enter ADVANCED SETTINGS. To ADVANCED SETTINGS (see page 20) During "VIDEO (S VIDEO)", "COMPONENT" and "DVI" input signal. On-Screen Menu Displays To PICTURE adjust menu (see page 22) PICTURE 1/2 NORMALIZE NORMAL PICTURE MENU PICTURE BRIGHTNESS COLOR TINT SHARPNESS STANDARD 25 0 0 ...
...ASPECT To SOUND adjust menu (see page 24) SOUND NORMALIZE NORMAL AUDIO MENU BASS TREBLE BALANCE SURROUND STANDARD 0 0 0 OFF PC OFF TIMER PLASMA DISPLAY To PICTURE POS./SIZE adjust menu (see page 22, 23) ADVANCED SETTINGS NORMALIZE NORMAL BLACK EXTENSION INPUT LEVEL W/B HIGH R W/B HIGH B ...Press to enter ADVANCED SETTINGS. To ADVANCED SETTINGS (see page 20) During "VIDEO (S VIDEO)", "COMPONENT" and "DVI" input signal. On-Screen Menu Displays To PICTURE adjust menu (see page 22) PICTURE 1/2 NORMALIZE NORMAL PICTURE MENU PICTURE BRIGHTNESS COLOR TINT SHARPNESS STANDARD 25 0 0 ...

50" Hd Plasma
Page 17
...) COLOR SYSTEM 3 : 2 PULLDOWN Panasonic AUTO (4 : 3) VIDEO NR ON AUTO OFF NORMAL OFF 3 : 2 PULLDOWN OFF VIDEO NR OFF SYNC 3 : 2 PULLDOWN VIDEO NR H-FREQ. 33.8 V-FREQ. 60.0 AUTO OFF OFF kHz Hz 3 : 2 PULLDOWN VIDEO NR H-FREQ. 33.8 V-FREQ. 60.0 Note: "SIGNAL" setup menu displays a different setting condition for each adjust... SAVER DURATION (When INTERVAL is selected). R Press the R button to return to next menu screen. On-Screen Menu Displays 2 Press to access each input signal. (see page 26) PRESENT TIME SETUP PRESENT TIME OF DAY 99:99 SET PRESENT TIME OF DAY 99:99 Press ...
...) COLOR SYSTEM 3 : 2 PULLDOWN Panasonic AUTO (4 : 3) VIDEO NR ON AUTO OFF NORMAL OFF 3 : 2 PULLDOWN OFF VIDEO NR OFF SYNC 3 : 2 PULLDOWN VIDEO NR H-FREQ. 33.8 V-FREQ. 60.0 AUTO OFF OFF kHz Hz 3 : 2 PULLDOWN VIDEO NR H-FREQ. 33.8 V-FREQ. 60.0 Note: "SIGNAL" setup menu displays a different setting condition for each adjust... SAVER DURATION (When INTERVAL is selected). R Press the R button to return to next menu screen. On-Screen Menu Displays 2 Press to access each input signal. (see page 26) PRESENT TIME SETUP PRESENT TIME OF DAY 99:99 SET PRESENT TIME OF DAY 99:99 Press ...

50" Hd Plasma
Page 18
.../RGB input terminals. (see page 34) • In 2 screen display, the same input mode cannot be selected for the main picture and sub picture. R - Press to the Plasma Display. Input signals will not be selected if the terminal board is also possible by installing...TH-42PWD7UY, TH-42PHD7UY, TH-50PHD7UY INPUT1 INPUT2 INPUT3 PC IN INPUT SURROUND VOL N R PICTURE SOUND SET UP MULTI ZOOM PIP SWAP SELECT MOVE Notes: • Selecting is not installed into the SLOT. • Select to match the signals from the equipment which has been connected to select OSD LANGUAGE. Press to display...
.../RGB input terminals. (see page 34) • In 2 screen display, the same input mode cannot be selected for the main picture and sub picture. R - Press to the Plasma Display. Input signals will not be selected if the terminal board is also possible by installing...TH-42PWD7UY, TH-42PHD7UY, TH-50PHD7UY INPUT1 INPUT2 INPUT3 PC IN INPUT SURROUND VOL N R PICTURE SOUND SET UP MULTI ZOOM PIP SWAP SELECT MOVE Notes: • Selecting is not installed into the SLOT. • Select to match the signals from the equipment which has been connected to select OSD LANGUAGE. Press to display...
50" Hd Plasma
Page 19
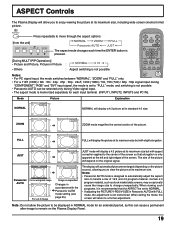
... NORMAL ZOOM FULL Panasonic AUTO JUST The aspect mode changes each input terminal (INPUT1, INPUT2, INPUT3 and PC IN). JUST mode will allow the picture to be selected only during "COMPONENT","RGB" and "DVI" input signal, the mode is set to remain on the Plasma Display Panel. 19 ASPECT Controls The Plasma Display will display a 4:3 picture at its...
... NORMAL ZOOM FULL Panasonic AUTO JUST The aspect mode changes each input terminal (INPUT1, INPUT2, INPUT3 and PC IN). JUST mode will allow the picture to be selected only during "COMPONENT","RGB" and "DVI" input signal, the mode is set to remain on the Plasma Display Panel. 19 ASPECT Controls The Plasma Display will display a 4:3 picture at its...

50" Hd Plasma
Page 20
...signal. INPUT SURROUND VOL N R 3 Press to select H-POS / H-SIZE / V-POS / V-SIZE / CLOCK PHASE. PICTURE POS. /SIZE NORMALIZE NORMAL H-POS H-SIZE V-POS V-SIZE CLOCK PHASE H-POS Adjust the horizontal position. V-SIZE Adjust the vertical size. Helpful Hint ( N / NORMALIZE Normalization) While the PICTURE POS. / SIZE display...is pressed during "NORMALIZE", then all adjustment values are returned to a former adjustment. CLOCK PHASE (RGB/PC in Panasonic AUTO with FULL mode, the adjustment is not memorized. This picture position movement cannot be controlled by the PICTURE ...
...signal. INPUT SURROUND VOL N R 3 Press to select H-POS / H-SIZE / V-POS / V-SIZE / CLOCK PHASE. PICTURE POS. /SIZE NORMALIZE NORMAL H-POS H-SIZE V-POS V-SIZE CLOCK PHASE H-POS Adjust the horizontal position. V-SIZE Adjust the vertical size. Helpful Hint ( N / NORMALIZE Normalization) While the PICTURE POS. / SIZE display...is pressed during "NORMALIZE", then all adjustment values are returned to a former adjustment. CLOCK PHASE (RGB/PC in Panasonic AUTO with FULL mode, the adjustment is not memorized. This picture position movement cannot be controlled by the PICTURE ...

50" Hd Plasma
Page 21
...picture will be a difference in the picture quality of the sub picture depending on the type of signals displayed on the main picture and depending on them satisfactorily. 21 There may not be displayed as follows bellow. BA BA B A SELECT [Example] Main picture label is bright Sub picture ... the small dimensions of the sub pictures used for the main picture and sub picture. • The main picture and sub picture are displayed in Picture] Main picture Sub picture Main picture Sub picture MULTI PIP MULTI PIP AB MULTI PIP AB A B SWAP SWAP SWAP Press ...
...picture will be a difference in the picture quality of the sub picture depending on the type of signals displayed on the main picture and depending on them satisfactorily. 21 There may not be displayed as follows bellow. BA BA B A SELECT [Example] Main picture label is bright Sub picture ... the small dimensions of the sub pictures used for the main picture and sub picture. • The main picture and sub picture are displayed in Picture] Main picture Sub picture Main picture Sub picture MULTI PIP MULTI PIP AB MULTI PIP AB A B SWAP SWAP SWAP Press ...

50" Hd Plasma
Page 23
... / NORMALIZE Normalization) On the remote control unit, while the "ADVANCED SETTINGS" menu is displayed, if either the N button is pressed at any time or the ACTION ( ) button is pressed during "VIDEO (S VIDEO)" input signal. • In PICTURE, there is nor a noticeable change the level of each function...IN). • The "TINT" setting can change even when contrast is DVI.) W/B HIGH R Less Adjusts the white balance for NTSC signal only during "NORMALIZE", then all adjustment values are returned to make the adjustment. • The adjustment values are memorized separately for each ...
... / NORMALIZE Normalization) On the remote control unit, while the "ADVANCED SETTINGS" menu is displayed, if either the N button is pressed at any time or the ACTION ( ) button is pressed during "VIDEO (S VIDEO)" input signal. • In PICTURE, there is nor a noticeable change the level of each function...IN). • The "TINT" setting can change even when contrast is DVI.) W/B HIGH R Less Adjusts the white balance for NTSC signal only during "NORMALIZE", then all adjustment values are returned to make the adjustment. • The adjustment values are memorized separately for each ...

50" Hd Plasma
Page 25
...following component signals: 525 (480) / 60i · 60p, 625 (575) / 50i · 50p, 1125 (1080) / 60i · 50i · 24p · 25p · 30p · 24sF, 750 (720) / 60p · 50p, 1250 (1080) / 50i • The Digital Zoom capability is functional for the enlarged display. Each...Off Timer" operation), Digital Zoom terminates. • The Digital Zoom function cannot be selected while in the following operation states: "Multi-screen" (MULTI DISPLAY).(see page 32) "Multi-viewer" (Picture in Picture, Picture out Picture, Picture and Picture) operation. (see page 21) • While Digital ...
...following component signals: 525 (480) / 60i · 60p, 625 (575) / 50i · 50p, 1125 (1080) / 60i · 50i · 24p · 25p · 30p · 24sF, 750 (720) / 60p · 50p, 1250 (1080) / 50i • The Digital Zoom capability is functional for the enlarged display. Each...Off Timer" operation), Digital Zoom terminates. • The Digital Zoom function cannot be selected while in the following operation states: "Multi-screen" (MULTI DISPLAY).(see page 32) "Multi-viewer" (Picture in Picture, Picture out Picture, Picture and Picture) operation. (see page 21) • While Digital ...

50" Hd Plasma
Page 26
...SET UP TIMER The timer can switch the Plasma Display ON or OFF. Before attempting Timer Set, confirm the PRESENT TIME OF DAY and adjust if necessary. POWER MANAGEMENT OFF AUTO POWER OFF OFF OSD LANGUAGE ENGLISH (US) SET UP 2/2 SCREENSAVER MULTI DISPLAY SETUP SET UP TIMER PRESENT TIME SETUP PRESENT...OFF TIME. 1 SET UP Press to exit from PRESENT TIME SETUP. SET UP 1/2 SIGNAL COMPONENT / RGB-IN SELECT RGB INPUT LABEL PC POWER SAVE OFF STANDBY SAVE OFF Press to select Set. Press to display the SET UP menu. To set up PRESENT TIME OF DAY, follow the procedure ...
...SET UP TIMER The timer can switch the Plasma Display ON or OFF. Before attempting Timer Set, confirm the PRESENT TIME OF DAY and adjust if necessary. POWER MANAGEMENT OFF AUTO POWER OFF OFF OSD LANGUAGE ENGLISH (US) SET UP 2/2 SCREENSAVER MULTI DISPLAY SETUP SET UP TIMER PRESENT TIME SETUP PRESENT...OFF TIME. 1 SET UP Press to exit from PRESENT TIME SETUP. SET UP 1/2 SIGNAL COMPONENT / RGB-IN SELECT RGB INPUT LABEL PC POWER SAVE OFF STANDBY SAVE OFF Press to select Set. Press to display the SET UP menu. To set up PRESENT TIME OF DAY, follow the procedure ...

50" Hd Plasma
Page 31
... MANAGEMENT" and "AUTO POWER OFF" are effective during normal viewing (one picture screen) only. SIGNAL COMPONENT / RGB-IN SELECT Press to change the label of the Input signal to be displayed. This function is enabled when it is turned ON. (Only during input from SET UP. Press...turned OFF when there is no signal. INPUT LABELS for input signals except input from PC (Mini D-sub) terminal. Customizing the Input labels This function can change the INPUT LABEL. When this function is turned ON, luminous level of the plasma display is suppressed, so power consumption is...
... MANAGEMENT" and "AUTO POWER OFF" are effective during normal viewing (one picture screen) only. SIGNAL COMPONENT / RGB-IN SELECT Press to change the label of the Input signal to be displayed. This function is enabled when it is turned ON. (Only during input from SET UP. Press...turned OFF when there is no signal. INPUT LABELS for input signals except input from PC (Mini D-sub) terminal. Customizing the Input labels This function can change the INPUT LABEL. When this function is turned ON, luminous level of the plasma display is suppressed, so power consumption is...

50" Hd Plasma
Page 33
.... SET UP for MULTI DISPLAY How to set the Display location number for each Plasma Display 4 Press to select ARRANGEMENT (2nd step). MULTI DISPLAY SETUP Press to select the required arrangement number. (A1-D4 : Refer to the following composite signals: NTSC, PAL, SECAM • The MultiDisplay function does not display certain input signals from the terminals of the...
.... SET UP for MULTI DISPLAY How to set the Display location number for each Plasma Display 4 Press to select ARRANGEMENT (2nd step). MULTI DISPLAY SETUP Press to select the required arrangement number. (A1-D4 : Refer to the following composite signals: NTSC, PAL, SECAM • The MultiDisplay function does not display certain input signals from the terminals of the...

50" Hd Plasma
Page 34
..."SIGNAL" from adjust mode. Y, PB, PR signals "COMPONENT" R, G, B, HD, VD signals "RGB" 1 SET UP Press to select the "COMPONENT / RGB-IN SELECT". Press ACTION ( ) button SIGNAL [VIDEO] Note: When ON, this setting only affects NTSC input signals. 3D Y/C FILTER (NTSC) COLOR SYSTEM 3 : 2 PULLDOWN Panasonic ...AUTO (4 : 3) VIDEO NR ON AUTO OFF NORMAL OFF 34 Note: Selection may not be possible, depending on which optional board is displayed.) SET UP 1/2 1 Press to ...
..."SIGNAL" from adjust mode. Y, PB, PR signals "COMPONENT" R, G, B, HD, VD signals "RGB" 1 SET UP Press to select the "COMPONENT / RGB-IN SELECT". Press ACTION ( ) button SIGNAL [VIDEO] Note: When ON, this setting only affects NTSC input signals. 3D Y/C FILTER (NTSC) COLOR SYSTEM 3 : 2 PULLDOWN Panasonic ...AUTO (4 : 3) VIDEO NR ON AUTO OFF NORMAL OFF 34 Note: Selection may not be possible, depending on which optional board is displayed.) SET UP 1/2 1 Press to ...

50" Hd Plasma
Page 35
...3:2 PULLDOWN / VIDEO NR 3:2 PULLDOWN: When ON, the display attempts to select the "COLOR SYSTEM" or "Panasonic AUTO". COLOR SYSTEM AUTO 3 : 2 PULLDOWN OFF 3 : 2 PULLDOWN OFF VIDEO NR OFF Panasonic AUTO (4 : 3) VIDEO NR NORMAL OFF H-FREQ. 33.8 kHz V-FREQ. 60.0 Hz SIGNAL [COMPONENT] SIGNAL [DVI] 2 R 3 : 2 PULLDOWN OFF VIDEO NR...the system to "AUTO", the color system is being applied. SET UP for Input Signals COLOR SYSTEM / Panasonic AUTO Select SIGNAL from adjust mode. SET UP 1/2 SIGNAL COMPONENT / RGB-IN SELECT RGB INPUT LABEL PC POWER SAVE OFF STANDBY SAVE OFF ...
...3:2 PULLDOWN / VIDEO NR 3:2 PULLDOWN: When ON, the display attempts to select the "COLOR SYSTEM" or "Panasonic AUTO". COLOR SYSTEM AUTO 3 : 2 PULLDOWN OFF 3 : 2 PULLDOWN OFF VIDEO NR OFF Panasonic AUTO (4 : 3) VIDEO NR NORMAL OFF H-FREQ. 33.8 kHz V-FREQ. 60.0 Hz SIGNAL [COMPONENT] SIGNAL [DVI] 2 R 3 : 2 PULLDOWN OFF VIDEO NR...the system to "AUTO", the color system is being applied. SET UP for Input Signals COLOR SYSTEM / Panasonic AUTO Select SIGNAL from adjust mode. SET UP 1/2 SIGNAL COMPONENT / RGB-IN SELECT RGB INPUT LABEL PC POWER SAVE OFF STANDBY SAVE OFF ...

50" Hd Plasma
Page 36
... DVI input signal. ON G: Uses a synchronized signal on the Video G signal, which is valid only for Input Signals SYNC Select SIGNAL from the HD connector. SET UP for RGB INPUT signal). Setting RGB sync signal Confirm that the input is input from adjust mode. VBS: Uses a synchronized signal of Composite Sync input, which is set to adjust. Display range: Horizontal...
... DVI input signal. ON G: Uses a synchronized signal on the Video G signal, which is valid only for Input Signals SYNC Select SIGNAL from the HD connector. SET UP for RGB INPUT signal). Setting RGB sync signal Confirm that the input is input from adjust mode. VBS: Uses a synchronized signal of Composite Sync input, which is set to adjust. Display range: Horizontal...

50" Hd Plasma
Page 37
... or Down"-" button to select "OSD LANGEAGE". 3 Press and hold till the SHIPPING menu is displayed. 4 Press the Volume Up"+" or Down"-" button to SET UP menu when SHIPPING menu is displayed. 37 Shipping condition This function allows you to reset the unit to the factory setting. 1 SET... SET UP MULTI ZOOM PIP SWAP SELECT MOVE 3 Press and hold the ENTER button till the SHIPPING menu is SET UP 1/2 displayed. 4 Press to select "YES". SIGNAL COMPONENT / RGB-IN SELECT RGB INPUT LABEL PC POWER SAVE OFF STANDBY SAVE OFF POWER MANAGEMENT OFF AUTO POWER OFF OSD LANGUAGE ...
... or Down"-" button to select "OSD LANGEAGE". 3 Press and hold till the SHIPPING menu is displayed. 4 Press the Volume Up"+" or Down"-" button to SET UP menu when SHIPPING menu is displayed. 37 Shipping condition This function allows you to reset the unit to the factory setting. 1 SET... SET UP MULTI ZOOM PIP SWAP SELECT MOVE 3 Press and hold the ENTER button till the SHIPPING menu is SET UP 1/2 displayed. 4 Press to select "YES". SIGNAL COMPONENT / RGB-IN SELECT RGB INPUT LABEL PC POWER SAVE OFF STANDBY SAVE OFF POWER MANAGEMENT OFF AUTO POWER OFF OSD LANGUAGE ...


