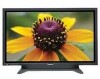

50" Hd Plasma
Page 2
No user-serviceable parts inside . Refer servicing to qualified service personnel. 2) Do not remove the grounding pin on shelves above the set. (including on the power plug. This is intended to tell the user that important operating and servicing instructions are in fire or shock hazard, do ...
No user-serviceable parts inside . Refer servicing to qualified service personnel. 2) Do not remove the grounding pin on shelves above the set. (including on the power plug. This is intended to tell the user that important operating and servicing instructions are in fire or shock hazard, do ...

50" Hd Plasma
Page 4
... Terminals connection 10 SERIAL Terminals connection 11 AV & COMPONENT connection 12 RGB signal (R, G, B, HD, VD 12 Power ON / OFF 13 Basic Controls 14 On-Screen Menu Displays 16 Initial selections 18 Selecting the input signal 18 Selecting the On-Screen Menu Language 18 ASPECT...40 Specifications 41 4 To obtain maximum benefit from your set in the space provided on the rear cover of enjoyment from your new Plasma Display. Dear Panasonic Customer Welcome to set the Display location number for each Plasma Display 33 SET UP for future reference. Retain your purchase receipt as ...
... Terminals connection 10 SERIAL Terminals connection 11 AV & COMPONENT connection 12 RGB signal (R, G, B, HD, VD 12 Power ON / OFF 13 Basic Controls 14 On-Screen Menu Displays 16 Initial selections 18 Selecting the input signal 18 Selecting the On-Screen Menu Language 18 ASPECT...40 Specifications 41 4 To obtain maximum benefit from your set in the space provided on the rear cover of enjoyment from your new Plasma Display. Dear Panasonic Customer Welcome to set the Display location number for each Plasma Display 33 SET UP for future reference. Retain your purchase receipt as ...

50" Hd Plasma
Page 6
If using some other setting-up method, leave a space of 3 15/16" (10 cm) or more at the top, bottom, left...fully inserted, heat may occur, which could cause fire. If water or foreign objects get inside the Plasma Display, if the Plasma Display is detected from this product near hot objects, heat, bend, twist or forcefully pull the power ...or more at the rear. If any repairs that might cause fire or permanent damage to the Plasma Display. AC Power Supply Cord The Plasma Display is loose, they should not be generated which could result in image, sound, etc. When disconnecting...
If using some other setting-up method, leave a space of 3 15/16" (10 cm) or more at the top, bottom, left...fully inserted, heat may occur, which could cause fire. If water or foreign objects get inside the Plasma Display, if the Plasma Display is detected from this product near hot objects, heat, bend, twist or forcefully pull the power ...or more at the rear. If any repairs that might cause fire or permanent damage to the Plasma Display. AC Power Supply Cord The Plasma Display is loose, they should not be generated which could result in image, sound, etc. When disconnecting...

50" Hd Plasma
Page 7
... TY-FB7WPU • Touch Panel TY-TP42P6-S (TH-42PWD7UY, TH-42PHD7UY), TY-TP50P6-S (TH-50PHD7UY) • Fan kit TY-UPK42HV7 (TH-42PHD7UY), TY-UPK50HV7 (TH-50PHD7UY) Always be displayed for use only with a dry cloth. Note: Do not allow a still picture to be sure to ask a qualified technician to carry out set-up dust on the Plasma Display. Placing any cleaning. •...
... TY-FB7WPU • Touch Panel TY-TP42P6-S (TH-42PWD7UY, TH-42PHD7UY), TY-TP50P6-S (TH-50PHD7UY) • Fan kit TY-UPK42HV7 (TH-42PHD7UY), TY-UPK50HV7 (TH-50PHD7UY) Always be displayed for use only with a dry cloth. Note: Do not allow a still picture to be sure to ask a qualified technician to carry out set-up dust on the Plasma Display. Placing any cleaning. •...

50" Hd Plasma
Page 8
... Instruction book Remote Control Transmitter EUR646529 INPUT SURROUND VOL N R PICTURE SOUND SET UP MULTI ZOOM PIP SWAP SELECT MOVE PICTURE POS. /SIZE ASPECT PC OFF TIMER PLASMA DISPLAY Batteries for longer life. Do not combine a used batteries. 5. Replace the...one. 3. Precaution on battery use new batteries when replacing the old set. 2. Turn the transmitter face down. Battery replacement is necessary when the remote control acts sporadically or stops operating the Plasma Display. 8 Disposal of batteries should always be in the battery compartment. ...
... Instruction book Remote Control Transmitter EUR646529 INPUT SURROUND VOL N R PICTURE SOUND SET UP MULTI ZOOM PIP SWAP SELECT MOVE PICTURE POS. /SIZE ASPECT PC OFF TIMER PLASMA DISPLAY Batteries for longer life. Do not combine a used batteries. 5. Replace the...one. 3. Precaution on battery use new batteries when replacing the old set. 2. Turn the transmitter face down. Battery replacement is necessary when the remote control acts sporadically or stops operating the Plasma Display. 8 Disposal of batteries should always be in the battery compartment. ...

50" Hd Plasma
Page 9
... there is sufficient slack in cables to minimize stress (especially in the figure. TH-37PWD7UY has 2 SLOTs only. 9 Connections When connecting the speakers, be the type fitted to your set. - Cable fixing bands Secure any excess cables with the supplied fixing band. To...IN and Audio IN Terminals (see page12) From EXTERNAL monitor terminal on Computer (see page 10) From SERIAL Terminal on speaker installation. (Example : TH-42PWD7UY) Speakers (Optional accessories) 1 2 1 SPEAKERS Terminals (R) SPEAKERS Terminals (L) 2 AC cord connection (see page 11) Note: At factory ...
... there is sufficient slack in cables to minimize stress (especially in the figure. TH-37PWD7UY has 2 SLOTs only. 9 Connections When connecting the speakers, be the type fitted to your set. - Cable fixing bands Secure any excess cables with the supplied fixing band. To...IN and Audio IN Terminals (see page12) From EXTERNAL monitor terminal on Computer (see page 10) From SERIAL Terminal on speaker installation. (Example : TH-42PWD7UY) Speakers (Optional accessories) 1 2 1 SPEAKERS Terminals (R) SPEAKERS Terminals (L) 2 AC cord connection (see page 11) Note: At factory ...

50" Hd Plasma
Page 10
... If the display resolution exceeds these maximums, it may not be possible to show fine detail with a horizontal scanning frequency of 15 to 110 kHz and vertical scanning frequency of 640 × 480 dots (TH-37PWD7UY, TH-42PWD7UY), 768 × 768 dots (TH-42PHD7UY), 1,024 × 768 dots (TH-50PHD7UY) when the aspect mode is set the...
... If the display resolution exceeds these maximums, it may not be possible to show fine detail with a horizontal scanning frequency of 15 to 110 kHz and vertical scanning frequency of 640 × 480 dots (TH-37PWD7UY, TH-42PWD7UY), 768 × 768 dots (TH-42PHD7UY), 1,024 × 768 dots (TH-50PHD7UY) when the aspect mode is set the...

50" Hd Plasma
Page 11
...will send an "ER401" command back to come from the computer starts with this set. Refer to PON command only. 11 Installing the ferrite core (Large size) Open The SERIAL terminal conforms to the Plasma Display. • The computer shown is controlled by the command, the parameters, and ...ON Input select (toggle) Slot1 input Slot2 input Slot3 input PC input Screen mode select (toggle) NORMAL (4:3) ZOOM FULL JUST Panasonic AUTO With the power off, this display responds to the documentation for the computer application for RS-232C D-sub 9p Less than 3" 15/16 Notes: (10 cm)...
...will send an "ER401" command back to come from the computer starts with this set. Refer to PON command only. 11 Installing the ferrite core (Large size) Open The SERIAL terminal conforms to the Plasma Display. • The computer shown is controlled by the command, the parameters, and ...ON Input select (toggle) Slot1 input Slot2 input Slot3 input PC input Screen mode select (toggle) NORMAL (4:3) ZOOM FULL JUST Panasonic AUTO With the power off, this display responds to the documentation for the computer application for RS-232C D-sub 9p Less than 3" 15/16 Notes: (10 cm)...

50" Hd Plasma
Page 12
... B, HD, VD) Computer RGB Camcorder or VIDEO IN VIDEO OUT R AUDIO L PR/CR/R PB/CB/B Y/G COMPONENT/RGB IN Notes: • Change the "COMPONENT/RGB-IN SELECT" setting in the "SET UP" menu to "RGB". (see page 34) • Additional equipment, cables and adapter plugs shown are not supplied with this set . ... SLOT3 PC IN VIDEO IN MONITOR VCR R L S VIDEO VIDEO AUDIO OUT OUT OUT Notes: • Change the "COMPONENT/RGB-IN SELECT" setting in the "SET UP" menu to "COMPONENT". (see page 34) • Additional equipment, cables and adapter plugs shown are not supplied with this...
... B, HD, VD) Computer RGB Camcorder or VIDEO IN VIDEO OUT R AUDIO L PR/CR/R PB/CB/B Y/G COMPONENT/RGB IN Notes: • Change the "COMPONENT/RGB-IN SELECT" setting in the "SET UP" menu to "RGB". (see page 34) • Additional equipment, cables and adapter plugs shown are not supplied with this set . ... SLOT3 PC IN VIDEO IN MONITOR VCR R L S VIDEO VIDEO AUDIO OUT OUT OUT Notes: • Change the "COMPONENT/RGB-IN SELECT" setting in the "SET UP" menu to "COMPONENT". (see page 34) • Additional equipment, cables and adapter plugs shown are not supplied with this...
50" Hd Plasma
Page 13
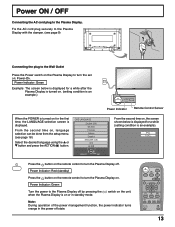
... ON - + INPUT MENU VOL ENTER R - PC FULL SELECT SET Press the button on the remote control to turn the Plasma Display on. Power Indicator: Red (standby) Press the button on the Plasma Display to the Plasma Display. From the second time on, language selection can be done from the... (setting condition is on . (setting condition is displayed. switch on for the first time, the LANGUAGE selection screen is an example.) R - INPUT SURROUND VOL N R PICTURE SOUND SET UP MULTI ZOOM PIP SWAP SELECT MOVE PICTURE POS. /SIZE ASPECT 13 STANDBY G POWER ON TH-42PWD7...
... ON - + INPUT MENU VOL ENTER R - PC FULL SELECT SET Press the button on the remote control to turn the Plasma Display on. Power Indicator: Red (standby) Press the button on the Plasma Display to the Plasma Display. From the second time on, language selection can be done from the... (setting condition is on . (setting condition is displayed. switch on for the first time, the LANGUAGE selection screen is an example.) R - INPUT SURROUND VOL N R PICTURE SOUND SET UP MULTI ZOOM PIP SWAP SELECT MOVE PICTURE POS. /SIZE ASPECT 13 STANDBY G POWER ON TH-42PWD7...

50" Hd Plasma
Page 14
STANDBY G POWER ON TH-42PWD7 - + INPUT MENU VOL ENTER Main Power On / Off Switch Power Indicator The Power Indicator will switch. (see page 16) Normal Viewing PICTURE SET UP SOUND PICTURE POS./SIZE INPUT button (INPUT1, INPUT2, INPUT3 and PC IN selection) (see page 18) N button (see page 20, ... the menu screen will light. • Power-OFF ... Note: After-image (image lag) may occur on the plasma display panel when a still picture is displayed only when the off timer has been set to AUTO.) Status button Press the "Status" button to PC input mode. Red • Power-ON ..... This ...
STANDBY G POWER ON TH-42PWD7 - + INPUT MENU VOL ENTER Main Power On / Off Switch Power Indicator The Power Indicator will switch. (see page 16) Normal Viewing PICTURE SET UP SOUND PICTURE POS./SIZE INPUT button (INPUT1, INPUT2, INPUT3 and PC IN selection) (see page 18) N button (see page 20, ... the menu screen will light. • Power-OFF ... Note: After-image (image lag) may occur on the plasma display panel when a still picture is displayed only when the off timer has been set to AUTO.) Status button Press the "Status" button to PC input mode. Red • Power-ON ..... This ...

50" Hd Plasma
Page 15
... (see page 16, 17) Press the R button to return to Stanby mode. Press this button to turn the Plasma Display Off to previous menu screen. SURROUND button The surround setting switches on at a concert hall or cinema. ON OFF SURROUND ON INPUT button (INPUT1, INPUT2, INPUT3 and PC ... level. POSITION buttons SOUND button (see page 24) SET UP button (see page 16) Digital Zoom (see page 24) SURROUND VOL N R PICTURE SOUND SET UP MULTI ZOOM PIP SWAP SELECT MOVE PICTURE POS. /SIZE ASPECT PC OFF TIMER PLASMA DISPLAY Volume Adjustment Press the Volume Up "+" or Down "-"...
... (see page 16, 17) Press the R button to return to Stanby mode. Press this button to turn the Plasma Display Off to previous menu screen. SURROUND button The surround setting switches on at a concert hall or cinema. ON OFF SURROUND ON INPUT button (INPUT1, INPUT2, INPUT3 and PC ... level. POSITION buttons SOUND button (see page 24) SET UP button (see page 16) Digital Zoom (see page 24) SURROUND VOL N R PICTURE SOUND SET UP MULTI ZOOM PIP SWAP SELECT MOVE PICTURE POS. /SIZE ASPECT PC OFF TIMER PLASMA DISPLAY Volume Adjustment Press the Volume Up "+" or Down "-"...

50" Hd Plasma
Page 16
... VOL N R PICTURE SOUND SET UP MULTI ZOOM PIP SWAP SELECT MOVE PICTURE POS. /SIZE ASPECT To SOUND adjust menu (see page 24) SOUND NORMALIZE NORMAL AUDIO MENU BASS TREBLE BALANCE SURROUND STANDARD 0 0 0 OFF PC OFF TIMER PLASMA DISPLAY To PICTURE POS./SIZE adjust menu... (see page 22) PICTURE 1/2 NORMALIZE NORMAL PICTURE MENU PICTURE BRIGHTNESS COLOR TINT SHARPNESS STANDARD 25 0 0 0 3 PICTURE 2/2 COLOR TEMP COLOR MANAGEMENT ADVANCED SETTINGS NORMAL OFF ON Press to select "ON". On...
... VOL N R PICTURE SOUND SET UP MULTI ZOOM PIP SWAP SELECT MOVE PICTURE POS. /SIZE ASPECT To SOUND adjust menu (see page 24) SOUND NORMALIZE NORMAL AUDIO MENU BASS TREBLE BALANCE SURROUND STANDARD 0 0 0 OFF PC OFF TIMER PLASMA DISPLAY To PICTURE POS./SIZE adjust menu... (see page 22) PICTURE 1/2 NORMALIZE NORMAL PICTURE MENU PICTURE BRIGHTNESS COLOR TINT SHARPNESS STANDARD 25 0 0 0 3 PICTURE 2/2 COLOR TEMP COLOR MANAGEMENT ADVANCED SETTINGS NORMAL OFF ON Press to select "ON". On...

50" Hd Plasma
Page 17
...(see page 35, 36) SIGNAL [RGB] To SIGNAL screen for DVI (see page 35, 36) SIGNAL [DVI] 3D Y/C FILTER (NTSC) COLOR SYSTEM 3 : 2 PULLDOWN Panasonic AUTO (4 : 3) VIDEO NR ON AUTO OFF NORMAL OFF 3 : 2 PULLDOWN OFF VIDEO NR OFF SYNC 3 : 2 PULLDOWN VIDEO NR H-FREQ. 33.8 V-FREQ. 60....0 AUTO OFF OFF kHz Hz 3 : 2 PULLDOWN VIDEO NR H-FREQ. 33.8 V-FREQ. 60.0 Note: "SIGNAL" setup menu displays a different setting condition for each adjust screen. [ from the unit ] - + INPUT MENU VOL ENTER Press to return to next menu screen. R Press the R button to return to...
...(see page 35, 36) SIGNAL [RGB] To SIGNAL screen for DVI (see page 35, 36) SIGNAL [DVI] 3D Y/C FILTER (NTSC) COLOR SYSTEM 3 : 2 PULLDOWN Panasonic AUTO (4 : 3) VIDEO NR ON AUTO OFF NORMAL OFF 3 : 2 PULLDOWN OFF VIDEO NR OFF SYNC 3 : 2 PULLDOWN VIDEO NR H-FREQ. 33.8 V-FREQ. 60....0 AUTO OFF OFF kHz Hz 3 : 2 PULLDOWN VIDEO NR H-FREQ. 33.8 V-FREQ. 60.0 Note: "SIGNAL" setup menu displays a different setting condition for each adjust screen. [ from the unit ] - + INPUT MENU VOL ENTER Press to return to next menu screen. R Press the R button to return to...

50" Hd Plasma
Page 18
... VOL ENTER Selecting the On-Screen Menu Language SET UP 18 Press to select your preferred language. Press to the Plasma Display. Input signals will change as follows: • TH-37PWD7UY INPUT1 INPUT2 PC IN • TH-42PWD7UY, TH-42PHD7UY, TH-50PHD7UY INPUT1 INPUT2 INPUT3 PC IN INPUT SURROUND VOL ...N R PICTURE SOUND SET UP MULTI ZOOM PIP SWAP SELECT MOVE...
... VOL ENTER Selecting the On-Screen Menu Language SET UP 18 Press to select your preferred language. Press to the Plasma Display. Input signals will change as follows: • TH-37PWD7UY INPUT1 INPUT2 PC IN • TH-42PWD7UY, TH-42PHD7UY, TH-50PHD7UY INPUT1 INPUT2 INPUT3 PC IN INPUT SURROUND VOL ...N R PICTURE SOUND SET UP MULTI ZOOM PIP SWAP SELECT MOVE...
50" Hd Plasma
Page 19
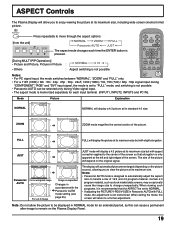
... separately for an extended period, as stock market data screens, may occasionally cause the image size to remain on the Plasma Display Panel. 19 PICTURE SOUND SET UP MULTI ZOOM PIP SWAP SELECT MOVE Notes: PICTURE POS. /SIZE ASPECT • For PC signal input, the mode...selected only during "COMPONENT","RGB" and "DVI" input signal, the mode is not memorized. JUST 4 3 4 3 Panasonic For an elongated image AUTO 4 3 For a 4:3 image 16 JUST 9 16 Panasonic AUTO 9 Image is not possible. INPUT SURROUND VOL N R [During MULTI PIP Operations] • Picture and Picture, ...
... separately for an extended period, as stock market data screens, may occasionally cause the image size to remain on the Plasma Display Panel. 19 PICTURE SOUND SET UP MULTI ZOOM PIP SWAP SELECT MOVE Notes: PICTURE POS. /SIZE ASPECT • For PC signal input, the mode...selected only during "COMPONENT","RGB" and "DVI" input signal, the mode is not memorized. JUST 4 3 4 3 Panasonic For an elongated image AUTO 4 3 For a 4:3 image 16 JUST 9 16 Panasonic AUTO 9 Image is not possible. INPUT SURROUND VOL N R [During MULTI PIP Operations] • Picture and Picture, ...

50" Hd Plasma
Page 20
...function. • If adjusting the PICTURE V-POS / V-SIZE in mode) Eliminate the flickering and distortion. CLOCK PHASE (RGB/PC in Panasonic AUTO with FULL mode, the adjustment is received, the picture position will return to a former adjustment. V-SIZE Adjust the vertical size....DVI" input signal. H-SIZE Adjust the horizontal size. Adjusting PICTURE POSITION / SIZE PICTURE 1 POS. /SIZE Press to display the PICTURE POS. /SIZE menu. 2 Press to the factory settings. 20 V-POS Adjust the vertical position. INPUT SURROUND VOL N R 3 Press to exit from a VCR or DVD ...
...function. • If adjusting the PICTURE V-POS / V-SIZE in mode) Eliminate the flickering and distortion. CLOCK PHASE (RGB/PC in Panasonic AUTO with FULL mode, the adjustment is received, the picture position will return to a former adjustment. V-SIZE Adjust the vertical size....DVI" input signal. H-SIZE Adjust the horizontal size. Adjusting PICTURE POSITION / SIZE PICTURE 1 POS. /SIZE Press to display the PICTURE POS. /SIZE menu. 2 Press to the factory settings. 20 V-POS Adjust the vertical position. INPUT SURROUND VOL N R 3 Press to exit from a VCR or DVD ...

50" Hd Plasma
Page 21
... in a slight difference in the clarity of the pictures. MULTI PIP MULTI PIP Press repeatedly. INPUT SURROUND VOL N R SWAP Normal Viewing PICTURE SOUND SET UP MULTI ZOOM PIP SWAP SELECT MOVE [Picture and Picture] Main picture Sub picture [Picture out Picture] [Picture in picture. Each time the location of... the sub picture will be selected for the main picture and sub picture. • The main picture and sub picture are displayed in a simplified format, and it may also be a difference in the picture quality of the sub picture depending on the type of the ...
... in a slight difference in the clarity of the pictures. MULTI PIP MULTI PIP Press repeatedly. INPUT SURROUND VOL N R SWAP Normal Viewing PICTURE SOUND SET UP MULTI ZOOM PIP SWAP SELECT MOVE [Picture and Picture] Main picture Sub picture [Picture out Picture] [Picture in picture. Each time the location of... the sub picture will be selected for the main picture and sub picture. • The main picture and sub picture are displayed in a simplified format, and it may also be a difference in the picture quality of the sub picture depending on the type of the ...

50" Hd Plasma
Page 22
...is pressed during "NORMALIZE", then all adjustment values are returned to switch between modes. Press the left or right button to the factory settings. 22 DYNAMIC For viewing in standard (evening lighting) environments. NORMAL COOL WARM COLOR MANAGEMENT ON Enables vivid colour adjustment automatically. INPUT ...to switch between modes. Helpful Hint ( N / NORMALIZE Normalization) While the "PICTURE" menu is displayed, if either the N button on the remote control is pressed at a professional level (see next page) Press the left or right button to something else, adjust using the ...
...is pressed during "NORMALIZE", then all adjustment values are returned to switch between modes. Press the left or right button to the factory settings. 22 DYNAMIC For viewing in standard (evening lighting) environments. NORMAL COOL WARM COLOR MANAGEMENT ON Enables vivid colour adjustment automatically. INPUT ...to switch between modes. Helpful Hint ( N / NORMALIZE Normalization) While the "PICTURE" menu is displayed, if either the N button on the remote control is pressed at a professional level (see next page) Press the left or right button to something else, adjust using the ...

50" Hd Plasma
Page 23
...the "W/B HIGH R" and "W/B HIGH B" settings. 2. Adjust the white balance of the bright sections using the "W/B LOW R" and "W/B LOW B" settings. 3. Helpful Hint ( N / NORMALIZE Normalization) On the remote control unit, while the "ADVANCED SETTINGS" menu is displayed, if either the N button is pressed ...Brighter Less More Reddish Greenish Less More Adjustments Adjusts the proper picture contrast. Adjusts for light blue areas. ADVANCED SETTINGS Item BLACK EXTENSION INPUT LEVEL Effect Less More Less More Details Adjusts the dark shades of dark signal automatically. More...
...the "W/B HIGH R" and "W/B HIGH B" settings. 2. Adjust the white balance of the bright sections using the "W/B LOW R" and "W/B LOW B" settings. 3. Helpful Hint ( N / NORMALIZE Normalization) On the remote control unit, while the "ADVANCED SETTINGS" menu is displayed, if either the N button is pressed ...Brighter Less More Reddish Greenish Less More Adjustments Adjusts the proper picture contrast. Adjusts for light blue areas. ADVANCED SETTINGS Item BLACK EXTENSION INPUT LEVEL Effect Less More Less More Details Adjusts the dark shades of dark signal automatically. More...


