SCHTB350 User Guide
Page 4
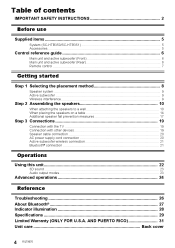
...)...6 Remote control ...7 Getting started Step 1 Selecting the placement method...8 Speaker system...9 Active subwoofer ...9 Wireless interference...9 Step 2 Assembling the speakers...10 When attaching the speakers to a wall...10 When placing the speakers on a table ...14 Additional speaker fall prevention measures ...17 Step 3 Connections ...19 Connection with the TV ...Connection with other devices...
...)...6 Remote control ...7 Getting started Step 1 Selecting the placement method...8 Speaker system...9 Active subwoofer ...9 Wireless interference...9 Step 2 Assembling the speakers...10 When attaching the speakers to a wall...10 When placing the speakers on a table ...14 Additional speaker fall prevention measures ...17 Step 3 Connections ...19 Connection with the TV ...Connection with other devices...
SCHTB350 User Guide
Page 8
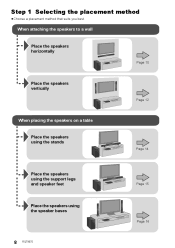
When attaching the speakers to a wall Place the speakers horizontally Page 10 Place the speakers vertically Page 12 When placing the speakers on a table Place the speakers using the stands Page 14 Place the speakers using the support legs and speaker feet Page 15 Place the speakers using the speaker bases Page 16 8 RQT9670 Step 1 Selecting the placement method Getting started ≥ Choose a placement method that suits you best.
When attaching the speakers to a wall Place the speakers horizontally Page 10 Place the speakers vertically Page 12 When placing the speakers on a table Place the speakers using the stands Page 14 Place the speakers using the support legs and speaker feet Page 15 Place the speakers using the speaker bases Page 16 8 RQT9670 Step 1 Selecting the placement method Getting started ≥ Choose a placement method that suits you best.
SCHTB350 User Guide
Page 9
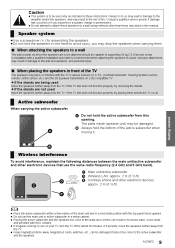
...the active subwoofer and the speakers too close to the amplifier and/or the speakers, and may be damaged. Cover walls and windows with a qualified installation specialist is to a wall. Consultation with thick curtains. ≥ If irregular coloring occurs on a 3D compatible TV. ≥ If the ...If the TV still does not function properly, try placing them . ∫ When attaching the speakers to a wall The wall or pillar on which the speakers are to a wall using methods other than those described in performance. ≥ Do not attempt to attach these speakers to be attached...
...the active subwoofer and the speakers too close to the amplifier and/or the speakers, and may be damaged. Cover walls and windows with a qualified installation specialist is to a wall. Consultation with thick curtains. ≥ If irregular coloring occurs on a 3D compatible TV. ≥ If the ...If the TV still does not function properly, try placing them . ∫ When attaching the speakers to a wall The wall or pillar on which the speakers are to a wall using methods other than those described in performance. ≥ Do not attempt to attach these speakers to be attached...
SCHTB350 User Guide
Page 10
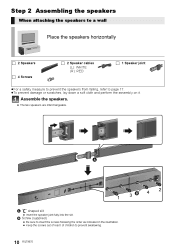
.... ≥ To prevent damage or scratches, lay down a soft cloth and perform the assembly on it. Step 2 Assembling the speakers When attaching the speakers to a wall Place the speakers horizontally ∏ 2 Speakers ∏ 2 Speaker cables (L): WHITE (R): RED ∏ 1 Speaker joint ∏ 4 Screws ≥ For a safety measure to prevent the speakers from...
.... ≥ To prevent damage or scratches, lay down a soft cloth and perform the assembly on it. Step 2 Assembling the speakers When attaching the speakers to a wall Place the speakers horizontally ∏ 2 Speakers ∏ 2 Speaker cables (L): WHITE (R): RED ∏ 1 Speaker joint ∏ 4 Screws ≥ For a safety measure to prevent the speakers from...

SCHTB350 User Guide
Page 11
... side of children to prevent swallowing. C D E F G At least 30 mm (1 3/16q) ‰4.0 mm (5/32q) ‰7.0 mm to ‰9.4 mm (9/32q to 3/8q) Wall or pillar 5.5 mm to 6.5 mm (7/32q to 1/4q) Front view (semi-transparent image) H 326 mm (12 27/32q) I 316 mm (12 7/16q...: Left speaker channel (L) ≥ Insert the wire fully, taking care not to insert beyond the wire insulation. Connect the speaker cables. ≥ Use the "Panasonic" logo to identify the left and right speakers, then connect the cables (as the screw, should be capable of supporting over 33 kg (72.8 lbs...
... side of children to prevent swallowing. C D E F G At least 30 mm (1 3/16q) ‰4.0 mm (5/32q) ‰7.0 mm to ‰9.4 mm (9/32q to 3/8q) Wall or pillar 5.5 mm to 6.5 mm (7/32q to 1/4q) Front view (semi-transparent image) H 326 mm (12 27/32q) I 316 mm (12 7/16q...: Left speaker channel (L) ≥ Insert the wire fully, taking care not to insert beyond the wire insulation. Connect the speaker cables. ≥ Use the "Panasonic" logo to identify the left and right speakers, then connect the cables (as the screw, should be capable of supporting over 33 kg (72.8 lbs...

SCHTB350 User Guide
Page 13
... wire fully, taking care not to 1/4q) F Front speaker (Rear view) G 102 mm (4 1/32q) H 37 mm (1 15/32q) I Wall mounting hole White J WHITE: Left speaker channel (L) DO Red K RED: Right speaker channel (R) DO NOT ≥ Move the speaker so that the screw.../32q) of children to prevent swallowing. Fit the speaker(s) securely onto the screw(s). ≥ Place the speaker that is in the wall where the screw is to the left . RQT9670 13 Getting started A At least 30 mm (1 3/16q) B ‰4.0 mm (5/32q) C ‰7.0 mm ...
... wire fully, taking care not to 1/4q) F Front speaker (Rear view) G 102 mm (4 1/32q) H 37 mm (1 15/32q) I Wall mounting hole White J WHITE: Left speaker channel (L) DO Red K RED: Right speaker channel (R) DO NOT ≥ Move the speaker so that the screw.../32q) of children to prevent swallowing. Fit the speaker(s) securely onto the screw(s). ≥ Place the speaker that is in the wall where the screw is to the left . RQT9670 13 Getting started A At least 30 mm (1 3/16q) B ‰4.0 mm (5/32q) C ‰7.0 mm ...
SCHTB350 User Guide
Page 15
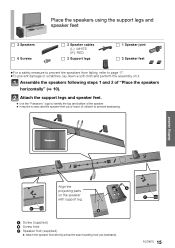
Attach the support legs and speaker feet. ≥ Use the "Panasonic" logo to identify the top and bottom of the speaker. ≥ Keep the screws and the speaker feet out of reach of "Place the speakers ... on the speaker with support leg. A Screw (supplied) B Screw hole C Speaker foot (supplied) ≥ Attach the speaker foot directly below the wall mounting hole (as illustrated). Place the speakers using the support legs and speaker feet ∏ 2 Speakers ∏ 2 Speaker cables (L): WHITE (R): RED ∏ 2 Support legs ∏...
Attach the support legs and speaker feet. ≥ Use the "Panasonic" logo to identify the top and bottom of the speaker. ≥ Keep the screws and the speaker feet out of reach of "Place the speakers ... on the speaker with support leg. A Screw (supplied) B Screw hole C Speaker foot (supplied) ≥ Attach the speaker foot directly below the wall mounting hole (as illustrated). Place the speakers using the support legs and speaker feet ∏ 2 Speakers ∏ 2 Speaker cables (L): WHITE (R): RED ∏ 2 Support legs ∏...

SCHTB350 User Guide
Page 17
...white connector on the observers' right, and connect with the speaker cable with a qualified installation specialist concerning the appropriate procedure when attaching to a concrete wall or a surface that may result in 2 locations, about 1.5 mm (1/16q)). ≥ Keep the screws out of reach of children to prevent swallowing... enough support is recommended (> 11, 13). RQT9670 17 Connect the speaker cables. ≥ Insert the wire fully, taking care not to the wall and speakers, and personal injury. ≥ Use a cord that the slack of supporting over 10 kg (22.05 lbs) (with a fall...
...white connector on the observers' right, and connect with the speaker cable with a qualified installation specialist concerning the appropriate procedure when attaching to a concrete wall or a surface that may result in 2 locations, about 1.5 mm (1/16q)). ≥ Keep the screws out of reach of children to prevent swallowing... enough support is recommended (> 11, 13). RQT9670 17 Connect the speaker cables. ≥ Insert the wire fully, taking care not to the wall and speakers, and personal injury. ≥ Use a cord that the slack of supporting over 10 kg (22.05 lbs) (with a fall...

SCHTB350 User Guide
Page 18
C Wall D Approx. 150 mm (5 29/32q) § If the cord cannot be threaded through the holes, try bending the cord in 2 locations, about 10 mm (13/32q) apart from the tip, at an angle of the screw eye may differ. When placing the speakers on a table Horizontal placement Vertical placement A Cord§ B Screw eye ≥ Depending on the placement of the speakers, the screwing position of 45o (as illustrated above). 18 RQT9670
C Wall D Approx. 150 mm (5 29/32q) § If the cord cannot be threaded through the holes, try bending the cord in 2 locations, about 10 mm (13/32q) apart from the tip, at an angle of the screw eye may differ. When placing the speakers on a table Horizontal placement Vertical placement A Cord§ B Screw eye ≥ Depending on the placement of the speakers, the screwing position of 45o (as illustrated above). 18 RQT9670

SCHTB350 User Guide
Page 30
...feet and the support legs Dimensions (WkHkD) 956 mmk78 mmk55 mm (37 5/8qk3 1/16qk2 5/32q) Mass (Weight) 1.57 kg (3.5 lbs) Horizontal placement (for wall mount) Dimensions (WkHkD) 956 mmk75 mmk35 mm (37 5/8qk2 15/16qk1 3/8q) Mass (Weight) 1.54 kg (3.5 lbs) Vertical placement using the speaker bases ...Dimensions (WkHkD) 148 mmk528 mmk145 mm (5 13/16qk20 25/32qk5 23/32q) Mass (Weight) 0.88 kg (1.98 lbs) Vertical placement (for wall mount) Dimensions (WkHkD) 75 mmk478 mmk35 mm (2 15/16qk18 13/16qk1 3/8q) Mass (Weight) 0.77 kg (1.76 lbs) Bluetooth® SECTION Bluetooth®...
...feet and the support legs Dimensions (WkHkD) 956 mmk78 mmk55 mm (37 5/8qk3 1/16qk2 5/32q) Mass (Weight) 1.57 kg (3.5 lbs) Horizontal placement (for wall mount) Dimensions (WkHkD) 956 mmk75 mmk35 mm (37 5/8qk2 15/16qk1 3/8q) Mass (Weight) 1.54 kg (3.5 lbs) Vertical placement using the speaker bases ...Dimensions (WkHkD) 148 mmk528 mmk145 mm (5 13/16qk20 25/32qk5 23/32q) Mass (Weight) 0.88 kg (1.98 lbs) Vertical placement (for wall mount) Dimensions (WkHkD) 75 mmk478 mmk35 mm (2 15/16qk18 13/16qk1 3/8q) Mass (Weight) 0.77 kg (1.76 lbs) Bluetooth® SECTION Bluetooth®...