
SCEN5 User Guide
Page 1
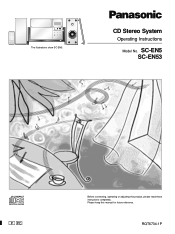
RQT6734-1P Please keep this product, please read these instructions completely. CD Stereo System Operating Instructions Model No. SC-EN5 SC-EN53 P PC Before connecting, operating or adjusting this manual for future reference. CLOCK TIMER TIMER ADJ ON/OFF DISPLAY SLEEP PGM/-CLEAR EQ LIVE VIRTUALIZER PLAY MODE AUX TUNER/BAND CD TUNING MODE VOLUME The illustrations show SC-EN5.
RQT6734-1P Please keep this product, please read these instructions completely. CD Stereo System Operating Instructions Model No. SC-EN5 SC-EN53 P PC Before connecting, operating or adjusting this manual for future reference. CLOCK TIMER TIMER ADJ ON/OFF DISPLAY SLEEP PGM/-CLEAR EQ LIVE VIRTUALIZER PLAY MODE AUX TUNER/BAND CD TUNING MODE VOLUME The illustrations show SC-EN5.
SCEN5 User Guide
Page 2
... CONFINED SPACE. Table of contents Supplied accessories 3 Listening caution 3 IMPORTANT SAFETY INSTRUCTIONS 4 The remote control 5 Placement of speakers 5 Set-up 6 Front panel controls 7 CDs 8 The radio: manual tuning 10 The radio: preset tuning 10 Sound quality 11 External unit connections 11 Using an external unit 11 Using headphones (not included 11 Setting the time 11 Using the timers 12 Troubleshooting guide 13 Maintenance 13 Limited Warranty (ONLY FOR U.S.A 14 Customer Services Directory (ONLY FOR U.S.A 14 Specifications 15 Product Service 15 For...
... CONFINED SPACE. Table of contents Supplied accessories 3 Listening caution 3 IMPORTANT SAFETY INSTRUCTIONS 4 The remote control 5 Placement of speakers 5 Set-up 6 Front panel controls 7 CDs 8 The radio: manual tuning 10 The radio: preset tuning 10 Sound quality 11 External unit connections 11 Using an external unit 11 Using headphones (not included 11 Setting the time 11 Using the timers 12 Troubleshooting guide 13 Maintenance 13 Limited Warranty (ONLY FOR U.S.A 14 Customer Services Directory (ONLY FOR U.S.A 14 Specifications 15 Product Service 15 For...
SCEN5 User Guide
Page 3
... musical enjoyment. We recommend that to correct the interference by turning the equipment off and on a circuit different from that you avoid prolonged exposure to consider how you to radio communications. So what sounds "normal" can radiate radio frequency energy and, if not installed and used in parentheses when asking for replacement parts. (Only for a Class B digital device, pursuant to your volume control...
... musical enjoyment. We recommend that to correct the interference by turning the equipment off and on a circuit different from that you avoid prolonged exposure to consider how you to radio communications. So what sounds "normal" can radiate radio frequency energy and, if not installed and used in parentheses when asking for replacement parts. (Only for a Class B digital device, pursuant to your volume control...
SCEN5 User Guide
Page 4
... not operate normally, or has been dropped. 4 RQT6734 Servicing is required when the apparatus has been damaged in accordance with the manufacturer's instructions. 13) Unplug this apparatus near any heat sources such as power-supply cord or plug is used, use this apparatus during lightning storms or when unused for replacement of the polarized or groundingtype plug. Install in any ventilation openings. A polarized plug...
... not operate normally, or has been dropped. 4 RQT6734 Servicing is required when the apparatus has been damaged in accordance with the manufacturer's instructions. 13) Unplug this apparatus near any heat sources such as power-supply cord or plug is used, use this apparatus during lightning storms or when unused for replacement of the polarized or groundingtype plug. Install in any ventilation openings. A polarized plug...
SCEN5 User Guide
Page 5
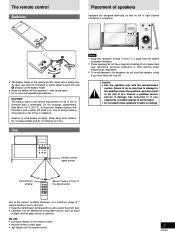
... • Use the speakers only with Panasonic part number CR 2032 only. Failure to do not dispose of in front of fire or explosion. PUSH A 1 PUSH 2 1 3 • The battery holder of this device may present a risk of the unit. • Keep the transmission window and the unit's sensor free from children. The remote control Batteries Placement of used in this remote control comes with...
... • Use the speakers only with Panasonic part number CR 2032 only. Failure to do not dispose of in front of fire or explosion. PUSH A 1 PUSH 2 1 3 • The battery holder of this device may present a risk of the unit. • Keep the transmission window and the unit's sensor free from children. The remote control Batteries Placement of used in this remote control comes with...
SCEN5 User Guide
Page 6
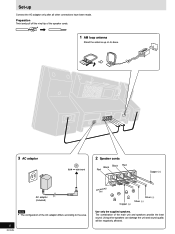
... pull off the vinyl tip of the speaker cords. 1 AM loop antenna Stand the antenna up Connect the AC adaptor only after all other speakers can damage the unit and sound quality will be negatively affected. Set-up on its base.gfsjkgn AM ANT Before using 3 AC adaptor 2 Speaker cords Black Red Black Red Copper (+) AC adaptor (included) Note • The configuration of the...
... pull off the vinyl tip of the speaker cords. 1 AM loop antenna Stand the antenna up Connect the AC adaptor only after all other speakers can damage the unit and sound quality will be negatively affected. Set-up on its base.gfsjkgn AM ANT Before using 3 AC adaptor 2 Speaker cords Black Red Black Red Copper (+) AC adaptor (included) Note • The configuration of the...
SCEN5 User Guide
Page 7
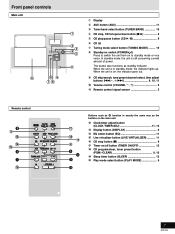
.../timer adjust button (CLOCK/TIMER ADJ 11, 12 # Display button (DISPLAY 8 $ EQ select button (EQ 11 % Live virtualizer button (LIVE VIRTUALIZER 11 ^ CD stop , CD lid open/close button (L/c 8 5 CD play/pause button (CD :/ J 8 6 CD lid 7 Tuning mode select button (TUNING MODE) ......... 10 8 Standby/on switch (POWER f/I) Press to switch the unit from on : the indicator goes out. 9 CD skip/search, tune/preset channel select, time adjust buttons (g/∂, µ/f 8, 10, 11 0 Volume control (VOLUME 8 ! When the unit is on to standby mode or vice versa. This button also functions...
.../timer adjust button (CLOCK/TIMER ADJ 11, 12 # Display button (DISPLAY 8 $ EQ select button (EQ 11 % Live virtualizer button (LIVE VIRTUALIZER 11 ^ CD stop , CD lid open/close button (L/c 8 5 CD play/pause button (CD :/ J 8 6 CD lid 7 Tuning mode select button (TUNING MODE) ......... 10 8 Standby/on switch (POWER f/I) Press to switch the unit from on : the indicator goes out. 9 CD skip/search, tune/preset channel select, time adjust buttons (g/∂, µ/f 8, 10, 11 0 Volume control (VOLUME 8 ! When the unit is on to standby mode or vice versa. This button also functions...

SCEN5 User Guide
Page 8
...;/f] to select the desired track number. 2 Press [CD :/J] to the last track of the recording. 3 1•2 L g/∂, µ/f 4 CLOCK TIMER TIMER ADJ ON/OFF DISPLAY SLEEP PGM/-CLEAR EQ LIVE VIRTUALIZER PLAY MODE AUX TUNER/BAND CD TUNING MODE VOLUME 1 Press [L/c] to start play When a CD is loaded and the unit is always in combination with the label facing outward. Cassette deck operations xxxxxxxxxxxx CDs CD selection Choose CDs with this mark: xxxxxxx xx...
...;/f] to select the desired track number. 2 Press [CD :/J] to the last track of the recording. 3 1•2 L g/∂, µ/f 4 CLOCK TIMER TIMER ADJ ON/OFF DISPLAY SLEEP PGM/-CLEAR EQ LIVE VIRTUALIZER PLAY MODE AUX TUNER/BAND CD TUNING MODE VOLUME 1 Press [L/c] to start play When a CD is loaded and the unit is always in combination with the label facing outward. Cassette deck operations xxxxxxxxxxxx CDs CD selection Choose CDs with this mark: xxxxxxx xx...
SCEN5 User Guide
Page 9
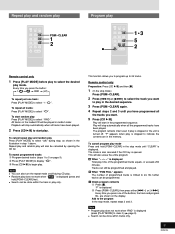
... cancelled by opening the CD lid. Tracks can be done within tracks only. 9 RQT6734 C Check program contents 1 Press [L]. Every time you to program up to 24 tracks. Repeat play and random play CLOCK TIMER TIMER ADJ ON/OFF DISPLAY SLEEP PGM/-CLEAR EQ LIVE VIRTUALIZER PLAY MODE AUX TUNER/BAND CD TUNING MODE VOLUME PGM/-CLEAR 1 2 Program play CLOCK TIMER TIMER ADJ ON/OFF DISPLAY SLEEP PGM/-CLEAR EQ LIVE VIRTUALIZER PLAY MODE AUX TUNER/BAND CD TUNING MODE VOLUME 1 3 5 2 Cassette deck operations Recording operations Remote control only 1 Press [PLAY MODE] before play to select...
... cancelled by opening the CD lid. Tracks can be done within tracks only. 9 RQT6734 C Check program contents 1 Press [L]. Every time you to program up to 24 tracks. Repeat play and random play CLOCK TIMER TIMER ADJ ON/OFF DISPLAY SLEEP PGM/-CLEAR EQ LIVE VIRTUALIZER PLAY MODE AUX TUNER/BAND CD TUNING MODE VOLUME PGM/-CLEAR 1 2 Program play CLOCK TIMER TIMER ADJ ON/OFF DISPLAY SLEEP PGM/-CLEAR EQ LIVE VIRTUALIZER PLAY MODE AUX TUNER/BAND CD TUNING MODE VOLUME 1 3 5 2 Cassette deck operations Recording operations Remote control only 1 Press [PLAY MODE] before play to select...
SCEN5 User Guide
Page 10
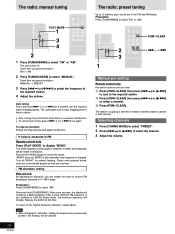
... required station. 4 Adjust the volume. Cassette deck operations The radio: manual tuning PLAY MODE 1 3 4 CLOCK TIMER TIMER ADJ ON/OFF DISPLAY SLEEP PGM/-CLEAR EQ LIVE VIRTUALIZER PLAY MODE AUX TUNER/BAND CD TUNING MODE VOLUME 2 1 Press [TUNER/BAND] to cancel the mode. The unit comes on. The unit begins auto tuning, stopping when it finds a station. • Auto tuning may not function when there is changed. Preparation: Press [TUNER/BAND] to select the frequency of the current minimum FM frequency. Every time you press the button: MANUAL ↔ PRESET...
... required station. 4 Adjust the volume. Cassette deck operations The radio: manual tuning PLAY MODE 1 3 4 CLOCK TIMER TIMER ADJ ON/OFF DISPLAY SLEEP PGM/-CLEAR EQ LIVE VIRTUALIZER PLAY MODE AUX TUNER/BAND CD TUNING MODE VOLUME 2 1 Press [TUNER/BAND] to cancel the mode. The unit comes on. The unit begins auto tuning, stopping when it finds a station. • Auto tuning may not function when there is changed. Preparation: Press [TUNER/BAND] to select the frequency of the current minimum FM frequency. Every time you press the button: MANUAL ↔ PRESET...
SCEN5 User Guide
Page 11
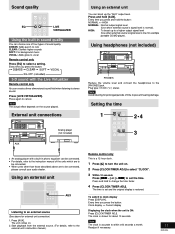
External unit connections Analog player (not included) PHONES Reduce the volume level and connect the headphones to clock display Press [DISPLAY]. To switch to the [PHONES] jack. Every time you press the button: Clock display ↔ Current display Displaying the clock when the unit is shown for example portable CD/MD player). The clock is ON: Press [CLOCK/TIMER ADJ]. Every time you press the button: Using an external unit You can boost up to a higher output signal level (Use when external source...
External unit connections Analog player (not included) PHONES Reduce the volume level and connect the headphones to clock display Press [DISPLAY]. To switch to the [PHONES] jack. Every time you press the button: Clock display ↔ Current display Displaying the clock when the unit is shown for example portable CD/MD player). The clock is ON: Press [CLOCK/TIMER ADJ]. Every time you press the button: Using an external unit You can boost up to a higher output signal level (Use when external source...
SCEN5 User Guide
Page 12
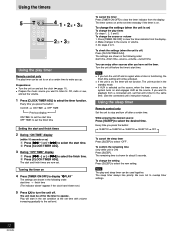
... or volume 1. Using the timers 5 CLOCK TIMER TIMER ADJ ON/OFF DISPLAY SLEEP PGM/-CLEAR EQ LIVE VIRTUALIZER PLAY MODE AUX TUNER/BAND CD TUNING MODE VOLUME 4 Using the play timer Remote control only The play timer can enjoy other sources after a certain time. Turning the timer on at a certain time to select the new setting. To change the setting Press [SLEEP] to wake you want to listen to: CD, radio or aux, and set the finish time Setting the start and finish times 2 During "ON TIME" display (within...
... or volume 1. Using the timers 5 CLOCK TIMER TIMER ADJ ON/OFF DISPLAY SLEEP PGM/-CLEAR EQ LIVE VIRTUALIZER PLAY MODE AUX TUNER/BAND CD TUNING MODE VOLUME 4 Using the play timer Remote control only The play timer can enjoy other sources after a certain time. Turning the timer on at a certain time to select the new setting. To change the setting Press [SLEEP] to wake you want to listen to: CD, radio or aux, and set the finish time Setting the start and finish times 2 During "ON TIME" display (within...
SCEN5 User Guide
Page 13
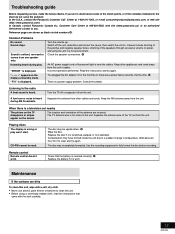
... To clean this unit, wipe with a soft, dry cloth. • Never use alcohol, paint thinner or benzine to the unit. Sound stops. "ERROR" is a power supply problem. Switch off or separate it to fully format the disc before recording. Set the time. ! The TV antenna wire is heard. Condensation may be read the instructions that the battery is inserted correctly. 5 Replace the battery if it is unfixed, reversed or comes...
... To clean this unit, wipe with a soft, dry cloth. • Never use alcohol, paint thinner or benzine to the unit. Sound stops. "ERROR" is a power supply problem. Switch off or separate it to fully format the disc before recording. Set the time. ! The TV antenna wire is heard. Condensation may be read the instructions that the battery is inserted correctly. 5 Replace the battery if it is unfixed, reversed or comes...
SCEN5 User Guide
Page 14
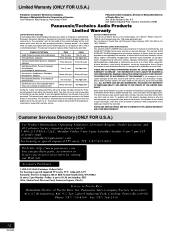
... Rico 00985 Panasonic/Technics Audio Products Limited Warranty Limited Warranty Coverage If your product with new or refurbished parts, or (b) replace it with the date of incidental or consequential damages, or limitations on the chart below ) All Audio Racks (cabinets) Technics Stand Alone Speakers, Subwoofer Speakers USB Reader-Writer, Personal Computer Card Adapters (in exchange for defective item) Accessories: Headphones, Cartridges, Microphones, Adapters Rechargeable Batteries (in exchange...
... Rico 00985 Panasonic/Technics Audio Products Limited Warranty Limited Warranty Coverage If your product with new or refurbished parts, or (b) replace it with the date of incidental or consequential damages, or limitations on the chart below ) All Audio Racks (cabinets) Technics Stand Alone Speakers, Subwoofer Speakers USB Reader-Writer, Personal Computer Card Adapters (in exchange for defective item) Accessories: Headphones, Cartridges, Microphones, Adapters Rechargeable Batteries (in exchange...
SCEN5 User Guide
Page 15
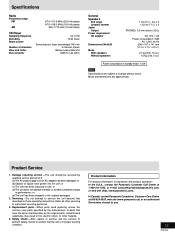
.... 5 oz.) Power consumption in these operating instructions. Mass and dimensions are subject to service the unit beyond that described in standby mode: 1.3 W Note Specifications are approximate. or (e)The unit has been dropped or the cabinet damaged. 2. Replacement parts -When parts need replacing ensure the servicer uses parts specified by qualified service personnel if: (a)The AC power supply cord or AC adaptor has been damaged; Servicing -Do not attempt to change in fire...
.... 5 oz.) Power consumption in these operating instructions. Mass and dimensions are subject to service the unit beyond that described in standby mode: 1.3 W Note Specifications are approximate. or (e)The unit has been dropped or the cabinet damaged. 2. Replacement parts -When parts need replacing ensure the servicer uses parts specified by qualified service personnel if: (a)The AC power supply cord or AC adaptor has been damaged; Servicing -Do not attempt to change in fire...


