
SAAK320 User Guide
Page 1
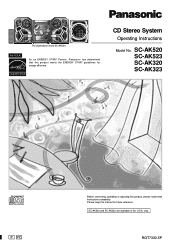
only. For U.S.A. As an ENERGY STAR® Partner, Panasonic has determined that this product, please read these instructions completely. SC-AK520 SC-AK523 SC-AK320 SC-AK323 P PC Before connecting, operating or adjusting this product meets the ENERGY STAR® guidelines for future reference. CD Stereo System Operating Instructions Model No. Please keep this manual for energy efficiency. SC-AK523 and SC-AK323 are available in the U.S.A. RQT7330-5P The illustrations show SC-AK520.
only. For U.S.A. As an ENERGY STAR® Partner, Panasonic has determined that this product, please read these instructions completely. SC-AK520 SC-AK523 SC-AK320 SC-AK323 P PC Before connecting, operating or adjusting this product meets the ENERGY STAR® guidelines for future reference. CD Stereo System Operating Instructions Model No. Please keep this manual for energy efficiency. SC-AK523 and SC-AK323 are available in the U.S.A. RQT7330-5P The illustrations show SC-AK520.

SAAK320 User Guide
Page 2
.... MODEL NUMBER SERIAL NUMBER User memo: DATE OF PURCHASE DEALER NAME DEALER ADDRESS TELEPHONE NUMBER Except for MP3 12 Marking a track 13 Radio 13 Cassettes 14 Sound quality/sound field 15 Other functions 15 Optional antenna connections 15 External unit connections 15 Using an external unit 15 Using headphones (not included 15 Turning the demo function on either the back or the bottom of SC-AK520. CAUTION! Table of contents IMPORTANT SAFETY INSTRUCTIONS 3 Listening caution 3 Product Service 3 Supplied...
.... MODEL NUMBER SERIAL NUMBER User memo: DATE OF PURCHASE DEALER NAME DEALER ADDRESS TELEPHONE NUMBER Except for MP3 12 Marking a track 13 Radio 13 Cassettes 14 Sound quality/sound field 15 Other functions 15 Optional antenna connections 15 External unit connections 15 Using an external unit 15 Using headphones (not included 15 Turning the demo function on either the back or the bottom of SC-AK520. CAUTION! Table of contents IMPORTANT SAFETY INSTRUCTIONS 3 Listening caution 3 Product Service 3 Supplied...

SAAK320 User Guide
Page 3
... or groundingtype plug. Install in any heat sources such as power-supply cord or plug is required when the apparatus has been damaged in accordance with the instructions, may not cause harmful interference, and (2) this by the manufacturer or parts that lets the sound come through loud and clear without annoying blaring or distortion-and, most out of time. 14) Refer...
... or groundingtype plug. Install in any heat sources such as power-supply cord or plug is required when the apparatus has been damaged in accordance with the instructions, may not cause harmful interference, and (2) this by the manufacturer or parts that lets the sound come through loud and clear without annoying blaring or distortion-and, most out of time. 14) Refer...
SAAK320 User Guide
Page 4
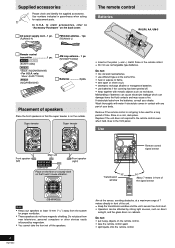
... electrolyte comes in front of batteries can cause electrolyte leakage which can be used for proper ventilation. • These speakers do not have magnetic shielding. AC power supply cord .. 1 pc. (RJA0065-A) FM indoor antenna .. 1pc. (RSA0006-J) The remote control Batteries R6/LR6, AA, UM-3 Remote control transmitter 1 pc. Remote control signal sensor 30˚ Transmission window 30˚ About 7 meters in contact with any part of...
... electrolyte comes in front of batteries can cause electrolyte leakage which can be used for proper ventilation. • These speakers do not have magnetic shielding. AC power supply cord .. 1 pc. (RJA0065-A) FM indoor antenna .. 1pc. (RSA0006-J) The remote control Batteries R6/LR6, AA, UM-3 Remote control transmitter 1 pc. Remote control signal sensor 30˚ Transmission window 30˚ About 7 meters in contact with any part of...
SAAK320 User Guide
Page 5
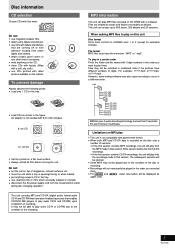
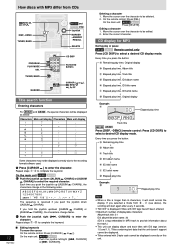
... the AC power supply cord from the MP3 made in that session. However, some CD-R or CD-RW due to play only the recordings made in the tray. • use CDs printed with 8 cm CDs (singles). The subsequent sessions will be ignored. • Some MP3 may not be recorded in the figure. To play in the order you want to play audio CD-R and CD-RW) upon...
... the AC power supply cord from the MP3 made in that session. However, some CD-R or CD-RW due to play only the recordings made in the tray. • use CDs printed with 8 cm CDs (singles). The subsequent sessions will be ignored. • Some MP3 may not be recorded in the figure. To play in the order you want to play audio CD-R and CD-RW) upon...
SAAK320 User Guide
Page 6
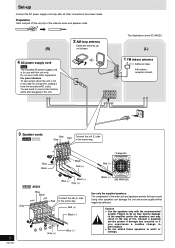
... in the risk of the main unit and speakers provide the best sound. The combination of fire. Caution • Use the speakers only with this unit only. Using other equipment. Set-up Connect the AC power supply cord only after plugging in the unit. 2 AM loop antenna Stand the antenna up on its base. Black Red (+) Subwoofer Red (+) 6 RQT7330 AK320 AK323 Blue Black Gray...
... in the risk of the main unit and speakers provide the best sound. The combination of fire. Caution • Use the speakers only with this unit only. Using other equipment. Set-up Connect the AC power supply cord only after plugging in the unit. 2 AM loop antenna Stand the antenna up on its base. Black Red (+) Subwoofer Red (+) 6 RQT7330 AK320 AK323 Blue Black Gray...

SAAK320 User Guide
Page 7
... Display 4 Deck 1 cassette holder 14 5 Disc tray 6 CD tray open button [c, DECK 1 14 , Display, demonstration button [DISP, -DEMO] .... 8, 12, 15, 16 - AUX button [AUX 15 / Volume control [VOLUME DOWN, UP 16 : Tape play buttons [1 ~ 5 8 8 Remote control signal sensor 4 9 Headphones jack [PHONES 15 ! AK520 AK523 Subwoofer button [SUBWOOFER] ......... 15 # Super sound EQ button [SUPER SOUND EQ 15 $ CD skip/search, tape fast-forward/rewind, tune/preset channel select, time adjust buttons [g/REW/3, f/FF/4 8-11, 13, 14, 16, 17 % Tuner/band select button [TUNER, BAND 13 & CD play...
... Display 4 Deck 1 cassette holder 14 5 Disc tray 6 CD tray open button [c, DECK 1 14 , Display, demonstration button [DISP, -DEMO] .... 8, 12, 15, 16 - AUX button [AUX 15 / Volume control [VOLUME DOWN, UP 16 : Tape play buttons [1 ~ 5 8 8 Remote control signal sensor 4 9 Headphones jack [PHONES 15 ! AK520 AK523 Subwoofer button [SUBWOOFER] ......... 15 # Super sound EQ button [SUPER SOUND EQ 15 $ CD skip/search, tape fast-forward/rewind, tune/preset channel select, time adjust buttons [g/REW/3, f/FF/4 8-11, 13, 14, 16, 17 % Tuner/band select button [TUNER, BAND 13 & CD play...

SAAK320 User Guide
Page 8
... [DISP, -DEMO] during play or pause. To cancel repeat play or pause. When playback ends The current play During standby mode and when a CD is displayed. Use the CD Play Mode function's ALL-DISC mode to play starts from disc 4, disc 3 will be retained in step 1. 2 Press [DISC] and (within the track. • You cannot use program mode together with the numbered buttons. Press [g/REW/3] (backward) or [f/FF/4] (forward) during play time display shows "- -:- -". To listen to specific CDs and tracks (CD Play Mode function) Remote control only...
... [DISP, -DEMO] during play or pause. To cancel repeat play or pause. When playback ends The current play During standby mode and when a CD is displayed. Use the CD Play Mode function's ALL-DISC mode to play starts from disc 4, disc 3 will be retained in step 1. 2 Press [DISC] and (within the track. • You cannot use program mode together with the numbered buttons. Press [g/REW/3] (backward) or [f/FF/4] (forward) during play time display shows "- -:- -". To listen to specific CDs and tracks (CD Play Mode function) Remote control only...

SAAK320 User Guide
Page 9
... program order are displayed. To select track 10 or over , press [>10] then the two digits. Repeat steps 2 and 3 to program other tracks. 4 Press [:/J, CD] to start play You can use repeat mode with the numbered buttons. Remote control only Preparation: Press [:/J, CD] and then [L, CLEAR]. 1 Press [PROGRAM]. The unit will be retained in the stop play Press [L, CLEAR]. Note • You can program up to select the disc. 3 Select the tracks with program play...
... program order are displayed. To select track 10 or over , press [>10] then the two digits. Repeat steps 2 and 3 to program other tracks. 4 Press [:/J, CD] to start play You can use repeat mode with the numbered buttons. Remote control only Preparation: Press [:/J, CD] and then [L, CLEAR]. 1 Press [PROGRAM]. The unit will be retained in the stop play Press [L, CLEAR]. Note • You can program up to select the disc. 3 Select the tracks with program play...

SAAK320 User Guide
Page 10
... track 10 Press [:/J, CD] to start play. Every time you change a disc or open the CD tray. AK320 AK323 : Program order is blinking, press the button again to clear all tracks. To play from another track, refer to "Track skip play" below. RQT7330 To play from another album, refer to "Album skip play" above. Remote control only Preparation: Press [:/J, CD] and then [L, CLEAR]. 1 Press [INTRO]. Program play for MP3 You can use repeat mode (A page 8) with program play...
... track 10 Press [:/J, CD] to start play. Every time you change a disc or open the CD tray. AK320 AK323 : Program order is blinking, press the button again to clear all tracks. To play from another track, refer to "Track skip play" below. RQT7330 To play from another album, refer to "Album skip play" above. Remote control only Preparation: Press [:/J, CD] and then [L, CLEAR]. 1 Press [INTRO]. Program play for MP3 You can use repeat mode (A page 8) with program play...

SAAK320 User Guide
Page 11
... start play from the track found . The characters change each time a numbered button is cancelled.) To cancel partway through Press [L, STOP]. To select track 10 or over , press [>10] once then the two digits. Starting play from a desired track in a desired album Remote control only Preparation: Press [:/J, CD] and then [L, CLEAR]. 1 Press [ALBUM ( or )] and then the numbered buttons to the numbered buttons: Numbered Characters Numbered Characters buttons buttons 1 1 6 M N O 6 2 A B C 2 7 P Q R S 7 3 D E F 3 8 T U V 8 4 G H I 4 9 W X Y Z 9 5 J K L 5 0 0 >10...
... start play from the track found . The characters change each time a numbered button is cancelled.) To cancel partway through Press [L, STOP]. To select track 10 or over , press [>10] once then the two digits. Starting play from a desired track in a desired album Remote control only Preparation: Press [:/J, CD] and then [L, CLEAR]. 1 Press [ALBUM ( or )] and then the numbered buttons to the numbered buttons: Numbered Characters Numbered Characters buttons buttons 1 1 6 M N O 6 2 A B C 2 7 P Q R S 7 3 D E F 3 8 T U V 8 4 G H I 4 9 W X Y Z 9 5 J K L 5 0 0 >10...
SAAK320 User Guide
Page 12
... will scroll across the display. Repeat steps 1~2 to select the required character. Deleting a character 1. If you press the button: → a Remaining play time, Original display b Elapsed play time, Album title c Elapsed play time, Track title d Elapsed play time, ID3 album name e Elapsed play time, ID3 title name f Elapsed play time, ID3 artist name g Elapsed play time, Original display Example: c Elapsed play time Track title AK320 AK323 Press [DISP, -DEMO] (remote control: Press [CD DISP]) to enter the...
... will scroll across the display. Repeat steps 1~2 to select the required character. Deleting a character 1. If you press the button: → a Remaining play time, Original display b Elapsed play time, Album title c Elapsed play time, Track title d Elapsed play time, ID3 album name e Elapsed play time, ID3 title name f Elapsed play time, ID3 artist name g Elapsed play time, Original display Example: c Elapsed play time Track title AK320 AK323 Press [DISP, -DEMO] (remote control: Press [CD DISP]) to enter the...

SAAK320 User Guide
Page 13
... the remote control Hold down [PLAY MODE] again to begin. "TUNED" is displayed when a radio station is preset in . Radio Manual tuning 1 Press [TUNER, BAND] to select the channel. The unit comes on the remote control. To stop On the remote control Press [MARKER] to tune step-bystep. Hold down [MARKER] until "STORING" blinks on the display. Preset tuning Remote control only There are preset. Hold down [MARKER, -MEMORY] until "STORING" blinks on the display. Note • After changing the "allocation" setting, the frequencies...
... the remote control Hold down [PLAY MODE] again to begin. "TUNED" is displayed when a radio station is preset in . Radio Manual tuning 1 Press [TUNER, BAND] to select the channel. The unit comes on the remote control. To stop On the remote control Press [MARKER] to tune step-bystep. Hold down [MARKER] until "STORING" blinks on the display. Preset tuning Remote control only There are preset. Hold down [MARKER, -MEMORY] until "STORING" blinks on the display. Note • After changing the "allocation" setting, the frequencies...

SAAK320 User Guide
Page 14
... open the other side of the tape, turn the tape over and press [a, REC]. Press [a, REC]. Cassettes ( AK520 and AK523 only) SUBWOOFER DISP, -DEMO PRESET EQ DECK 1 , REC AUX PLAY MODE ALBUM ( or ) SHIFT S.SOUND EQ ( AK520 and AK523 only) S.WOOFER CLOCK / PL AY/ AUTO OFF TIMER REC SLEEP CD DISP DIMMER DISC 1 PROGRAM GHI 4 PLAY MODE PQRS 7 R E P E AT DEL ABC DEF 23 JKL MNO 56 TUV WXYZ 89 SPACE 0 10 CD TUNER...
... open the other side of the tape, turn the tape over and press [a, REC]. Press [a, REC]. Cassettes ( AK520 and AK523 only) SUBWOOFER DISP, -DEMO PRESET EQ DECK 1 , REC AUX PLAY MODE ALBUM ( or ) SHIFT S.SOUND EQ ( AK520 and AK523 only) S.WOOFER CLOCK / PL AY/ AUTO OFF TIMER REC SLEEP CD DISP DIMMER DISC 1 PROGRAM GHI 4 PLAY MODE PQRS 7 R E P E AT DEL ABC DEF 23 JKL MNO 56 TUV WXYZ 89 SPACE 0 10 CD TUNER...
SAAK320 User Guide
Page 15
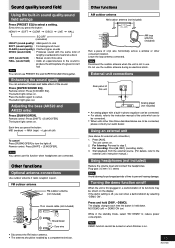
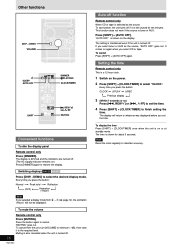
... [SUPER SOUND EQ]. Remote control: Press [S.SOUND EQ]. Turning the demo function on the display. The display changes each time the button is poor. Enhancing the sound quality You can show a demonstration by a competent technician. Adjusting the bass (AK520 and AK523 only) Press [SUBWOOFER]. Leave the loop antenna connected. Do not use PRESET EQ and SUPER SOUND EQ together. External unit connections Rear panel of the sound. Using an external unit (See above are connected. Other functions Optional antenna connections Use outdoor antenna if radio reception...
... [SUPER SOUND EQ]. Remote control: Press [S.SOUND EQ]. Turning the demo function on the display. The display changes each time the button is poor. Enhancing the sound quality You can show a demonstration by a competent technician. Adjusting the bass (AK520 and AK523 only) Press [SUBWOOFER]. Leave the loop antenna connected. Do not use PRESET EQ and SUPER SOUND EQ together. External unit connections Rear panel of the sound. Using an external unit (See above are connected. Other functions Optional antenna connections Use outdoor antenna if radio reception...
SAAK320 User Guide
Page 16
.... "AUTO OFF" is tuner or AUX. "MUTING" goes out. Setting the time Remote control only This is on .) Press [DIMMER] again to finish setting the time. Switching displays AK520 AK523 Press [DISP, -DEMO] to select "CLOCK". f (A page 12), the animation ("Race") will return to whatever was displayed before you selected a display mode from the unit, turn [VOLUME] to set the time. If you select CD or tape. It comes on the power. 2 Press [SHIFT] + [CLOCK/TIMER...
.... "AUTO OFF" is tuner or AUX. "MUTING" goes out. Setting the time Remote control only This is on .) Press [DIMMER] again to finish setting the time. Switching displays AK520 AK523 Press [DISP, -DEMO] to select "CLOCK". f (A page 12), the animation ("Race") will return to whatever was displayed before you selected a display mode from the unit, turn [VOLUME] to set the time. If you select CD or tape. It comes on the power. 2 Press [SHIFT] + [CLOCK/TIMER...

SAAK320 User Guide
Page 17
... clock hasn't been set.) 5 Press [f] to display the timer indicator. The play timer, prepare the desired music source (tape/CD/ radio/aux), and set the volume. • For the record timer, check the cassette's erasure prevention tabs (A page 14) and insert the tape in combination with the volume muted. Timers Using the play/record timer Remote control only You can use the unit after a set time. The unit must be turned off before the play timer) or to record a radio station or from a connected unit, set...
... clock hasn't been set.) 5 Press [f] to display the timer indicator. The play timer, prepare the desired music source (tape/CD/ radio/aux), and set the volume. • For the record timer, check the cassette's erasure prevention tabs (A page 14) and insert the tape in combination with the volume muted. Timers Using the play/record timer Remote control only You can use the unit after a set time. The unit must be turned off before the play timer) or to record a radio station or from a connected unit, set...

SAAK320 User Guide
Page 18
...) tracks. "- -:- -" appears on the display. Set the time. ^ Check and correct the speaker cords connection. 6 If this unit's cables. A beat sound is not possible. If you are incorrect. "TAKE OUT/DISC" appears on the display at standby mode. Remote control Remote control doesn't work. Remove the disc from the unit. If you are using an indoor antenna, change in the U.S.A., or refer to the unit. Sound stops. Turn off automatically. ^ Turn the volume up and changes continuously...
...) tracks. "- -:- -" appears on the display. Set the time. ^ Check and correct the speaker cords connection. 6 If this unit's cables. A beat sound is not possible. If you are incorrect. "TAKE OUT/DISC" appears on the display at standby mode. Remote control Remote control doesn't work. Remove the disc from the unit. If you are using an indoor antenna, change in the U.S.A., or refer to the unit. Sound stops. Turn off automatically. ^ Turn the volume up and changes continuously...

SAAK320 User Guide
Page 19
... and dimensions are subject to High frequency and Low frequency. 19 RQT7330 Specifications are approximate. 2. The labels "HIGH" and "LOW" on the rear of channels Stereo Frequency response 20 Hz-20 kHz (+1, -2 dB) Wow and flutter Below measurable limit Digital filter 8 fs D/A converter MASH (1 bit DAC) MP3 Bit rate 32 kbps-320 kbps Sampling frequency 32 kHz, 44.1 kHz, 48 kHz SPEAKER...
... and dimensions are subject to High frequency and Low frequency. 19 RQT7330 Specifications are approximate. 2. The labels "HIGH" and "LOW" on the rear of channels Stereo Frequency response 20 Hz-20 kHz (+1, -2 dB) Wow and flutter Below measurable limit Digital filter 8 fs D/A converter MASH (1 bit DAC) MP3 Bit rate 32 kbps-320 kbps Sampling frequency 32 kHz, 44.1 kHz, 48 kHz SPEAKER...

SAAK320 User Guide
Page 20
... limitation of incidental or consequential damages, or limitations on the chart below ) All Audio Racks (cabinets) Stand Alone Speakers, Subwoofer Speakers USB Reader-Writer, Personal Computer Card Adapters (in exchange for defective item) Accessories: Headphones, Cartridges, Microphones, Adapters Rechargeable Batteries, DVD-R/-RAM Discs (in exchange for parts. PARTS AND SERVICE WHICH ARE NOT COVERED BY THIS LIMITED WARRANTY ARE YOUR RESPONSIBILITY. Saturday-Sunday 10...
... limitation of incidental or consequential damages, or limitations on the chart below ) All Audio Racks (cabinets) Stand Alone Speakers, Subwoofer Speakers USB Reader-Writer, Personal Computer Card Adapters (in exchange for defective item) Accessories: Headphones, Cartridges, Microphones, Adapters Rechargeable Batteries, DVD-R/-RAM Discs (in exchange for parts. PARTS AND SERVICE WHICH ARE NOT COVERED BY THIS LIMITED WARRANTY ARE YOUR RESPONSIBILITY. Saturday-Sunday 10...


